SAML integration for AI agent
SAML (Security Assertion Markup Language) authentication allows you to authenticate users during their conversations with our AI agent. It ensures that only logged-in users can access specific journeys, such as viewing calendars, personal records, or restricted enterprise information.
This guide explains how to configure SAML authentication for your AI agent, including prerequisites, mandatory fields, session management, and the authentication flow.
When to Use SAML Authentication
Use SAML authentication if you want to:
- Restrict AI agent access to authenticated users only.
- Enable single sign-on (SSO) with any identity provider.
Prerequisites
Before configuring SAML authentication, ensure that you have:
- An active identity provider (IdP) such as Azure AD, Okta, or JumpCloud.
- Admin access to configure an application on the IdP.
- Access to the following details from your IdP:
- Authorization URL (IdP SSO login endpoint)
- IdP Certificate (X.509 certificate, usually downloadable from IdP metadata)
- Audience
Configure SAML for AI agent authentication
1. Create a SAML Application in Your IdP
- Log in to your identity provider (Azure, Okta, JumpCloud, etc.).
- Create a new SAML application.
- Add the following configuration values in the IdP:
- Redirect URI: Provide the AI agents Redirect URI.
- Audience: Use the Audience value provided by the agent platform.
- Download the IdP Certificate or copy it from the metadata.
2. Configure your SAML in the Yellow.ai cloud platform
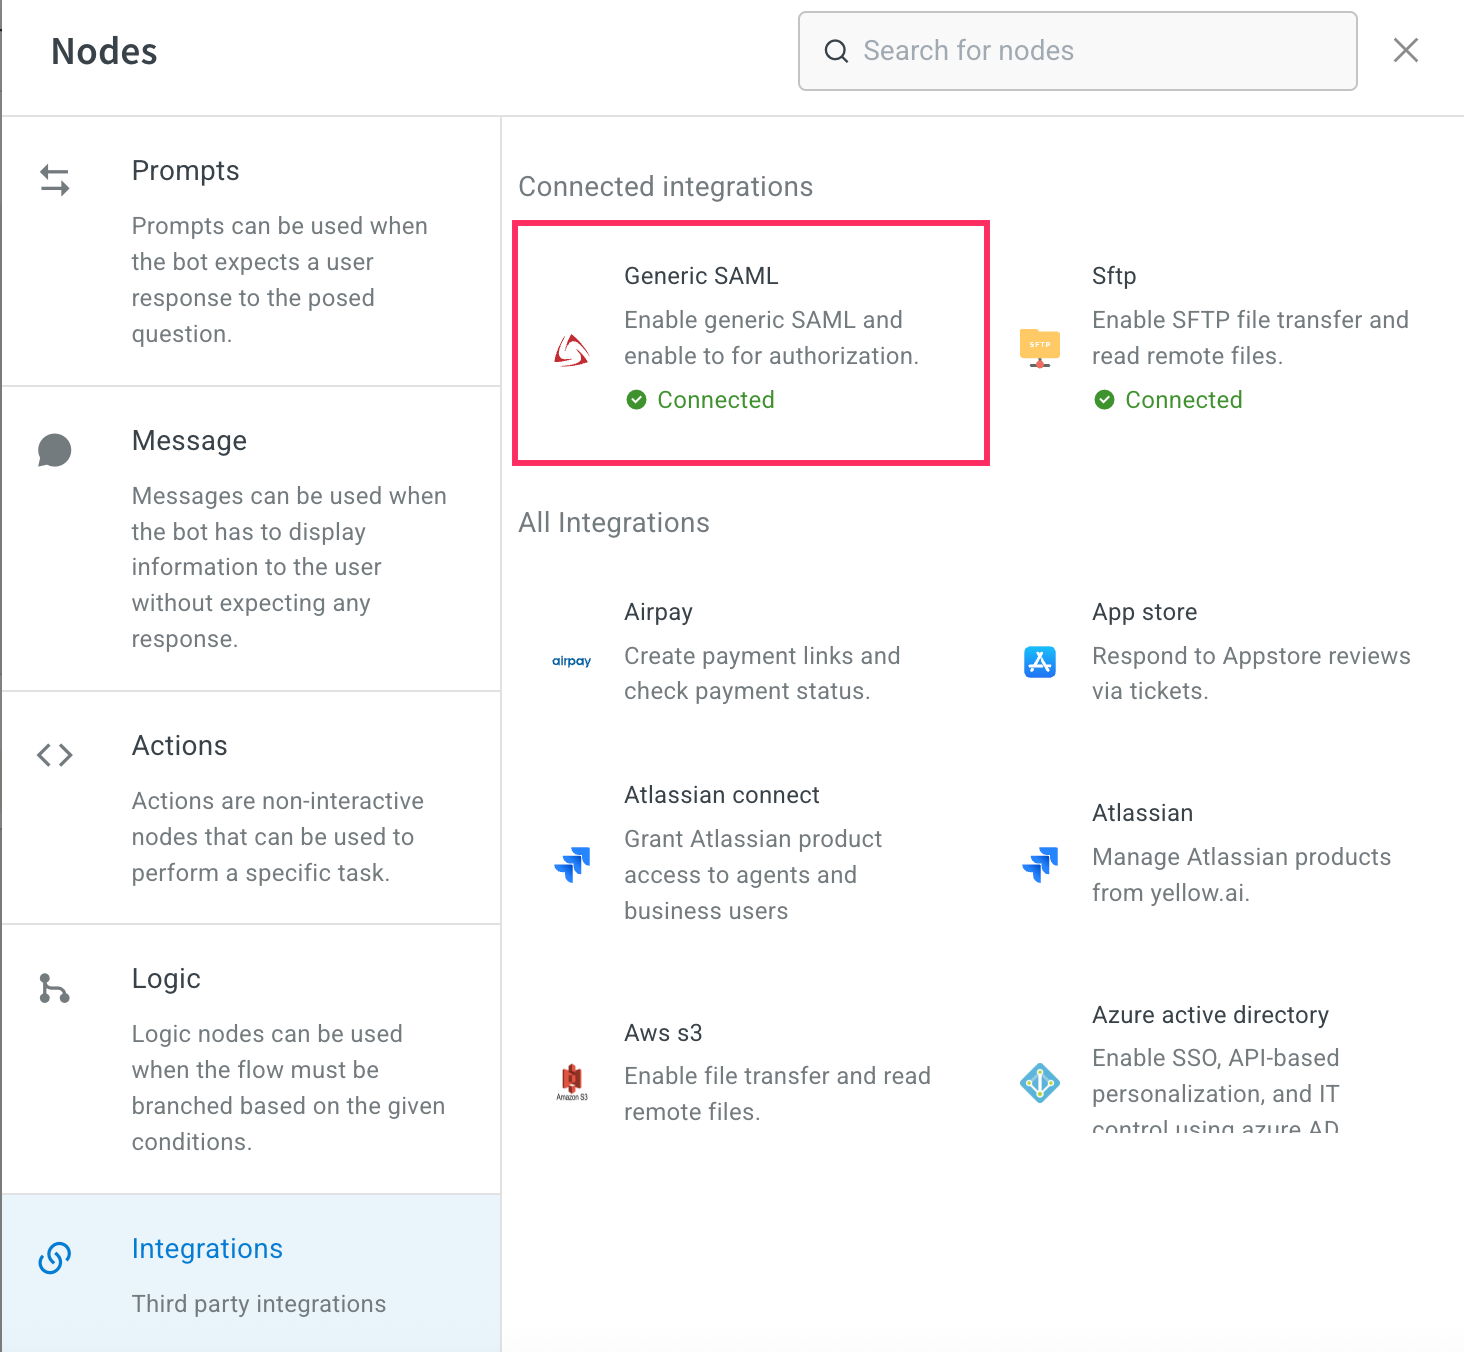
- Switch to development (Sandbox/Staging) environment, go to Extensions > Integrations > Tools & utilities.
- Click Generic SAML. You can also use the search bar to find the integration.

- Fill in the following mandatory fields:
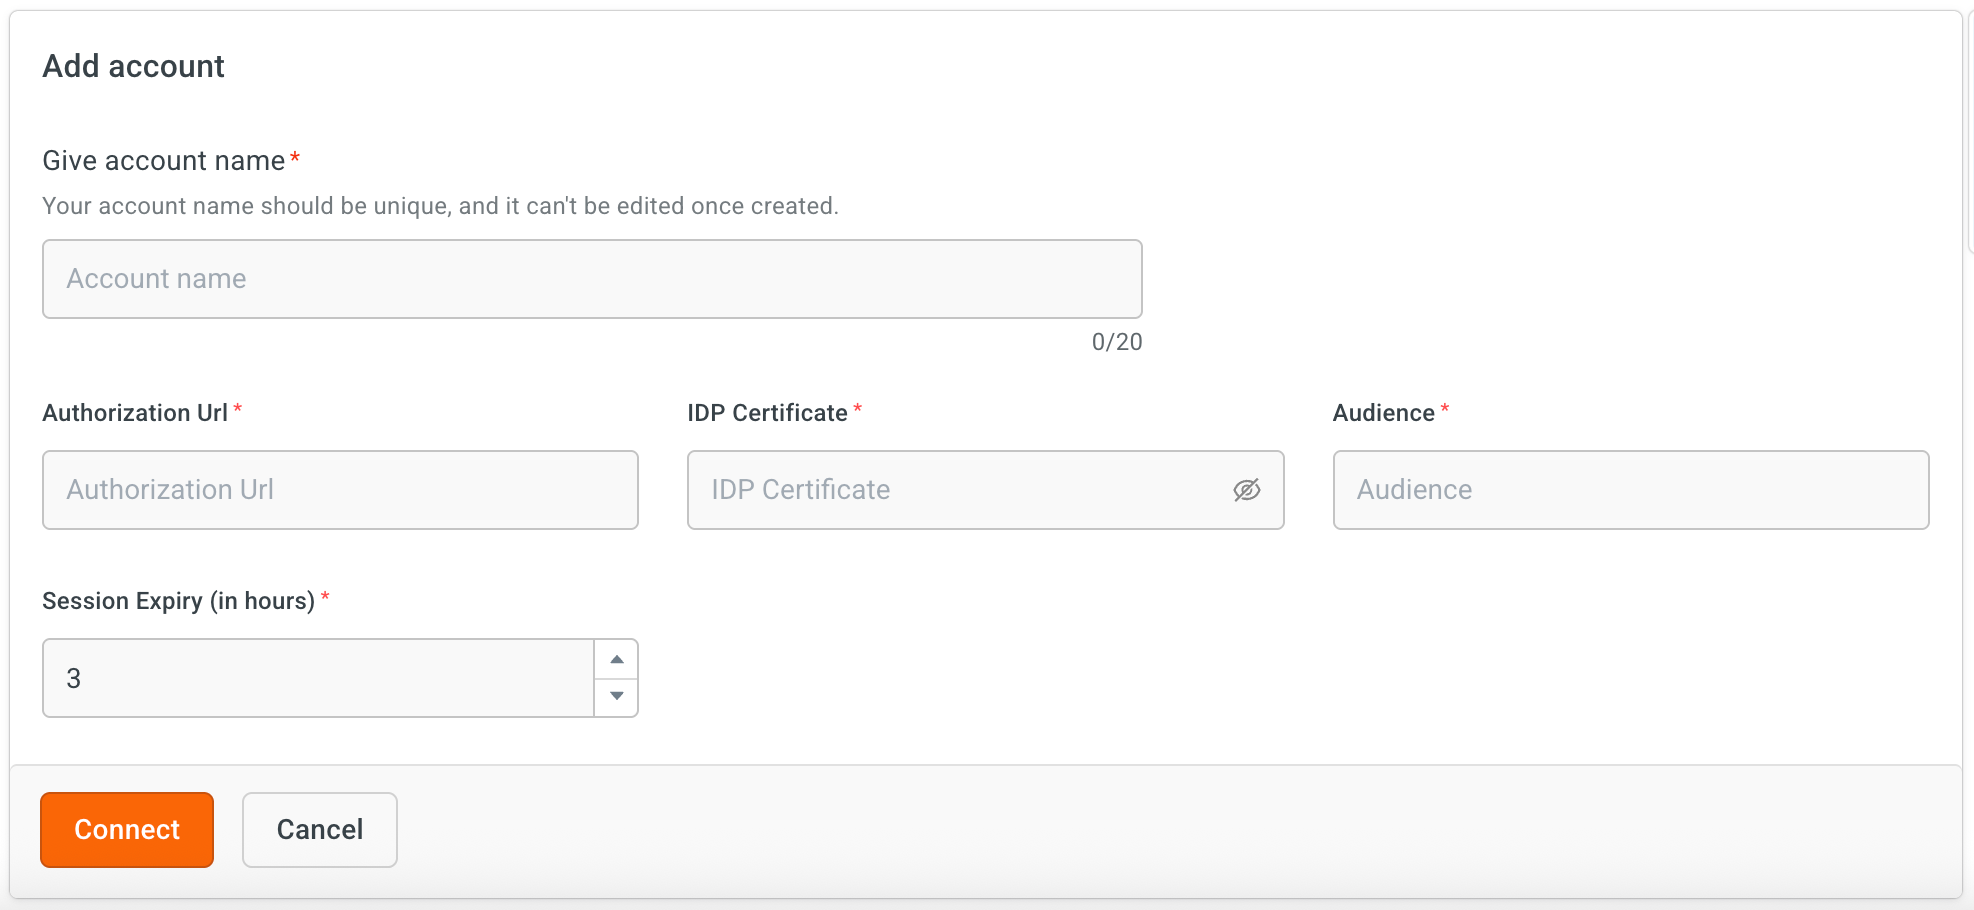
- Account name – A unique identifier for this SAML setup (e.g., "AzureSSO").
- Authorization URL – The IdP login endpoint.
- IdP certificate – Paste the X.509 certificate from the IdP.
- Audience – Enter the unique identifier for the Service Provider (SP). This is a crucial security field that specifies the application this SAML assertion is intended for. The application will reject any assertion where the Audience URI does not match its own ID. This value is provided by the SP and is often a URL. (It is typically a URL or a Uniform Resource Name (URN), such as
https://yourapp.com/saml/metadataorurn:google:workspace.) - Session expiry (in hours): Set how long a user’s authenticated session remains valid. After the session expires, users will be prompted to re-authenticate via SAML before continuing restricted conversation flows. Default value is 3 hours and maximum value is 6 hours.
- Click Connect.
Add Redirection URI
The Redirection URI is the endpoint on our AI agent platform where the identity provider (IdP) sends the authentication response after a user logs in. This URI is to ensure that the authentication handshake is completed successfully.
- On the Generic SAML Integration configuration page, click the Redirection URI displayed on the right to copy it.
- Add this URI to your Identity Provider (IdP) configuration. This step is mandatory—authentication will not succeed unless the Redirect URI is registered with the IdP.
Example format:
https://r6.cloud.yellow.ai/api/galaxy/genericsaml
Adding Redirect URI to Your Identity Provider (IdP)
After copying the Redirect URI from the Generic SAML Integration page, you must add it to your IdP configuration. This ensures the IdP knows where to send authentication responses after a user successfully signs in.
The Redirect URI differs by region and environment.
Make sure you copy the URI directly from your Generic SAML Integration configuration page in the platform.
Do not reuse values from another environment (e.g., staging vs. production) or region, as authentication will fail if mismatched.
- Azure AD
- Okta
- JumpCloud
Azure Active Directory (Azure AD)
- Sign in to the Azure portal.
- Navigate to Azure Active Directory > Enterprise Applications.
- Select your application or create a new one for the AI agent.
- Under Manage, go to Single sign-on > Basic SAML Configuration.
- In the Reply URL (Assertion Consumer Service URL) field, paste the copied Redirect URI.
- Save the configuration.
Okta
- Sign in to the Okta Admin Console.
- Go to Applications > Applications and select your app.
- Under the General tab, click Edit.
- In the Single sign-on URL field, paste the Redirect URI.
- Save the changes.
JumpCloud
- Sign in to the JumpCloud Admin Portal.
- Navigate to User Authentication > SSO Applications.
- Select your app or create a new SAML app.
- In the ACS URL (Assertion Consumer Service URL) field, paste the Redirect URI.
- Save the configuration.
Enable SAML success and failure events
After integrating SAML, it is important to track whether authentication attempts succeed or fail. To ensure your AI agent is notified of the authentication status, enable the generic-saml-success and generic-saml-failure events.
To enable:
-
Go to Automation > Events > Integration
-
Search for the SAML events mentioned above.
generic-saml-success: Triggered when the SAML authentication request completes successfully.generic-saml-failure: Triggered when the SAML authentication request fails.
-
Click the More options icon and select Enable.

Add SAML Authentication in your agent Flow
Once SAML configuration is complete, you can enable authentication in your agent flow as explained below:
- Navigate to the specific Flow where you want to add authentication process.
- In the agent flow, add an Integration node and select Generic SAML.
- Choose the Account name associated with your SAML configuration.
- In the Action field, you can set one of the following:
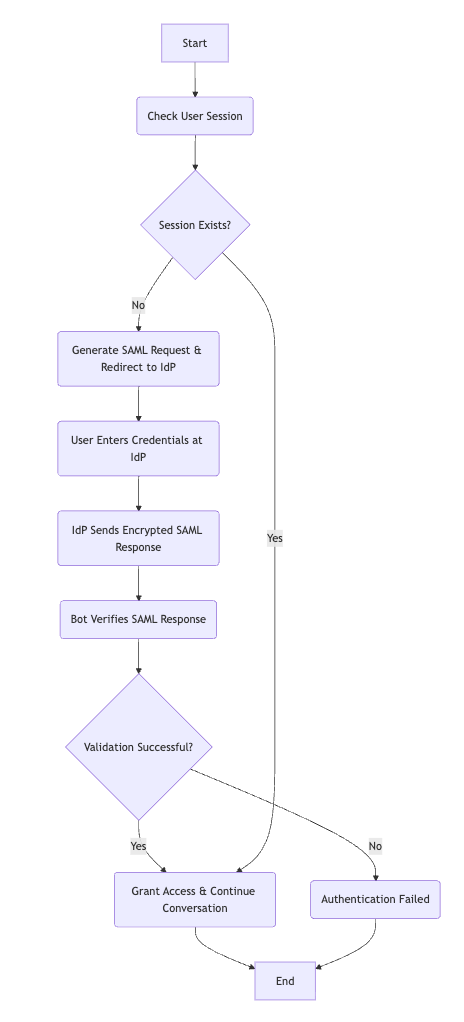
- Check user session – Verifies if the user is already logged in.
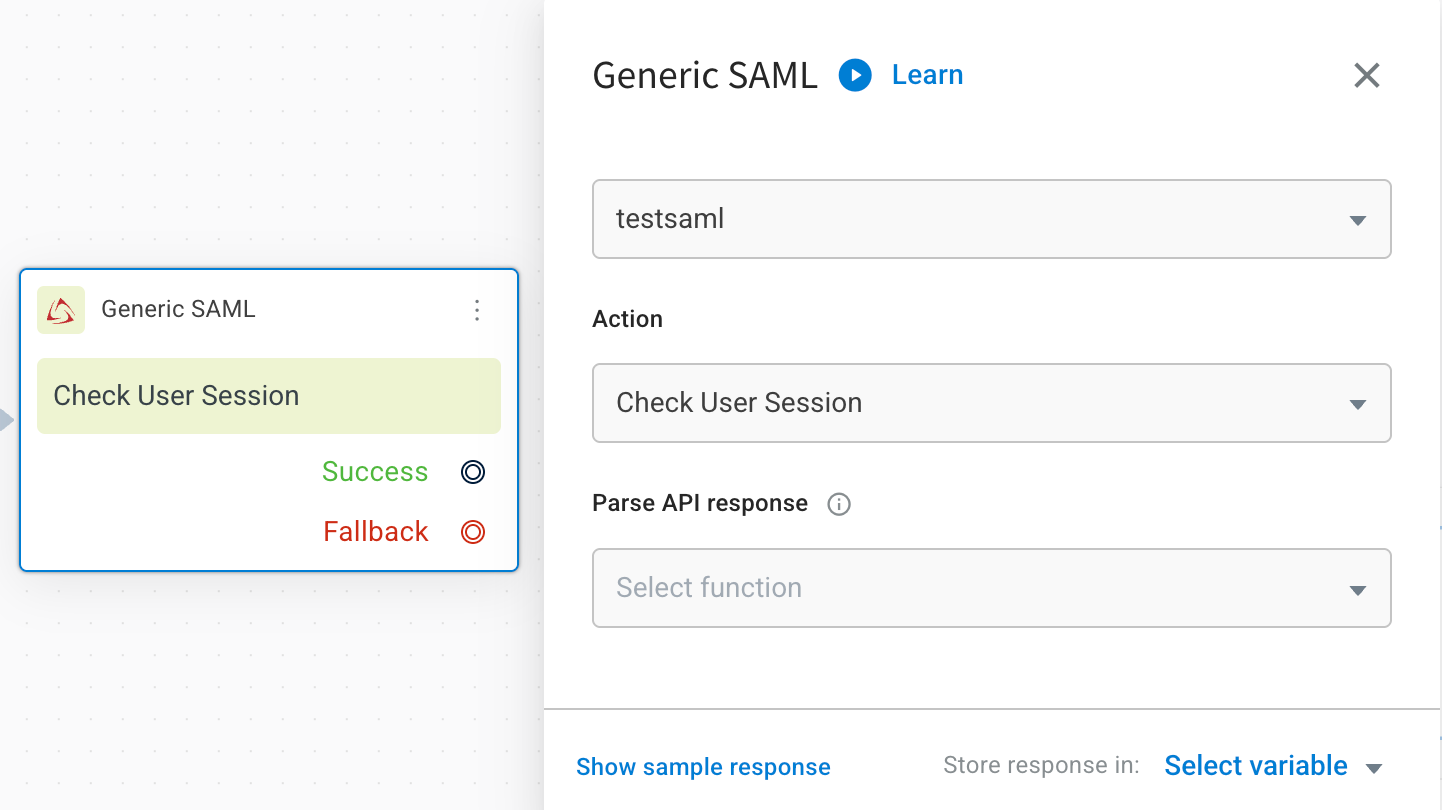
- Generate SAML request – Initiates a new authentication request.

- In Parse API response, choose the desired function (needed only if you want the AI agent to automatically extract and process values from the SAML response).
You can write custom functions to process success and failure events. The authentication response is passed to the AI agent through the {{{data}}} object variable. In your function, you can extract details such as authentication status, error messages, or user attributes and use them to guide the conversation flow or handle fallbacks.
Troubleshooting
| Issue | Possible Cause | Resolution |
|---|---|---|
| Authentication fails immediately | You will see proper reason in Failure event | Ensure Redirect URI matches in both IdP and AI agent configuration |
| Certificate validation error | Expired or incorrect IdP Certificate | Download a fresh certificate from the IdP |
| Users logged out too soon | Short session expiry configured | Increase session expiry up to 6 hours |
| AI agent not redirecting | Missing Check User Session node, Redirect URI mismatch | Ensure the flow includes session validation |