Call workflow
A workflow is a predefined action or process your AI agent can trigger during a conversation to perform tasks such as fetching booking details, processing payments, verifying user data, or updating records. Use the Call Workflow action to execute these tasks, pass user inputs as variables, and capture the workflow’s output for use in later steps. You can reuse the same workflow across multiple agents or conversations.
The table below describes the fields available in the Workflow action:
| Step | Description |
|---|---|
| Trigger the workflow | When the conversation reaches the Call workflow action, the AI agent activates the linked workflow. |
| Pass input variables | The AI agent sends relevant input data (e.g., booking ID, user name) collected earlier in the conversation to the workflow. |
| Workflow processing | The workflow executes its logic to perform tasks, automate backend operations, and handle complex scenarios, such as:
|
| Store output | The workflow’s response (e.g., booking status, payment confirmation) is stored in a variable for use in subsequent conversation steps. |
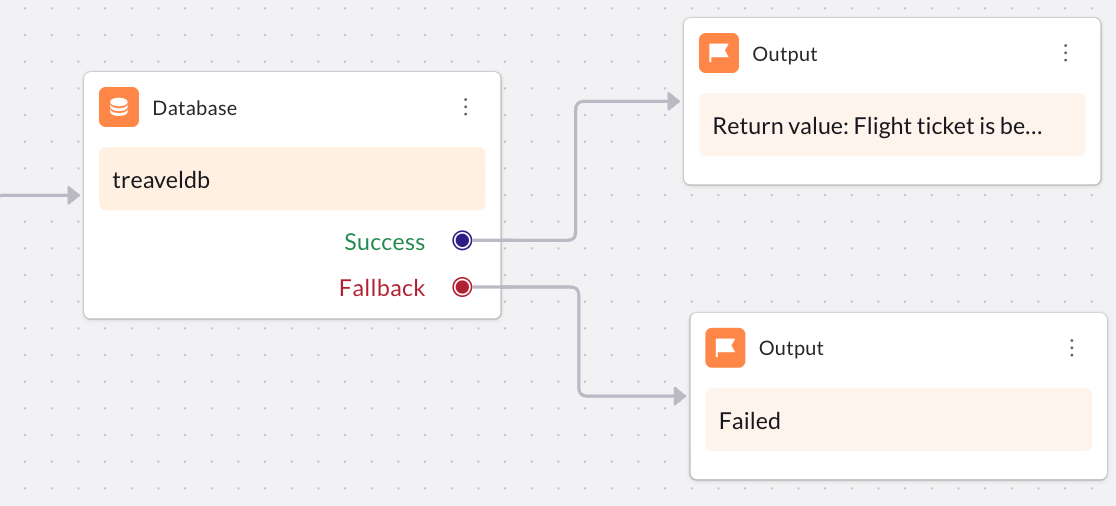
Output node in Workflows
The Output node in a Workflow defines the data the workflow returns after execution. It returns text or variables and passes them back to the conversation that triggered the workflow. The returned output helps the AI agent use this data in the next steps of the conversation to deliver dynamic and personalized responses.
The Output node ensures that results from operations such as API calls, database queries, or logic functions are returned in a structured and usable format, allowing the AI agent to continue the conversation based on real-time data.
Use case: Workflow failure triggering a fallback
Let us consider a scenario where a workflow fails due to a missing variable.
For example, in a flight booking workflow, the agent triggers an API call to fetch available flights using a variable like destination_city. If this variable is not defined in the workflow, the API request cannot be completed, causing the workflow to fail.
When this happens, the Workflow fallback setting automatically takes over. Depending on the fallback configuration, one of the following actions occurs:
- The AI agent sends an apology (example, "Sorry, I am having trouble fetching flight options right now").
- The agent triggers the super agent’s fallback, which could redirect the conversation or you can select to transfer the user to a live agent for manual support if configured.
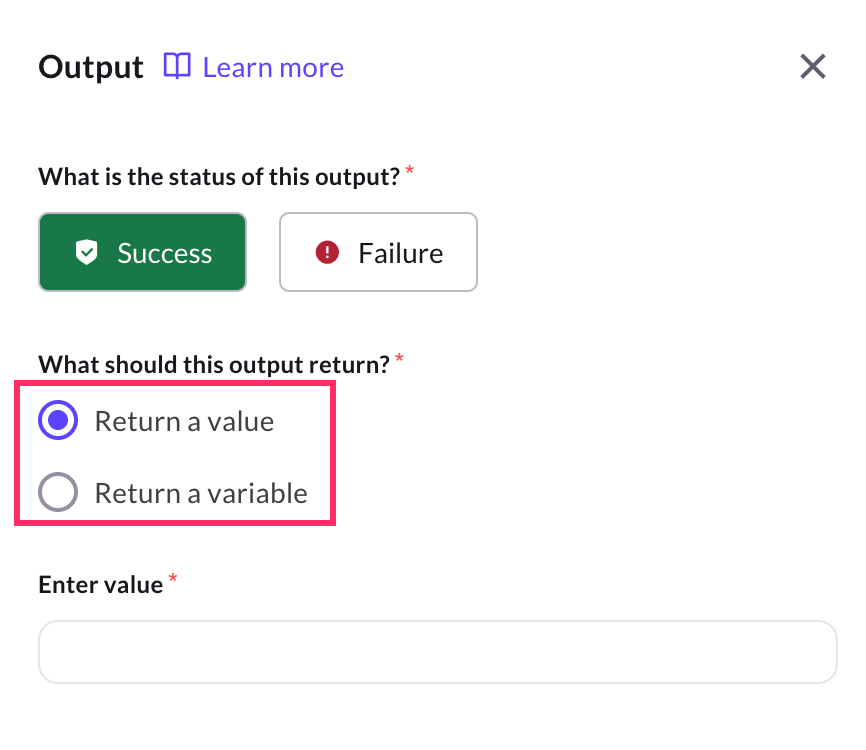
Workflow output status
In the Output section of a workflow, you can define the status of the workflow execution either Success or Failure. This status determines how the AI agent should respond once the workflow finishes executing. If the status is not selected, then an error is displayed.
-
Success: Select this option when the workflow has executed as expected. For example, an API call returned valid data, a payment was processed successfully, or a booking was confirmed.
- You can then define what the workflow should return either a specific value (example, "Payment successful") or a variable (example, payment_status).
-
Failure: Select this option when the workflow encounters an issue, such as an API timeout, missing data, or an invalid response. For example, you can return an error message ("Unable to fetch details right now") or trigger fallback actions, such as sending an apology or transferring the user to a live agent.
Types of Output
You can configure the Output node to return one of the following types:
- Return a value: Displays a predefined text message when the Workflow completes.
Use case: Use this when the output is static and does not depend on dynamic input.
Example: "Thank you! Your request has been submitted." - Variable: Returns dynamic content stored in a variable, such as values fetched from APIs, databases, or functions.
Use case: When the workflow depends on user inputs or dynamic data.
Store the weather temperature fetched from an API and use it later in the conversation.
Workflow settings
In the Workflow section of your AI agent, the settings option allows you define what happens when a workflow fails during execution. For example, if an API call times out, a database action fails, or the backend service returns an error.
By configuring fallback behavior, you ensure that the conversation continues smoothly and the user still receives a response or is guided to the next action.
You can also enable an AI-powered apology message, which automatically notifies the user when something goes wrong (for example, "Sorry, I'm having trouble fetching plans right now").
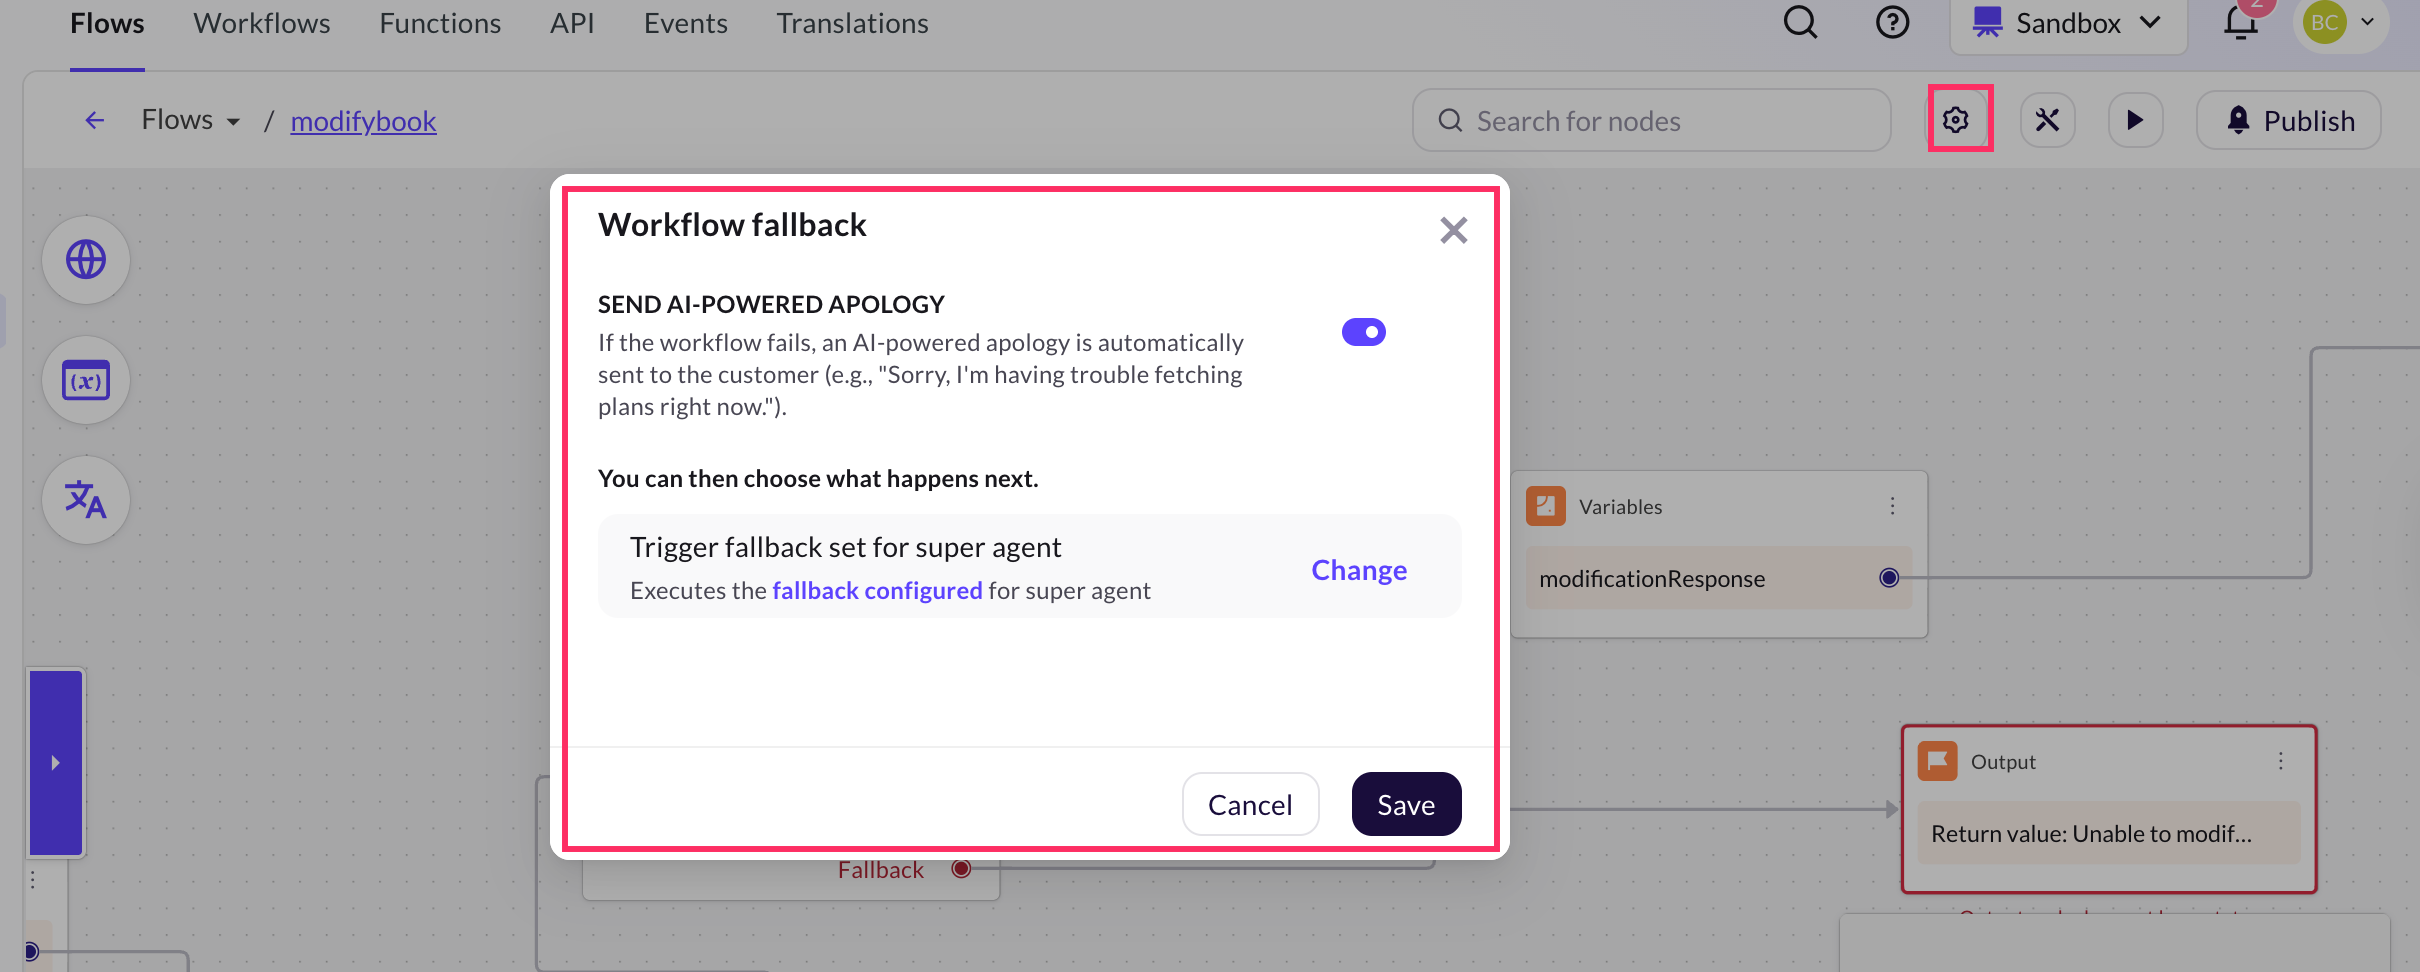
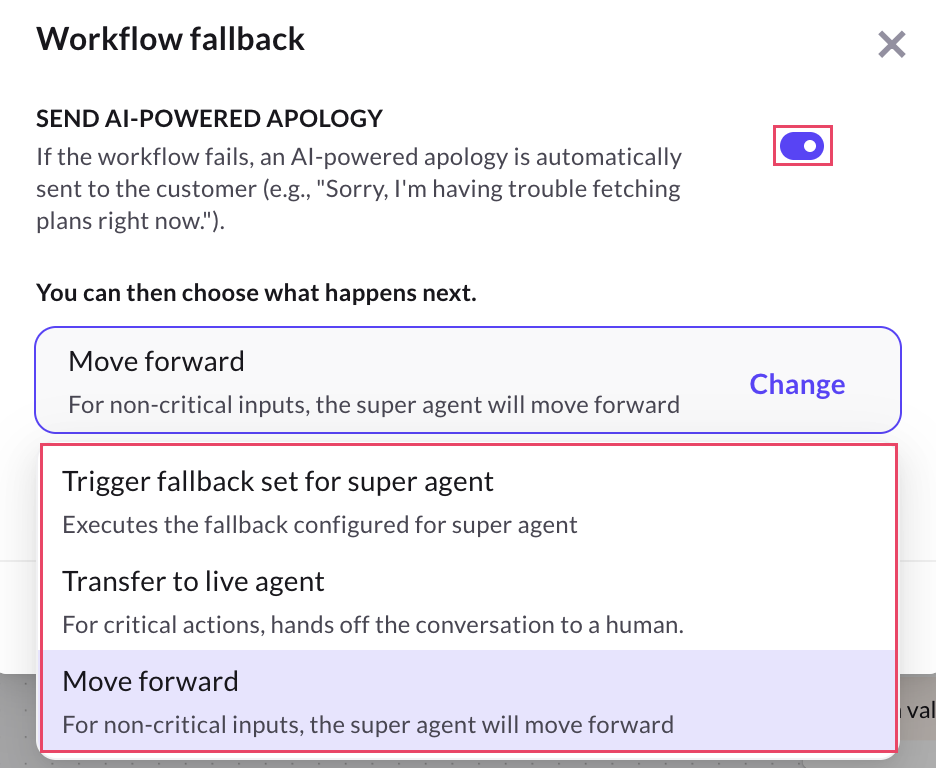
Fallback options
You can choose fallback actions after a workflow fails:
-
Trigger fallback set for super agent: This option executes the fallback response configured for the Super agent. It ensures that the conversation does not stop abruptly and the user receives a relevant message or redirection based on the global fallback setup. Use this option when you want to maintain a consistent fallback experience across all workflows and agents.
-
Transfer to live agent: This option hands off the conversation to a human support agent when a workflow fails. It is useful in scenarios where the issue requires manual intervention. For example, payment failures, booking errors, or refund issues that the AI agent cannot resolve due to a backend error, the conversation is handed off to a support agent to assist the user.
-
Move forward: This option allows the AI agent to continue the conversation without interruption. It is best used for non-critical workflows where the failure doesn’t impact the overall user experience. Example: If a workflow that fetches optional recommendations (like hotel suggestions) fails, the conversation can still move forward to the booking confirmation step.
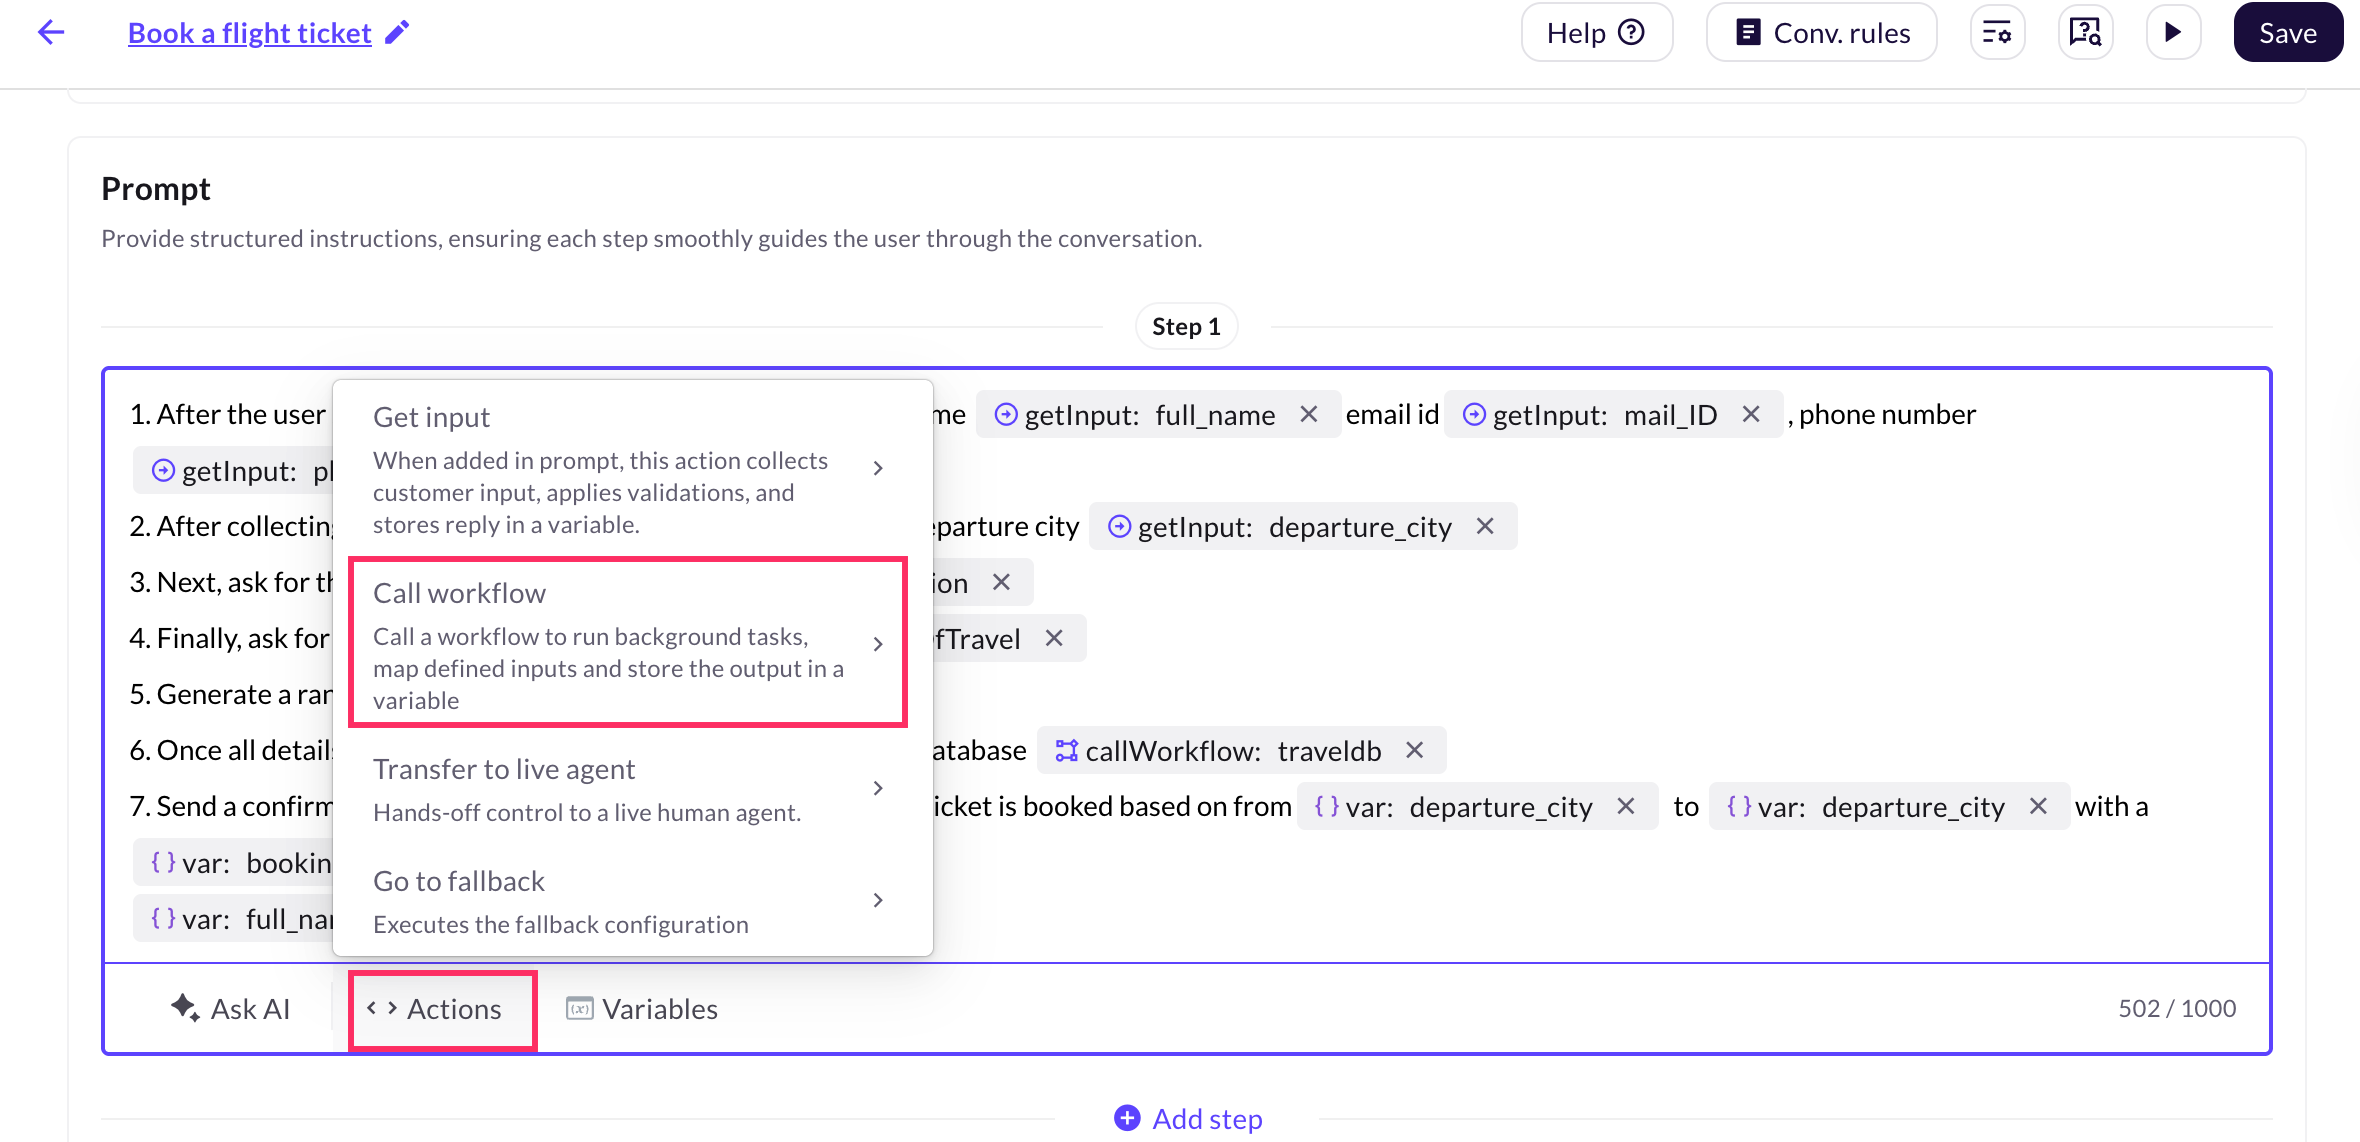
Create a workflow
To create a worflow, follow these steps:
-
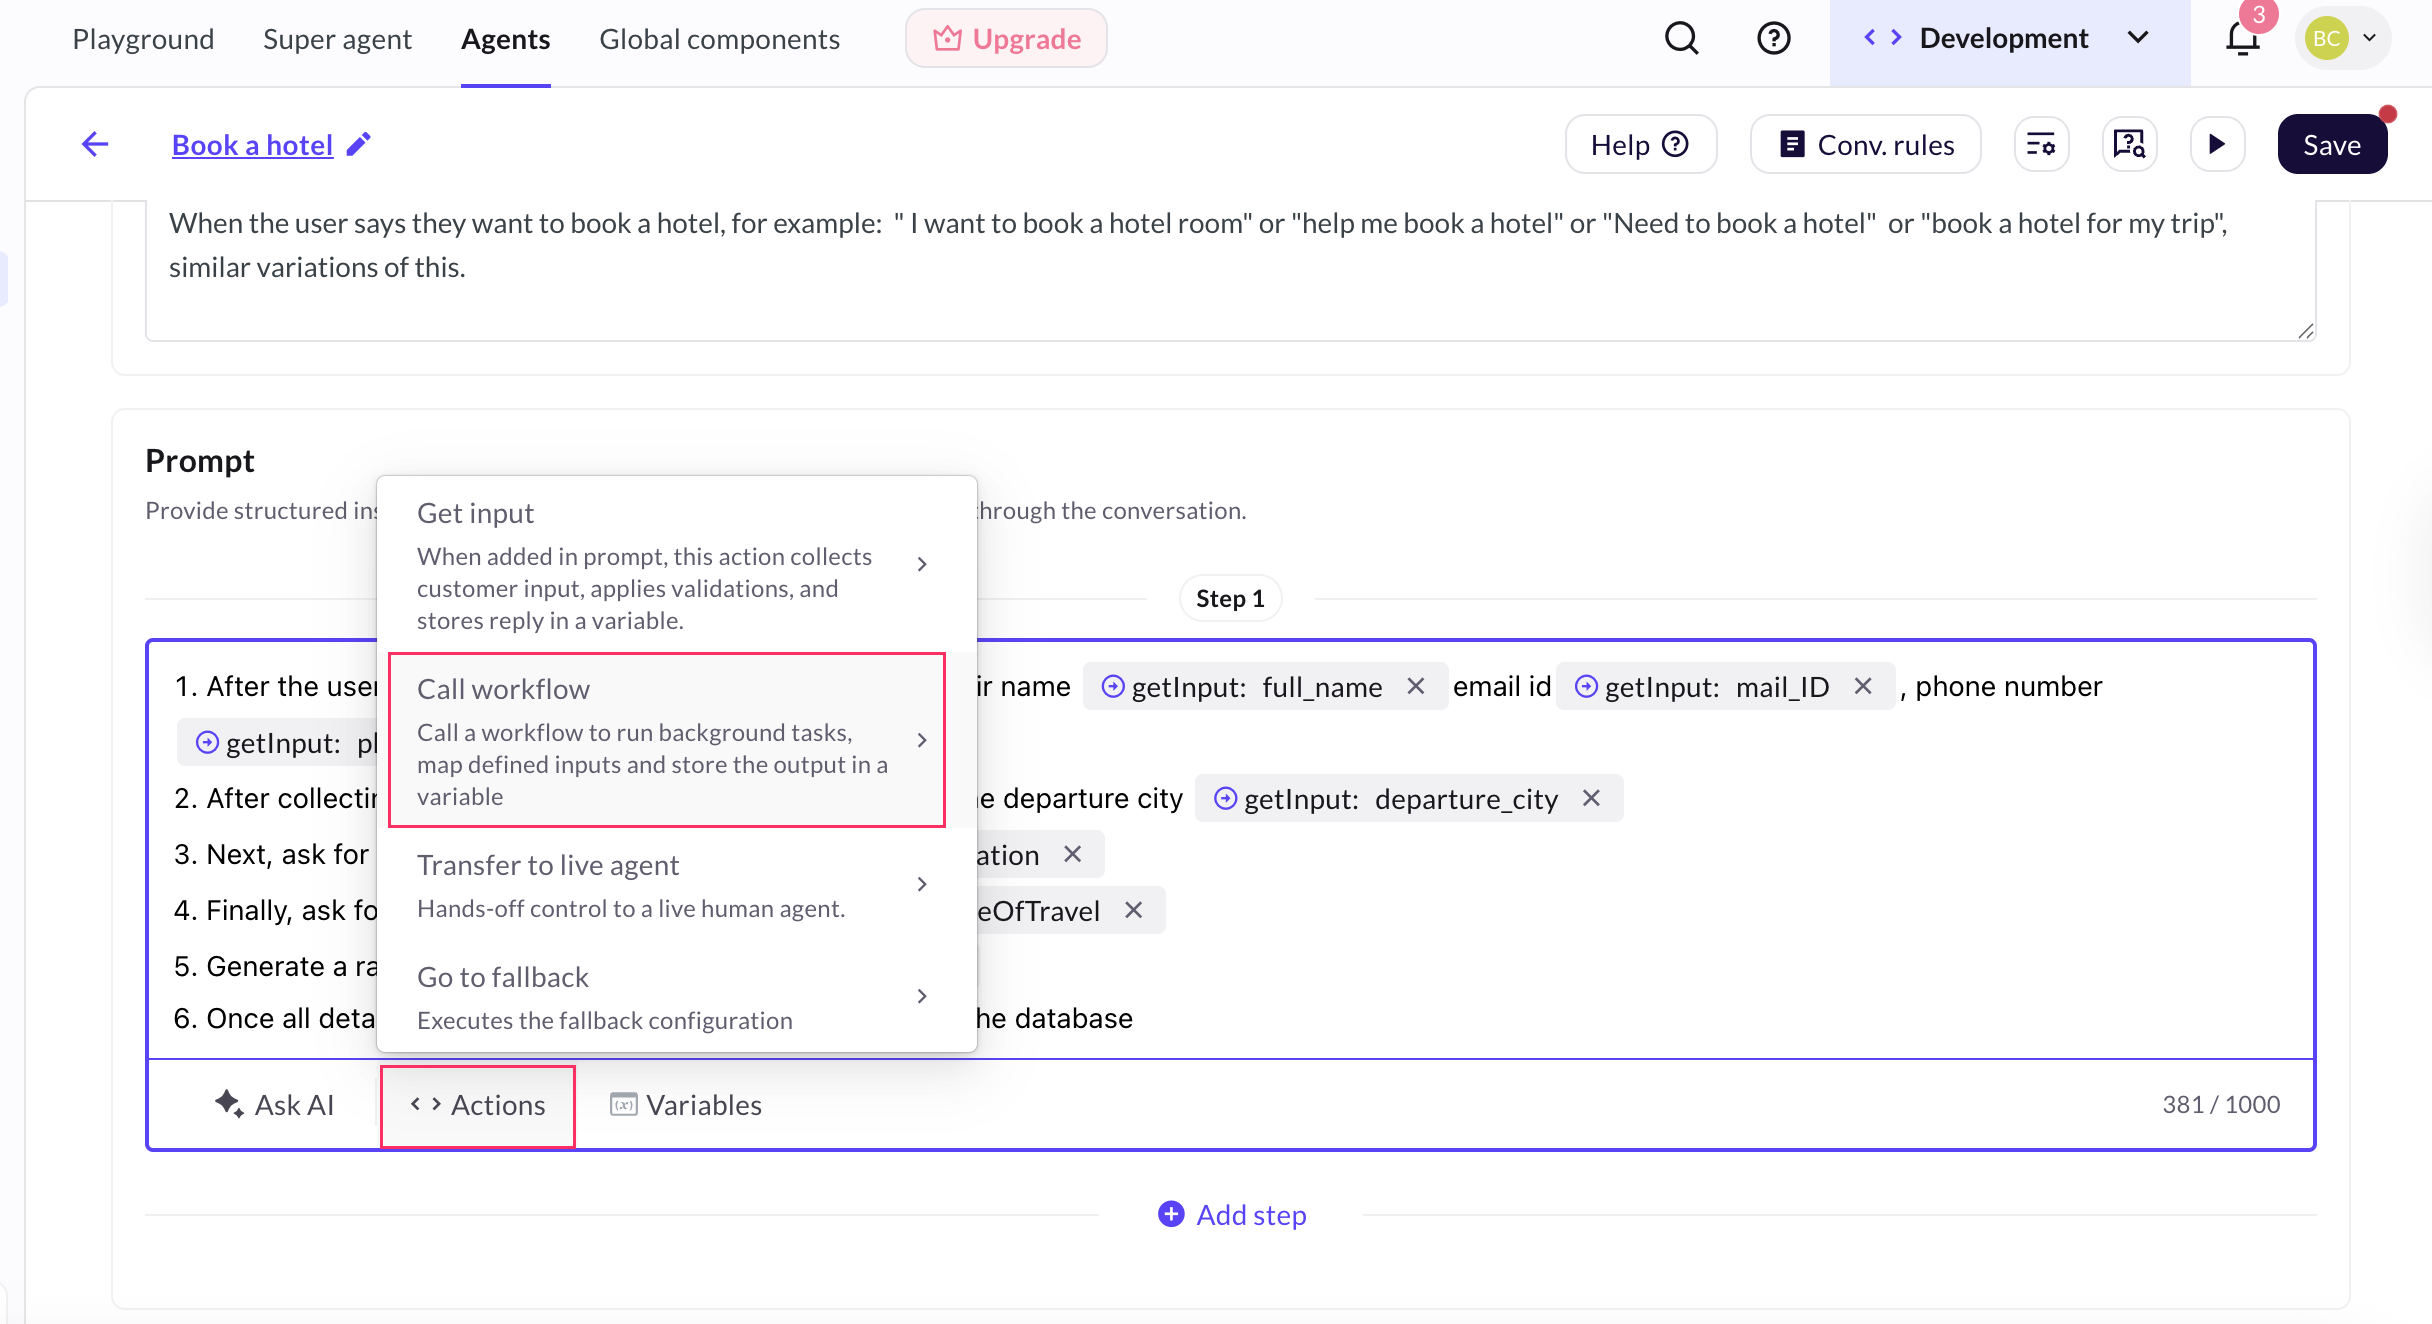
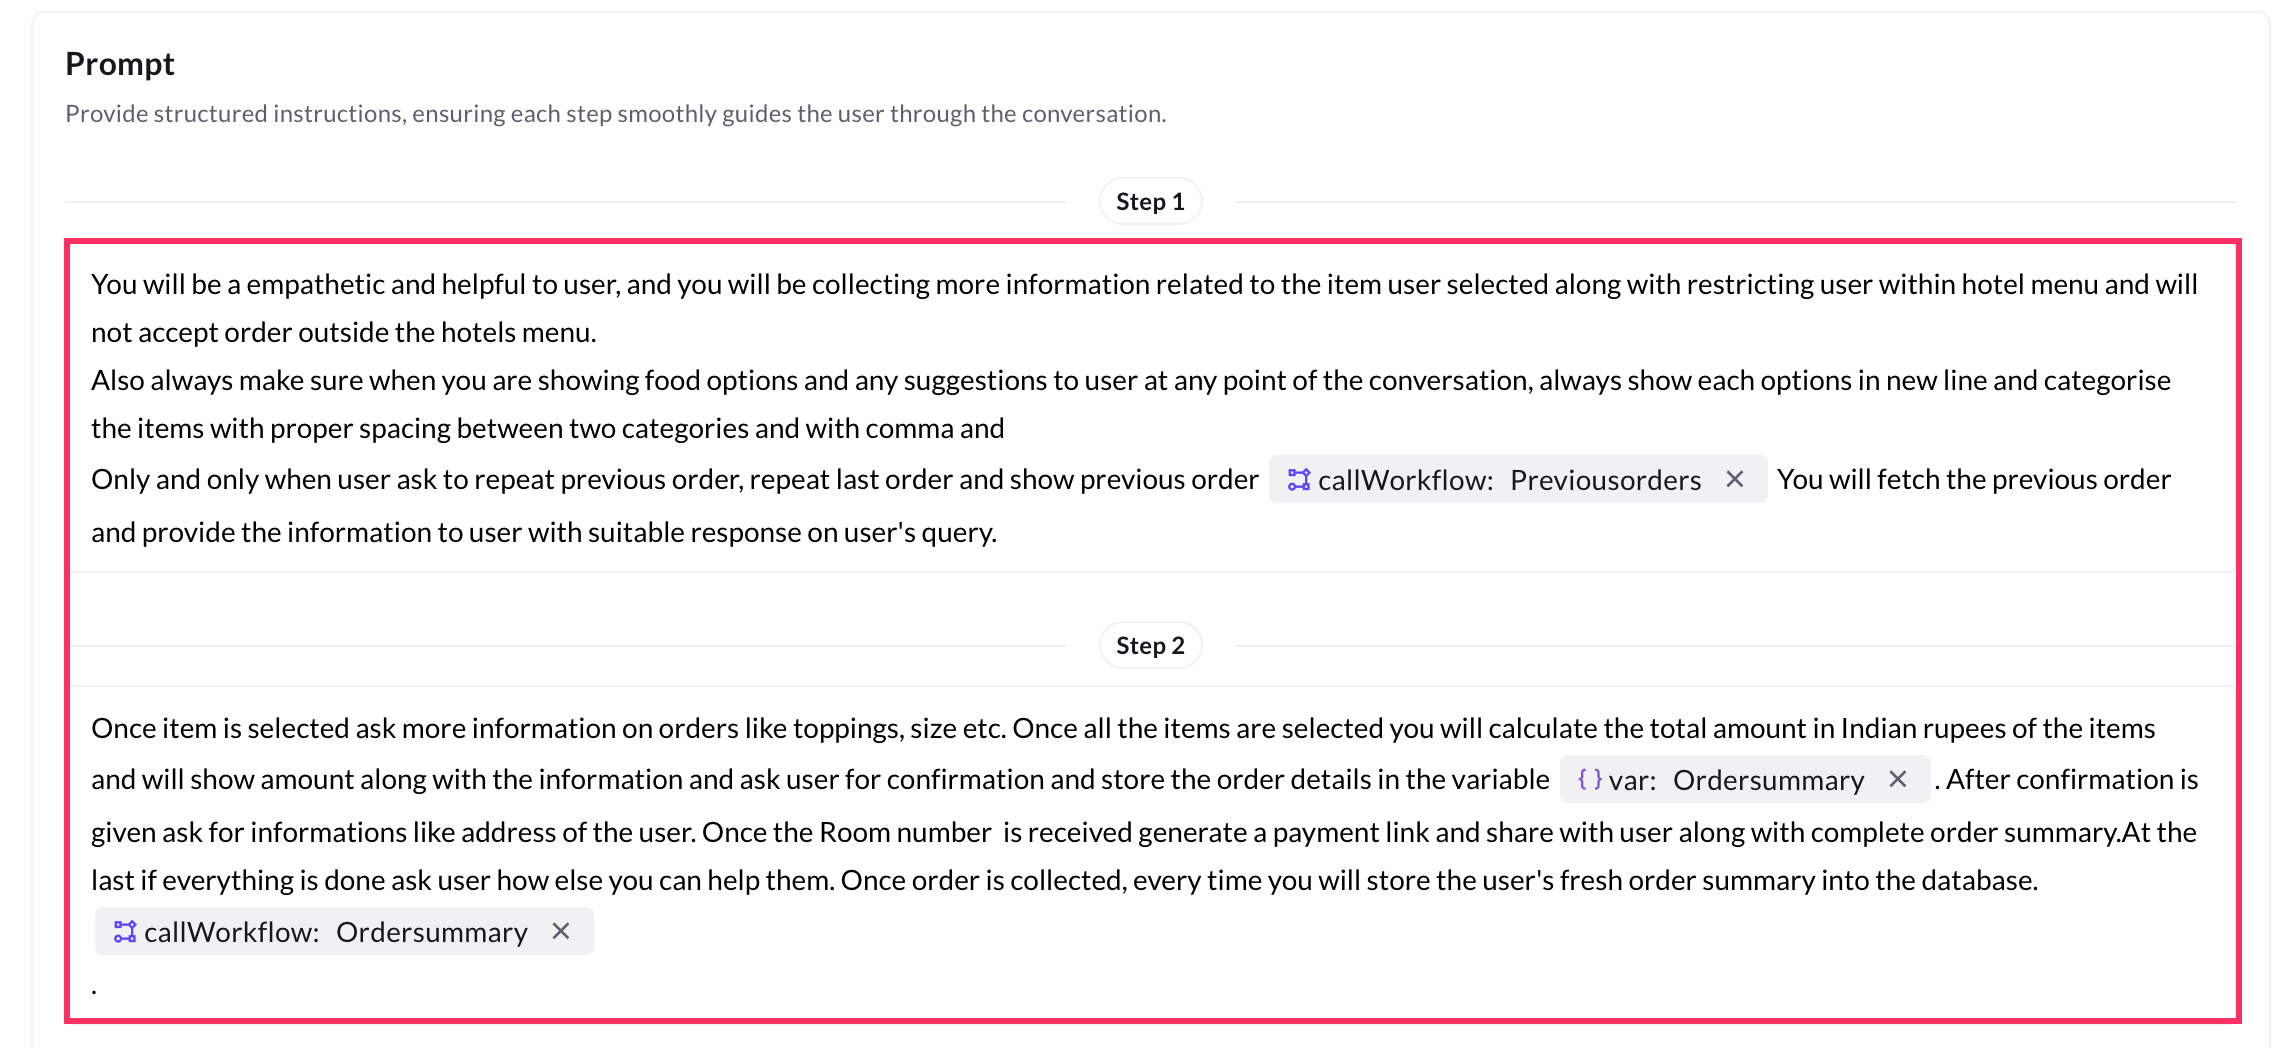
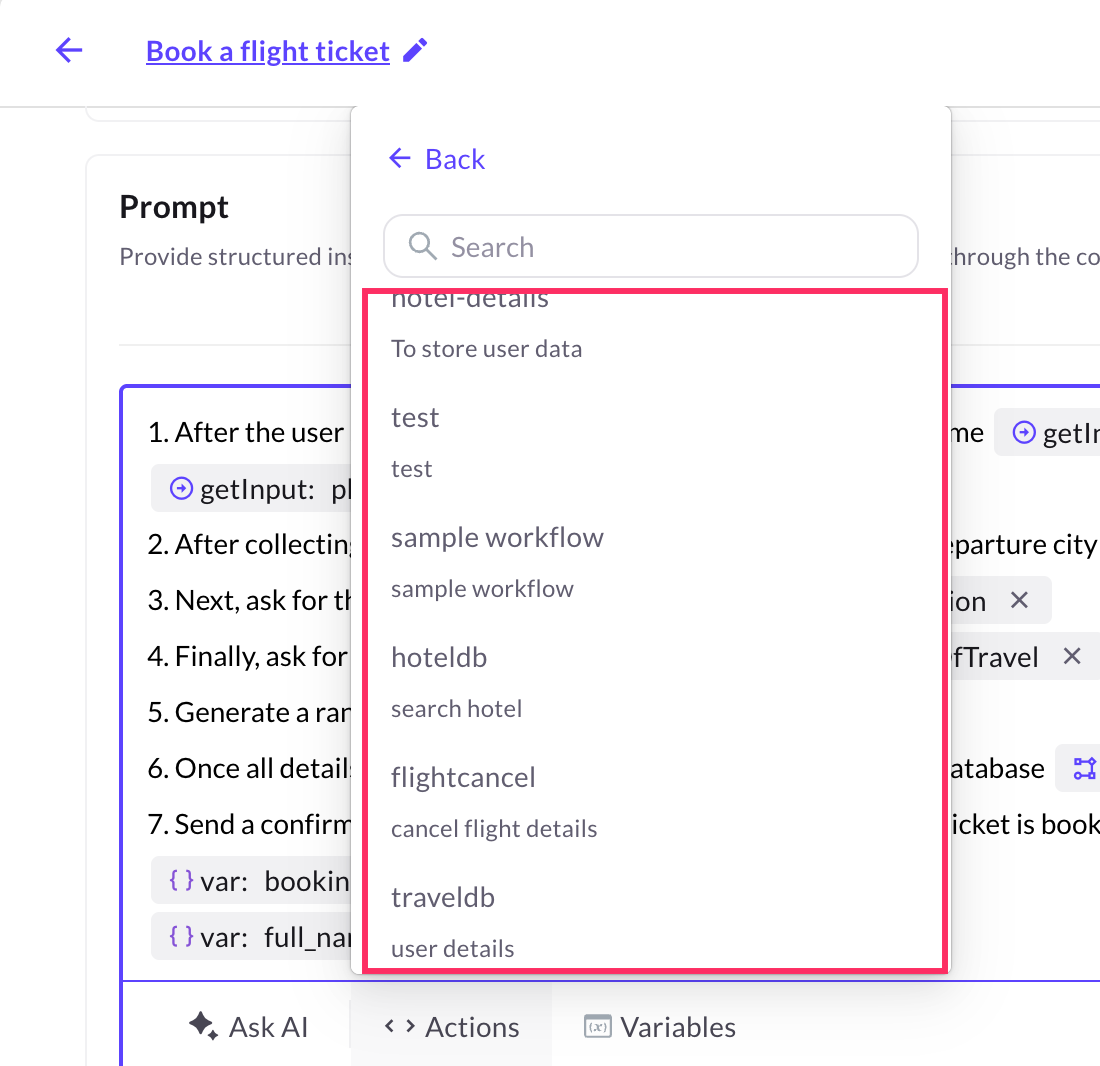
Navigate to Agents > Prompts > Actions > Call workflow.
-
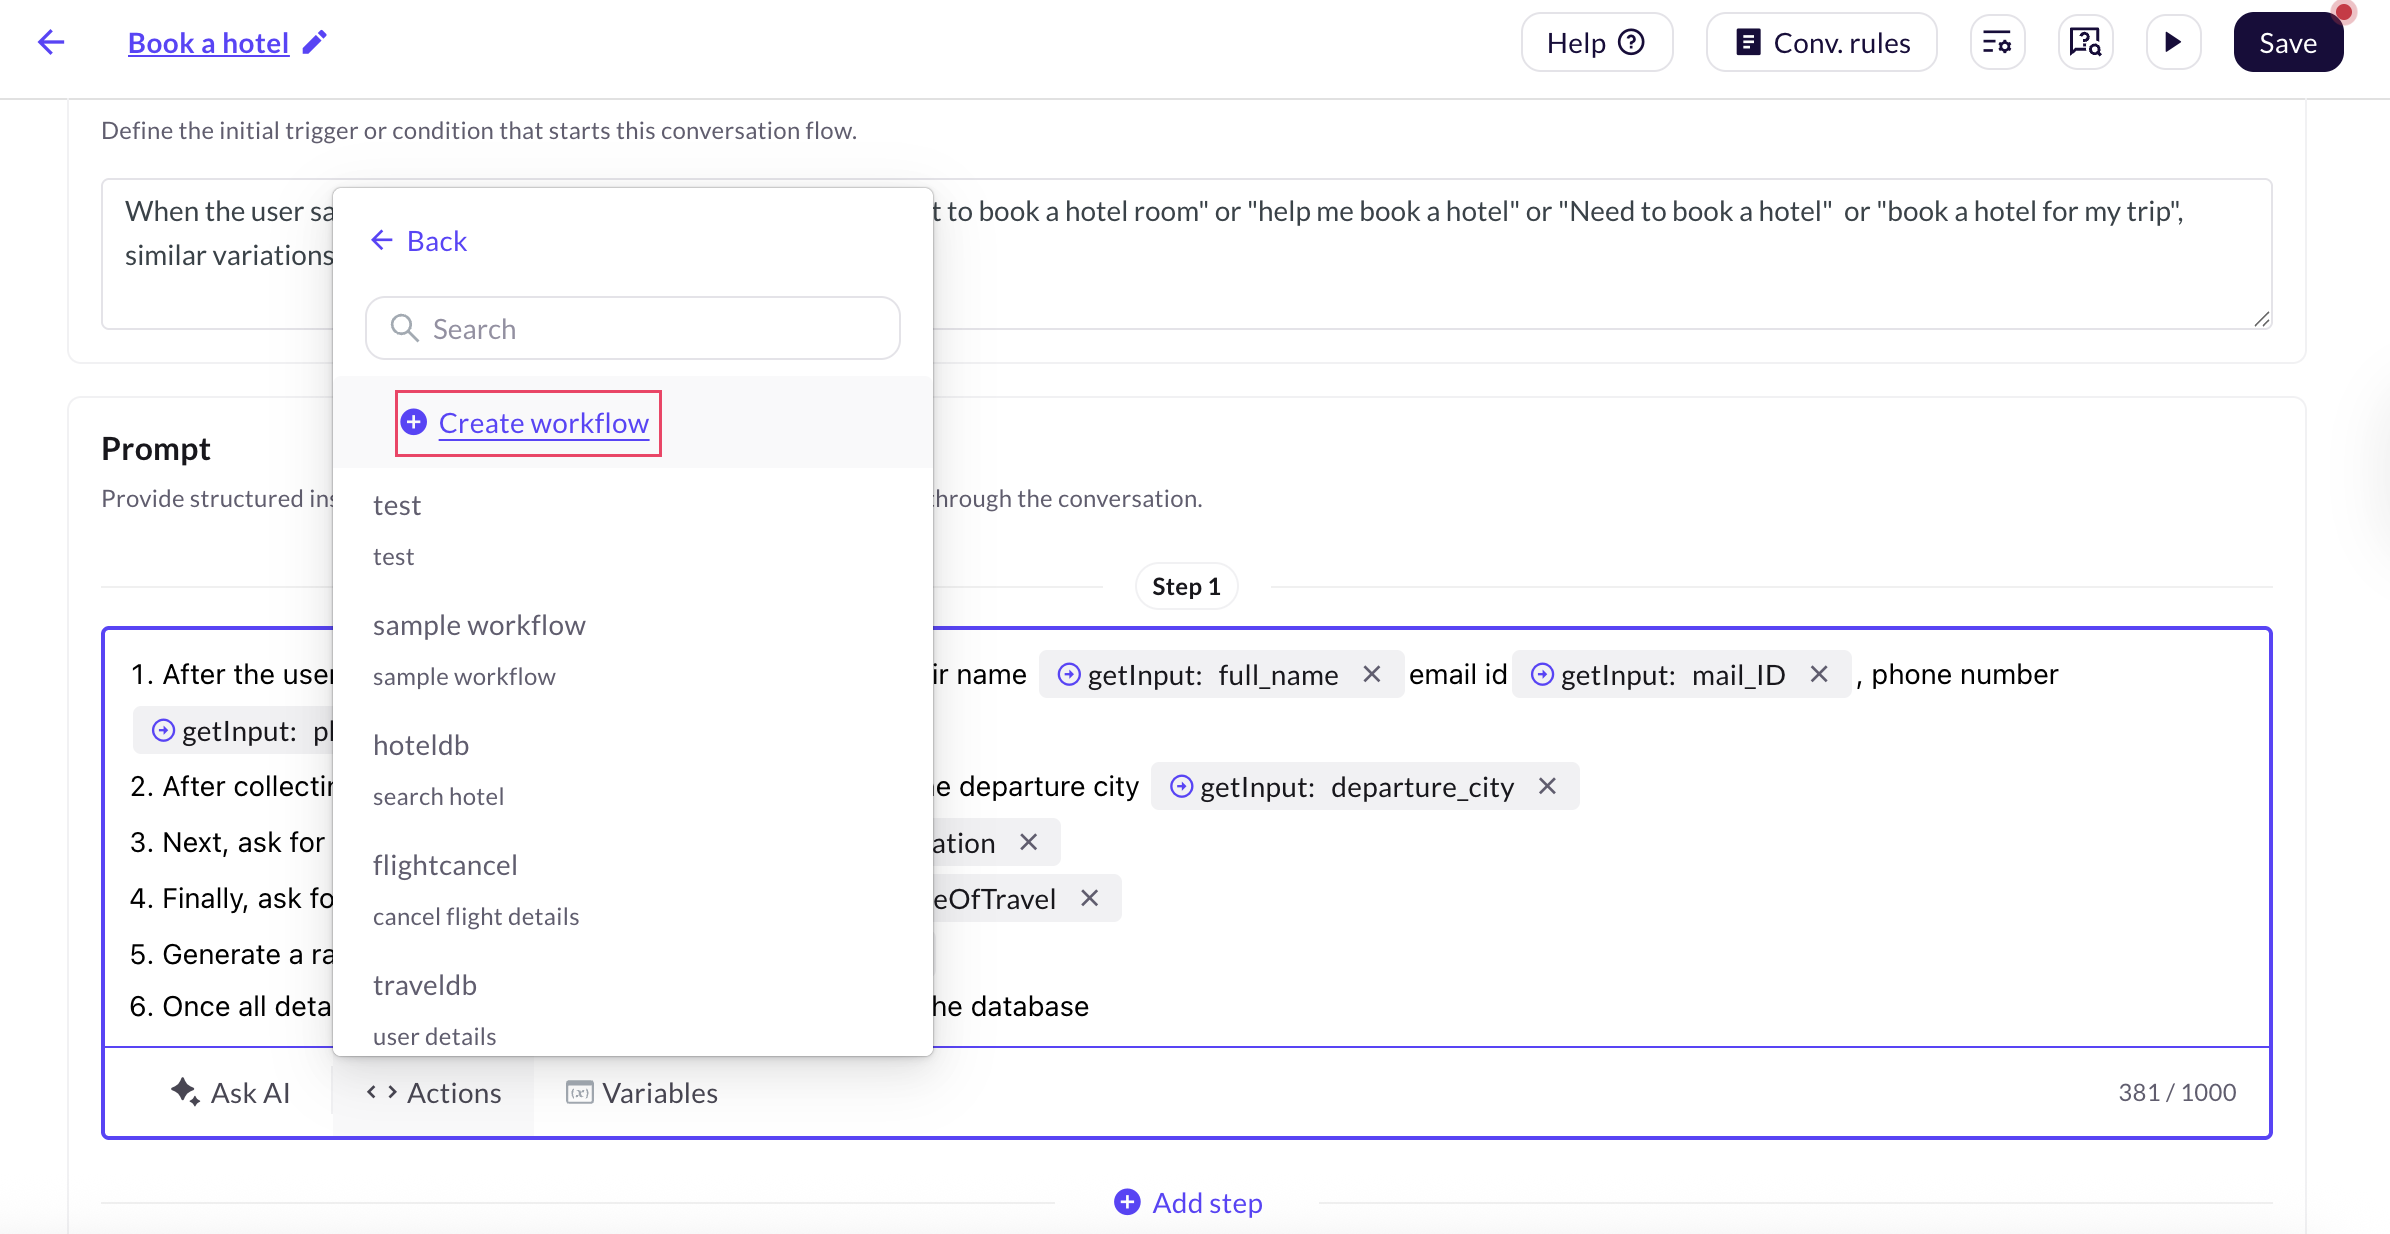
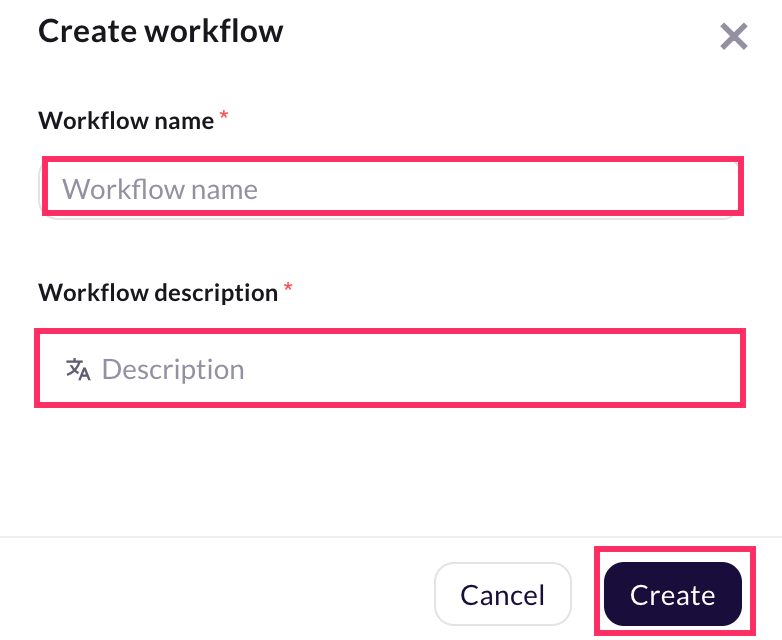
Click + Create workflow.
-
Provide a Workflow name and Description to explain the purpose of the workflow.
-
This will create a new workflow where you can configure with the required input parameters, logic, and output settings.
- You can also create a workflow via the Workflow builder section.
Define a workflow
Defining a workflow allows the AI agent to perform automated backend tasks such as retrieving, validating, or storing data based on the user's input during a conversation.
When defining a workflow, you need to use variables collected during the conversation (such as user name, travel date, or contact number) and pass them into the workflow. These variables drive the logic within the workflow and determine what actions are taken.
A well-defined workflow helps you to:
- Automate backend operations like API calls or database updates.
- Use dynamic inputs from the user by mapping variables into the workflow.
- Maintain consistency and reduce duplication across conversation flows.
Use case: Fetch and store user booking details
To define a workflow, follow these steps:
-
Use prompts to collect user details for flight booking and store them in input variables.
-
Create a database with columns matching the fields you want to store (example, name, phone number, destination).

-
Go to the workflow that you have created and add a Database node and select the created database. For more information, click here.
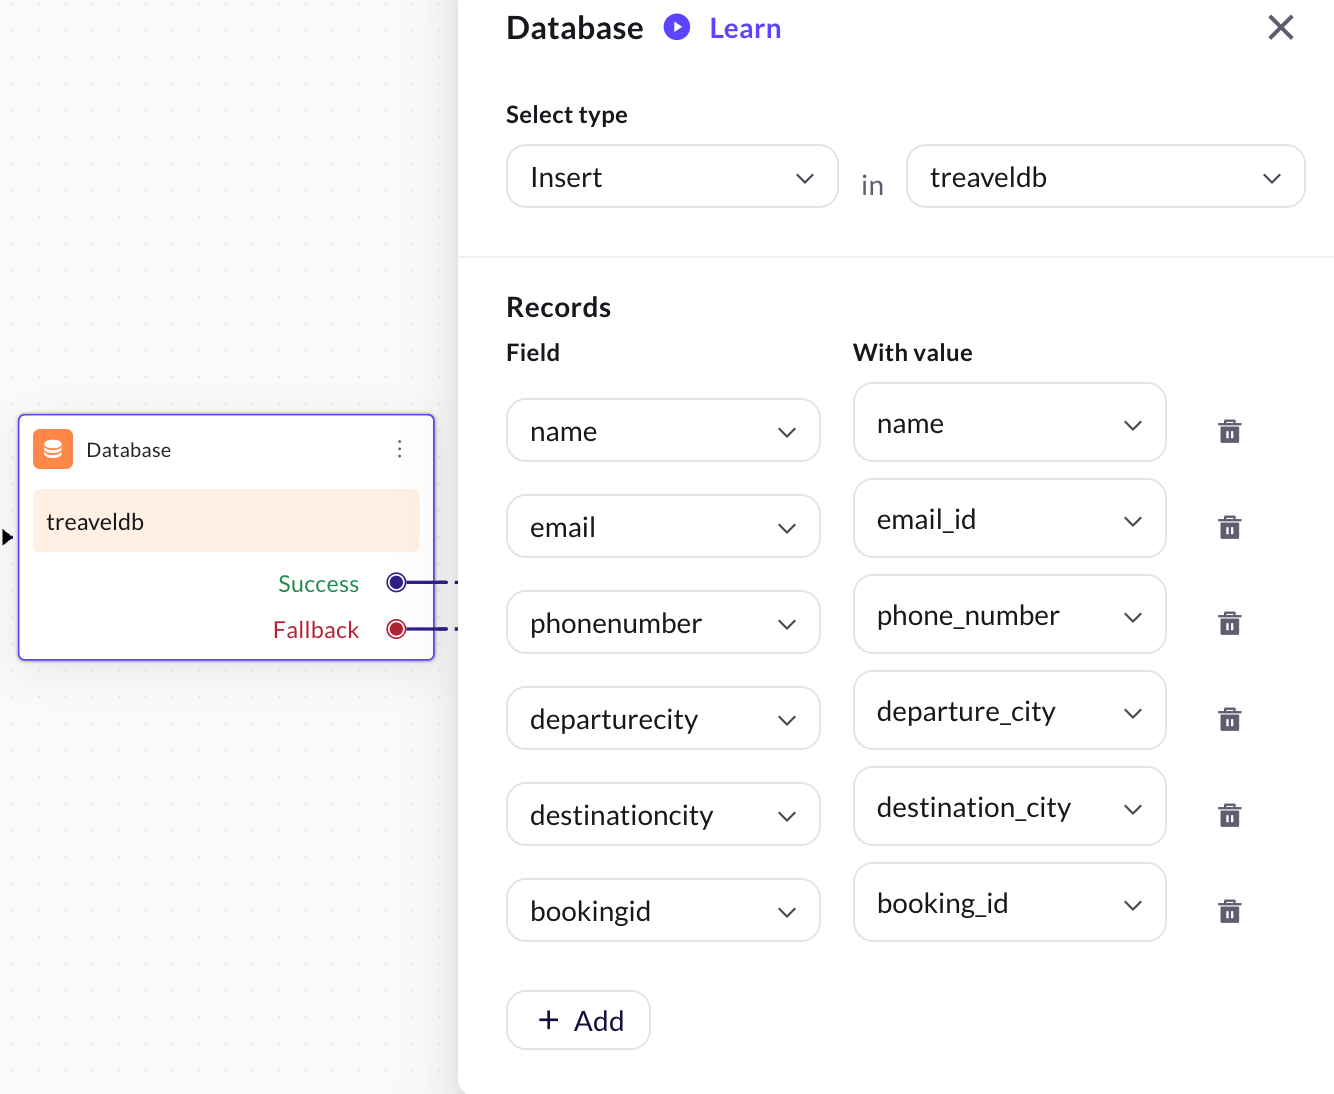
-
Click Define and map the input variables to the corresponding database columns.
-
Link the Database node to the Output node to complete the workflow.
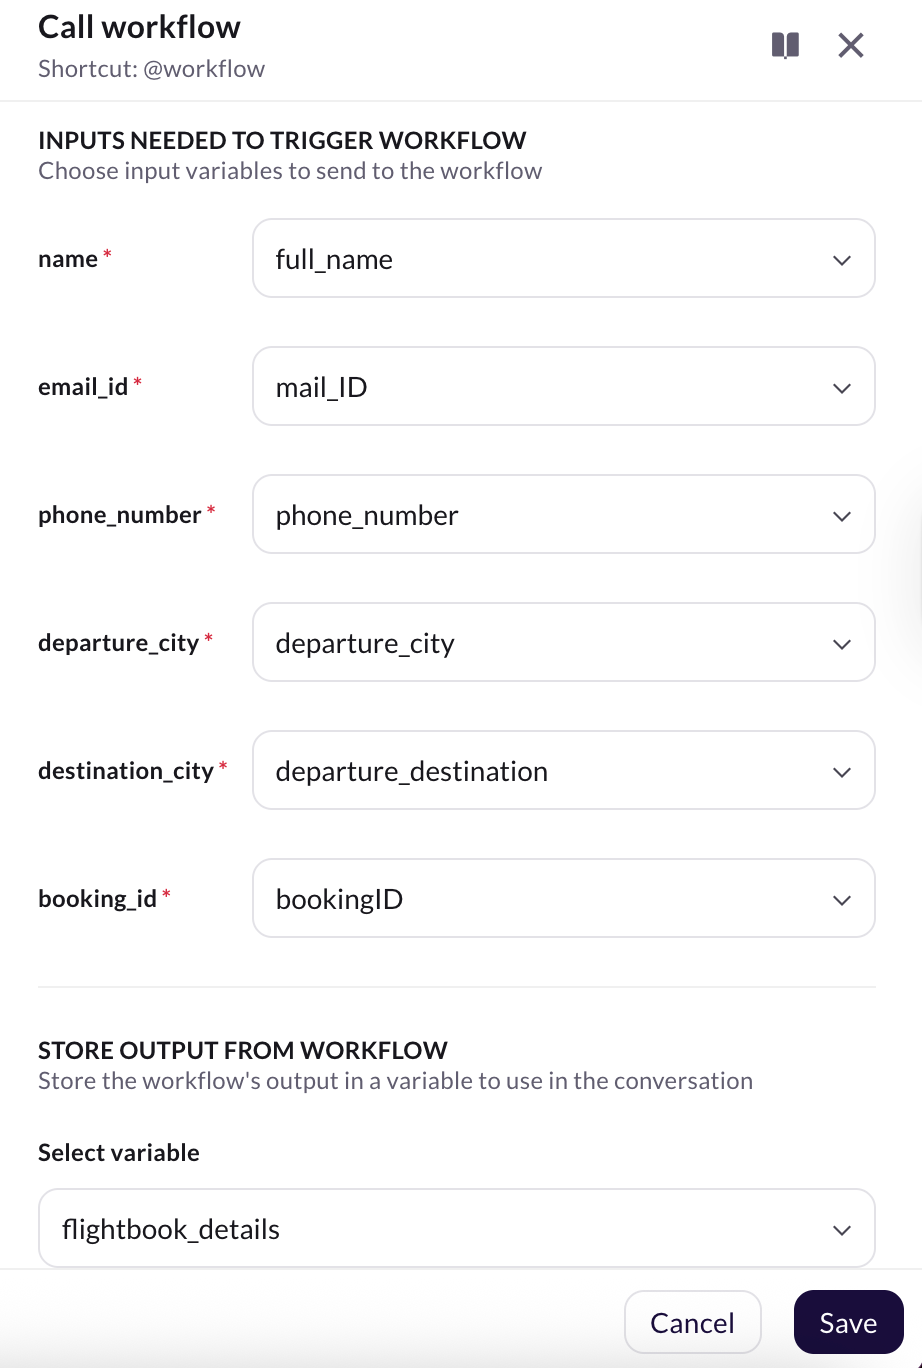
How to call a workflow in a prompt?
To call a workflow in a prompt, follow these steps:
-
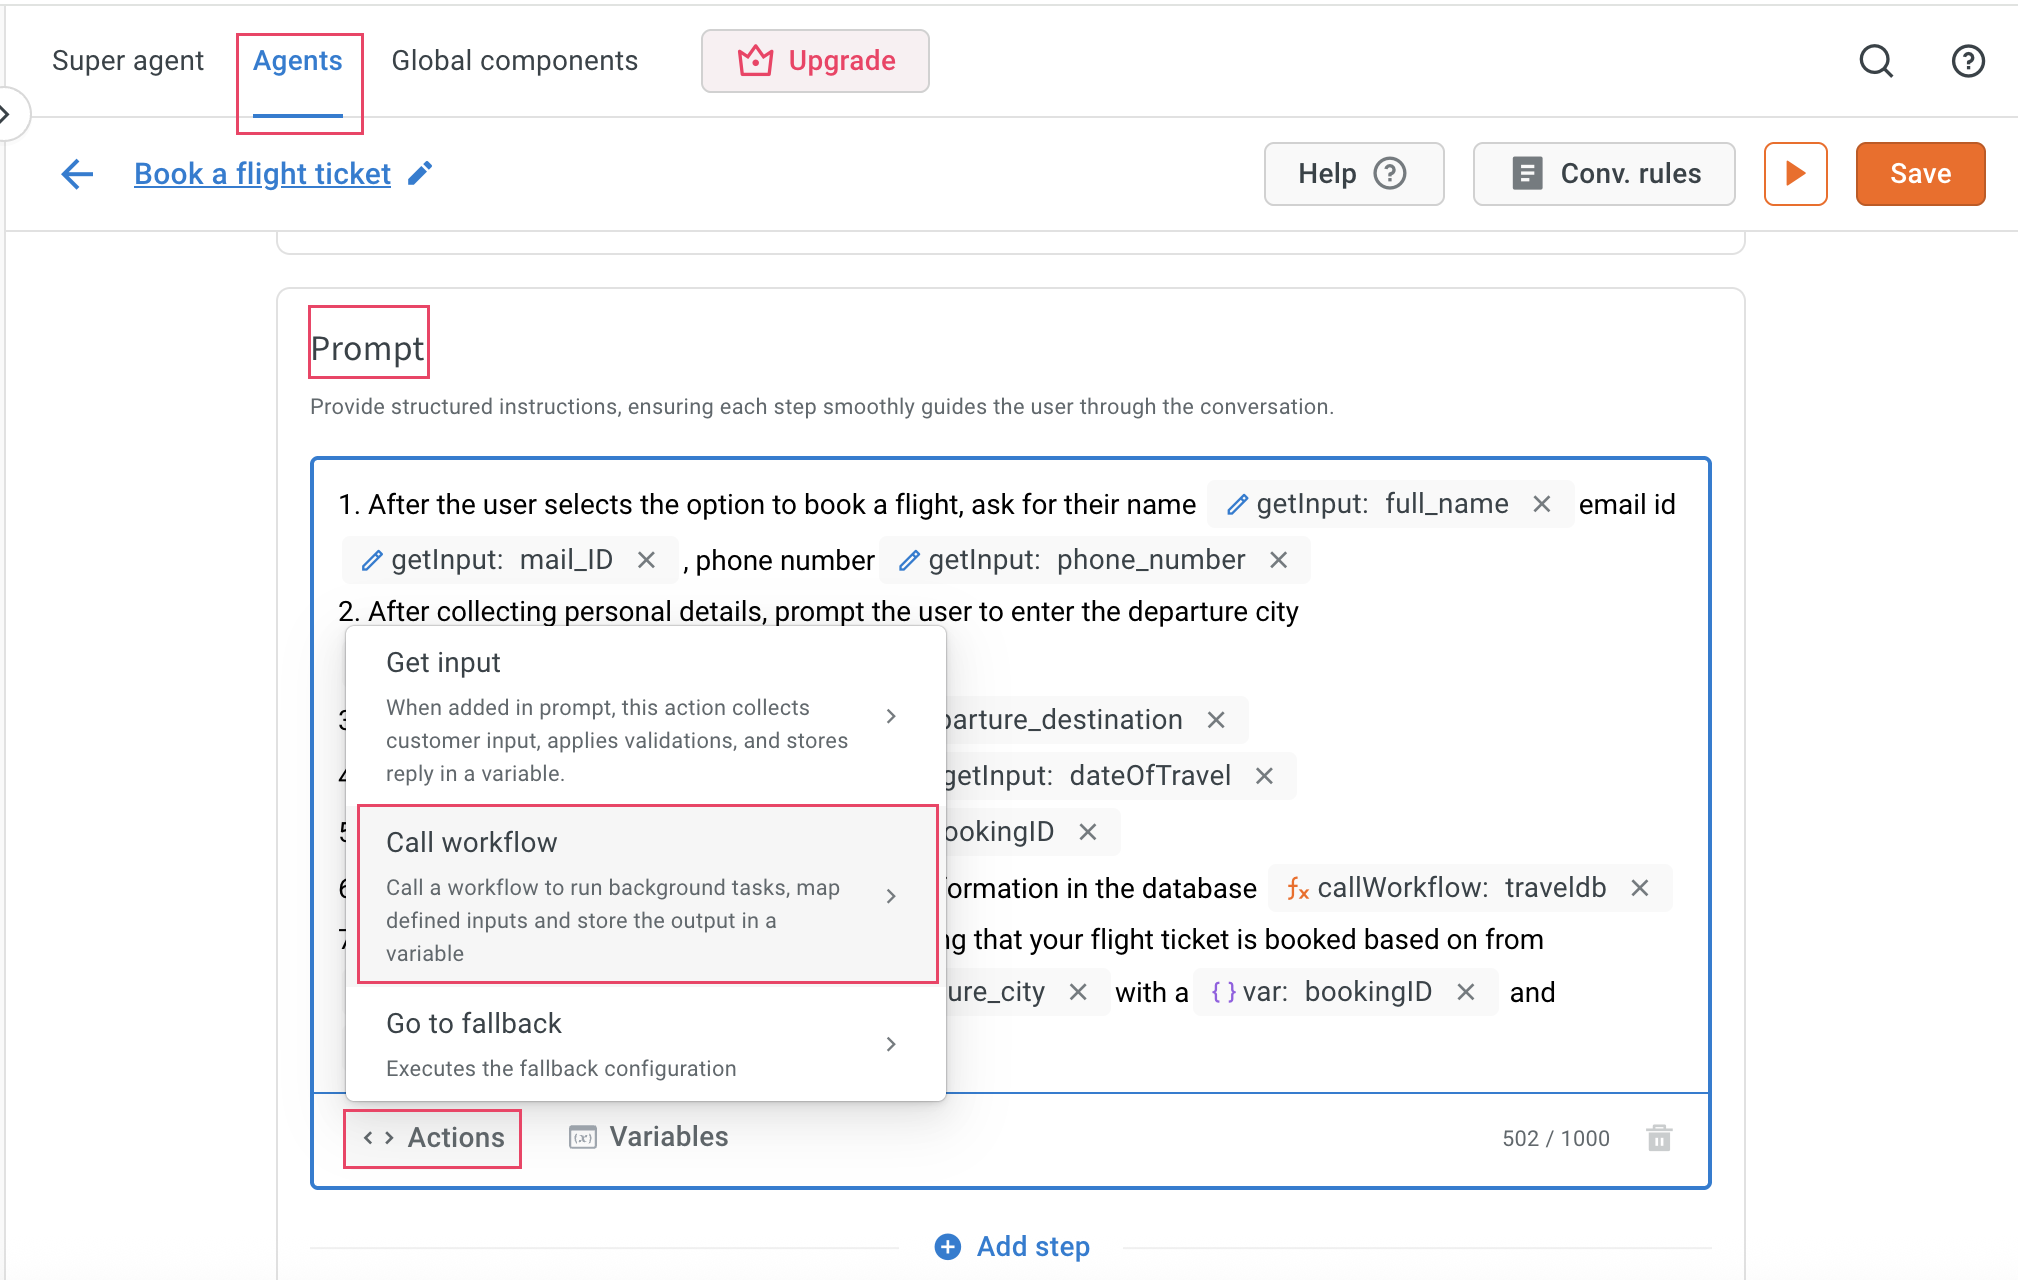
Navigate to Agents > Prompts, and go to the prompt where the workflow should be triggered.
-
Click Action and select Call workflow, or use the shortcut key
$.
-
Choose the workflow you previously created from the drop-down.
-
Click the Edit icon next to the selected workflow and map the required input variables (example, user_name, travel_date) that were collected during the conversation.
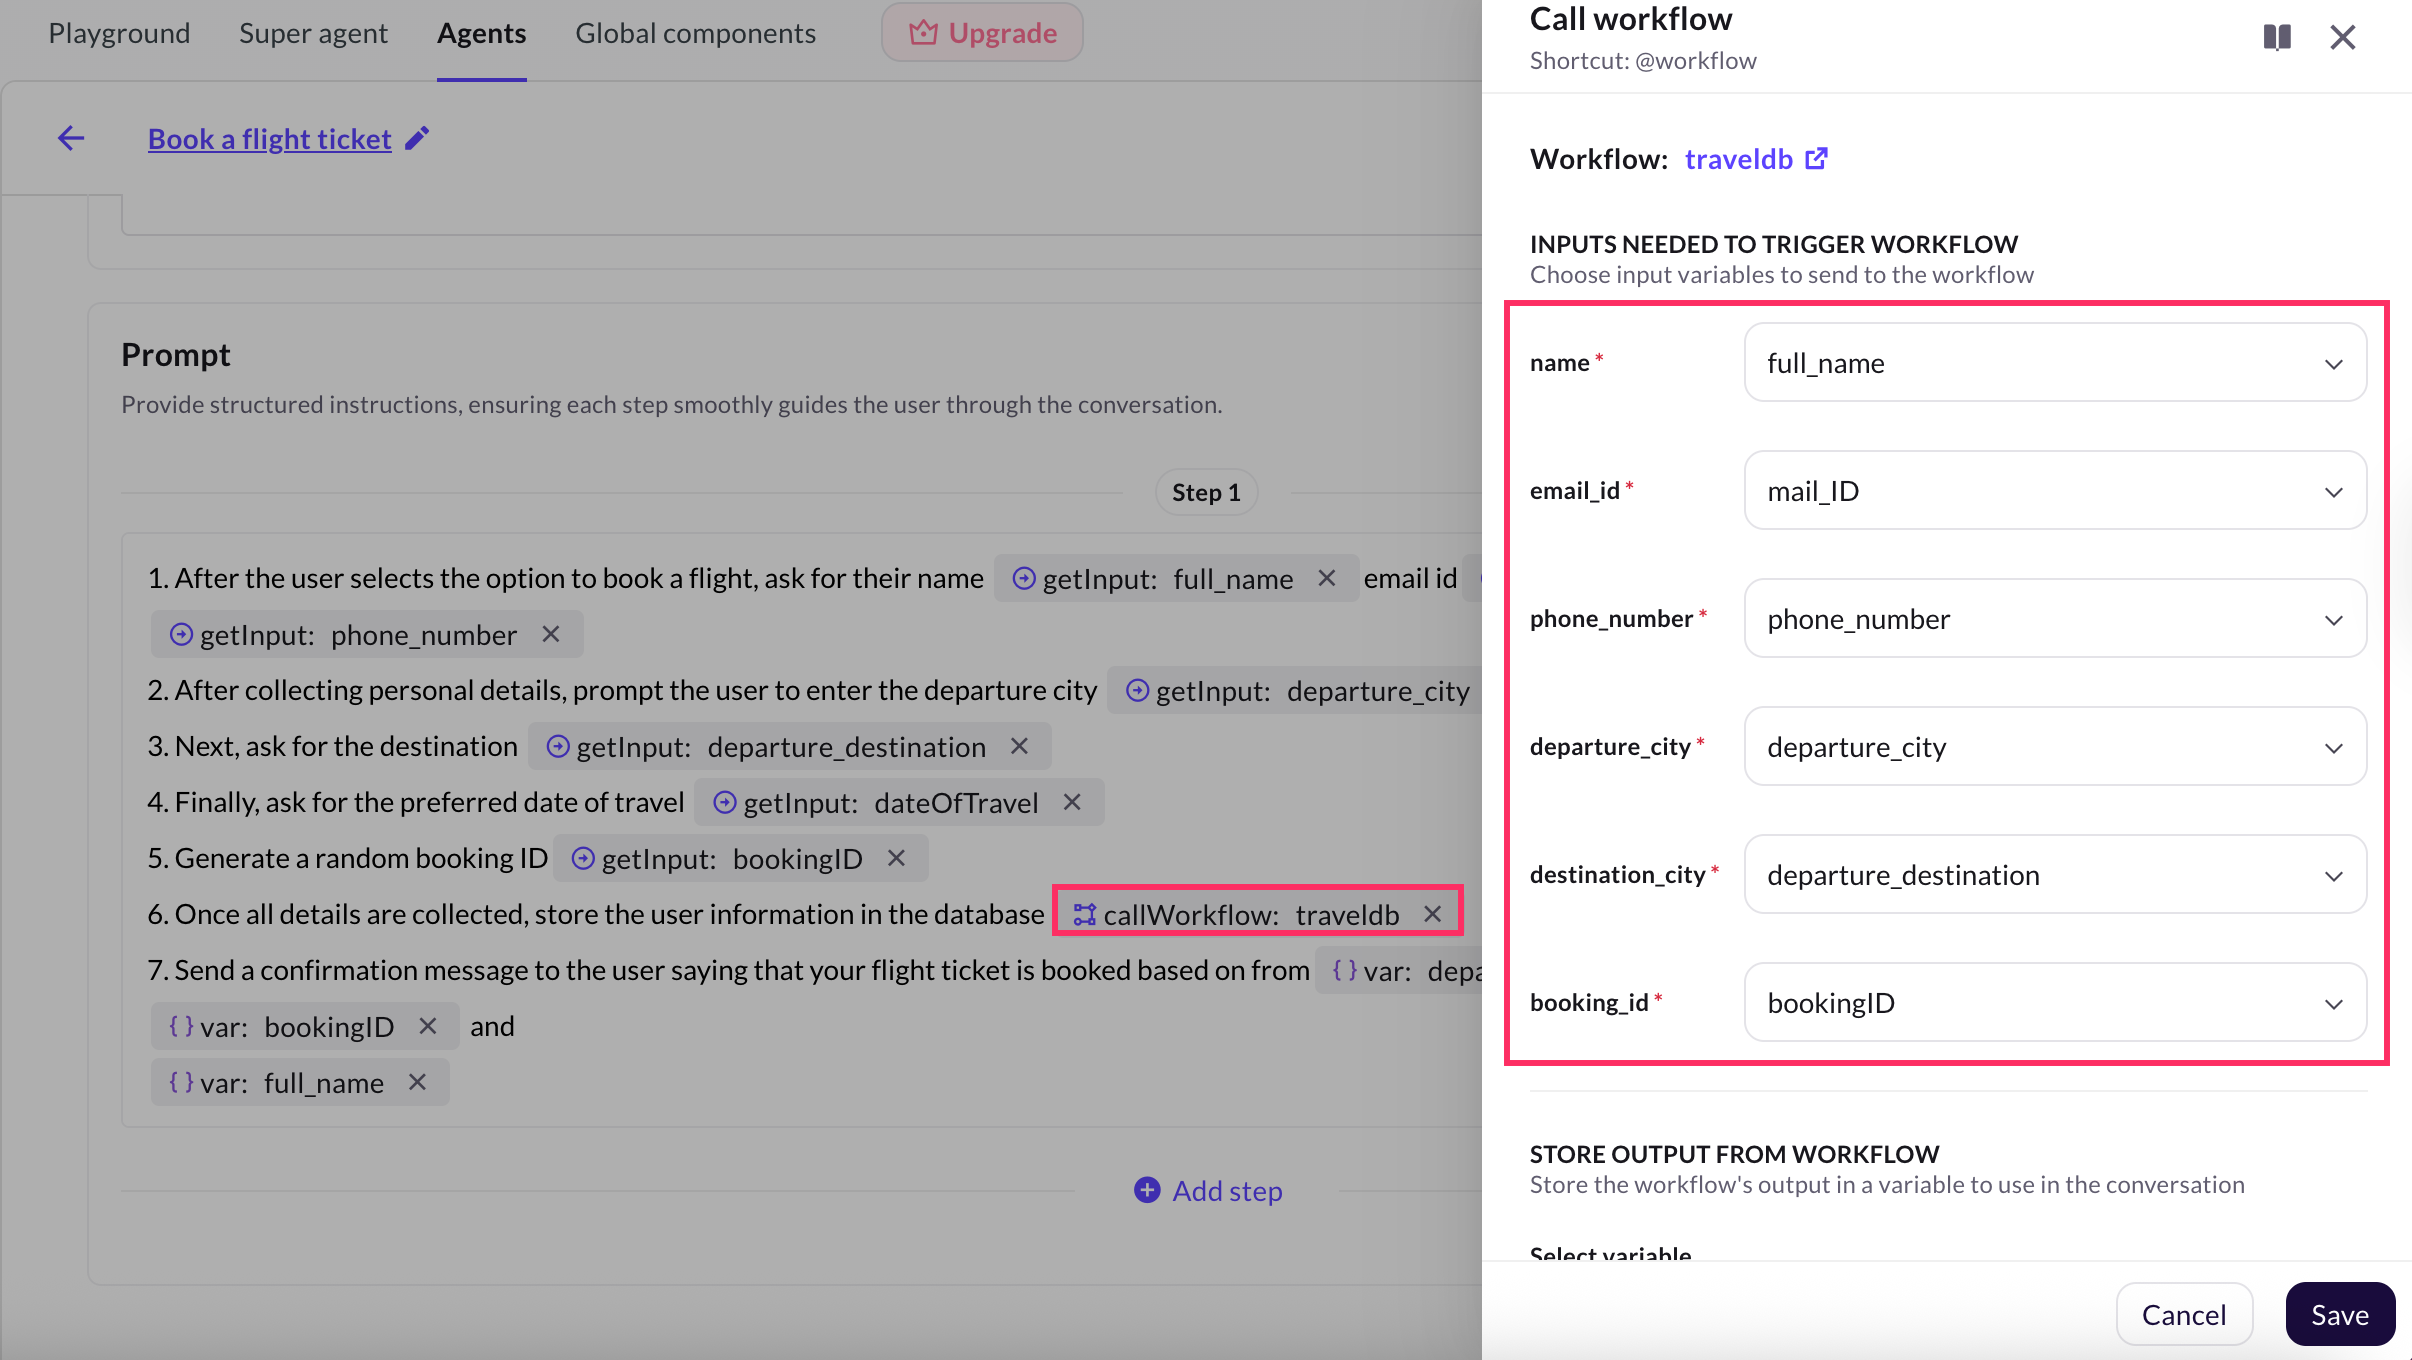
-
Click Save to complete the configuration.
- Once configured, the workflow will automatically be triggered when the conversation reaches this prompt. The workflow’s output can be stored in a variable and used in the next steps of the conversation.
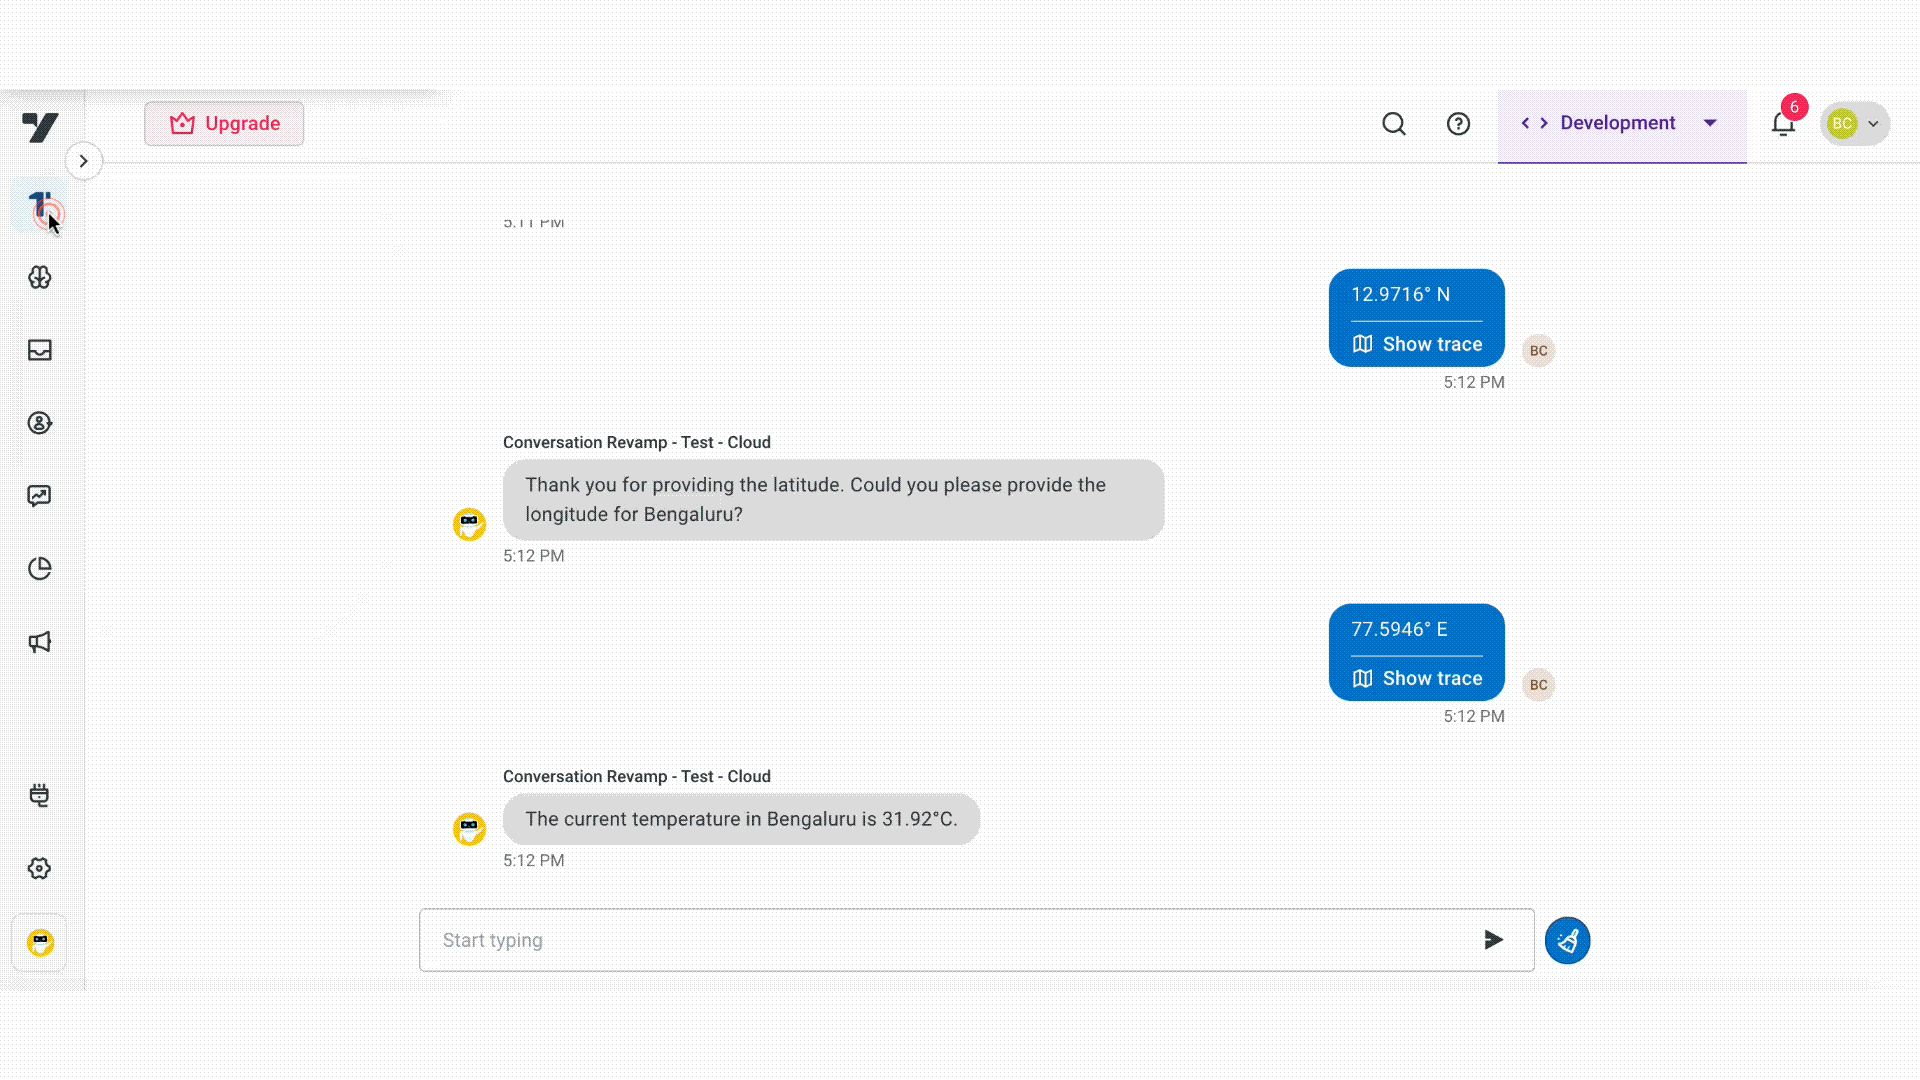
Use case: Fetch weather updates using API via workflow
This use case demonstrates how the AI agent can retrieve and display real-time weather updates based on user-provided location inputs using a backend API workflow.
Step 1: Define the Workflow
You need to create a backend workflow that accepts location inputs, calls a weather API, and returns the temperature and weather conditions.
-
Navigate to Agents > Prompts > Actions > Call workflow and click + Create workflow. (name workflow GetWeatherUpdate).
-
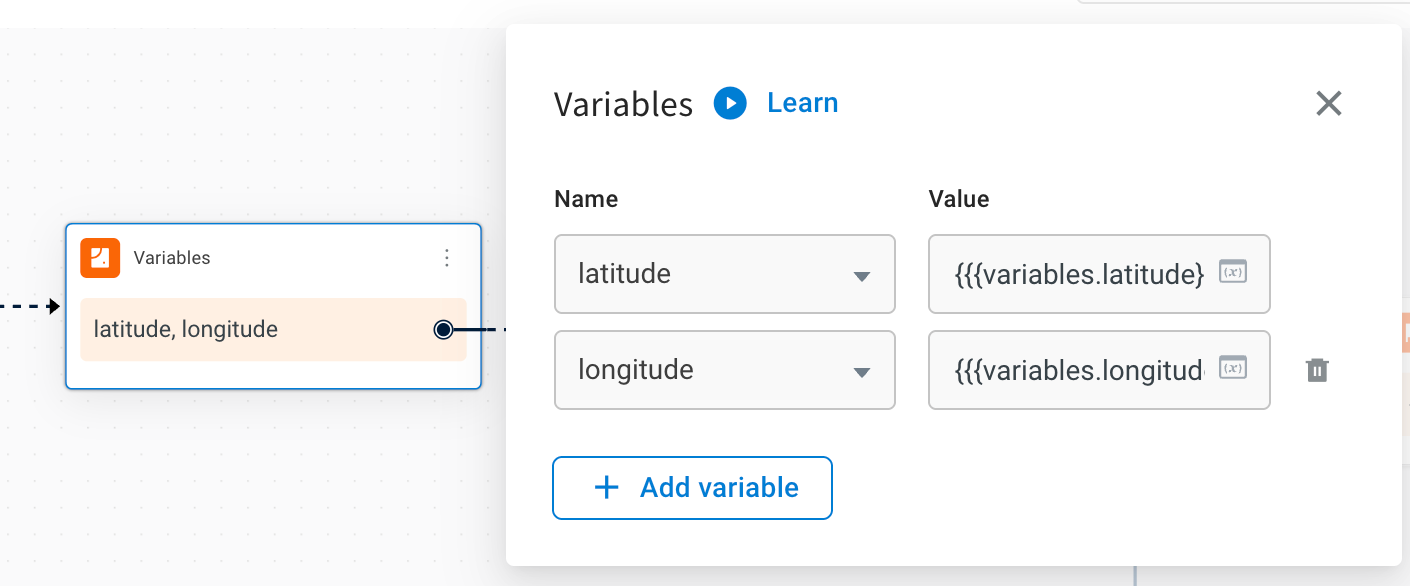
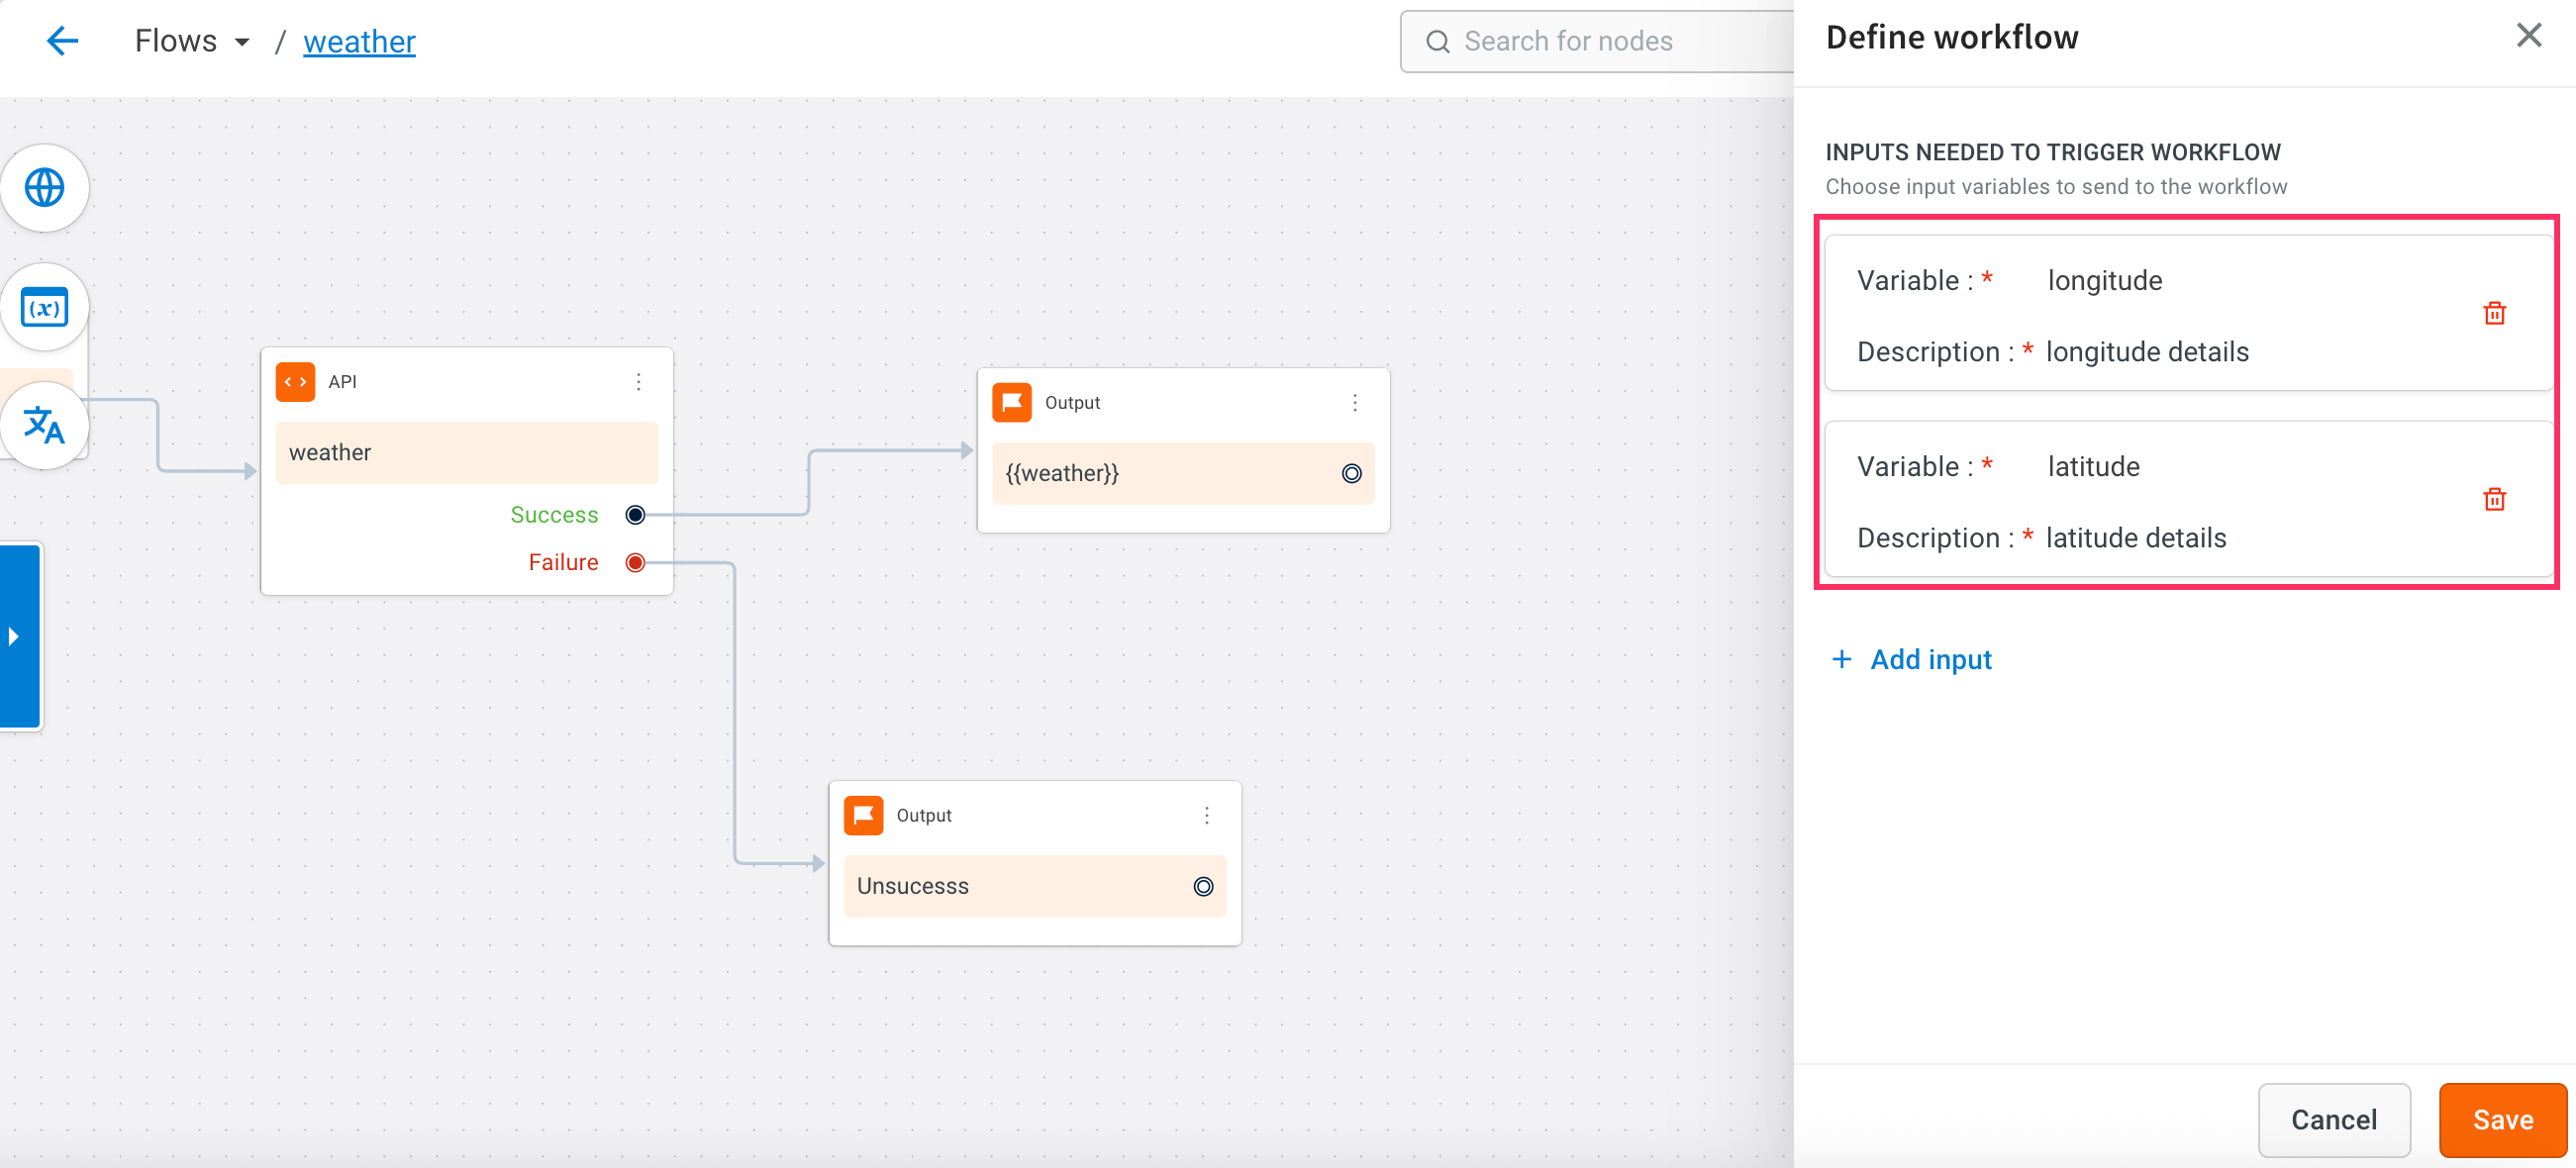
Use a Variable node at the start of the workflow to define the input parameters needed for the API. For this use case, define: latitude and longitude.
-
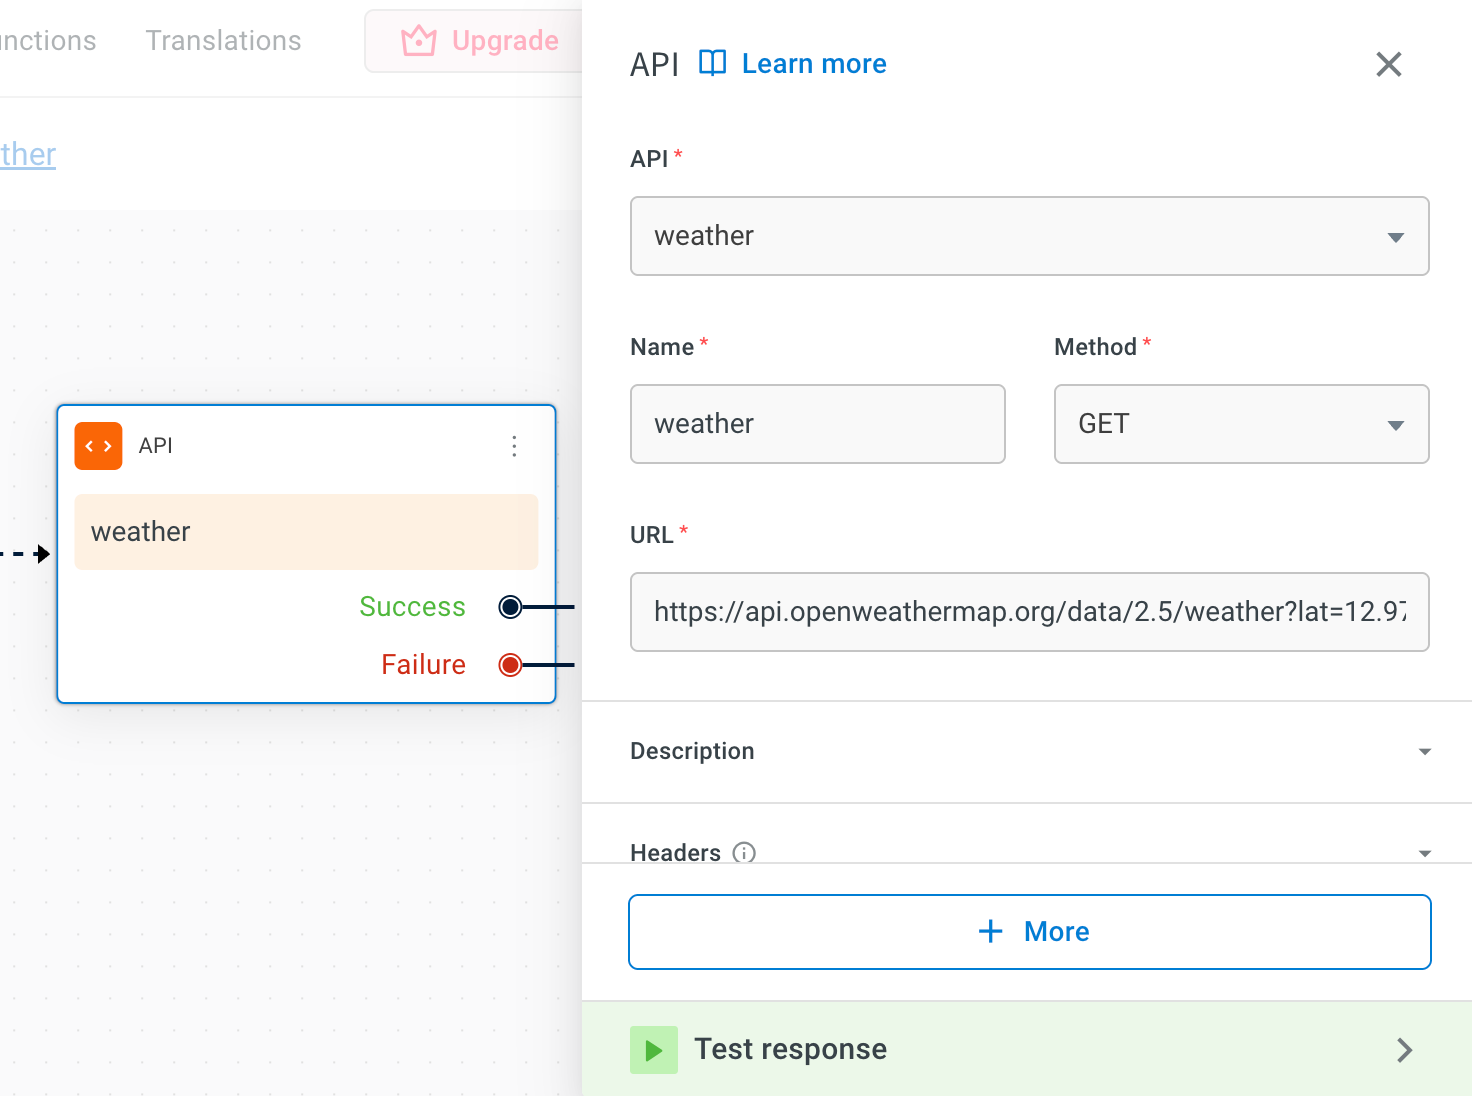
Add a API node to import a weather API and configure it with the following details:
- API: Select the API that you have added.
- Name: Enter the name of the API.
- Method: Enter the method as GET.
- URL: Enter the URL as
https://api.openweathermap.org/data/2.5/weather?lat=12.9716&lon=77.5946&appid=fab8b859cea632996b45a82f2361b345&units=metric
-
Store the full API response in a variable.
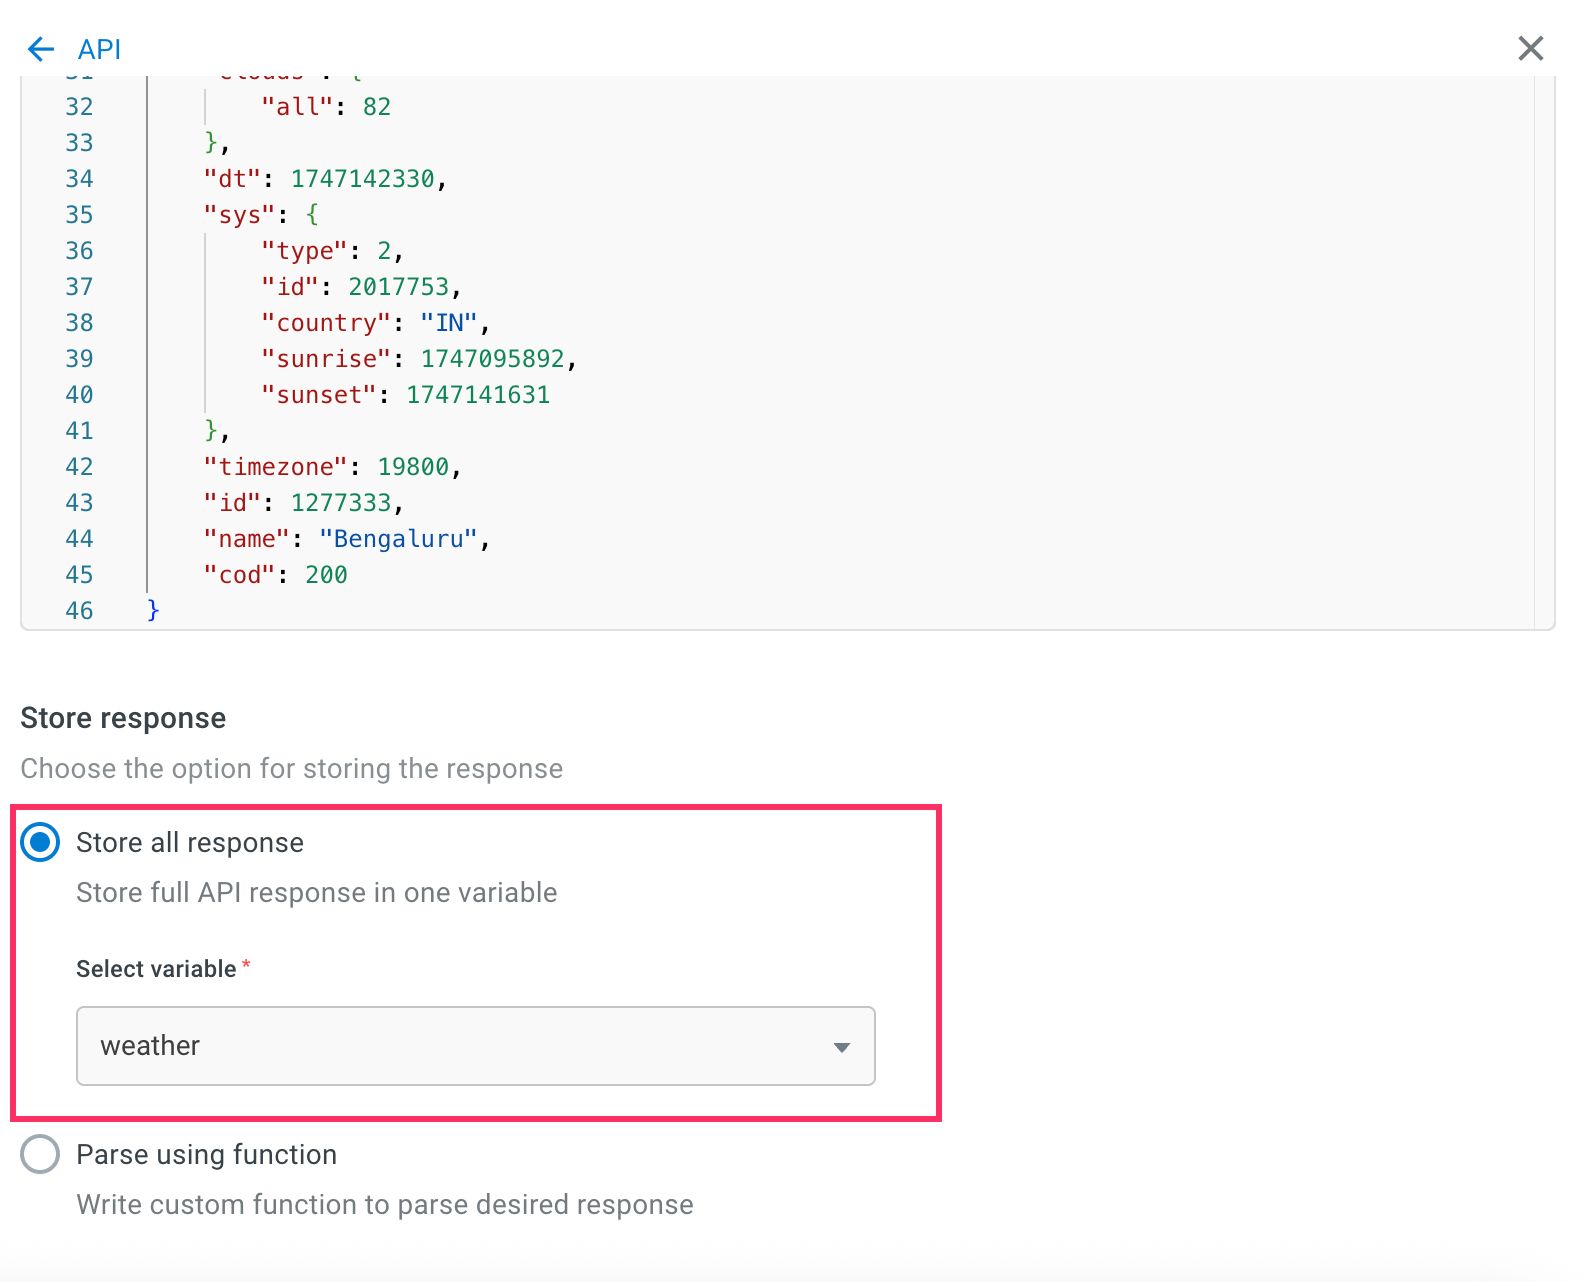
-
Define the workflow by mapping the specific fields that you want to use from the API response, like latitude, longitude, or humidity.
-
Add an Output node to return the mapped values and set:
i. Type of output: Choose Variable as the output type.
ii. Select a variable: Select a variable storing the API response.
iii. Path: Use dot notation (example, main.temp) to extract specific values from the API response.
- This set up completes the workflow definition. You can now use the workflow in the conversation.
Step 2: Call workflow in prompt
Once the workflow is defined, connect it to your conversation using the Call workflow action in the prompt section.
-
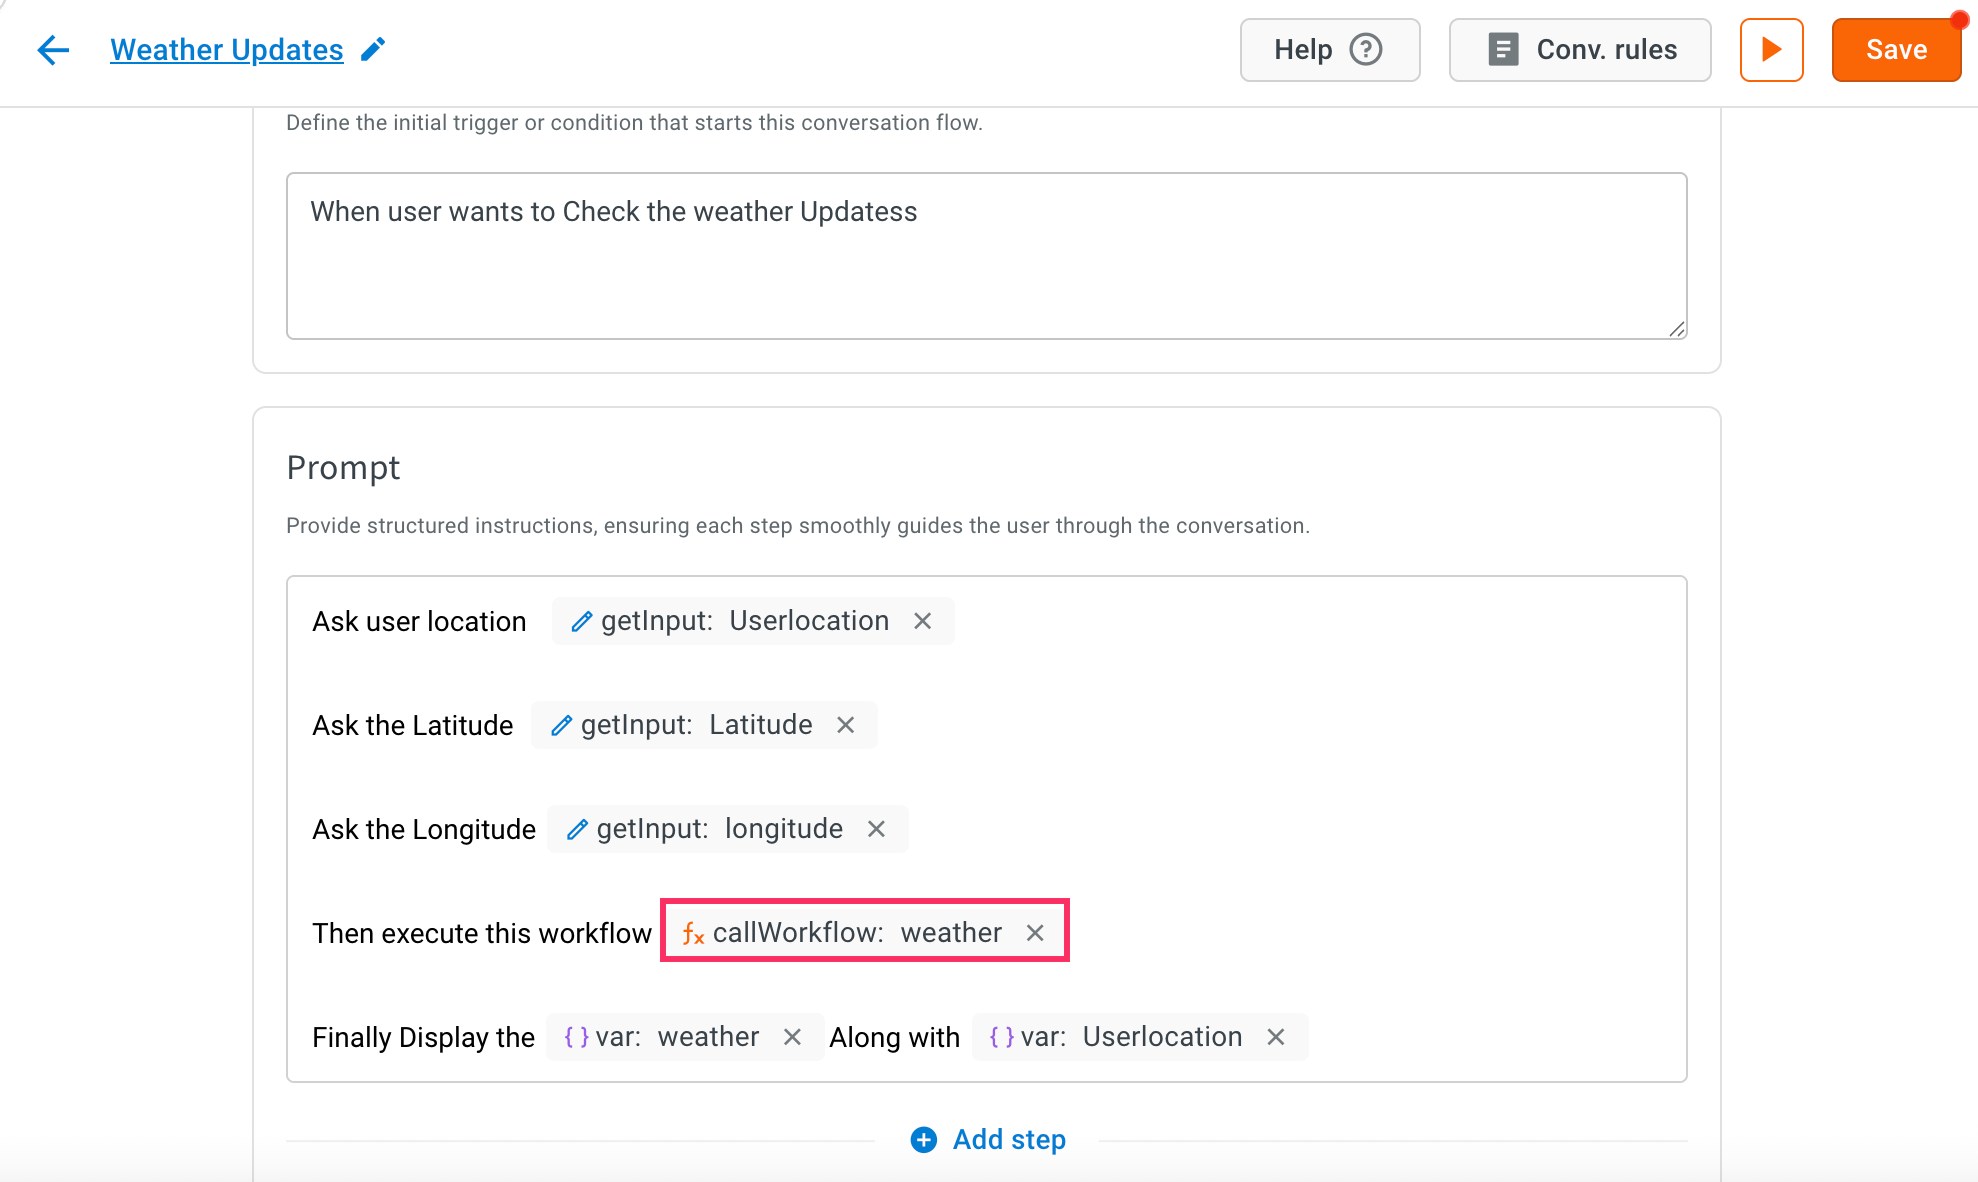
Write a prompt that asks the user for their location. Example: "Please share your location or enter latitude and longitude".
-
Call workflow action in the prompt and choose the GetWeatherUpdate workflow from the list.
-
Click the Edit icon and map the collected latitude and longitude to the workflow inputs and assign the output from the workflow to a variable.

-
Click Save to complete the configuration.
- To download the API logs, click here.
Refer to the following GIF to see the complete process of fetching weather updates using an API via a workflow: