Get input
Use Get input to collect and store user responses in variables, this allows the AI agent to reuse the data in future interactions. It ensures that inputs are validated before storing the input.
For example, if a user provides their name, the bot can use it in future intercations.
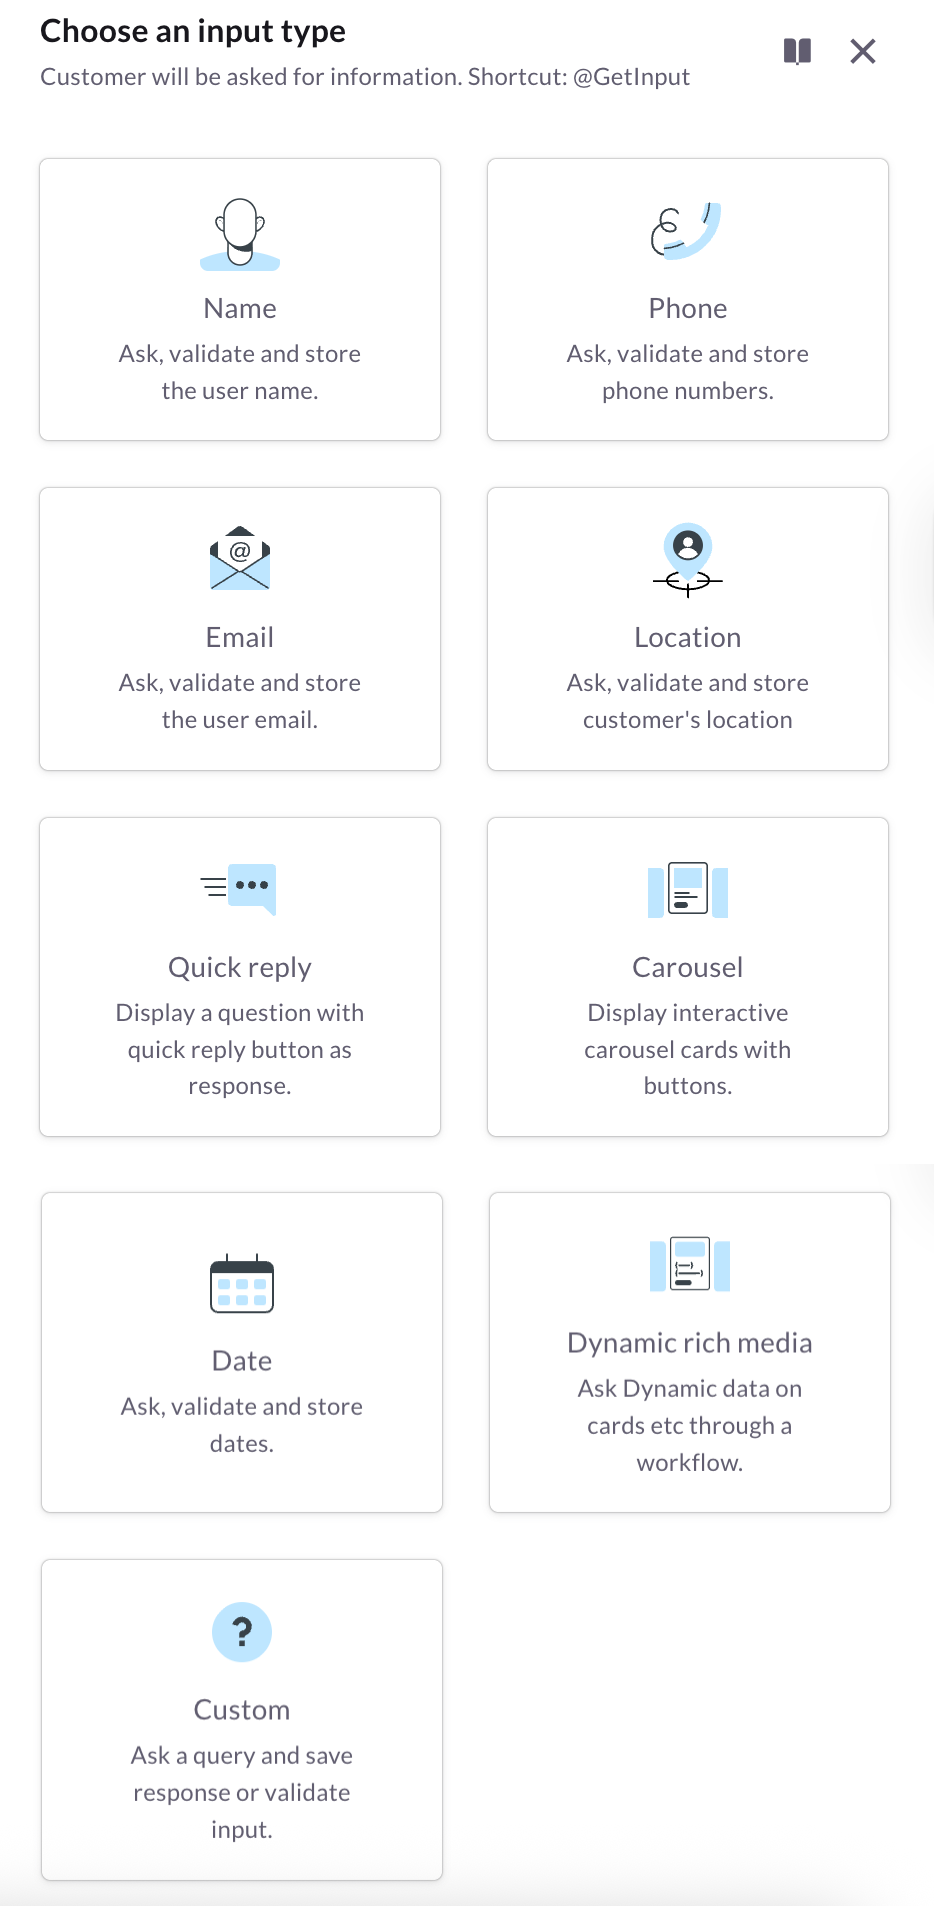
Types of inputs
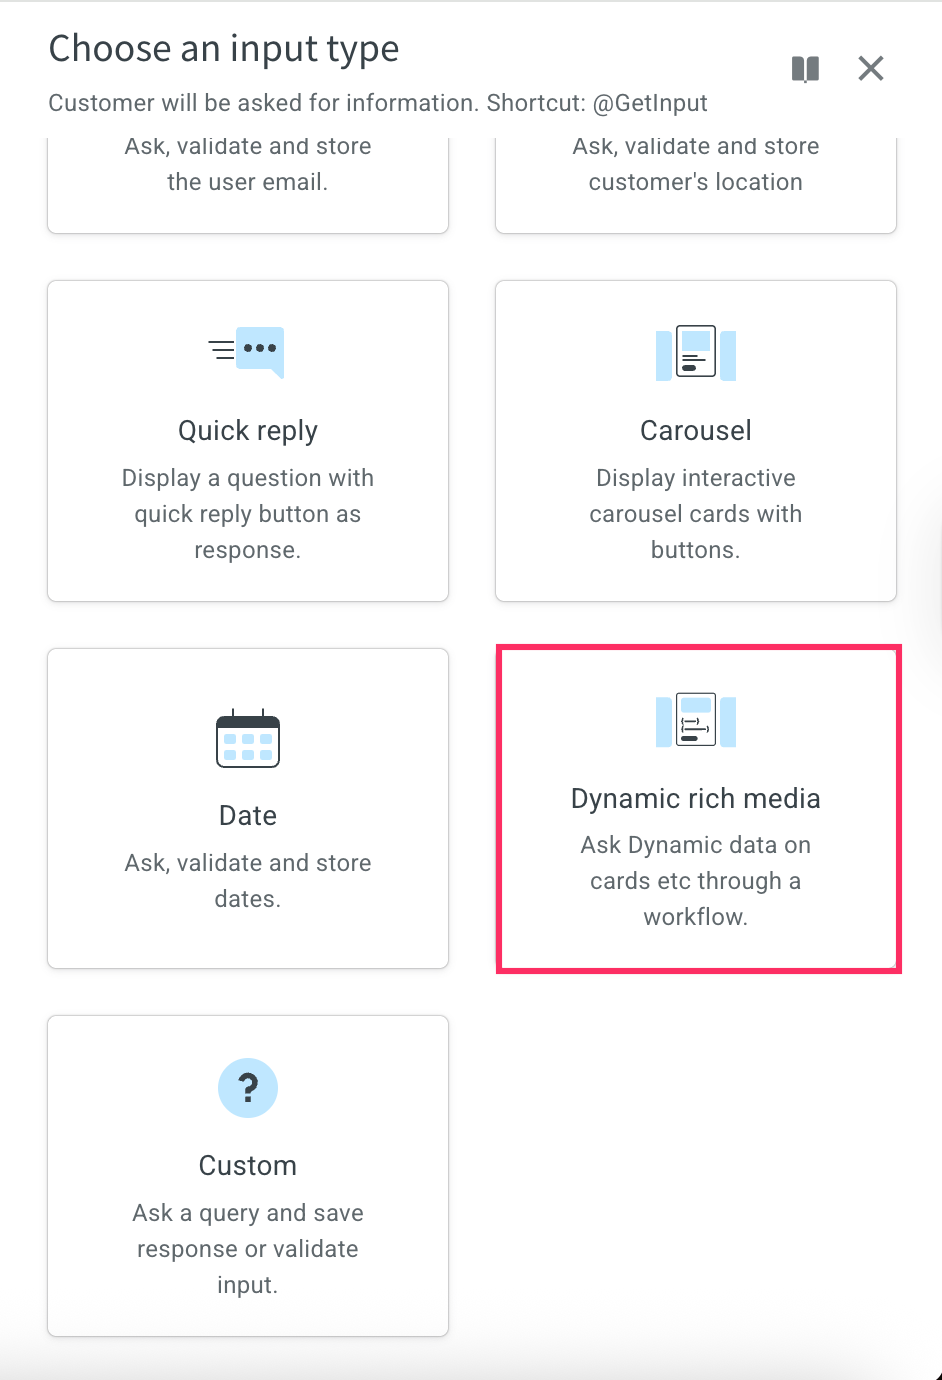
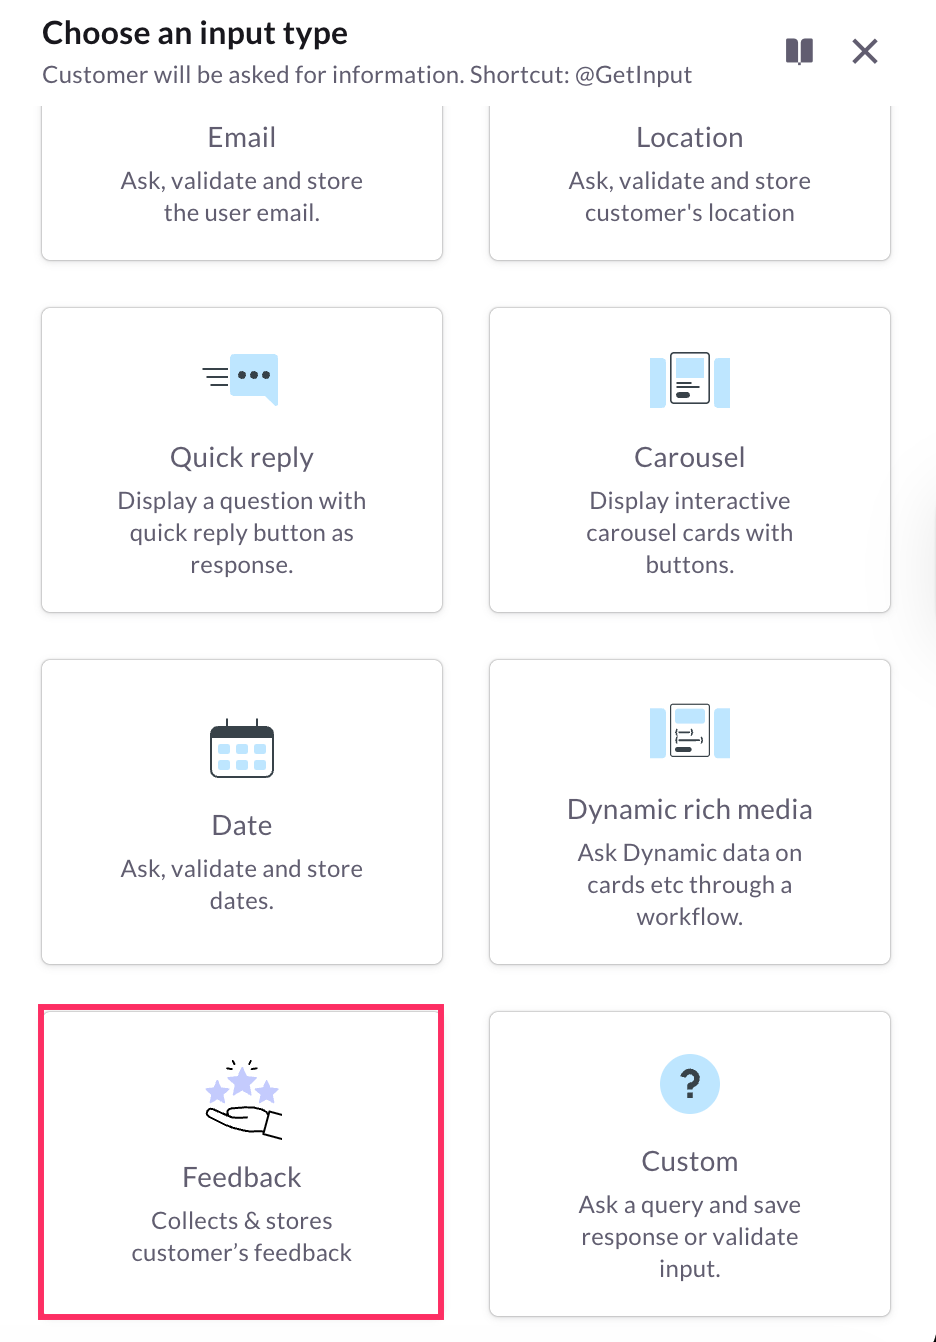
When creating an input, different input types can be selected based on the use case:
- Name – Captures the user’s name.
- Email – Collects the user’s email address.
- Phone – Gets the user’s phone number.
- Quick reply – Provides users with predefined response options.
- Carousel – Displays multiple options in a scrollable format.
- Date – Allows users to select or input a date.
- Custom – Enables a more flexible input type tailored to specific needs.
- Location - Captures the user’s location based on the user input.
- Dynamic rich media - Displays interactive options like cards with images and action buttons that are generated dynamically.
- Feedback - Collects the user's feedback.
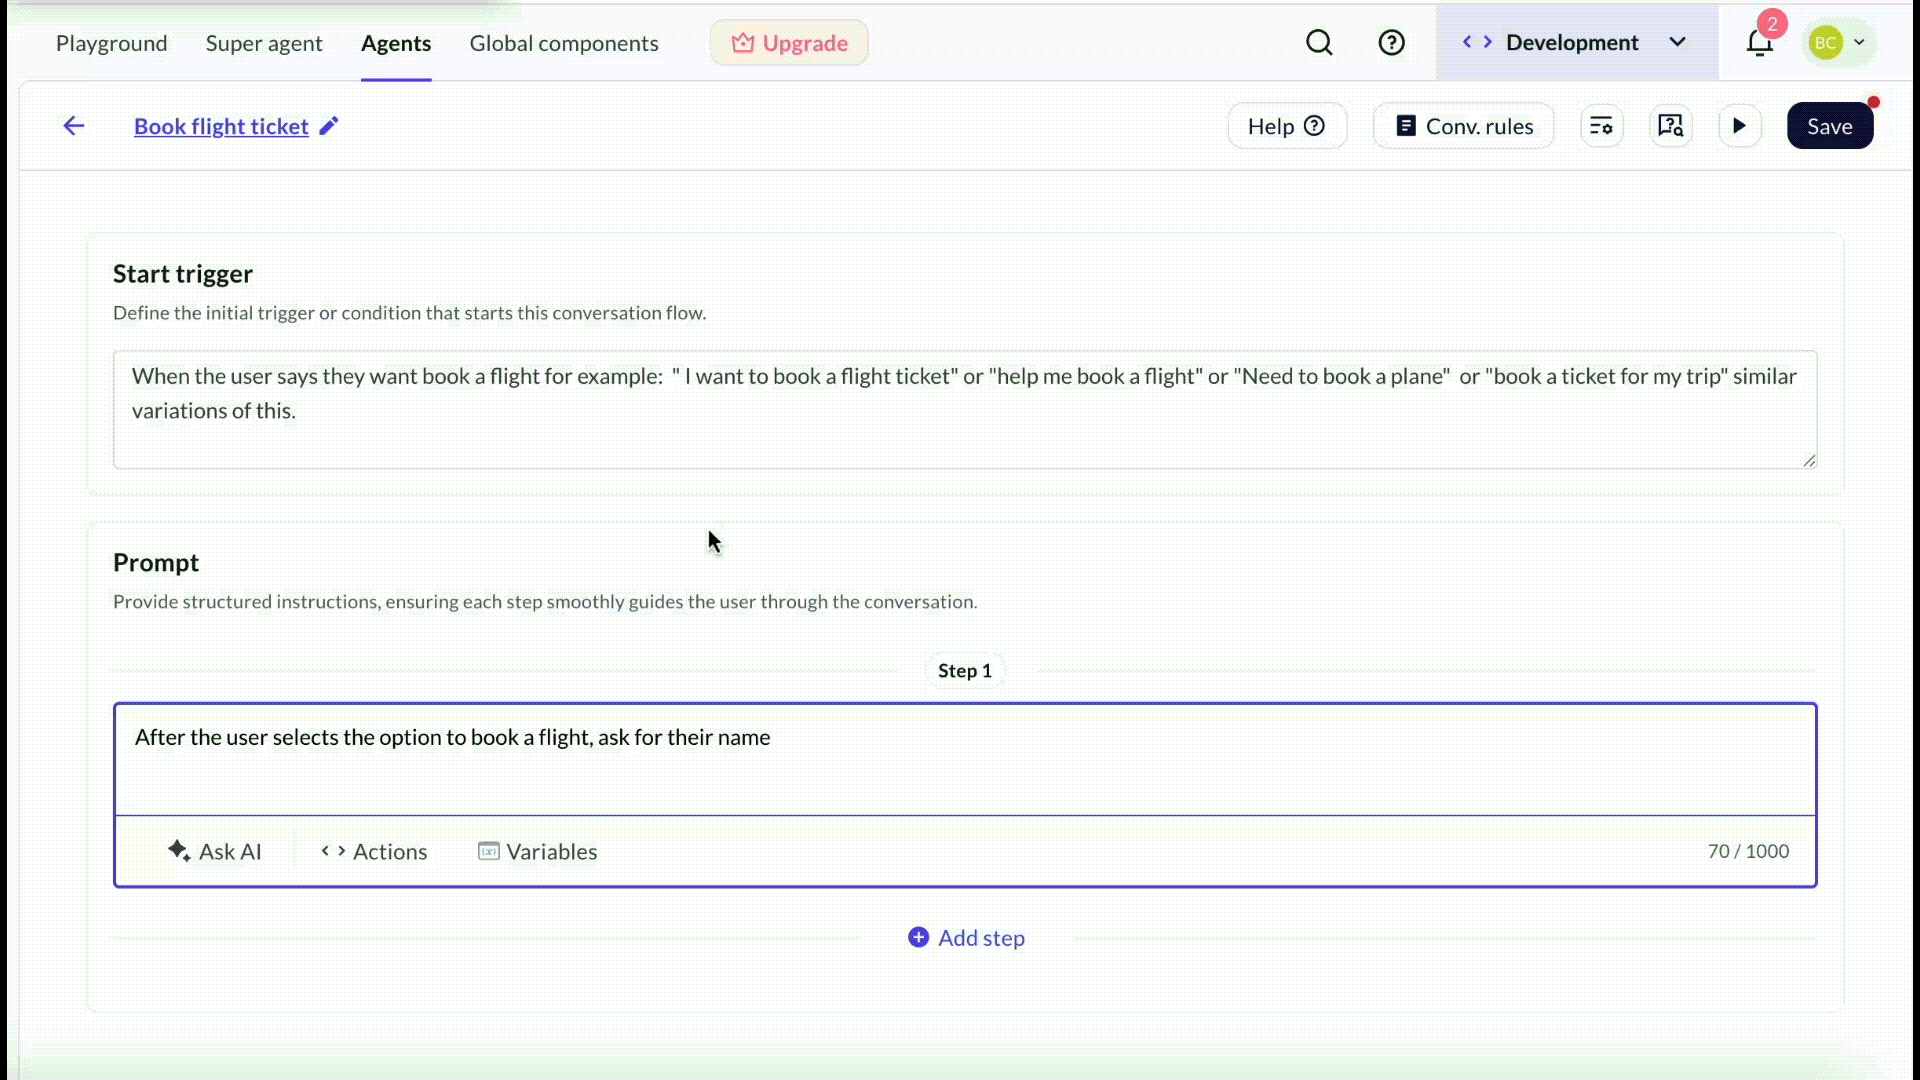
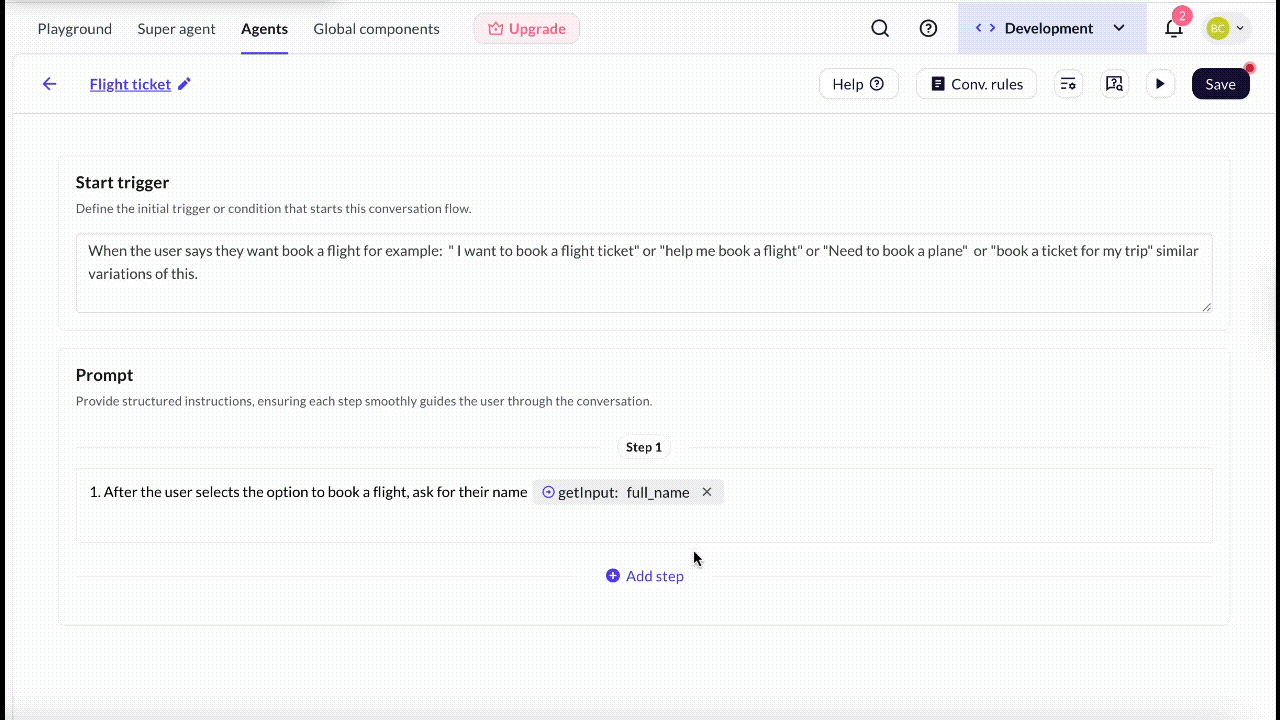
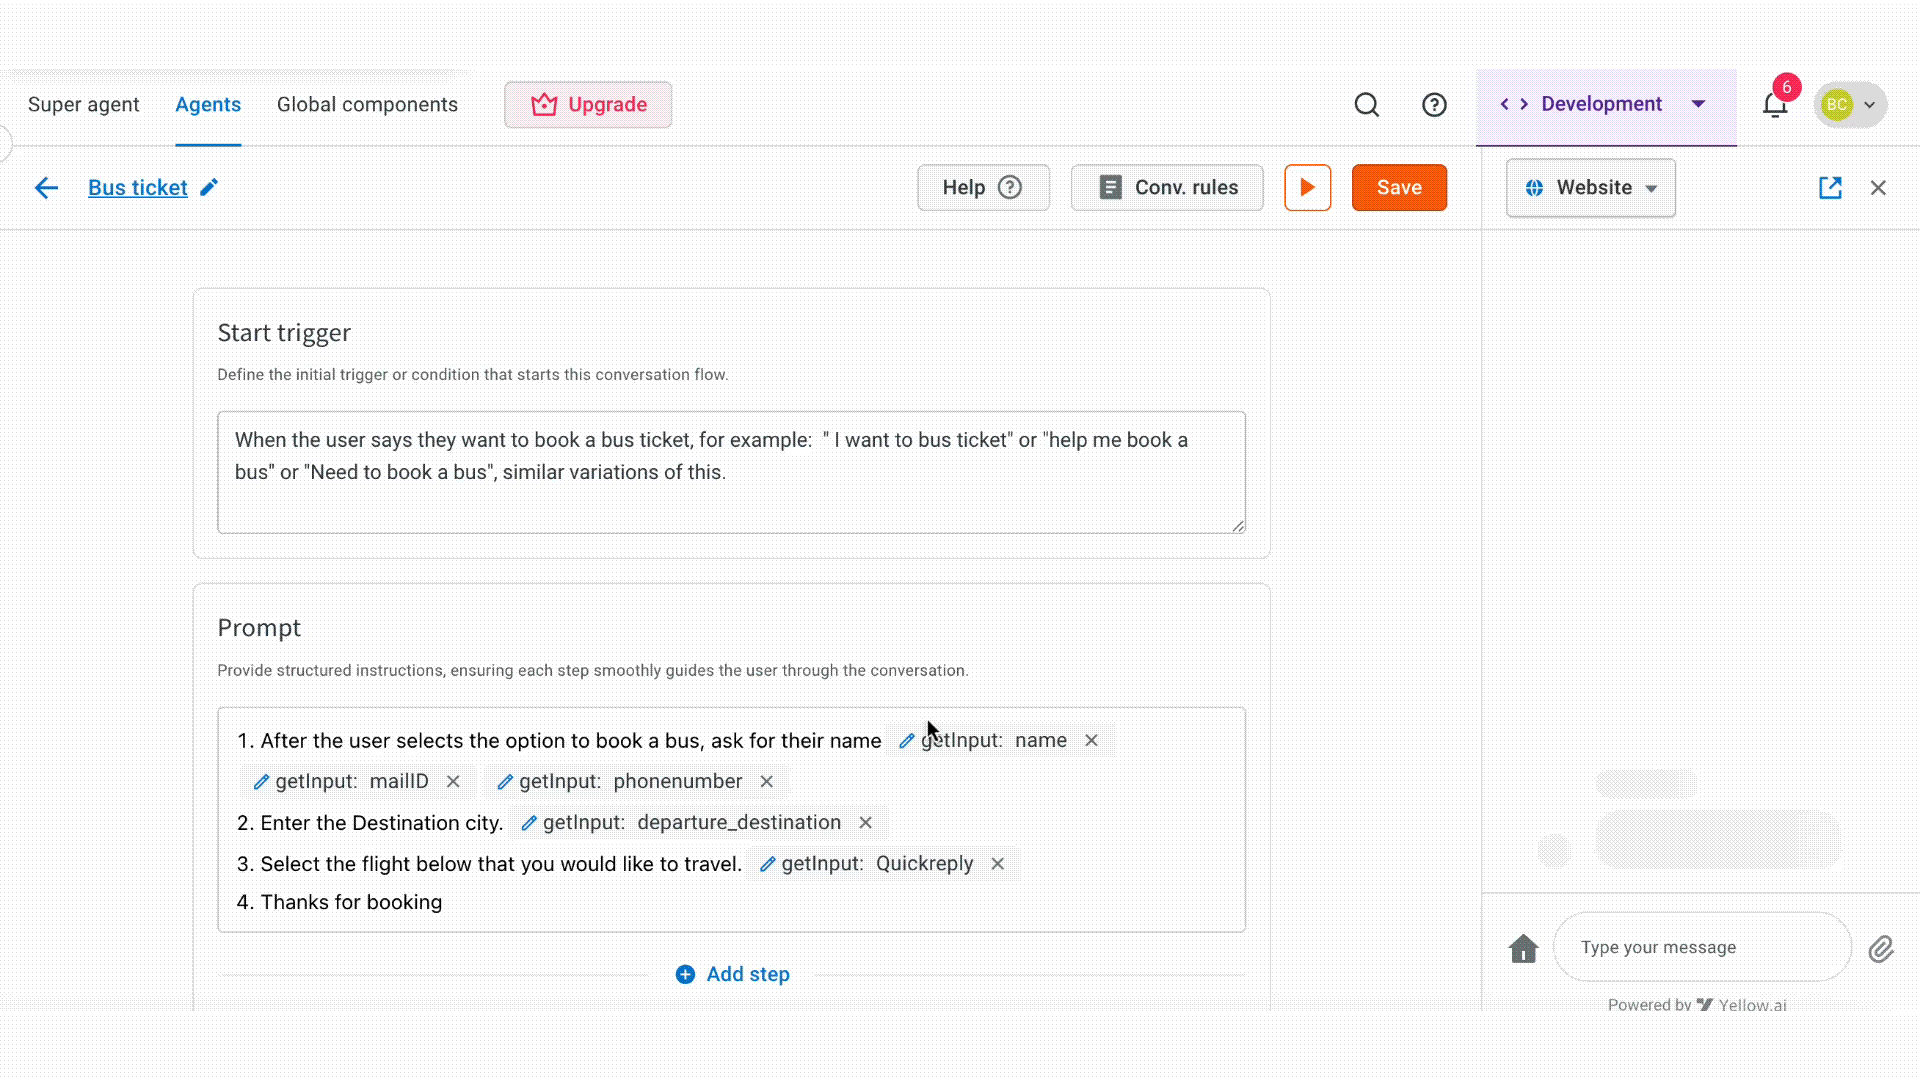
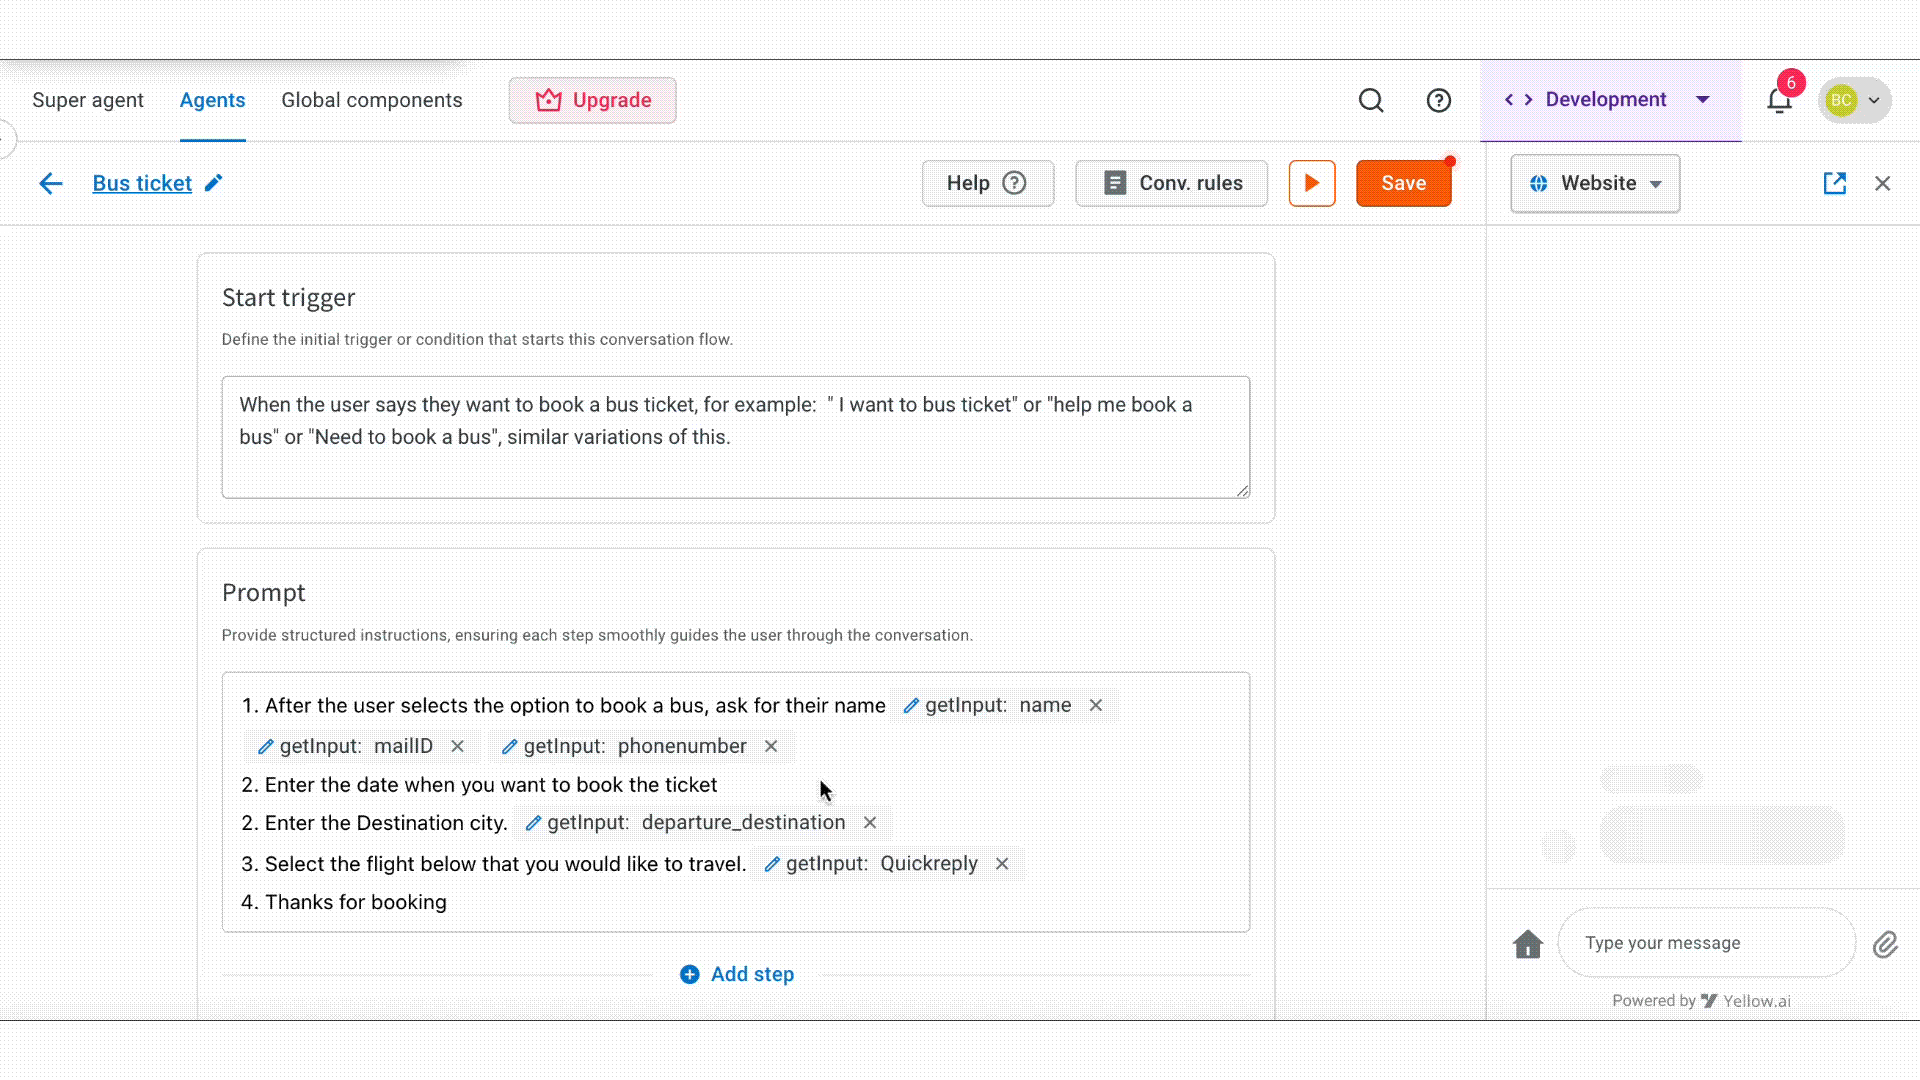
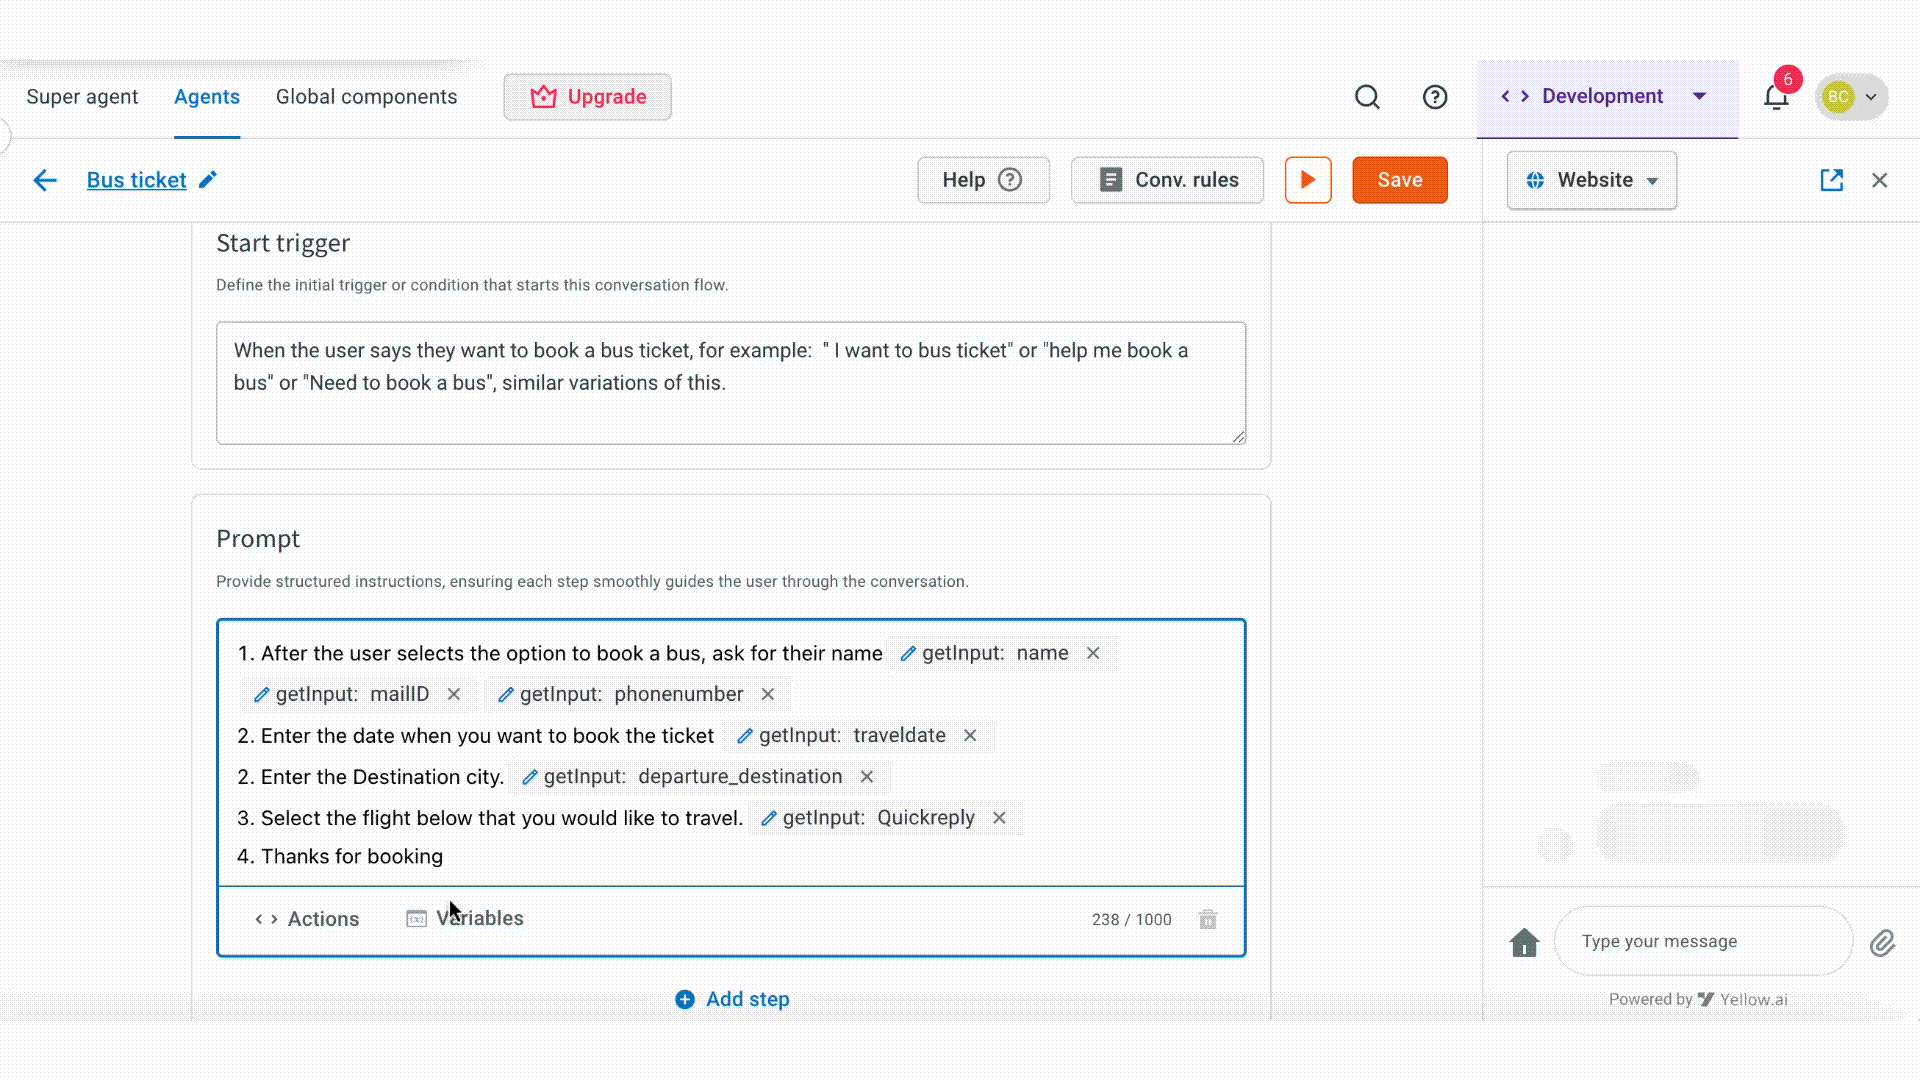
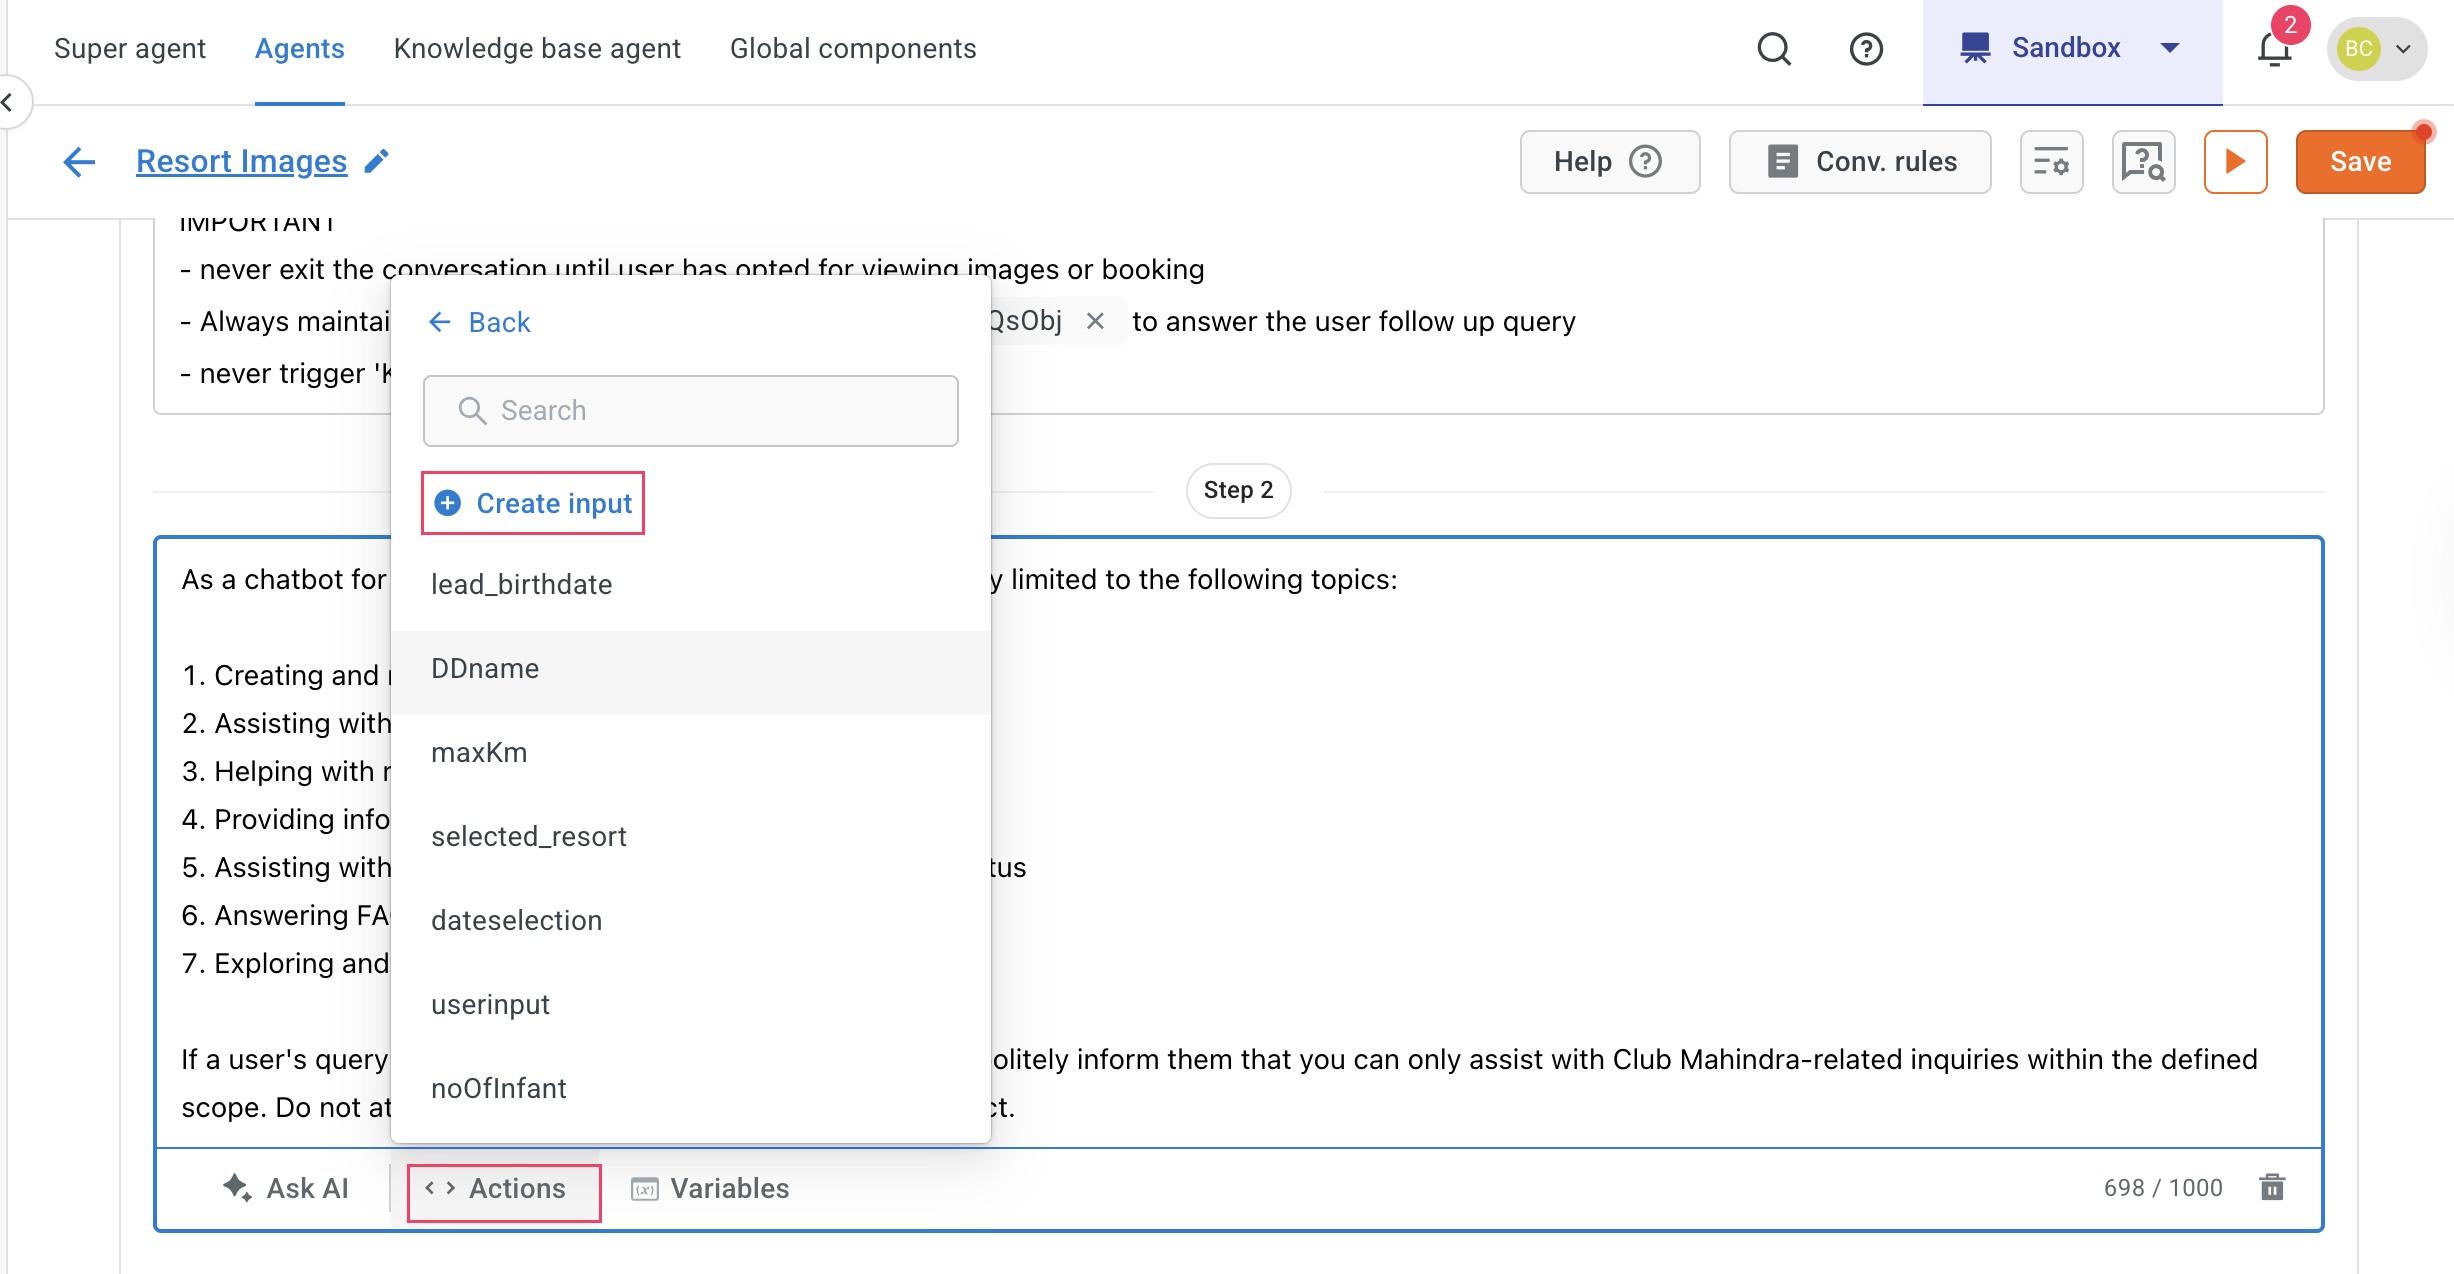
Create input
To create a input, follow these steps:
- Go to Agents > Prompt > click on Actions > Get input.
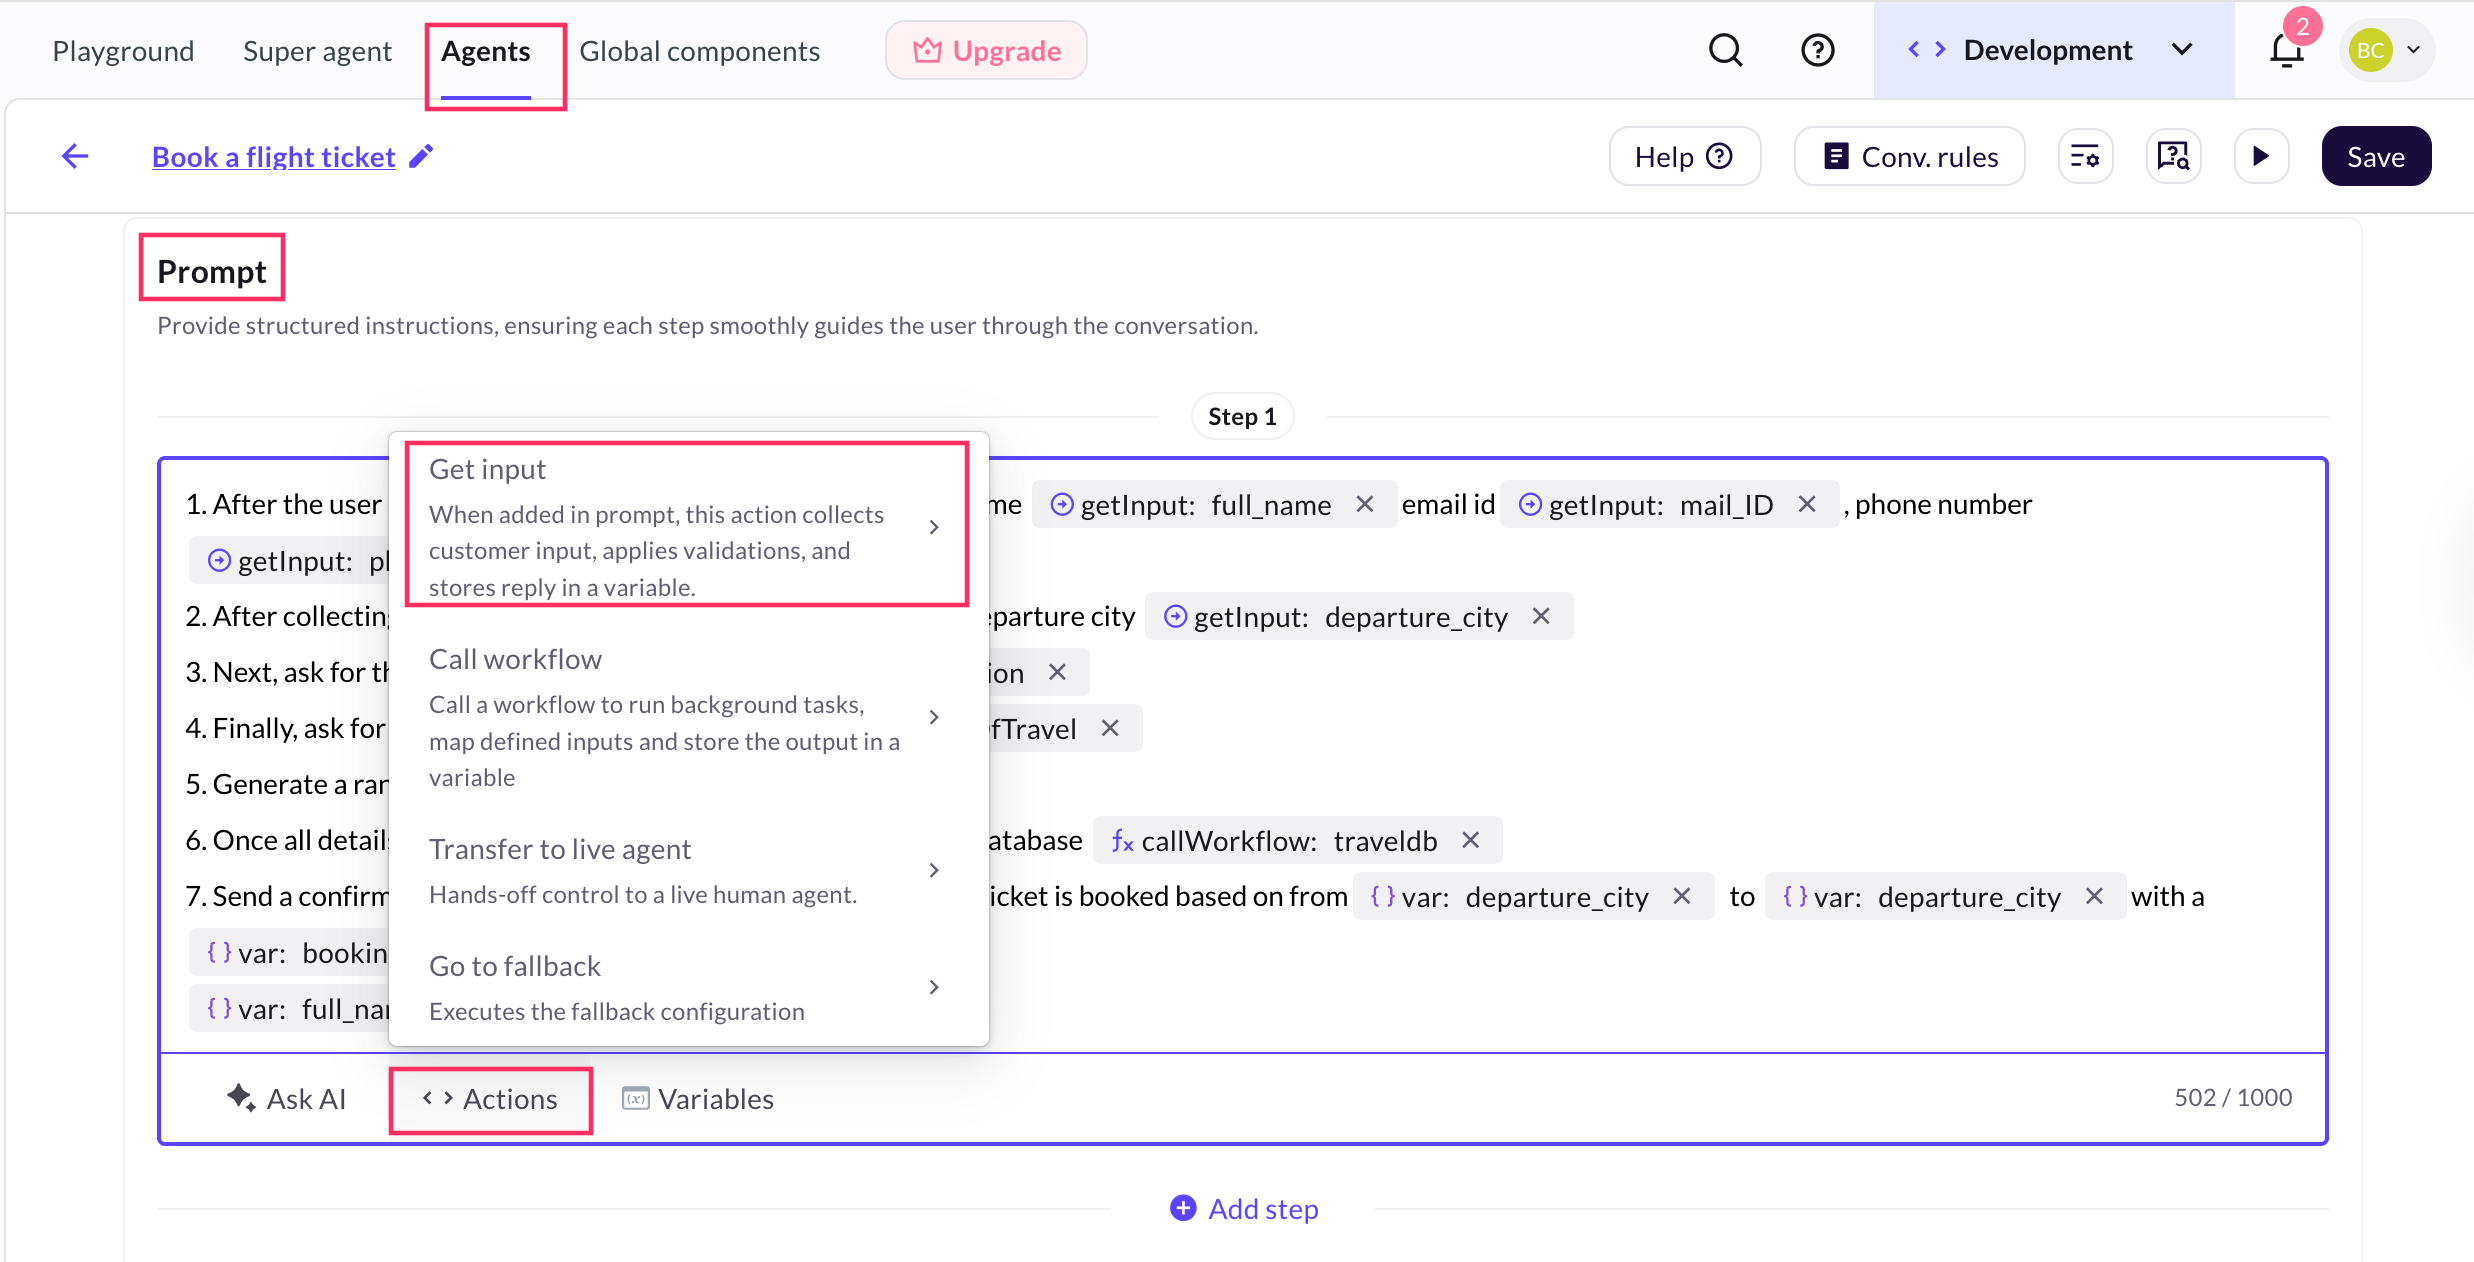
-
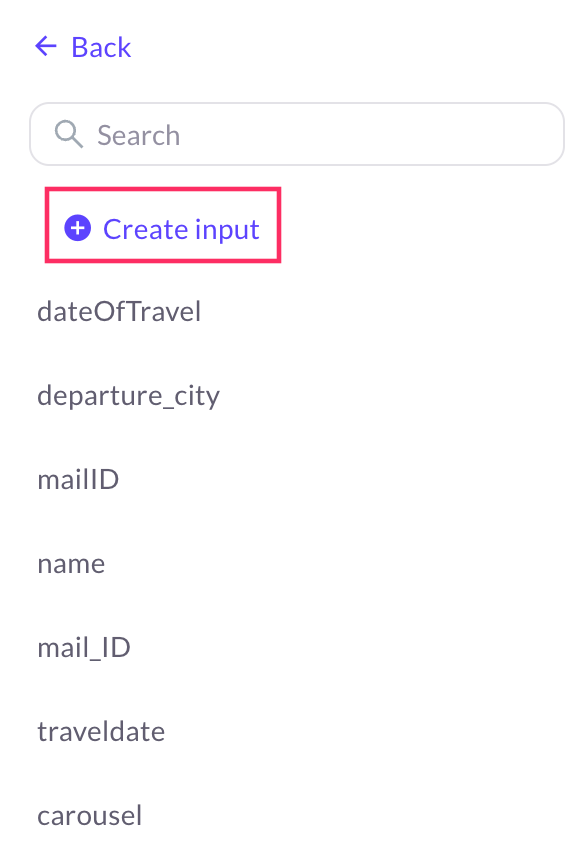
Click + Create input.
-
Select your preferred input type based on the use case.
Get name input
Use Get name input to capture and store the user's name during a conversation. This input remains available throughout the session and can be reused by referencing the same input name in the other conversations.
The table below describes the fields available in the Get Name Input action:
| Field name | Description |
|---|---|
| Input Name (Mandatory) | Defines the name of the input field where the user’s response will be stored. In this case, the field is labeled as Name. |
| Data type | Default data type is displayed. In this case, it is a String, meaning it only accepts text values. |
| Description | Provide additional details or context about the input field. This helps define how the AI agent will use the captured input. |
| Validation | Enter the validation rules to ensure the user provides valid input. Examples: – Allow upto 50 characters. – Reject names containing numbers. |
| Others | Enable Mark User Input as Optional checkbox: * If checked, the user is not required to provide their name. * If unchecked, the bot will prompt the user until a valid name is provided. |
Email
Use Get Email input to collect and store a user’s email address during a conversation.
The table below describes the fields available in the Get Email input action:
| Field name | Description |
|---|---|
| Input name (Mandatory) | Specifies the name of the variable where the user’s input will be stored. |
| Data type | Default data type is displayed. For email input, it is set as String. |
| Description (Mandatory) | Provide context about the input field. Example: "Collect user email ID" to inform the AI agent about the purpose of this input. |
| Validation | Ensures the user input follows the correct format. The current validation rule requires the email to contain exactly one "@" symbol to be considered valid. Additional validation rules can be added. |
| Example of User Input | Provide an example of a valid email address, such as "[email protected]", to guide users in entering the correct format. |
| Others | Enable Mark user input as optional checkbox: * If checked, users are not required to provide an email address. * If unchecked, the bot will prompt the user until they enter a valid email. |
Phone
Use the Get Phone input action to collect and store a user’s phone number during a conversation. The collected number is saved in a variable and can be used for tasks such as sending notifications, verifying the user’s identity, or linking to order details.
The table below describes the fields available in the Get Phone Input action:
| Field name | Description |
|---|---|
| Variable name (Mandatory) | Define the variable where the user’s phone number will be stored. Example: mobile_Number. |
| Data type | Specify the type of data expected from the user. For phone input, it is set as Number. |
| Description | Allows the user to provide additional details about the purpose of collecting the phone number. This field helps define how the AI agent will use the input. |
| Examples of expected input | Provides sample responses to help users understand the expected input format. Example: +91 9876543210. |
| Validation | Ensures the user input follows the correct format. In this case, users must select a country code to ensure proper phone number formatting. Additional validation rules can be added if needed. |
| Always save number with country code | If this option is enabled, the system will store the phone number with a country code, even if the user does not provide it. |
| Mark user input as optional | If checked, the user is not required to provide their phone number. If unchecked, the bot will prompt the user until a valid phone number is provided. |

Add Quick reply buttons to the AI agent
Use quick replies to present users with tap-to-select response options. They simplify input, reduce typing effort, and keep conversations on track.
The table below describes the available configuration fields:
| Field name | Description |
|---|---|
| Input name | Specifies the name of the input field where the selected quick reply will be stored. |
| Data type | Default data type is displayed. For quick reply input, it is set as String. |
| Description | Provide additional context or instructions about the quick reply input. |
| Dynamic options | Toggle this option to generate quick reply choices dynamically using variables. |
| Options | Click + Add to create static quick reply choices for users. More options can be added as required. |
| Others | Enable Allow users to type input manually (Checkbox) to protect sensitive information by replacing the characters with symbols to maintain privacy. |
Refer to the following GIF to see how the Quick reply input will work:
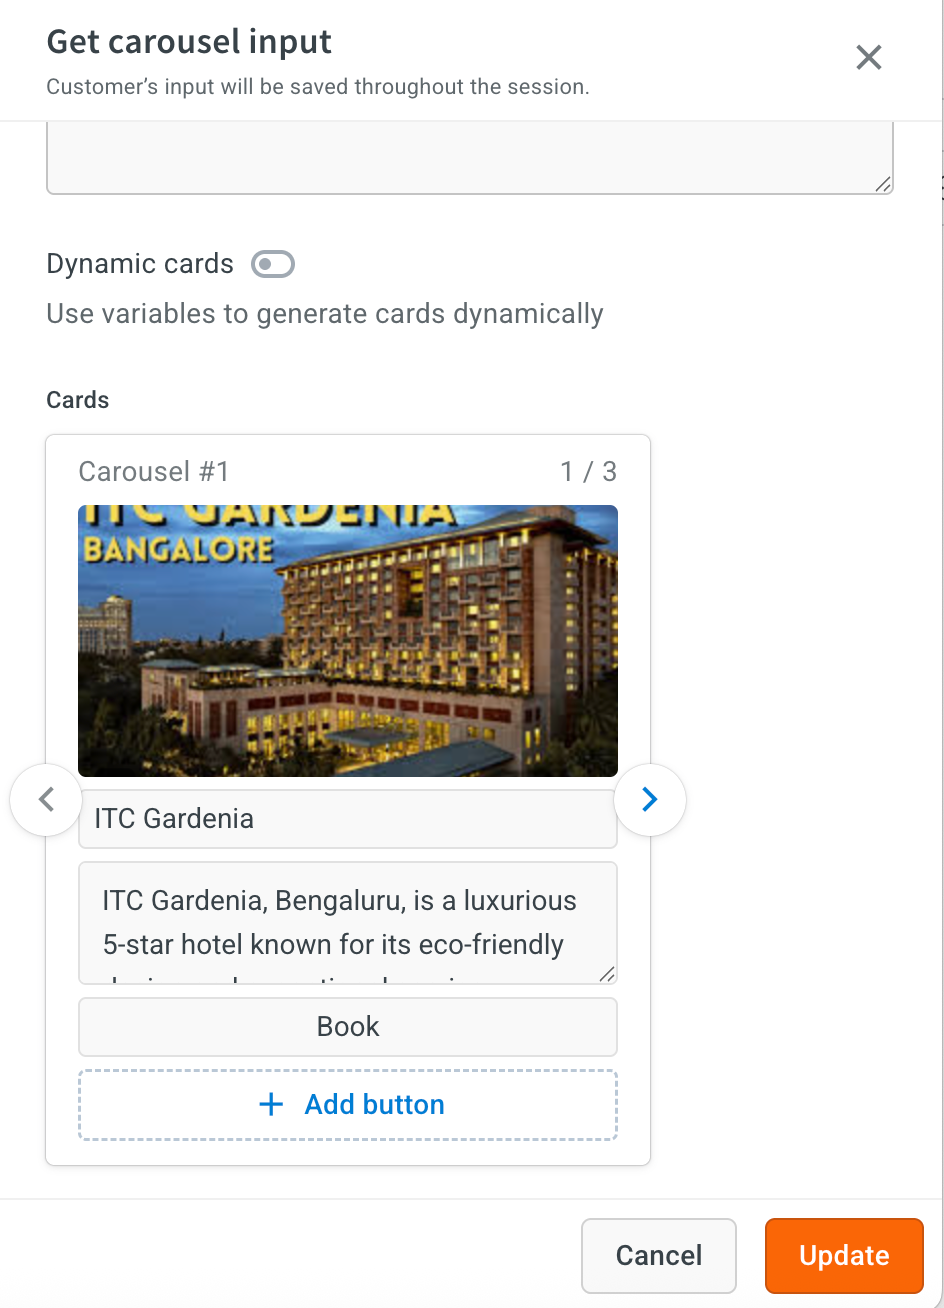
Carousel
Use a carousel to present multiple options as horizontally scrollable cards. Each card can contain an image, title, description, and one or more buttons for user actions.
The table below describes each field in the carousel configuration:
| Field name | Description |
|---|---|
| Input name | The variable name where the selected response from the carousel will be stored. |
| Data type | Default data type is displayed. For carousel input, it is set as String. |
| Description | Enter a brief explanation of the input's purpose to provide clarity on what information is being collected. |
| Dynamic response | Toggle this option to generate carousel options dynamically using variables instead of static data. |
| Cards | The individual items displayed in the carousel, which can include images, text, and buttons. Image: Allows you to upload an image (less than 10MB) to display the visual representation of the carousel item. Title: The main heading for the carousel item, giving a quick overview of the option. Description: Additional details about the carousel item to provide context to users. Buttons: Click + Add button to add interactive buttons for each carousel item, enabling actions such as selecting an option or opening a link. |
| Others | Enable Allow users to type input manually (Checkbox) to enable users to type a response instead of selecting a button in the card. |
Date
Use the date input field to collect structured, date-specific responses from users. You can apply validation to ensure the input falls within a defined range or meets formatting requirements.
The table below describes each field in the date configuration:
| Field name | Description |
|---|---|
| Input name | Enter the name where the user's selected date will be stored. |
| Data type | Default data type is displayed. For date input, it is set as "Date". |
| Description | A brief explanation of the purpose of the date input field. |
| Validation | Ensures that the entered date meets specified constraints. Range: Min. / Max: Allows setting a minimum and maximum date range to restrict user input within a valid timeframe. Custom instructions: Specifies the format in which the date should be entered or displayed (example, YYYY-MM-DD, MM/DD/YYYY). |
| Others | Enable Mark user input as optional to allow users to skip providing a date if they prefer not to share it. |
Custom
Use a custom field to collect user input in a specific format, apply validation rules, and store the response in a variable for later use. This field is ideal for capturing data like order IDs, ZIP codes, or any other input requiring tailored validation.
The table below describes each field in the custom input configuration:
| Field name | Description |
|---|---|
| Input name | Enter the name of the custom variable where the user's input will be stored. This variable can be used in the conversation. |
| Data type | Select the preferred data type based on the custom input such as String or Number. |
| Description | Enter a brief explanation of what the field is used for. |
| Example of user input | Provides a sample input to guide the user toward the correct format. For example: “CUST1234” for a customer ID. |
| Validation | Ensures that the user input follows specific rules or formats. Add custom validation: You can define specific rules that the user’s input must follow. This ensures that the AI agent collects accurate and correctly formatted data based on your business requirements. |
| Others | Use the Mark user input as optional checkbox to allow users to skip this question if they prefer not to provide the information. |
Location
Use the Get Location input action to collect and store a user’s location during a conversation. The collected location is stored as an object variable and can be used for tasks such as coordinating delivery services, suggesting nearby options, or validating service availability based on the user’s area.
The table below describes the fields available in the Location action:
| Field name | Description |
|---|---|
| Variable name (Mandatory) | Define the variable where the user’s location will be stored. Example: user_Location. |
| Data type | Default data type is displayed. For quick reply input, it is set as Object. |
| Description | Allows the user to provide additional details about the purpose of collecting the Location. Example: "Please share your current address for delivery". |
| Select allowed countries | Allows you to restrict the location input to specific country codes. Useful when services are limited to certain regions. |
| Add custom instruction | Optionally add more specific instructions or hints to guide the user in providing their location. |
| Mark user input as optional | If this option is selected, the user is not required to provide their location. If unchecked, the agent will prompt the user until valid location data is shared. |

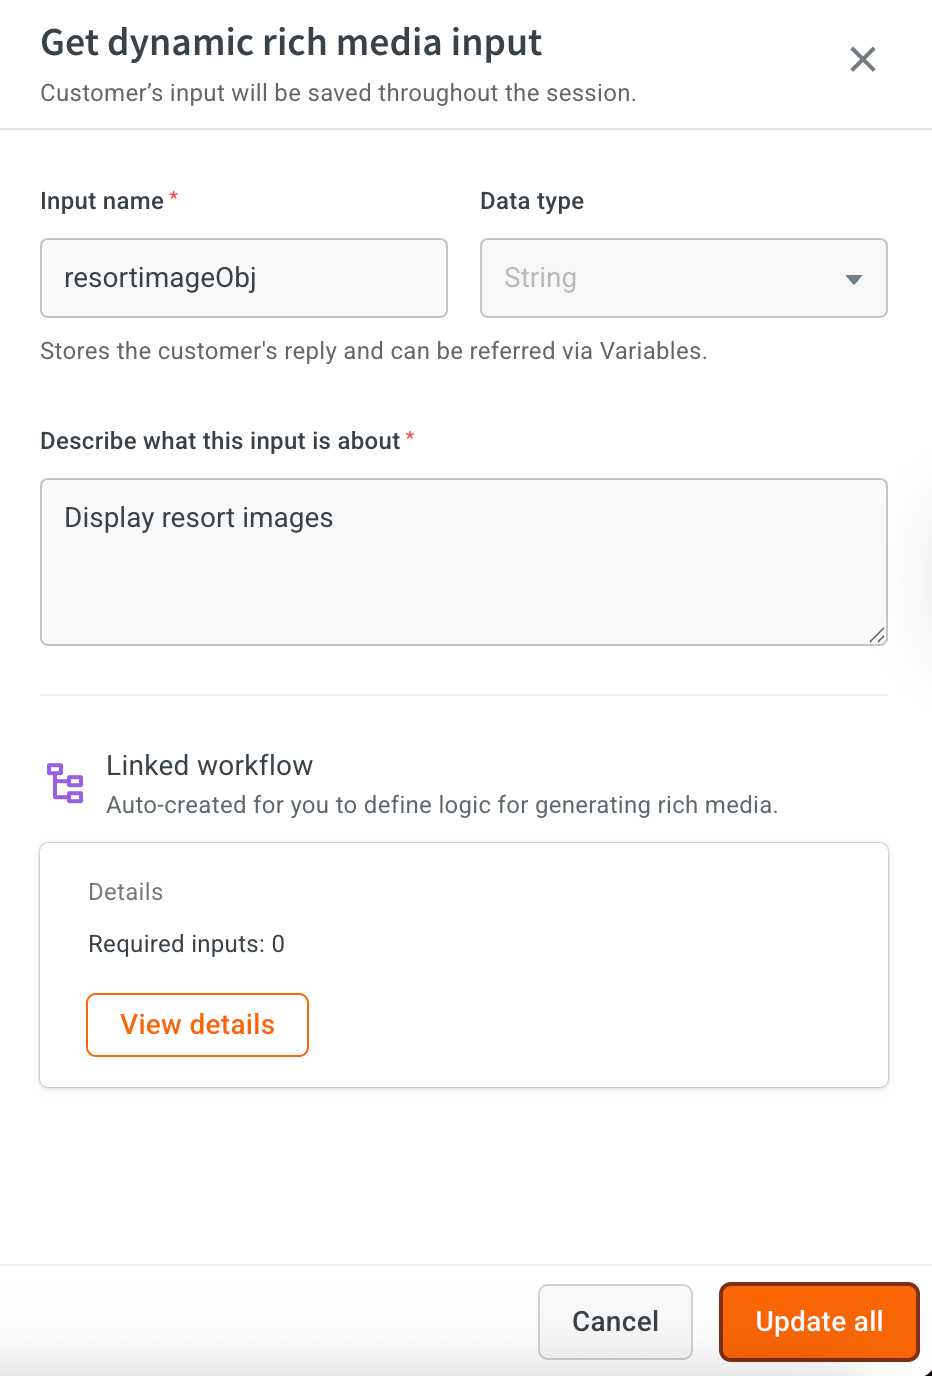
Dynamic rich media
Dynamic rich media is used to display interactive, visually rich options to users such as carousels or cards that are generated dynamically. These responses are fetched via APIs or from functions via workflow.
You can use Dynamic rich media when:
- You want to personalize the experience with updated, real-time data.
- The options are not static and need to change based on API responses.
- You want to display content in a more engaging and structured format, such as a carousel or card layout.
Examples:
It is useful in scenarios where user options need to be customized for example:
- Displaying a list of available resorts or hotels
- Showing product recommendations
- Listing support ticket summaries
- Offering multilingual responses based on user preferences
Supported Dynamic rich media:
- Quick replies
- WhatsApp List
- Cards
- File
- Image
- Video
- Whatsapp carousel
The table below describes the fields available in the Dynamic rich media action:
| Field name | Description |
|---|---|
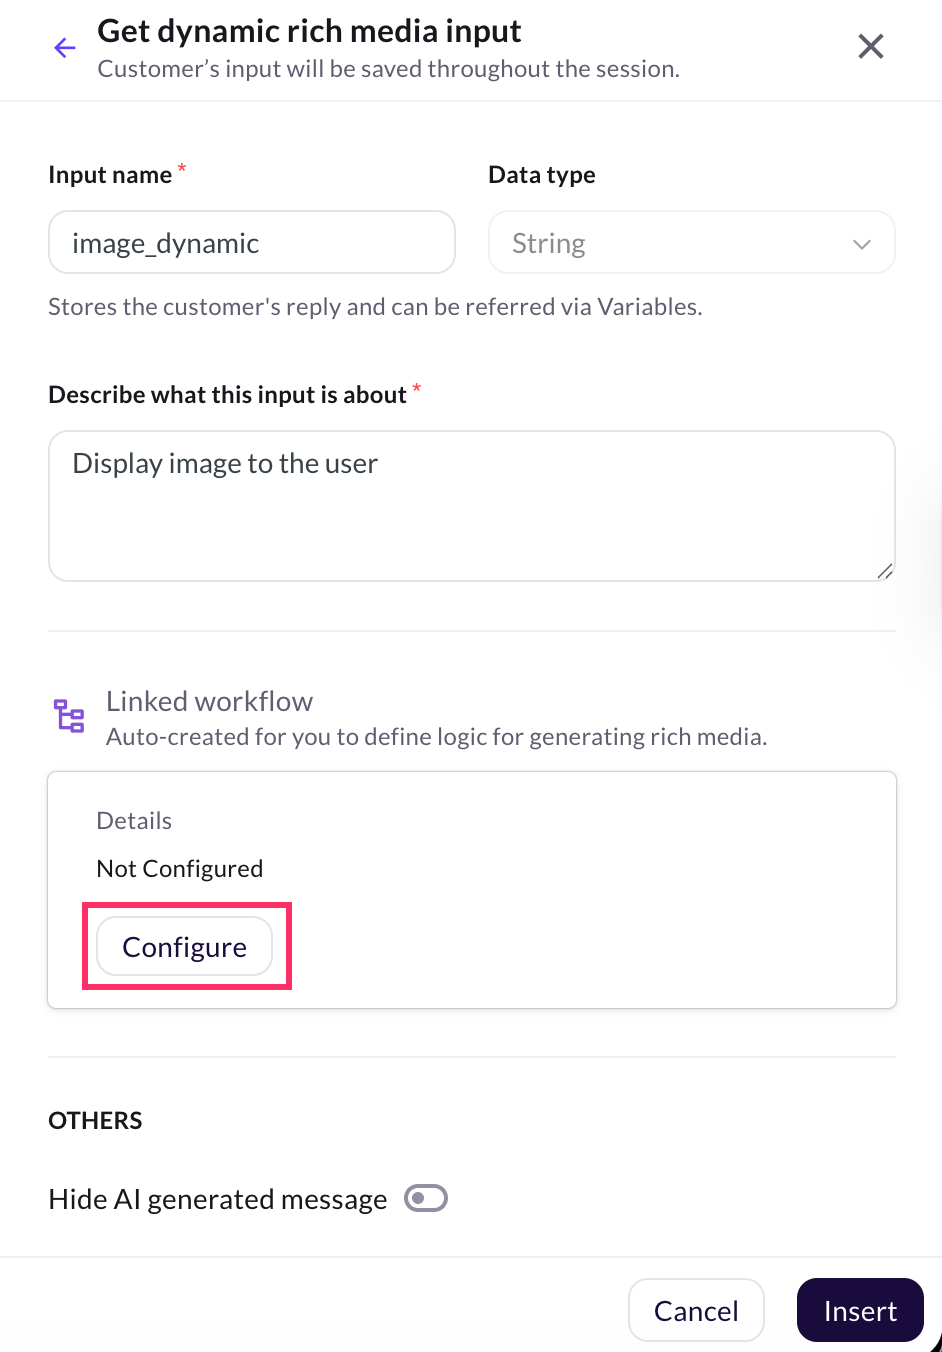
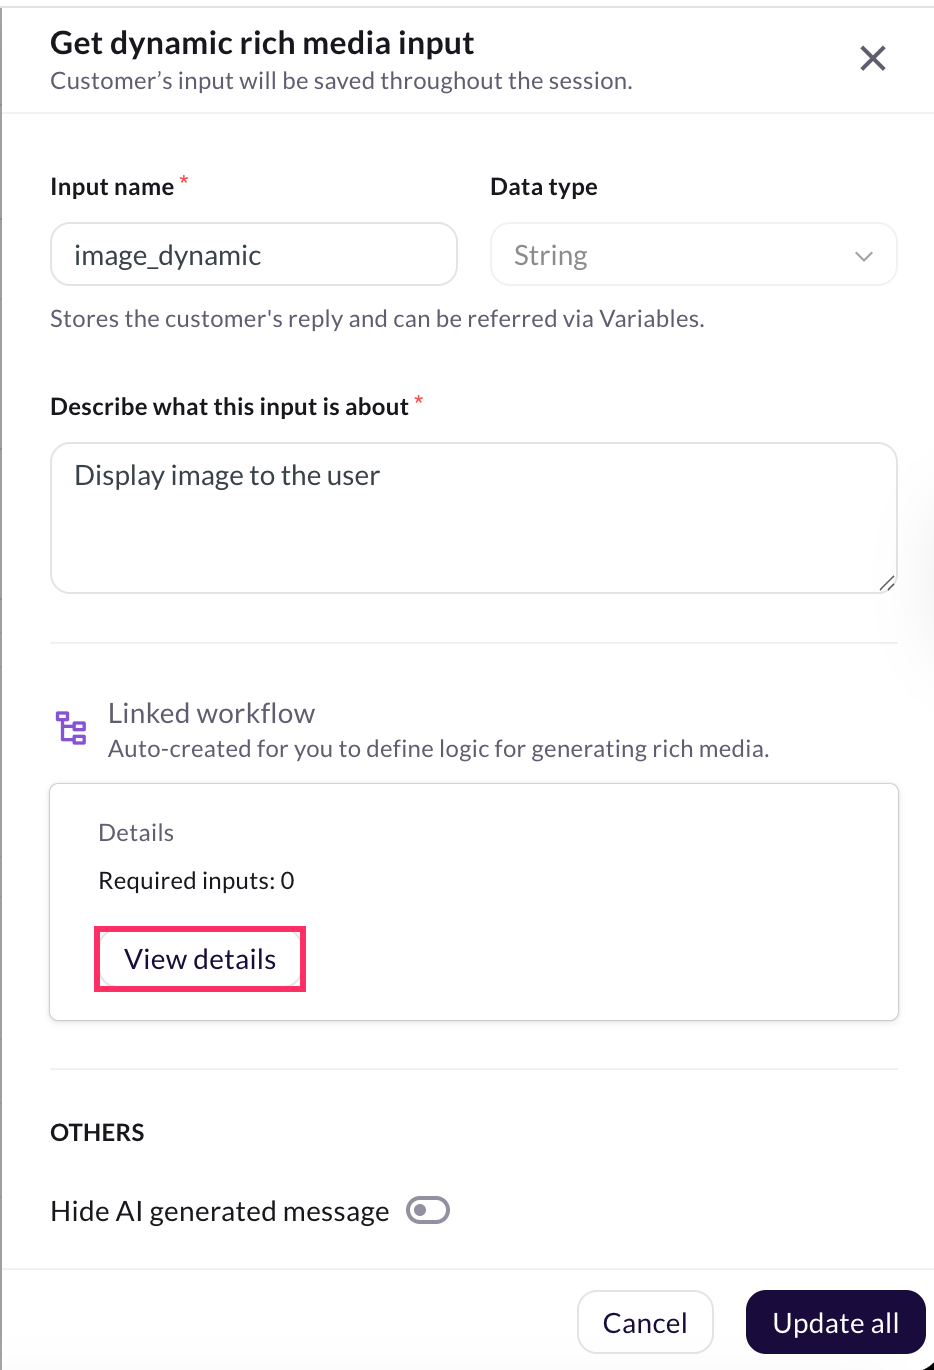
| Input name (Mandatory) | Define the name of the input field where the user’s response will be stored. |
| Data type | Default data type is displayed. In this case, it is a String, meaning it only accepts text values. |
| Description | Provide details of what this input is about. |
| Linked workflow | Select the workflow you created to fetch and format the data. |
How to configure Dynamic rich media
To configure and display dynamic rich media in your AI agent conversation, follow these steps:
-
Go to Prompts section and click Actions > Get input.
-
Select Dynamic rich media action.
-
Define the following fields:
i. Input name: Enter the Input name.
ii. Describe what this input is about: Provide details of what this input is about.
-
Click Configure.
-
Click Insert.
-
Click Save.
-
Click Edit icon of the Get input action.

-
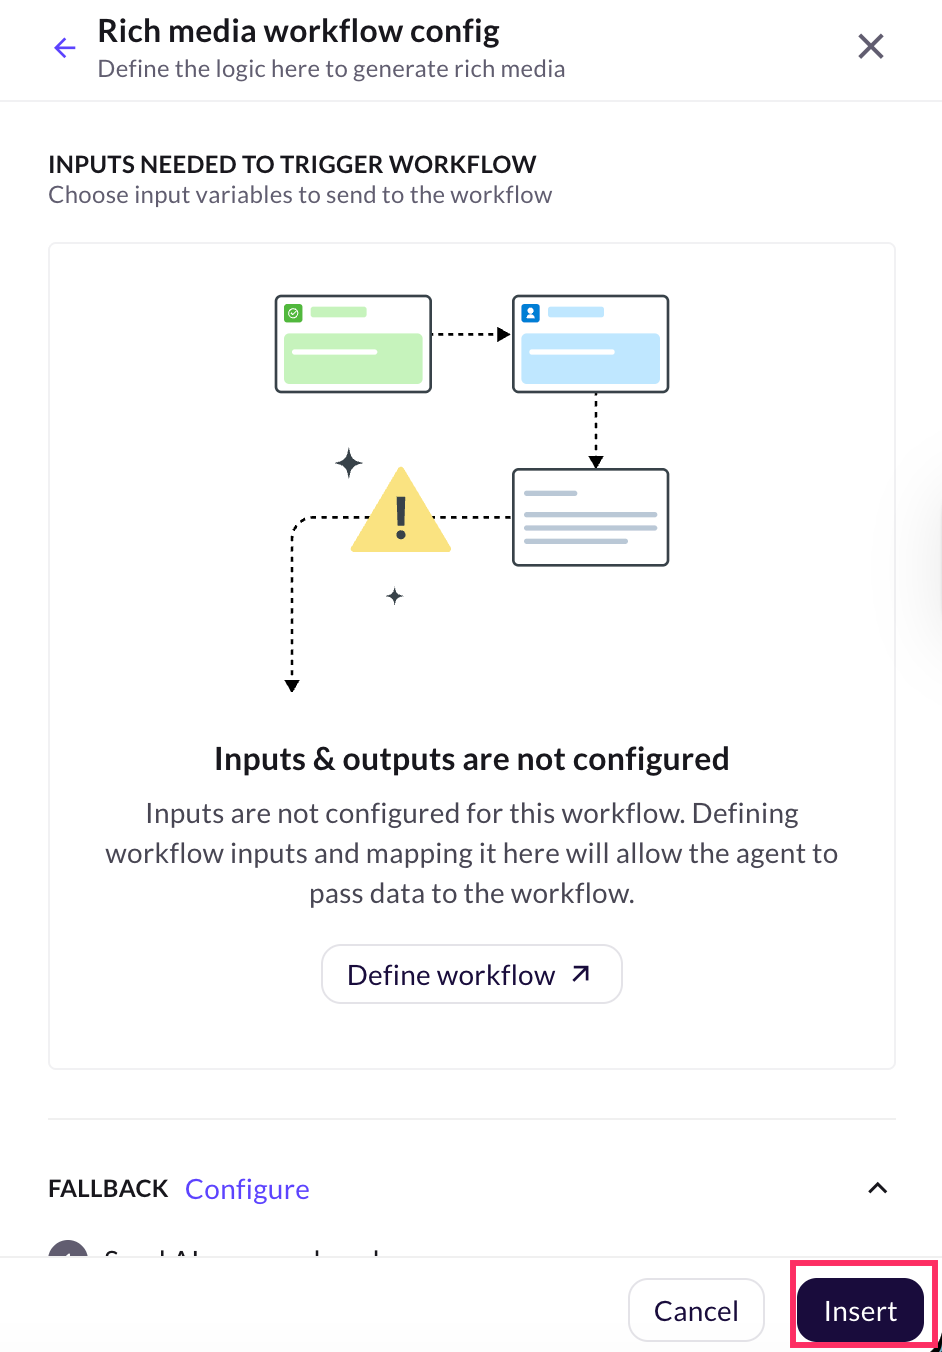
Click View details.
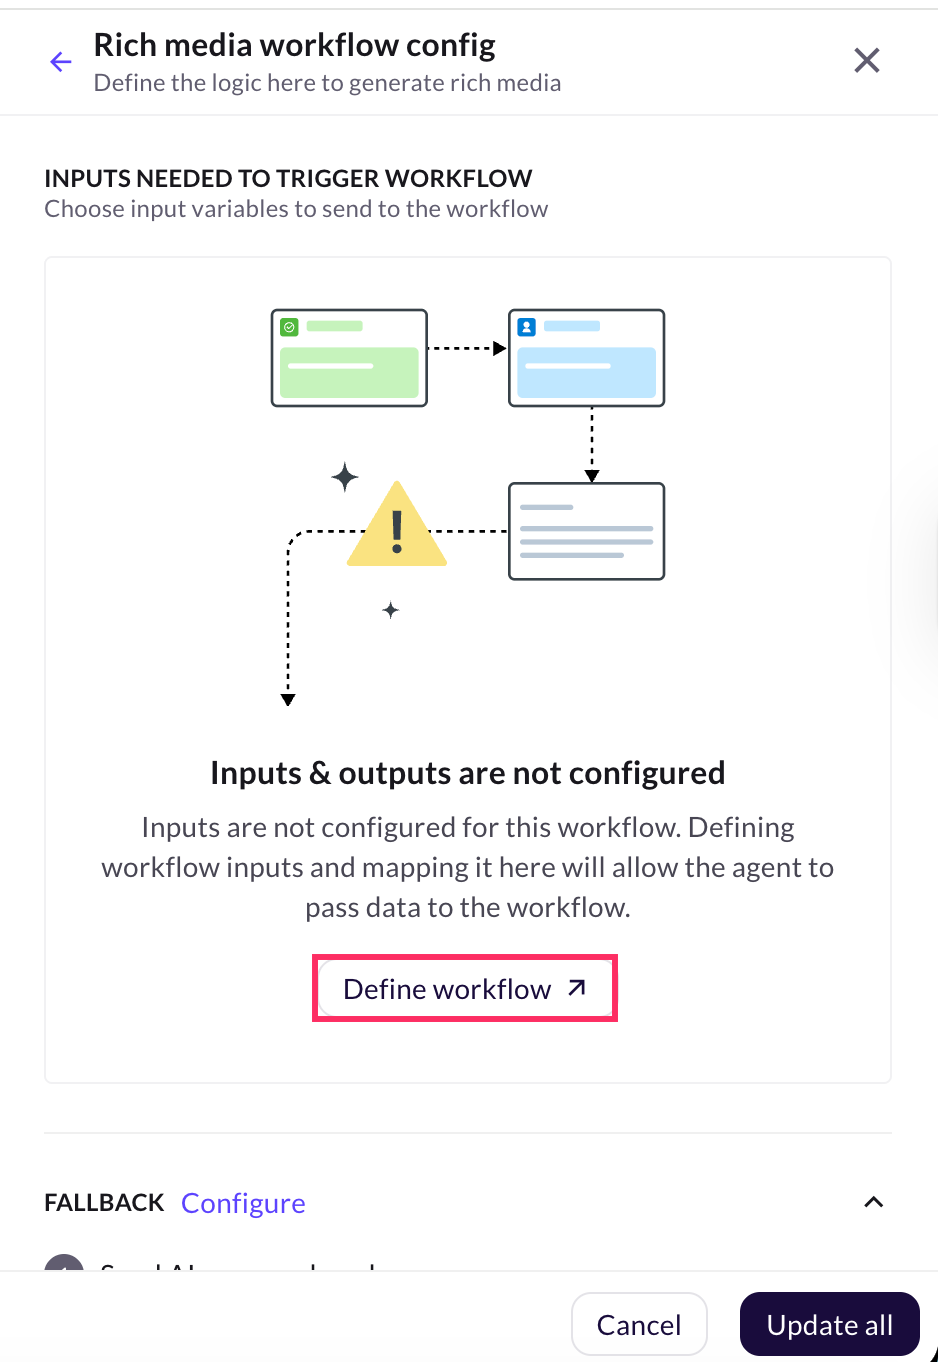
-
Click Define workflow to configure the workflow output.
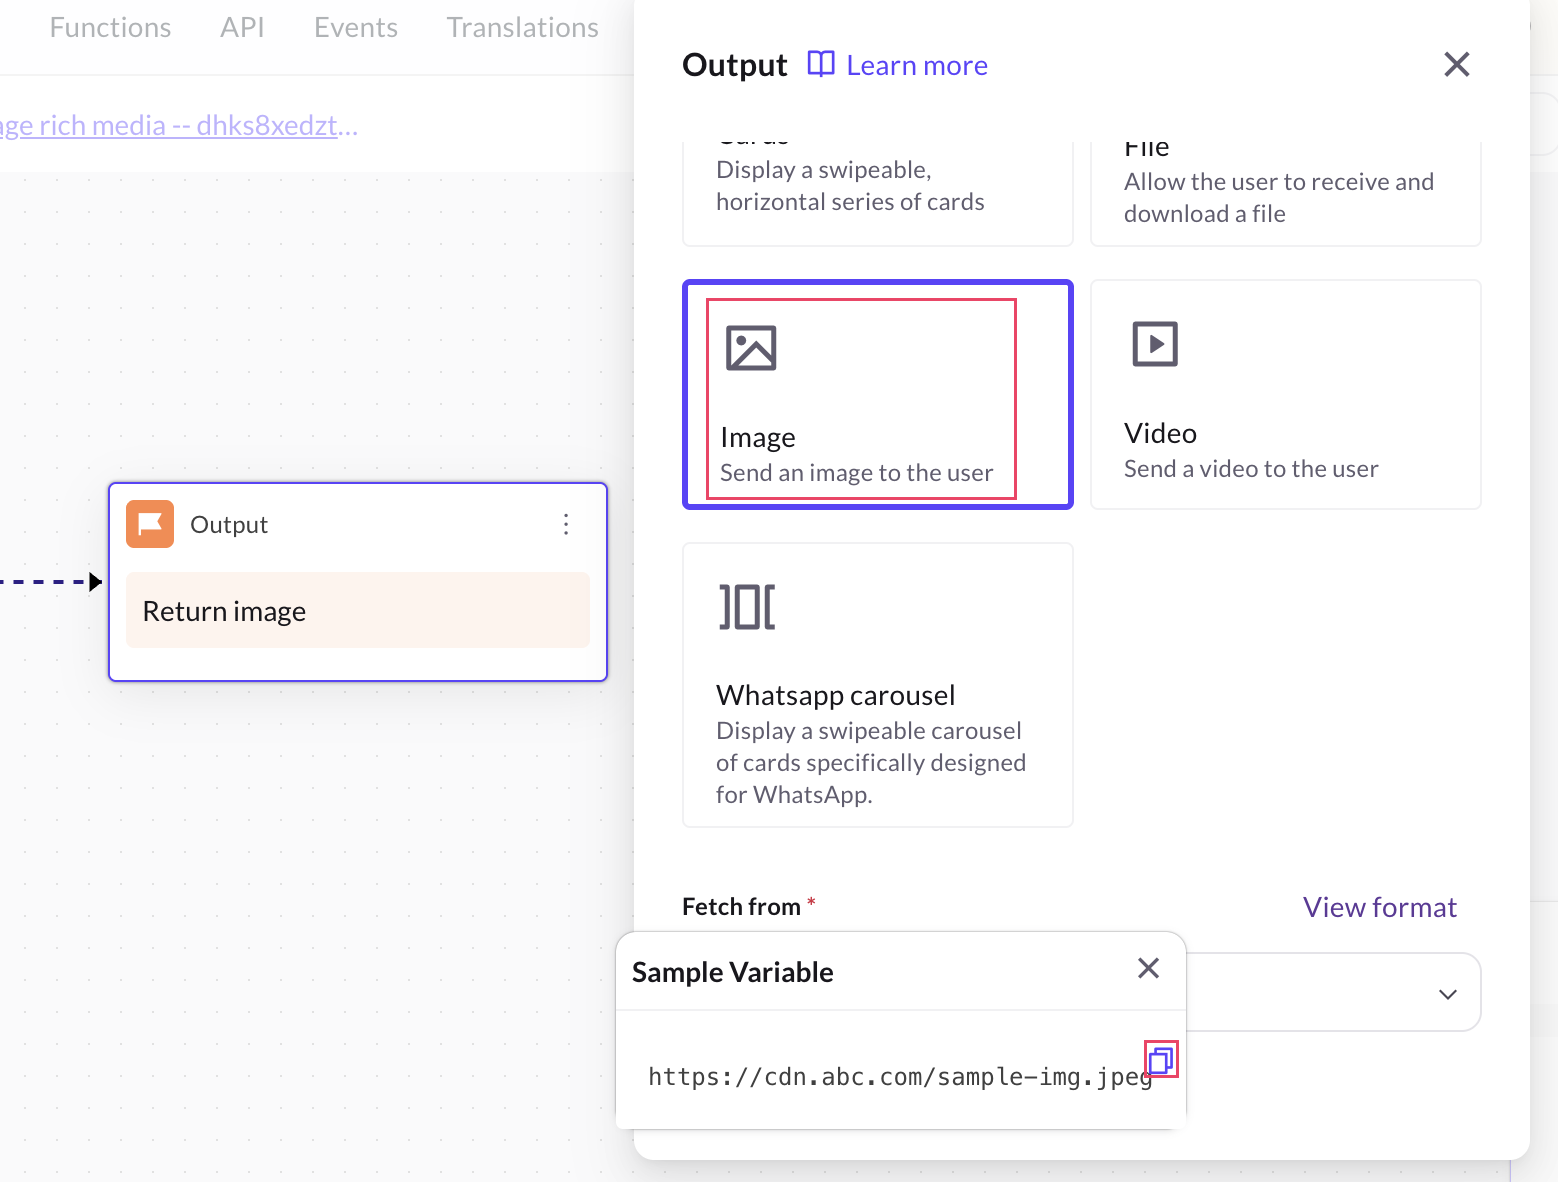
-
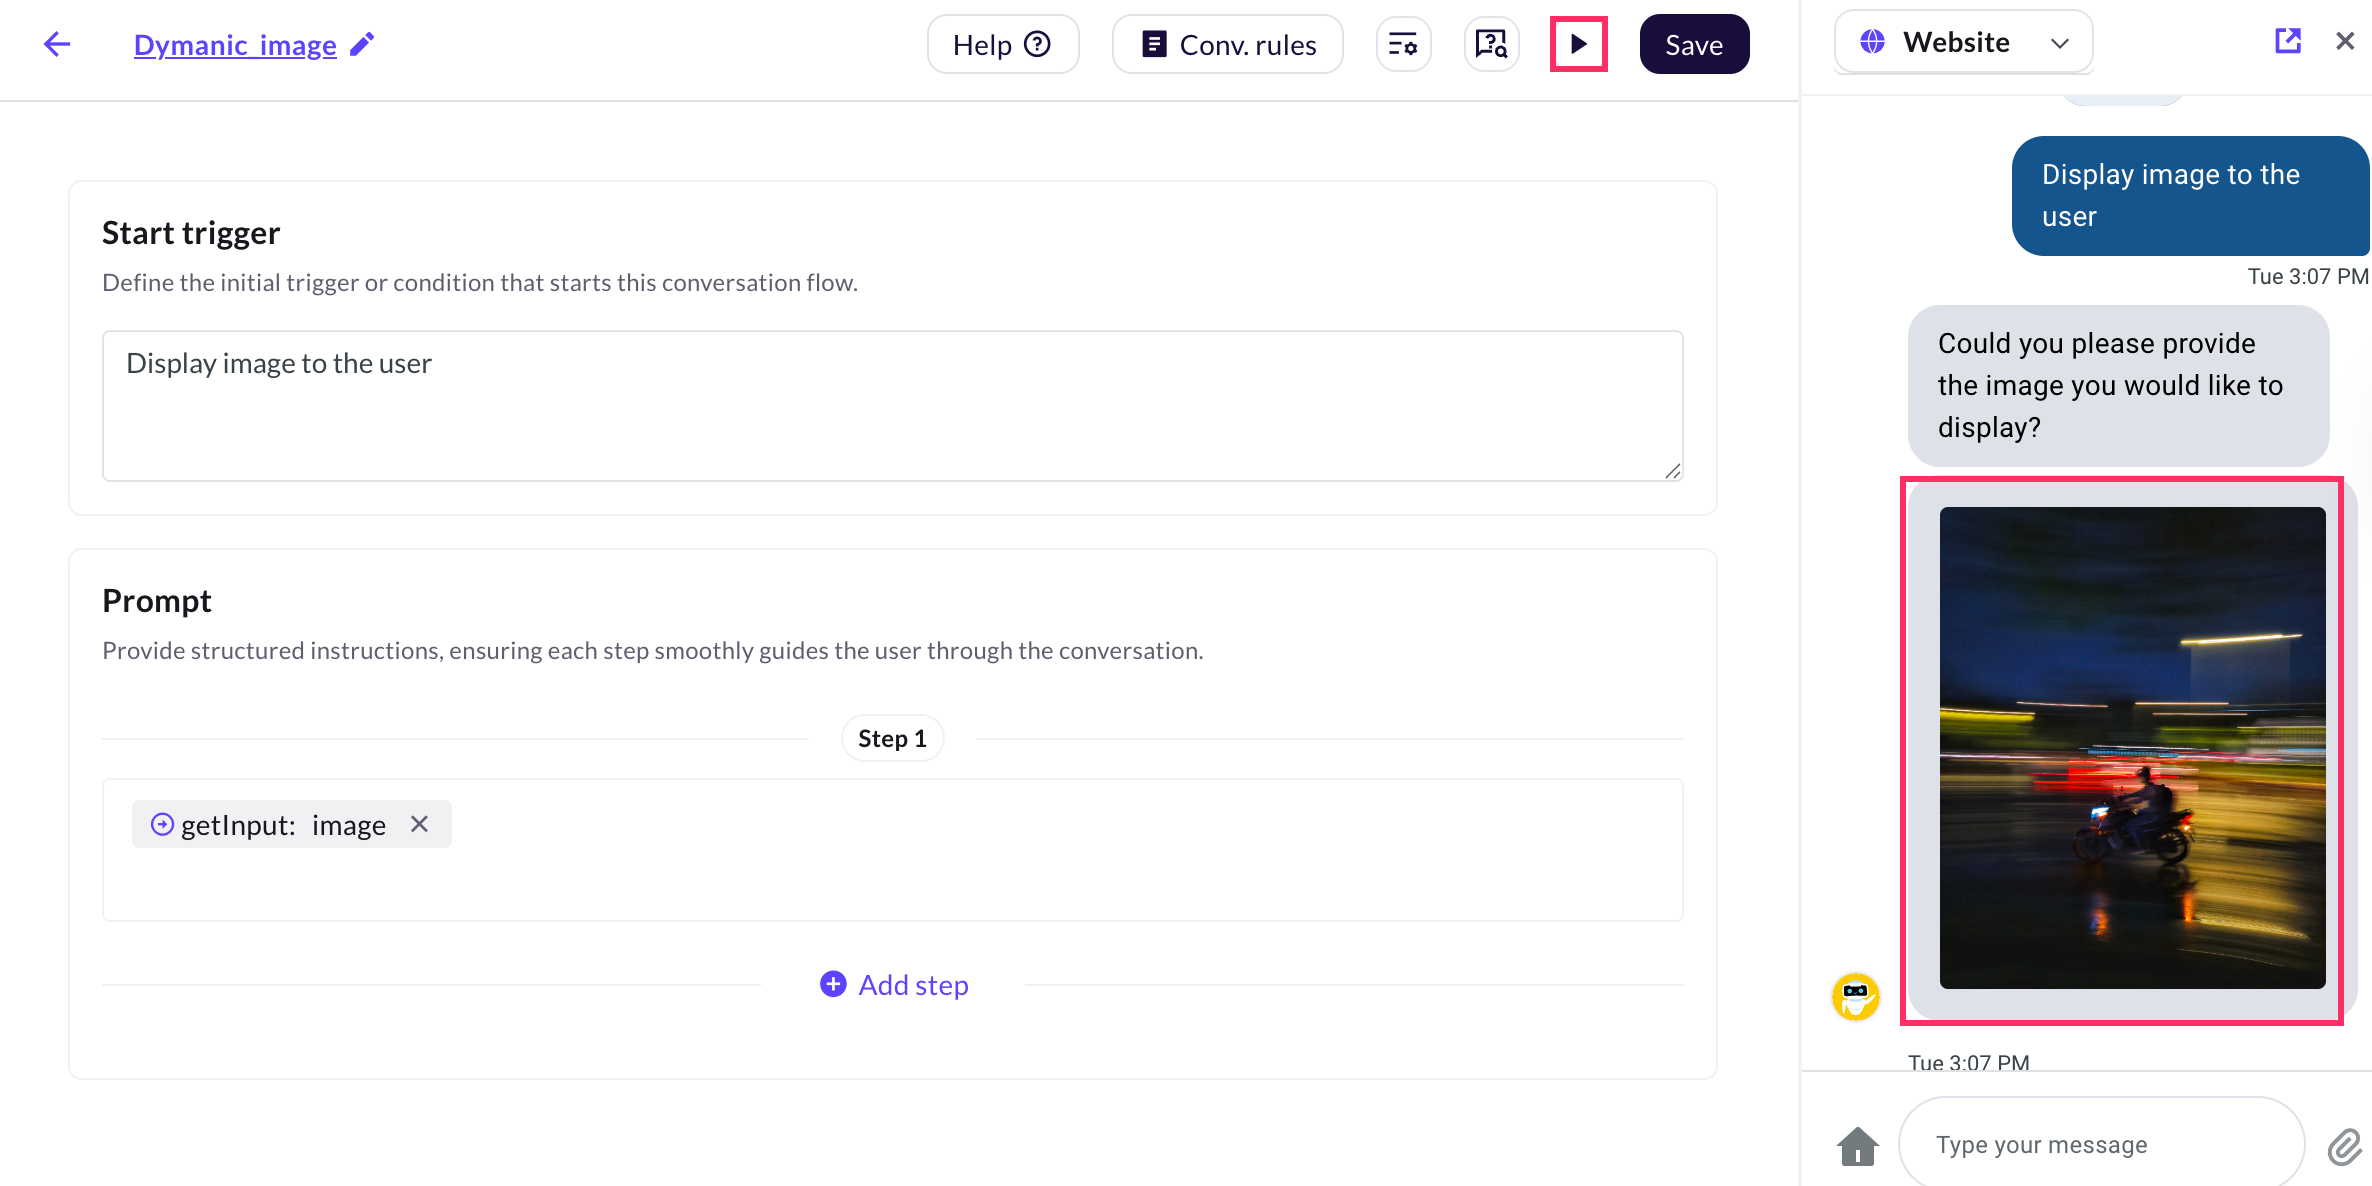
Add an Output node, select Image, and copy the sample variable format to display the dynamic image.
-
Click on the drop-down and select + Create new variable.
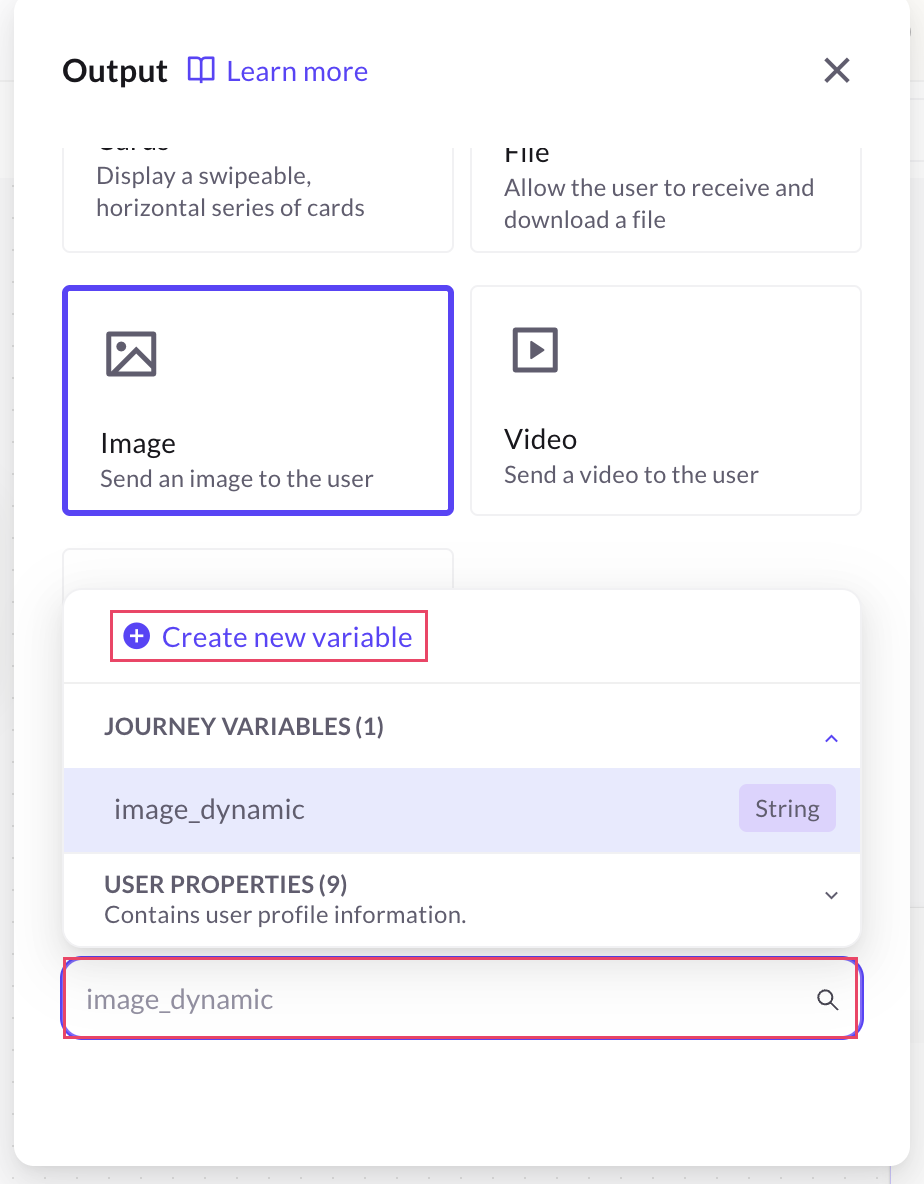
-
Enter the variable details:
i. Variable name: Specify the variable name.
ii. Data type: Select the data type as object.
iii. Default value: Paste the copied sample format or enter the image URL to display the dynamic image.
iv. Click Add.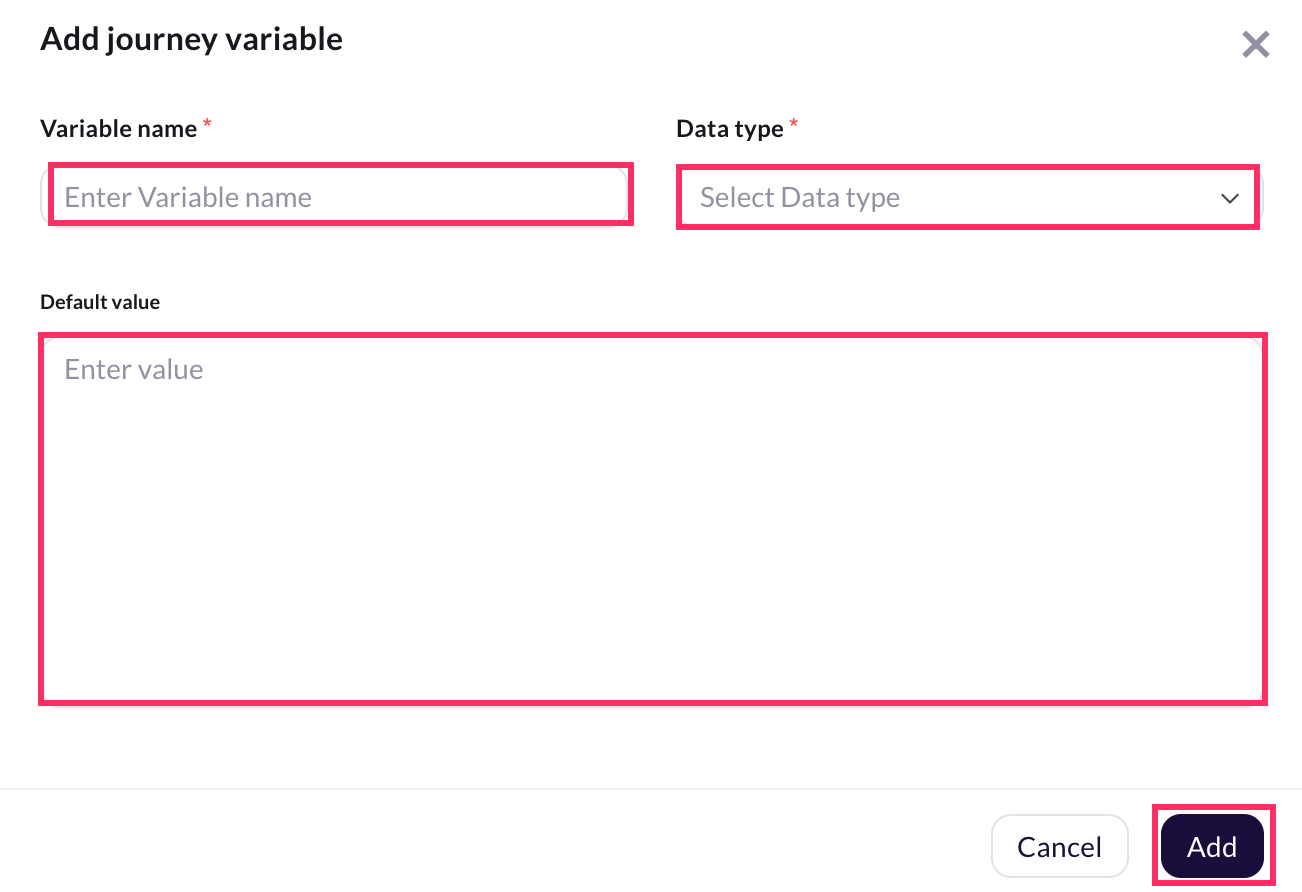
-
Go to Agent > click Preview to test and display the dynamic image.
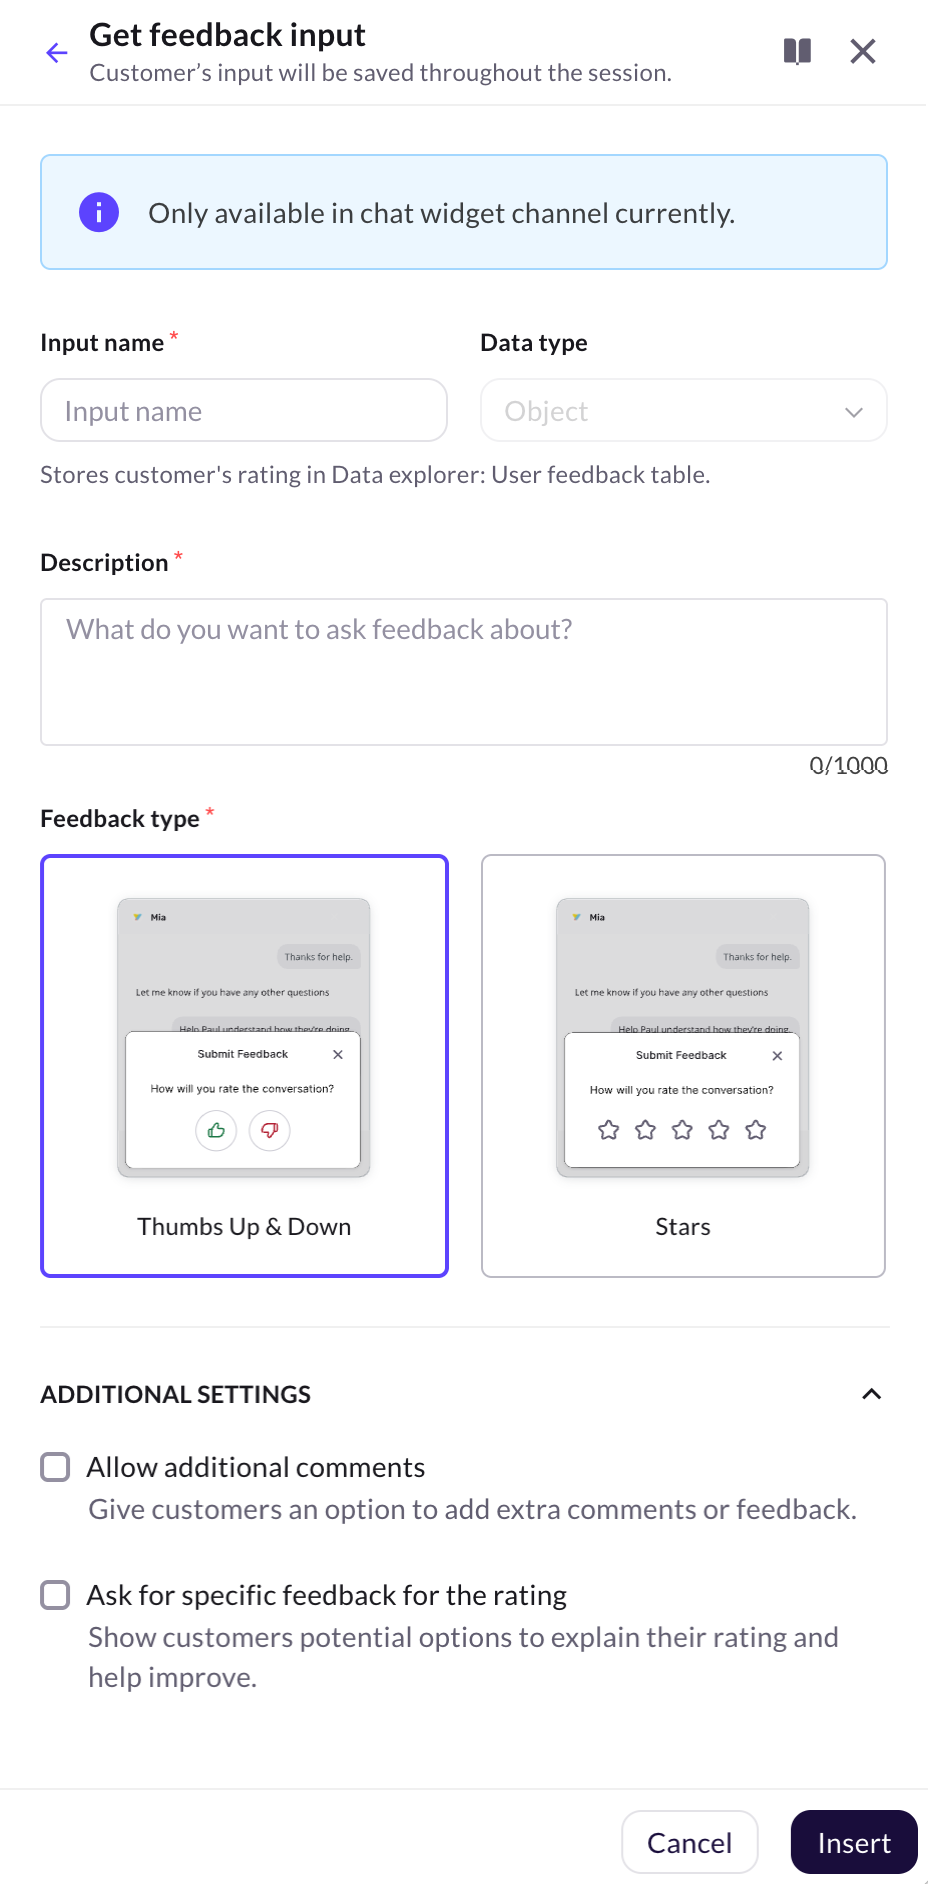
Get Feedback input
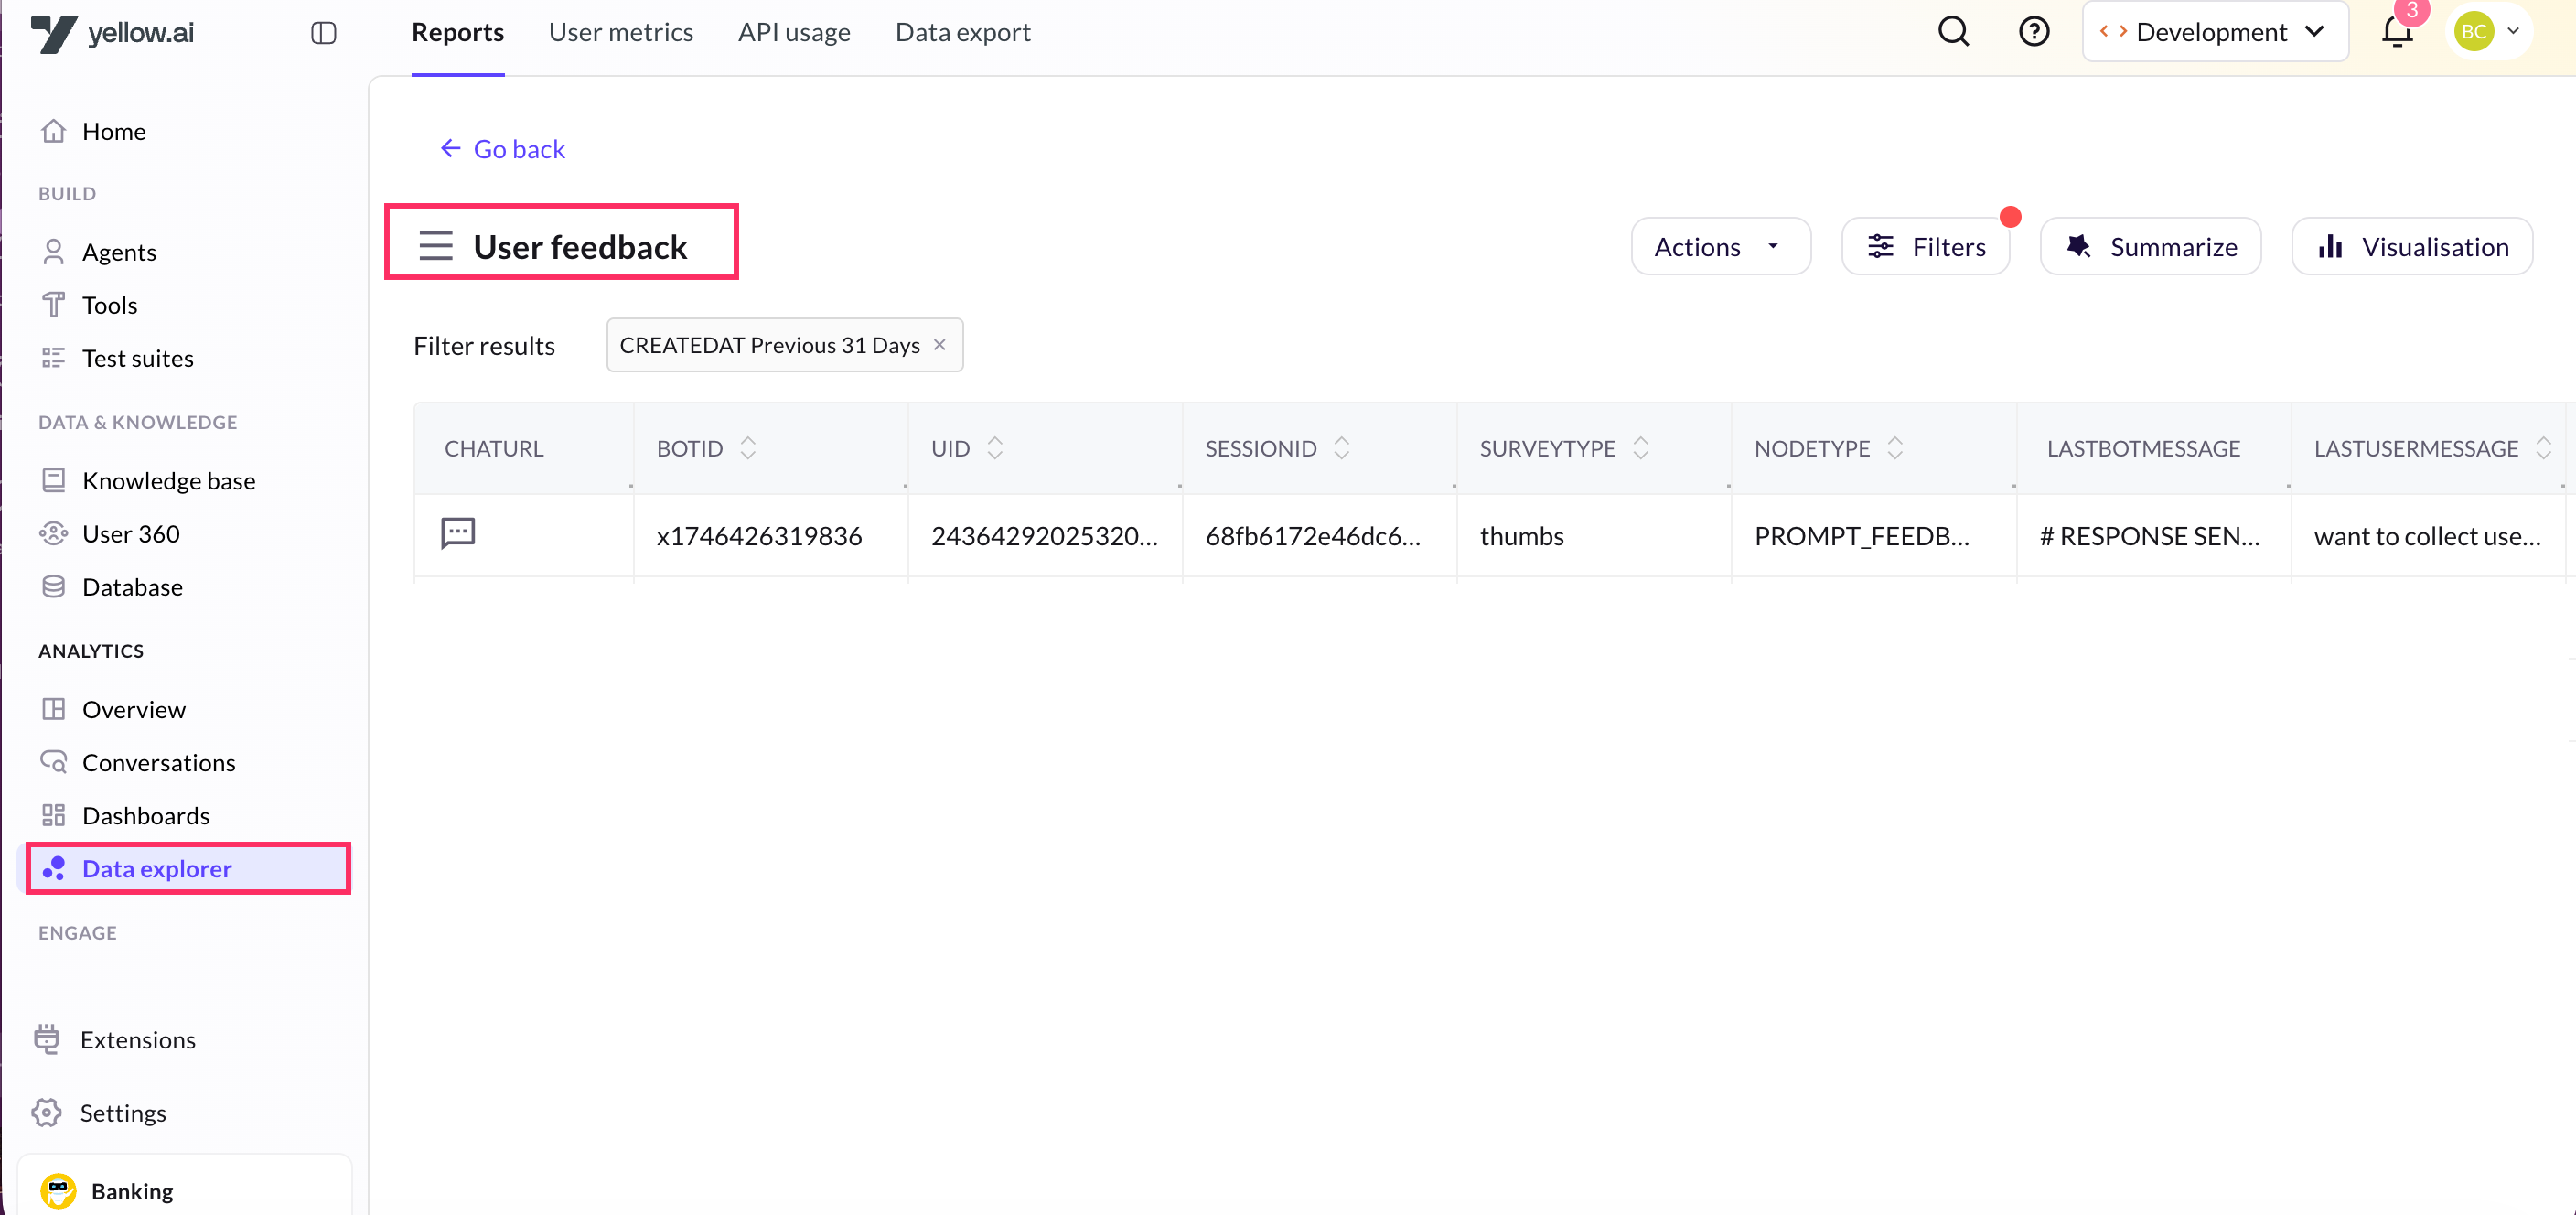
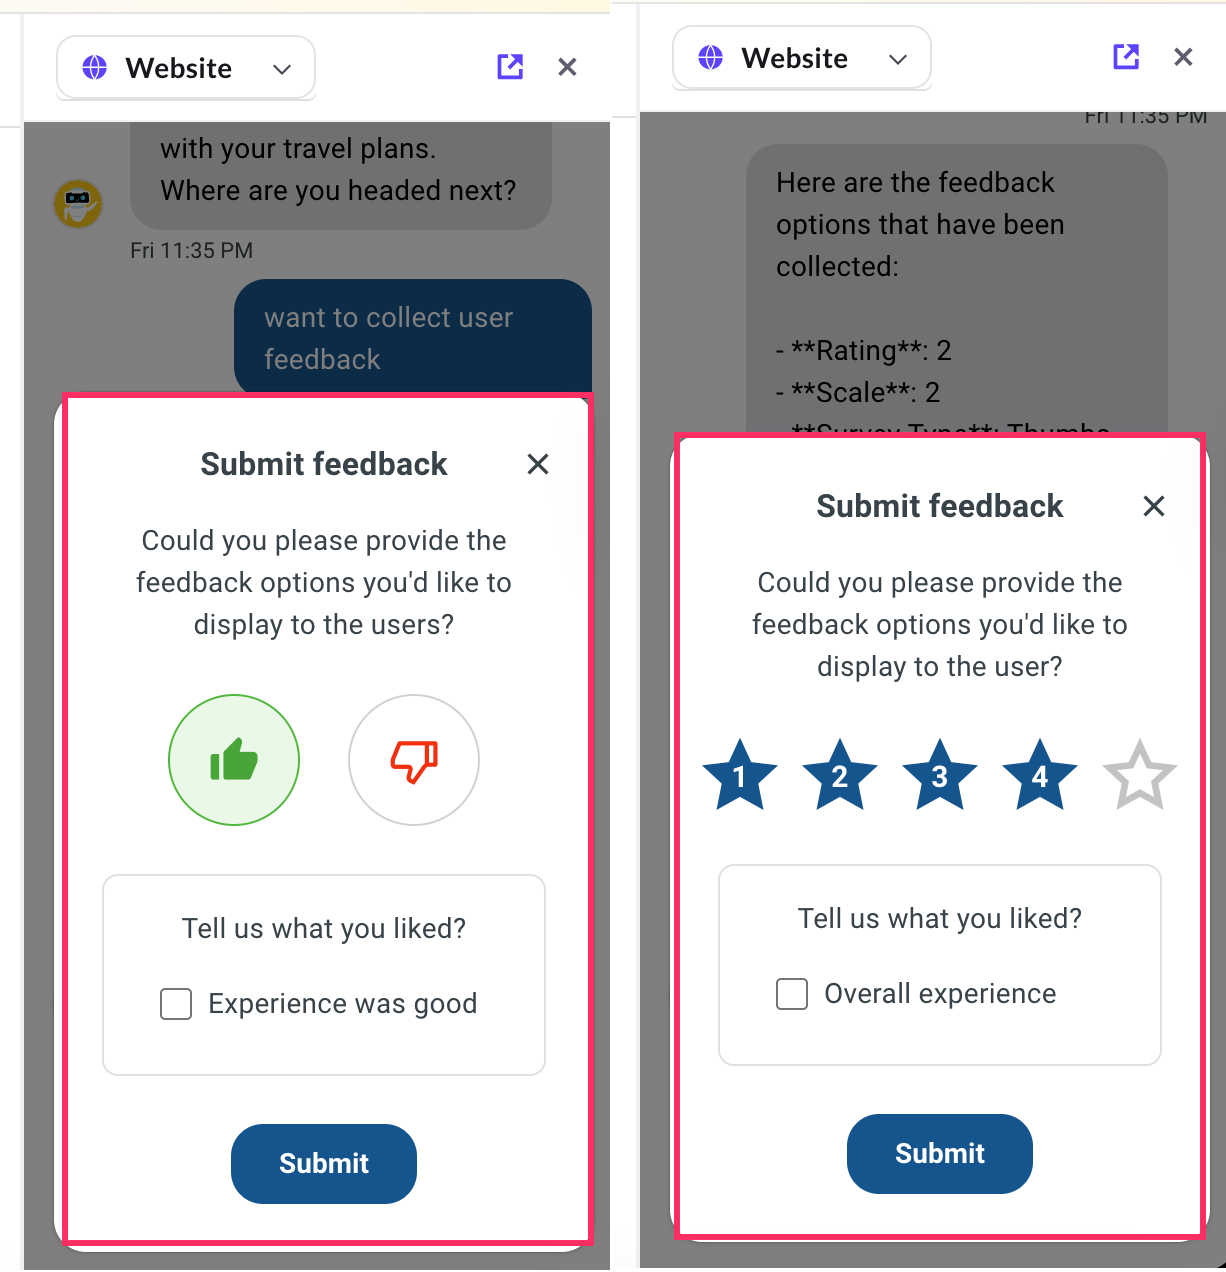
Use Get feedback input to collect feedback from users during conversation. This action allows you to capture ratings using either a thumbs up and thumbs down, or star rating. The feedback data is stored in the User feedback table in the Data Explorer and will be available throughout the session.
The Get feedback input action is currently available only for the Chat Widget channel.
The table below describes the fields available in the Get feedback input action:
| Field name | Description |
|---|---|
| Input name | Define the name of the input field where the user's feedback will be stored. |
| Data type | Default data type is Object, as the feedback includes structured data (rating and comments). |
| Description | Specify the question or context for which you want to collect feedback. Example: "How would you rate your chat experience?". |
| Feedback type | Choose the rating format: • Thumbs Up & Down – Allows users to express satisfaction or dissatisfaction. • Stars – Enables users to provide detailed feedback on a 5-star scale. |
| Allow additional comments | Enable this option to allow users provide extra comments or feedback along with their rating. |
| Ask for specific feedback for the rating | Enable this option to ask follow-up questions based on the rating. You can customize questions and provide predefined reply options to understand the reason behind the customer’s rating. |
How to configure Feedback input
To configure and display Feedback input in your AI agent conversation, follow these steps:
-
Go to Prompts section and click Actions > Get input.
-
Select the Feddback action.
-
In Input name, enter a unique name for the feedback input.
-
In Description, provide details about what feedback you want to collect from the user such as feedback on the conversation or service experience. Example: "How would you rate your chat experience?".
-
In Select feedback type, choose your preferred feedback form (type):
- Thumbs Up & Down – Allows users to give quick positive or negative feedback.
- Stars – Allows users to rate their experience on a scale (for example, 1 to 5 stars).
-
Allow additional comments: Enable this option to allow users to add extra comments or suggestions along with their rating.
-
Ask for specific feedback for the rating: Enable this option to collect detailed feedback from users based on their rating (positive or negative).
You can customize both the question and reply options for each rating type.1. Thumbs up / Thumbs down
Choose whether to configure the question for a positive (👍) or negative (👎) rating. Each rating type can have its own question and reply options.
Field Description Example Question Follow-up question that appears after a user provides their rating. "Tell us what you liked?" for positive feedback (👍) or "What went wrong?" for negative feedback (👎). Reply options Predefined responses that users can select. You can add multiple options. "Liked overall experience" or "Helpful agent". ➕ Add option Click + to add more reply options. Add "Response not clear" or "Issue not resolved". 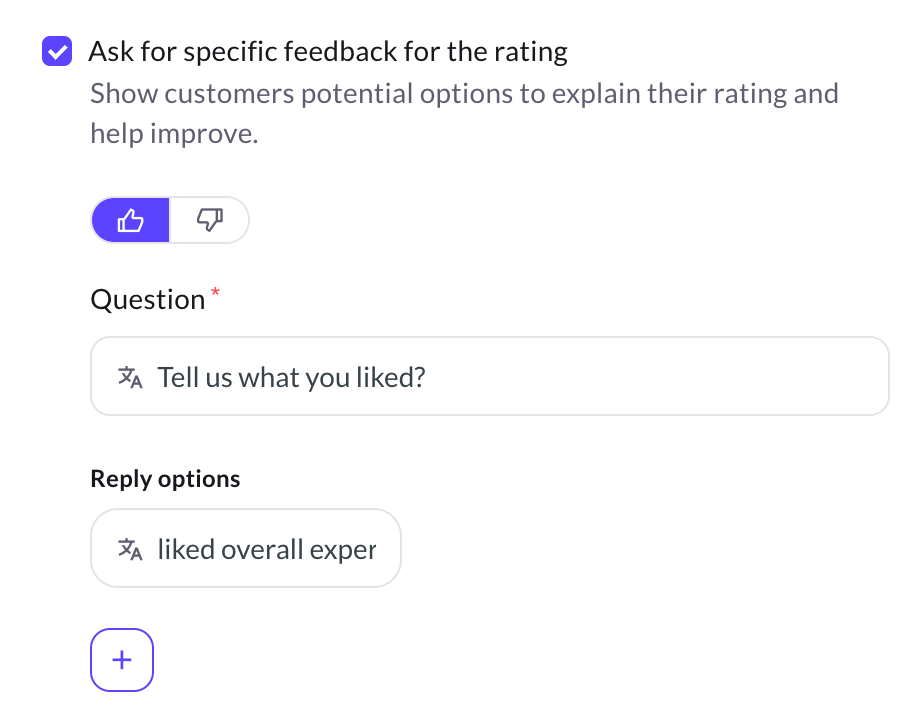
2. Star Rating
Displays a rating scale (for example, 1–5 stars).
You can define different feedback questions for each rating level (example, 5 stars- positive, 1–2 stars- needs improvement).Field Description Example Question The question asked based on the star rating provided. "Tell us what you liked?"" or "What could be improved?"" Reply options Predefined answers users can select after rating. "Experience was good", "Quick response", or "Helpful support". ➕ Add option Click + to add more reply options. Add "Response not clear" or "Issue not resolved". 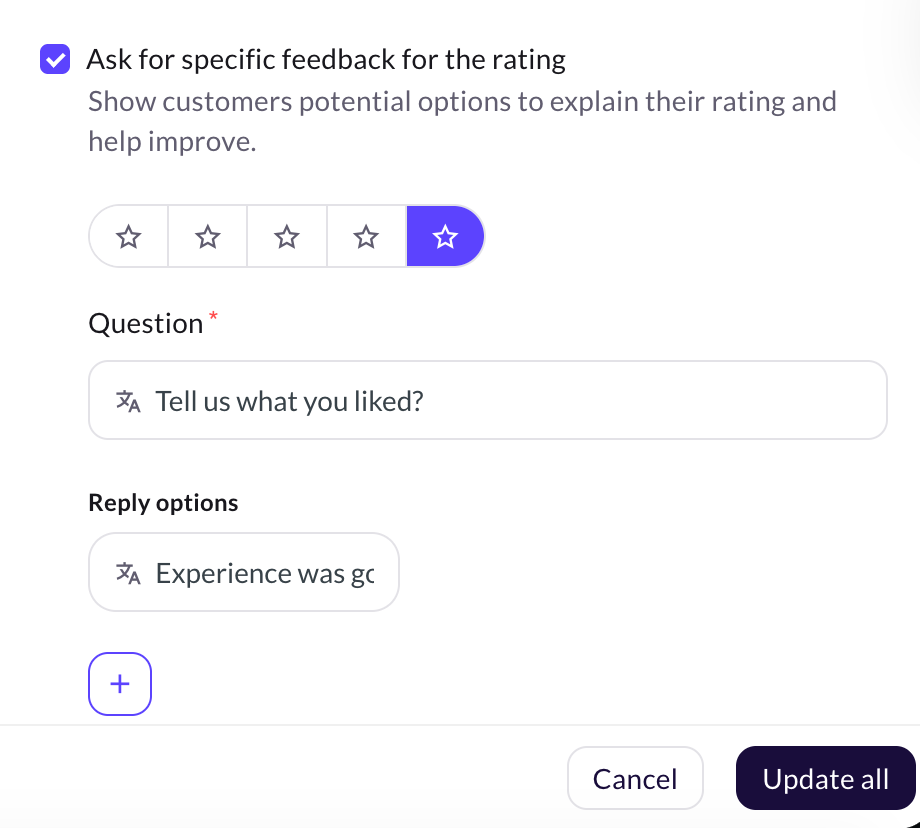
-
Click Save.
-
Click Preview to test and display the feedback option.
-
Navigate to Data Explorer > User feedback table to view the collected feedback.