User identification flow
Overview
The User Identification flow in AI-agent conversation is the process of identifying the user interacting with the AI-agent. This is achieved by requesting the unique identifier from the user. It could be an email address, phone number or other identifier.
Date data types are not supported for the userId. It supports String, Number, email, and phone types.
Significance of identifying users
The user identification is an important aspect of AI-agent conversation design, as it allows for a more personalized and engaging user experience. User identification helps in the following:
- Personalized responses: When a user is identified, the AI-agent can tailor its responses to the individual user's needs and preferences. This can lead to more relevant and helpful responses, which can improve the overall user experience.
- Context maintenance: User identification allows the AI-agent to maintain context throughout the conversation and across different channels. This means that the AI-agent can use user data and the interaction with the user, and use that information to provide more accurate and useful responses in subsequent interactions.
- Improved engagement: By providing personalized responses and maintaining context, the AI-agent can create a more engaging conversation with the user. This can lead to increased user satisfaction and higher levels of engagement with the AI-agent.
- Better data collection: User identification also allows the AI-agent to collect more detailed and accurate data on individual users. This can be used to improve the AI-agent's performance over time, by providing insights into user behavior and preferences.
Understand how user identification flow works
The primary objective of the User Identification flow is to ensure that the userId is captured for users that interact with the AI-agent on any channel.
If the userId is not captured before initiating a conversation, a blank user record is created without a userId with a user starts conversation. If capturing of userId is not managed properly, it may result in the creation of duplicate records for the same user, one with a userId and one without. This can also lead to the creation of multiple unidentified records for different sessions.
The following are the steps involved:
-
You first need to define the user property that needs to considered as the userId. Whenever the selected property is updated, the userId will be automatically updated with the same value.
For example, if you select the
phoneuser property, each time a value is captured for the phone property, that same value will also be automatically copied and assigned to the userId field. -
At the beginning of every conversation, the AI-agent verifies if the userId is known.
-
If it is not known, the User identification flow is triggered to capture the userId.
For details on how user records are created through conversations and unified in User 360, see this article.
Setup user identification flow
To add the User identification flow to your AI-agent, follow these steps:
-
In Automation, click Build > Conversation settings.

-
On the pop-up screen that appears, click User identification.

-
Select the relevant identification flow - Phone identification flow, Email identification flow or Custom property flow.

Phone identifier flow
Select this option if the phone user property serves as the unique identifier for your users. Make sure to collect the phone number and store it in the phone user property, which is already set by default for this identifier flow.

Email identifier flow
Select this option if email user property serves as the unique identifier for your users. Make sure to collect the email address and store it in the email user property, which is already set by default for this identifier flow.

Custom property identifier flow
Select this option if the unique identifier of your users is any property other than email or phone. In this case:
-
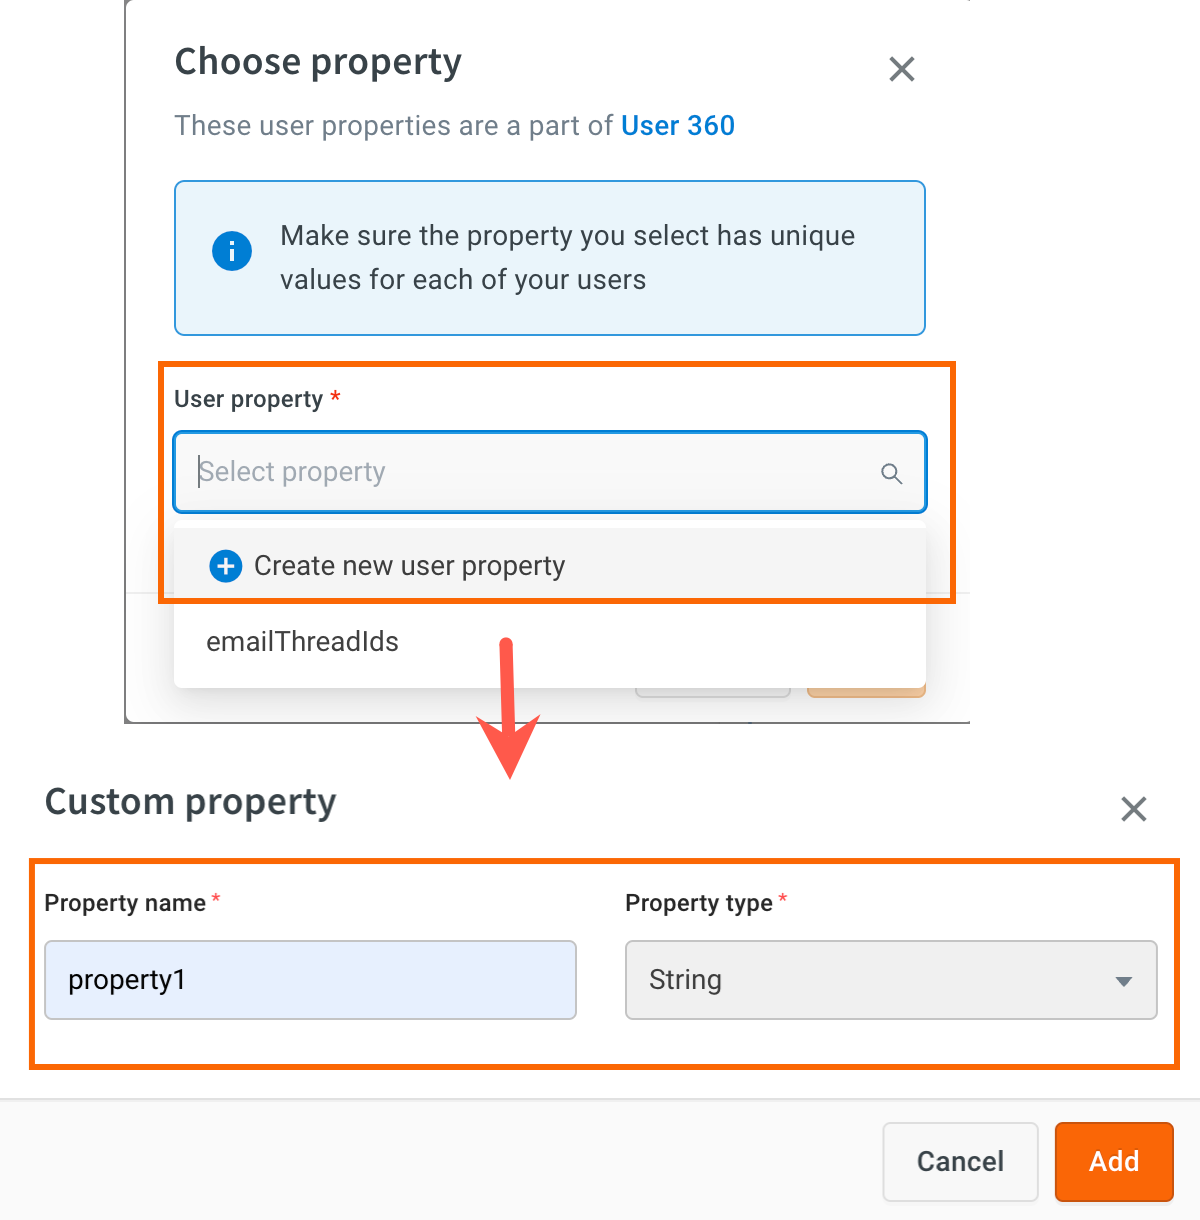
Choose the custom property that serves as the unique identifier for your users. Please note that only String, Number, email, and phone data types are supported for the custom property.

-
To create a new property and store it as userId, click on +Create new user property > Enter Property name and choose Property type > Click Add.
-
Collect property value.
1. To collect property values from user input
Collect the selected user property using the Prompt node and use Save response in to map the variable to the user property.
2. To capture property values from other variables
If you want to capture user properties from other variables, use the syntax:
{{variables.variableName}}
3. To capture user property values from bot script
For example, in the sample script below, to capture the phone number as the userId:
`<script type="text/javascript">`window.ymConfig = {"bot":"x1673261303850","host":"[https://cloud.yellow.ai](https://cloud.yellow.ai/)", "payload":{"name":"Tom","phoneNumber":"9090000000","email":"[[email protected]](mailto:[email protected])"},};(function() {var w = window,ic = w.YellowMessenger;if ("function" === typeof ic) ic("reattach_activator"), ic("update", ymConfig);else {var d = document,i = function() {i.c(arguments)};function l() {var e = d.createElement("script");e.type = "text/javascript", e.async = !0, e.src = "[https://cdn.yellowmessenger.com/plugin/widget-v2/latest/dist/main.min.js](https://cdn.yellowmessenger.com/plugin/widget-v2/latest/dist/main.min.js)";var t = d.getElementsByTagName("script")[0];t.parentNode.insertBefore(e, t)}i.q = [], i.c = function(e) {i.q.push(e)}, w.YellowMessenger = i, w.attachEvent ? w.attachEvent("onload", l) : w.addEventListener("load", l, !1)}})();</script>
You can use the Function node to capture and store the variable in the respective user property.
For instance, here returnId is the function name containing the provided code.
To access property values from the payload schema above, you can use the syntax: data.profile.payload.
return new Promise(resolve => {
   let payload = data.profile.payload
   if (typeof (payload) === "string") {
      payload = JSON.parse(payload);
   }
   console.log(payload);
   ymLib.logger.log(payload,"init--Payload");
   resolve(payload)
});
Store the response returned by the Function in the corresponding variable, in this case, 'userId`.

4. To capture property values from API response
First, store the response payload in an object variable.

Sample response payload
{
"name": "Tom",
"phoneNumber":"9090000000",
}
To access a specific key value from the object variable, use the syntax: {{{variables.objVariableName.key}}}

For example:
{{{variables.userData.phoneNumber}}}{{{variables.userData.email}}}
- You can also use SDK APIs to programmatically set user properties and the user ID.
- You can also make use of Function to extract the required information from a payload.
What next?