Prompt Nodes
Prompts are Interactive or conversational nodes, which expect user input. When a user provides an invalid input to the prompt, a fallback message will be displayed.
In this article, you will learn about the different types of prompt nodes:
All these prompts must be followed by another node as a response to this node.
1. Common Features in all the Prompt Nodes
Randomization
Randomization is a feature available in nodes that allows AI-agents show different variation of greeting messages/ questions to users, making the conversation feel more natural and human-like.
- To add multiple texts, click Add multiple text for randomizing on the node.
- Enter variations of the text that you want your users to see.

Delay
You can set a delay in displaying each of these nodes.
Fetch from
A Fetch from field will be provided in most of the fields to render the dynamic data of that respective node.
2. Frequently used prompts
2.1 Question
Use the Question node to ask users for any kind of input—names, dates, preferences, or other details you need during a conversation.
This node is available for voice bots also.
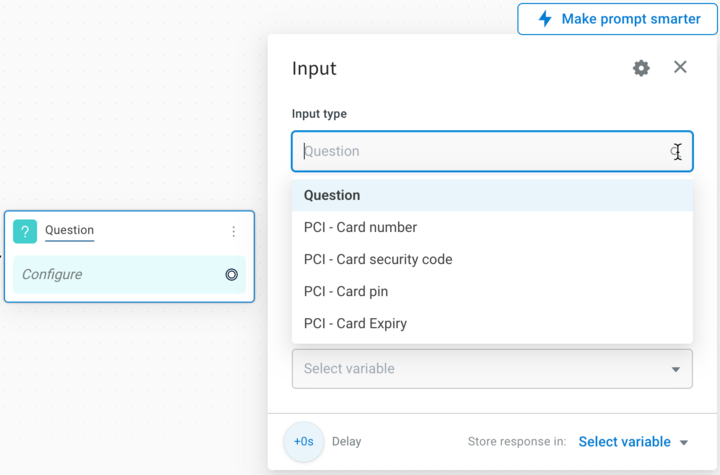
You can also collect PCI-sensitive information—such as card number, CVV, PIN, or expiry date—across all supported channels. When you select a PCI input type, the platform automatically encrypts the data and applies strict logging restrictions. The information is securely stored and never retained in logs or databases.
Question node to ask a general question
To ask a question,
In Input type, choose Question.
In Bot asks, enter what the AI agent should ask.
You can also add multiple variations using Add multiple text for randomising. Your agent will randomly pick one to keep the conversation natural.
To dynamically fetch question from a variable, use the Fetch from option and choose the variable that contains the question text.{
"type": "text",
"value": "What is your query?"
}
Question node to collect PCI Details
If you're collecting PCI-sensitive information (like card number, CVV, or expiry), select a PCI input type. When you do, you will see additional settings.
- In Input type, choose Question to ask the user for any information.
- In Bot asks, enter what the AI agent should ask. You can also add multiple variations using Add multiple text for randomising. Your agent will randomly pick one to keep the conversation natural.
- Validator message: Customize the message that appears if the input doesn’t meet validation rules.
- Additional settings (PCI configuration): Use Additional Settings to define how PCI data is passed to your API.
- Encoding type: Choose how the PCI input is encoded —
Text,Hexadecimal, orBase64. - Card number format: Choose the format in which users are expected to enter the card number. This helps validate and correctly capture card data.
XXXXXXX XXXXXXXXXX-XXXX-XXXX-XXXXXXXX XXXX XXXX XXXX
- Encoding type: Choose how the PCI input is encoded —
2.2 Name
This node is available for voice bots.
Ask and validate the user name with this node.
Validator
In the If validation fails field, enter the message to be displayed when the user enters an invalid response.
For example, if users enter anything instead of their names(first + last name), validation will fail and the AI-agent will display ‘Can you please repeat this, looks like an invalid name’.
If you are building a multilingual AI-agent, it's recommended to use a Question node instead of a Name node.

To store this response in a variable, create a Name Variable and store the user name in it.

Function auto-validation in nodes
| Input Type | User Input | Accepted/Not Accepted as a valid name | Name processed by the platform |
|---|---|---|---|
| Only numbers | 139344 | Not Accepted | - |
| Numbers + Special characters | 13143=? | Not Accepted | - |
| At least one alphabet, Numbers + Special character | 1243242swqw=? | Accepted | 1243242swqw=? |
| Gibberish | scsadf | Accepted | scsadf |
| Sentence | My Name is Vikash | Accepted | Vikash |
| Sentence in any language | मेरा नाम विकाश कुमार | Accepted | काश कुमार |
2.3 Phone
This node is available for voice bots.
Ask and validate phone numbers with this node. If the AI-agent is customised for a specific region, select a default ISD value.
In the If validation fails field, enter the message to be displayed when the user enters an invalid response.
For example, if users enters a number of length greater or less than the expected number (10 for India +91), validation fails and the AI-agent replies, 'Enter a valid phone number'.

One phone node can only support validation of one country code.
To store this response in a variable, create a Phone Variable and store the phone number in it.
If default ISD is not selected, the platform will fetch India's ISD and try to validate the user inputs based on the Indian Phone numbers. If the ISD is selected, then it will validate the user inputs based on the selected country's phone numbers.
Function autovalidation in nodes
Yellow.ai automatically validates the Phone node and no additional validation is needed.
| Input Type | User Input | Accepted/Not Accepted as a valid phone number | Phone number processed by the platform |
|---|---|---|---|
| Gibberish | sdsad1211 | Not Accepted | - |
| Gibberish with special characters | eqwrj# | Not Accepted | - |
| 9 digit no (If India selected as ISD/ Nothing selected in ISD) | 704430890 | Not Accepted | - |
| 10 digit No( If India selected as ISD) | 7044308905 | Accepted | 7044308905 |
| Sentences with 9 digit no (If India is selected) | My No is 703330890 | Not Accepted | - |
2.4 Quick Replies
Display a question along with quick reply buttons as the response for this node.Users can send their response by either clicking the buttons or manually typing them out.
You can connect each quick reply to a flow that should be triggered when this button is clicked. You can also configure fallback, which will work when none of the quick replies are validated from the user's input.

You can customize these buttons. To do so, click Configure buttons.

- Button value - This refers to the value that a button will hold if configured, which can either be stored in a variable or inserted into a database.
- Text aliases: Other phrases users can type which means the same as the text in the button, for example number can also be typed as num. or no.
- Link and Postback: On clicking this button, the users will be redirected to this link.
- Prefix Image: Image icon that you want to show for the button.

Whatsapp Quick replies
WA Quick replies node can switch between buttons and numbered lists. WhatsApp buttons can have up to maximum of 3 buttons and 20 characters/button. If more than 3 buttons are added, it defaults to numbered list.

Real time example:

Dynamic Quick Replies
In the above method to add quick replies you had to add each button yourself. You knew the number and text of buttons beforehand to create quick replies. You can generate some options from an API response or Database query where you either don't know what will be the option or the number of options can change from where you want to fetch it from. In such cases, you need to dynamically generate quick replies. To do this, we have a Fetch from option in the quick reply prompt. Here, instead of adding quick replies manually, you can select a variable containing a quick reply object. Format of quick reply object:
{
  "title": [
    "Select an option",
    "Pick an option"
  ],
  "options": [
    {
      "text": "cold drink",
      "title": "Cold Drink",
      "advancedSettings": true,
      "aliases": [
        "coke",
        "soft drink"
      ],
      "url": "https://www.tasty-food.com",
      "postback": "post-back",
      "image": "https://cdn.abc.com/coke-img.jpeg",
      "textColor": "#4384f5",
      "backgroundColor": "#FFFF",
      "id": "quick_01d78e38b44e1915",
      "analytics": {
        "aevent": "test-analytics"
      }
    },
    {
      "text": "",
      "title": "Btn #2",
      "advancedSettings": false,
      "id": "quick_d9eda393404266d4"
    },
    {
      "text": "",
      "title": "Btn #3",
      "advancedSettings": false,
      "id": "quick_39563a54f6889f4d"
    }
  ]
}
To dynamically generate quick replies, you can apply any logic in code (functions) around quick replies and store value of final object in intended variable. For example, you can apply for a loop around options to dynamically add to them while parsing through some API responses etc.
2.5 Email
Ask, validate and store the user's email with this node.

Validator
AI-agent checks if the entered email is in [email protected] format.
To store the response (email address) in a variable, create an email Variable and store the email ID in it.
Function autovalidation in nodes
Yellow.ai automatically validates the Email node and no additional validation is needed.
| Input Type | User Input | Accepted/Not Accepted as a valid email address | Email address processed by the platform |
|---|---|---|---|
| number@valid email domain | [email protected] | Not Accepted | - |
| Text @valid email domain | [email protected] | Not Accepted | - |
| nothing@valid email domain | @gmail.com | Not Accepted | - |
| Sentence (validator works on other languages too) | My email is [email protected] | Accepted | [email protected] |
2.6 Carousel
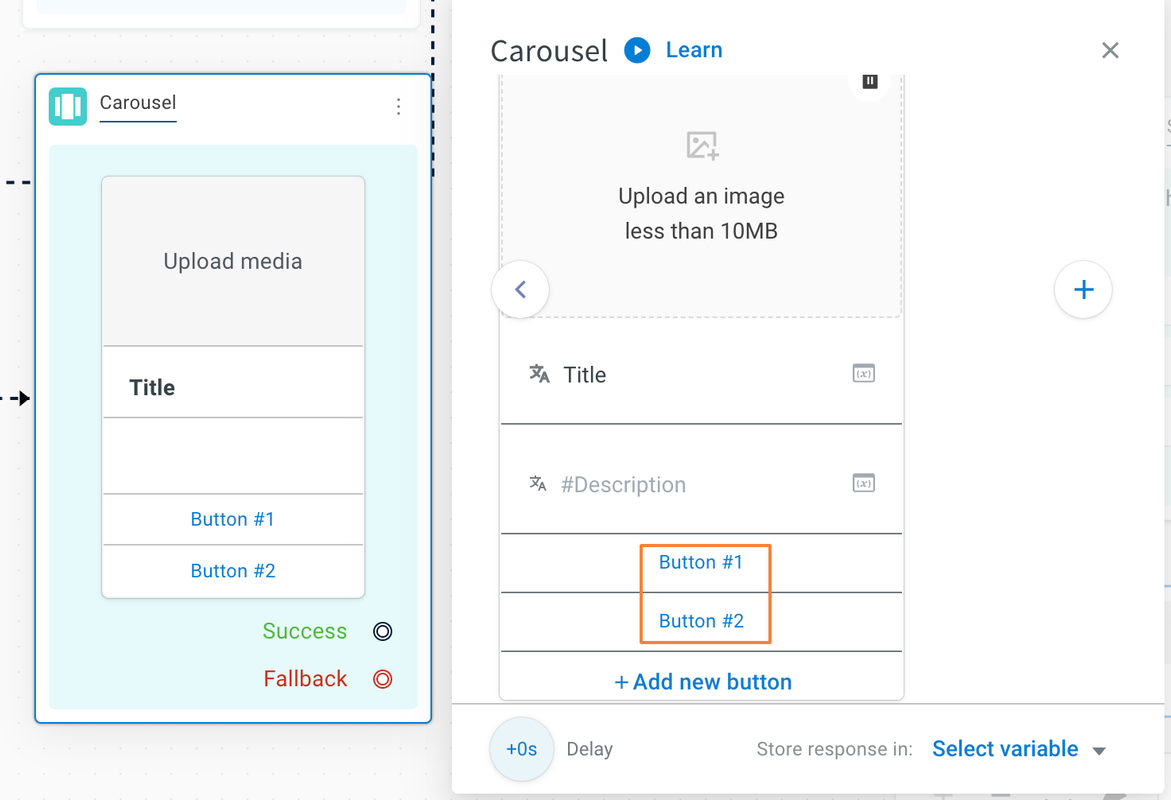
Use Carousel node to display interactive carousel cards with buttons. For instance, a website can showcase products with carousel cards containing buttons for navigation and actions like purchasing. Each carousel contains an option to add an image (less than 10MB), title,description and buttons to perform a certain action. The recommended dimensions for carousel images: Width - 248px and Height - 164.2px.

To add a button
Click the default Button #1 option.
In Button name, enter a name for your button and in Select button type, select the button type from the available options: Text Message, Go to Flow, Open URL, or Send Phone Number. Depending on the selected type, the button can display text, trigger another flow, open a specified URL, or call a specific number.
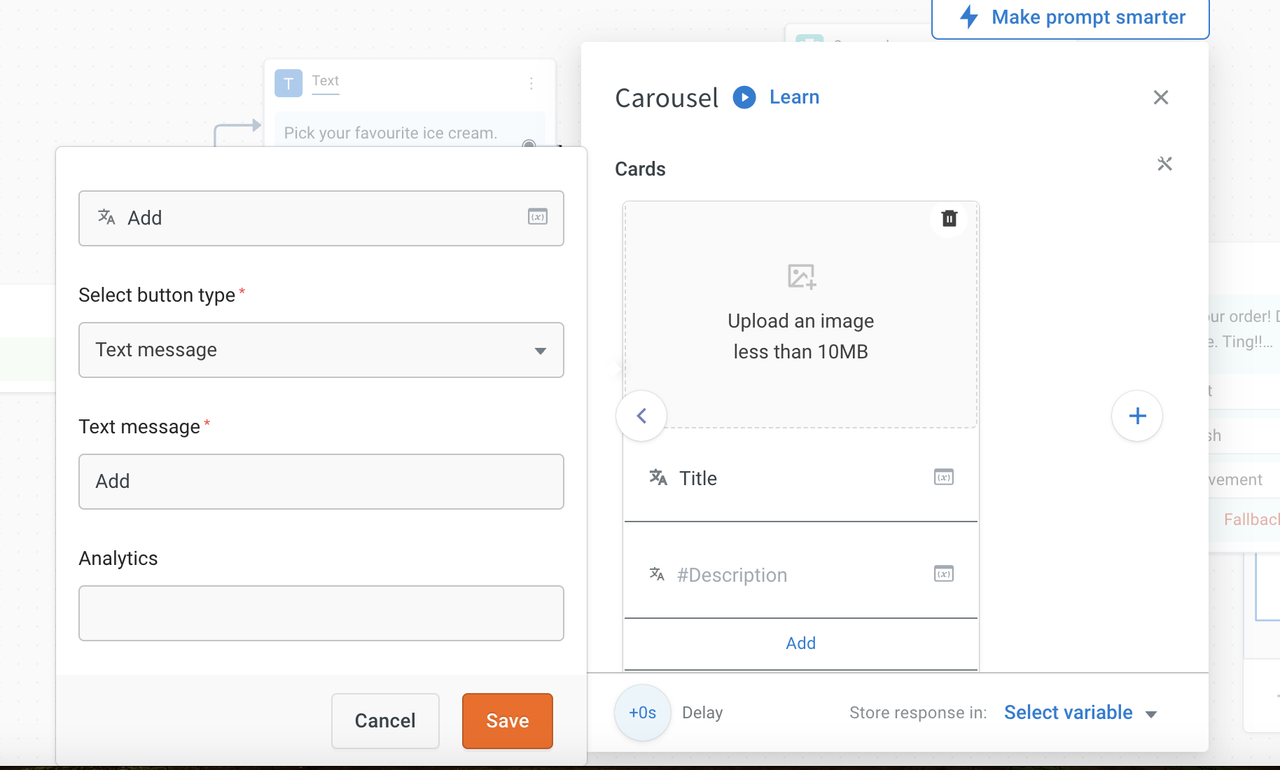
In Analytics, type the keyword for that caraousel option. This will help you track how many users have clicked this option. You can check this stats in Insights > Data Explorer > Custom Tables > Analytics.
Click Save.
- On WhatsApp, carousel cards do not support hyperlinking and allow for up to 3 clickable buttons.
- Carousels without buttons will act as Messages instead of Prompts.
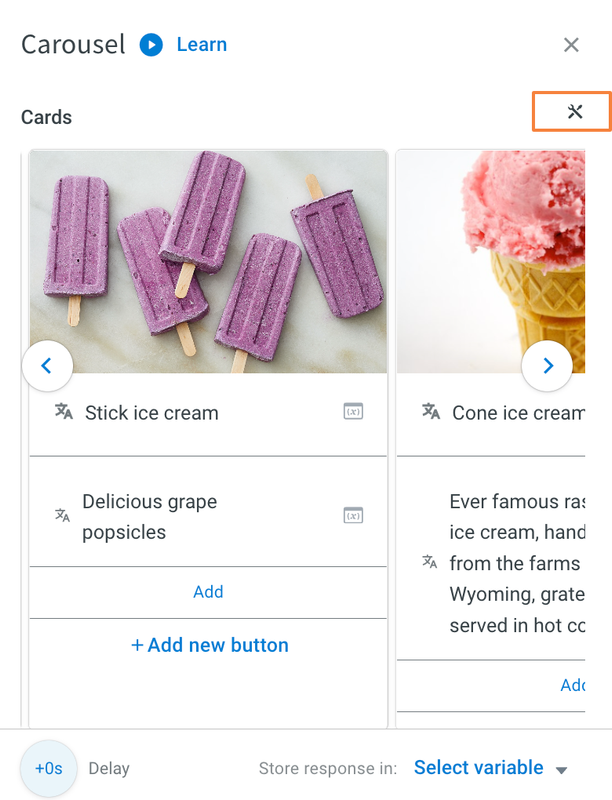
Carousel settings
Use carousel settings to customize the carousel cards as per your use case.
Click the settings icon.
Enable/ disable the following toggles and click Save.
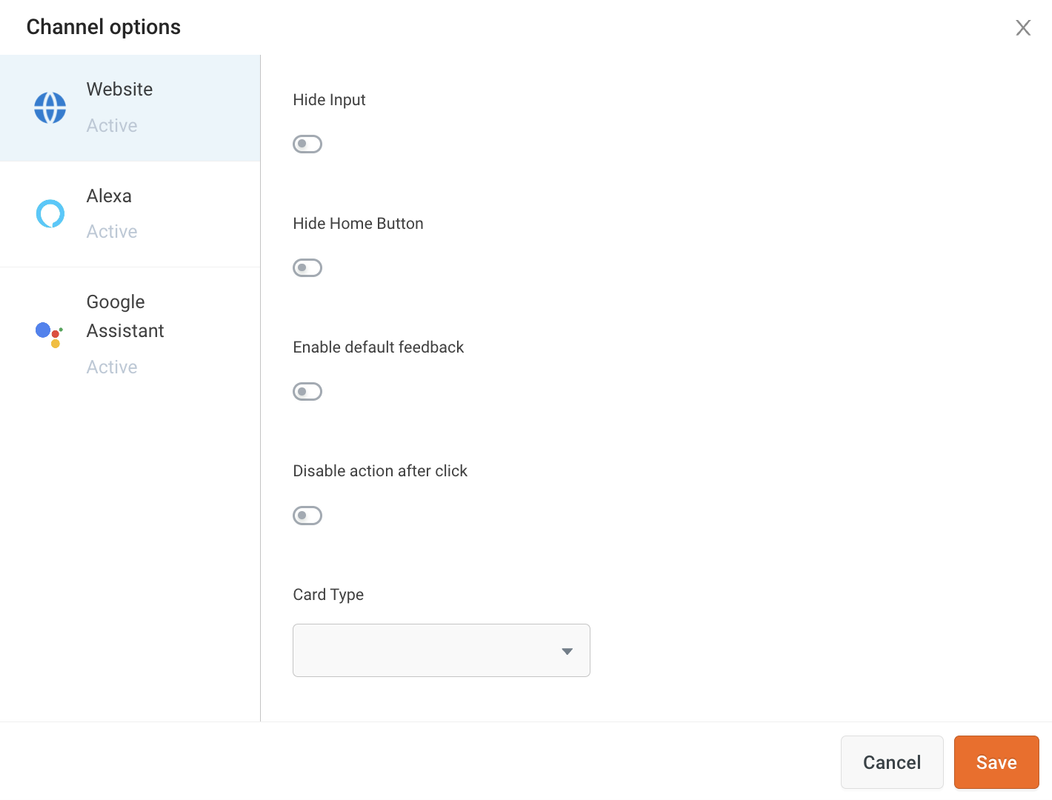
| Feature | Description |
|---|---|
| Hide Input | Hides the input area for the user in the AI-agent, preventing user input. |
| Hide Home Button | Hides the home button from the user interface. |
| Enable Default Feedback | Displays like and dislike emojis next to each card for user feedback. |
| Disable Action after Click | Disables the carousel list after a button has been clicked. |
| Card Type | Select how carousel options should be displayed based on the intended use case. For exmple, selecting Transaction Status displays the carousel as a transaction status to the user. |
Success and Fallback cases must be handled by connecting them to other nodes to continue the flow.
Dynamic Carousels
Similar to quick replies, Carousels can also be dynamically created using Fetch from option. Carousel object is an array of each card (JSON objects). Sample Carousel object:
[
  {
    "title": "Item1",
    "text": "Description",
    "actions": [
      {
        "title": "Button #1",
        "buttonDefault": "text",
        "text": "Message1"
      },
      {
        "title": "Button #2",
        "buttonDefault": "triggerJourney",
        "analytics": "analytics",
        "triggerJourney": "test"
      },
      {
        "title": "Button #3",
        "buttonDefault": "url",
        "analytics": "analytics",
        "url": "https://www.sample-site.com",
        "postback": "post-back"
      },
      {
        "title": "Button #4",
        "buttonDefault": "phoneNumber",
        "analytics": "test-analytics",
        "phoneNumber": "9876543210"
      }
    ],
    "image": "https://cdn.abc.com/sample-img.jpeg",
    "text": "Description for item1"
  },
  {
    "title": "Title",
    "description": "Description",
    "actions": [
      {
        "title": "Button #1"
      },
      {
        "title": "Button #2"
      }
    ],
    "image": "",
    "video": "",
    "text": ""
  }
]
The actions above describe the card button. You can add multiple actions to a single card in a carousel.
To add a URL type action, for example, the format becomes:
    {
        "title": "Explore more",
        "buttonDefault": "url",
        "url": "https://sampleurl.com",
    }
Sample function to add carousels
You can call this function from the function node we will learn about and store the returning value in a variable.
return new Promise(resolve => {
    // Your logic goes here
    let cars = data.variables.cars_h; //this AI-agent variable contains an API response
    let cars_cards = [];

    for (let i = 0; i < cars.length; i++) {

            cars_cards.push({
                "title": cars[i].model,

                "actions": [
                    {
                        "title": "Explore more",
                        "buttonDefault": "text",
                        "text": cars[i].model,

                    }
                ],
                "image": cars[i].main_img,
                // "video" : "",
                // "text" : "Desc1",

            });

    }

    return resolve(cars_cards);
});
3. Other prompts
3.1 Date
This node enables users to choose a date from the calendar widget. If the user input includes a date or time, it will pass the validation. Otherwise, the specified validation failure message will be sent.
This is an optional field, and users can still interact via chat without being required to use the date picker.

This node is supported only on Web and Mobile apps.
Types of date pickers available in AI-agent
There are various types of date pickers available, each catering to different needs and preferences. You can choose the one that best suits your requirements.
- Single Date Picker
- Date Range Picker
- Month Picker
- Single Date and Time Picker
- Time Picker
Learn more about Different date pickers.
Storing date variables
When a user enters or selects a date, the input undergoes validation and is stored in the specified variable as an object. Users aren't limited to using only the date picker; they can also input the date manually, which will still be saved in the variable.
After validating, the system will store the date entered date by users in the specified object variable.
The structure of the date object is as follows:
- singleDatePicker
- DateRangePicker
- MonthPicker
- SingleDateTimePicker
- TimePicker
To retrieve date from the date object, use this syntax: {{{variables.variable_name.objectname.field}}}. For example, to retrieve day from the following object, use {{{variables.variable_name.value.day}}}.
{
  "value": {
    "timestamp": "Tue, 12 Dec 2023 13:03:31 GMT",
    "year": 2023,
    "month": 12,
    "date": 12,
    "day": "Tuesday",
    "hour": 13,
    "minute": 3,
    "selected": {
      "hour": 7,
      "minute": 33
    }
  },
  "range": {
    "exists": false
  }
}
Syntax to retrieve dates from date range object:
- Start Date:
{{{variables.variable_name.range.start.date}}} - End Date:
{{{variables.variable_name.range.end.date}}}
{
  "value": {
    "timestamp": "Sun, 05 Nov 2023 05:30:00 GMT",
    "year": 2023,
    "month": 11,
    "date": 5,
    "day": "Sunday",
    "hour": 5,
    "minute": 30,
    "selected": {
      "hour": 0,
      "minute": 0
    }
  },
  "range": {
    "exists": true,
    "start": {
      "timestamp": "Sun, 05 Nov 2023 05:30:00 GMT",
      "year": 2023,
      "month": 11,
      "date": 5,
      "day": "Sunday",
      "hour": 5,
      "minute": 30,
      "selected": {
        "hour": 0,
        "minute": 0
      }
    },
    "end": {
      "timestamp": "Fri, 17 Nov 2023 05:30:00 GMT",
      "year": 2023,
      "month": 11,
      "date": 17,
      "day": "Friday",
      "hour": 5,
      "minute": 30,
      "selected": {
        "hour": 0,
        "minute": 0
      }
    }
  }
}
Syntax to retrieve date or time from the object: {{{variables.variable_name.objectname.field}}}
Ex:
To capture month: {{{variables.variable_name.value.value.month}}}
{
    "value": {
        "value": {
            "timestamp": "Tue, 19 Mar 2024 00:00:00 GMT",
            "year": 2024,
            "month": 3,
            "date": 19,
            "day": "Tuesday",
            "hour": 0,
            "minute": 0,
            "selected": {
                "hour": 18,
                "minute": 30
            }
        },
        "range": {
            "exists": false
        }
    }
}
Syntax to retrieve date or time from the object: {{{variables.variable_name.objectname.field}}}
Ex:
To capture date: {{{variables.variable_name.value.value.date}}}
To capture day: {{{variables.variable_name.value.value.day}}}
{
    "value": {
        "value": {
            "timestamp": "Tue, 19 Mar 2024 10:33:00 GMT",
            "year": 2024,
            "month": 3,
            "date": 19,
            "day": "Tuesday",
            "hour": 10,
            "minute": 33,
            "selected": {
                "hour": 5,
                "minute": 3
            }
        },
        "range": {
            "exists": false
        }
    }
}
Syntax to retrieve time from the object: {{{variables.variable_name.value.value.{timeUnit}}}}
Example: {{{variables.variable_name.value.value.hour}}}, {{{variables.variable_name.value.value.minute}}}
{
    "value": {
        "value": {
            "timestamp": "Tue, 19 Mar 2024 10:33:00 GMT",
            "year": 2024,
            "month": 3,
            "date": 19,
            "day": "Tuesday",
            "hour": 10,
            "minute": 33,
            "selected": {
                "hour": 5,
                "minute": 3
            }
        },
        "range": {
            "exists": false
        }
    }
}
- You cannot subtract a date from another date using the Date node. To do so, you need to write a custom function and use the data from date picker node.
Restrict date picker to display past or future dates
You can restrict date selection to past or future dates. This restriction applies only to the Single date picker and Single date and time picker.
To restrict the date picker to display historic dates:
In Widget Type, ensure you either have Single Date Picker or Single date and time picker You will see a new field, Restrict to.

In Restrict to, select Future Dates to allow users to select only future dates; select Past Dates to restrict selection to only past dates.
3.2 WhatsApp List
This node lets you configure the lists displayed on the WhatsApp channel. WhatsApp API provides a better UI for businesses to send List items (within 24 hours window).
To create a WhatsApp List:
- Select WhatsApp List under Prompt Nodes.
- Populate the fields Message Body, Title and Row.
- To provide row details, click a row and populate the fields Title, Value and Description.

Dynamic WA List
Enable Advanced options and i option next to fetch from to see the dynamic data.
{
  "title": "Please select your preferred slot for Appointment",
  "optionText": "Appointment Slots",
  "options": [
    {
      "section": "June 5, 2021",
      "options": [
        {
          "title": "9am-11am",
          "text": "5.9-5",
          "description": "General Medicine"
        },
        {
          "title": "12pm-2pm",
          "text": "5.12-2",
          "description": "Orthopedic"
        },
        {
          "title": "2pm-4pm",
          "text": "5.2-4",
          "description": "Physiotherapy"
        }
      ]
    },
    {
      "section": "June 6, 2021",
      "options": [
        {
          "title": "9am-11am",
          "text": "6.9-5",
          "description": "General Medicine"
        },
        {
          "title": "12pm-2pm",
          "text": "6.12-2",
          "description": "Orthopedic"
        },
        {
          "title": "2pm-4pm",
          "text": "6.2-4",
          "description": "Physiotherapy"
        }
      ]
    },
    {
      "section": "June 7, 2021",
      "options": [
        {
          "title": "9am-11am",
          "text": "7.9-5",
          "description": "General Medicine"
        },
        {
          "title": "12pm-2pm",
          "text": "7.12-2",
          "description": "Orthopedic"
        },
        {
          "title": "2pm-4pm",
          "text": "7.2-4",
          "description": "Physiotherapy"
        }
      ]
    }
  ],
  "footer": "Please follow Covid Guideline while consulting."
}
Limitations
- Maximum of 10 Buttons can be added. Multiple buttons cannot be selected in one go and are not supported in notifications.
- Character limit of Body is 1024.
- Character limit of Footer is 60.
- Character limit of Button Text and Response is 24.
- Section Title and List Headers are optional.
3.3 Multi Select
- Supported for all the mobile SDKs (Flutter, Android , iOS) and web.
- Not Supported for WhatsApp, Instagram, Facebook , Teams, and Slack.
Similar to the Quick Replies node, this node displays a question along with quick reply buttons where the user can select multiple responses.
Success and Fallback cases must be handled by connecting them to other nodes to continue the flow.

3.4 Location
Ask, validate and store user location with this node.
Validation is passed after extracting all the fields specified in Required fields. This does not mean users needs to provide all these fields, any info provided by the user is extracted.
It is then stored in the specified variable with the following format:
{ userMessage: '', coordinates: { lat: "", lng: "", }, fullAddress: '', city: '', state: '', country: '', postalCode: '', }

You can also send a Share location button to allow users to share their current location. Customize the text in this button by clicking on it.


The following screenshot is how Share your location will look on your AI-agent.
Function autovalidation in nodes
Yellow.ai automatically validates the Location node and no additional validation is needed.
Location has various attributes. For e.g., lets say that we have stored the user response in obj type variable named “address”,
You can fetch Pin Code through : variables.address.postalcode You can also fetch the City code through: variables.address.city
| Input Type | User Input | Accepted/Not Accepted as a valid location | Pincode processed by the platform | City processed by the platform |
|---|---|---|---|---|
| Only Pincode | 800007 | Accepted | 800007 | - |
| City+ Pincode | Patna 800007 | Accepted | 800007 | Patna |
| City+ wrong pincode | Patna 110007 | Accepted (with corrected Pin code) | 800001 (Pincode will be corrected by the platform) | Patna |
| City + wrong format pin code | Patna 80007 | Accepted (with corrected pin code) | 800001 (Pincode will be corrected by platform) | Patna |
| Only Address (without city and pin) | Hauz Khas | Accepted | 110016 (correct) | Delhi |
3.5 Store comment
This node helps you to skip triggering of NLU, intents, or entities for a respective flow. Using this node, you can provide inputs such as feedback, questions, suggestions, and so on.
User inputs are stored in a variable through the Store comment node without triggering the NLU of that particular flow.
For example, you have created a AI-agent to order food from a restaurant. You want to allow the user to provide feedback after delivering the food. In such cases, you can use the store comment node to provide feedback without triggering the NLU of the respective flow.

It is recommended not to use Quick reply option for Store comment node.
In the store comment node, there is a toggle to enable Quick reply. Quick reply in the comment store node captures both the comment and the Quick reply response. The comment will be stored as a fallback when the user hits enter after writing the comment, and if the user clicks on Quick reply, then that Quick reply response will be stored in the variable.
3.6 File Prompt
Ask, validate and store JPG/PNG/MP4/MOV/HEVC files with this node.
File size limit is 15 MB.
It will validate if the uploaded file is in JPG/PNG/MP4/MOV/HEVC format and if its size is less than or equal to the mentioned file size.

Create a file Variable and store the file in it.
To let users skip this option,
Click the tools icon.

Enable the toggle Enable Skip Button.

3.7 Feedback
- Supported for all the mobile SDKs (Flutter, Android, iOS) and web.
- Not Supported for WhatsApp, Instagram, Facebook , Teams, and Slack.
The Feedback node displays a feedback widget and stores user ratings and comments in a database table. Feedback prompt will ask for a rating on a scale of 5, and the additional comments prompt will take additional comments from the user in a text field if entered.

Feedback node data types:
- Use 'number' as the data type for the rating field.
- Use 'string' as the data type for the comment field in the Feedback node.
Customizable feedback questions:
- You can configure the questions you want to ask for feedback on this prompt.
- The feedback prompt will request a rating on a scale of 5.
- You can collect additional comments from users in a text field if provided.
Accessing Feedback data:
Find feedback data in Insights > Data explorer > User feedback. Ratings, feedback, and other user and flow details are all stored here without the need for separate storage.

The response to the Feedback node is stored in a variable, which can be accessed and displayed using
{{variables.var_name.rating}}and{{variables.var_name.comment}}.
3.8 Speak
This node is available for voice AI-agents.
Users can input the SSML text and can play the configured/generated audio on the go.
This node can be used for two purposes:
- When voice AI-agent developers can test the SSML inputs directly from this node (with the help of the Test Audio button).
- This node can be used as an alternative for the Question node but as a voice message.
You can enter what a AI-agent must ask the user in SSML format. This can be tested by clicking Test Audio and playing the produced audio. When this node is reached in the flow, the user will be sent a voice message (when the AI-agent is configured for it).
The response message (user utterance) obtained for this node can be stored as a variable (similar to the question node)

Sample SSML code:
<speak xmlns="http://www.w3.org/2001/10/synthesis" xmlns:mstts="http://www.w3.org/2001/mstts" xmlns:emo="http://www.w3.org/2009/10/emotionml" version="1.0" xml:lang="en-US"><voice name="en-US-JennyNeural"><prosody rate="0%" pitch="0%"> What is your query</prosody></voice></speak>
3.9 Input
Ask and store user input and other comments with this node.
Use this node only to store text comments from users - these replies will not trigger NLP.
In many use cases, there is a need for a non-linear flow. For example, if the phone number node asks "Please enter your phone number"- the user enters a number in the wrong format, the AI-agent displays the validation message saying "Entered number is wrong. Please enter again". For the same, if the user enters "Why do you want my phone number?" the reply will still be "Entered number is wrong. Please enter again". To handle such cases, the Input node can be used to handle different types of user replies.
For better & dynamic conversation design, use the functionalities of the input node:
- Custom validator design.
- Attachment of different custom flows/messages every time validation fails. Validation failure messages need not be monotonous as it can be configured for each of the failed attempt separately.
- Can attach the new Context handler locally for dynamic conversations.

3.10 Product search
Harnessing generative AI, the product search node dynamically showcases items from a catalog, enabling personalized interactions based on user choices. Upon selecting a product, it presents related products, optimizing user engagement and facilitating seamless exploration of offerings.
To use this node, you need to create a product catalogue and configure this node in flows.

4. Make prompt smarter
Make Prompt Smarter option is available on all the prompt nodes. 3 options available broadly are auto complete, autoskip and other related options.

4.1 Auto complete
Autocomplete is set so that the AI-agent can start predicting the rest of the word or sentence for users as they start typing. For example, if you want to find your location and you start typing Jai, you will get the city names starting with Jai - Jaipur. Similarly, if you type Ban, you will get suggestions such as Bangalore, Bangla, Banswara, etc.
This feature can be used:
- When the end user wants to easily discover what a AI-agent or a point does.
- When there are multiple options available and a limit is set on the display, autocomplete is a good singular or assisting alternative to show options.
- Faster typing, and improved user experience.
Autocomplete shows results after 3 characters are typed and it keeps filtering the results as the customer continues typing / or selects an option.

Auto complete is available at a global level and prompt level (that is triggered inside a prompt).

The following options can be set to auto-complete:
- Database column - Select a database table > column directly to populate autocomplete using that.
- List entity - Select a list entity , items of which will be used to populate autocomplete.
Only List Item names are considered, the is no search based on all synonyms.
- User properties - Select a user property(string type ) from Users table to autocomplete. (Note: Only distinct results will be shown) and add up to one filter on any column.
- FAQs - Multi-select categories of FAQs which you want to include in Autocomplete. FAQ descriptions are populated in autocomplete (which are by default same as the question itself)
- Function - If the use case turns is complicated and none of the above steps work, select a function where you can write your custom logic to ultimately return an array of string items which will populate your autocomplete.
Sample code snippet for function:
return new Promise(resolve => {
    console.log("inside autoSuggestion");
    let result = data.variables.autoComponents;
    const { term } = data;
    let suggestions = [];
    result.forEach((hit) => {
        if (hit.component.toLowerCase().includes(term.toLowerCase())) {
            suggestions.push([hit.component, hit.component]);
        }
    });
    resolve(suggestions);
});
4.2 Autoskip
You can keep your conversations from being repetitive by auto-skipping the prompt with entities or variables if you already received the value and have stored it.
In the below example, the user wont be asked for the name, phone number and email again in any of the flows.

Configure Auto-skip at a global level (from tools section), click here.
4.3 Additional
Use this as Unique ID for User: Info entered at this node will be unique for a user. For example, instead of setting a new user ID, you can use the phone number as a unique ID to recognize this user. Other nodes that can be used as Unique IDs are Car Number, Aadhar Card, SSN, etc. that are unique to an individual.
Mark user message as sensitive info: Mask this user info from appearing in conversation logs.
Mark bot message as sensitive info: Mask this AI-agent info from appearing in conversation logs.

Use-case
- Where there are 2 nodes in this flow, one asking for a password (marked user message as sensitive info) and the other providing a new password (marked AI-agent message as sensitive info).

- Text entered at these nodes will be displayed as "sensitive information" on the chat log.

Click the tools icon and configure the node. For more details, see Nodes.
5. Voice input node
A voice input node is used to gather user information, process it, and manage various scenarios of conversing in a human-like manner. This node is in auto-sync with the conversation design so all the designs you add there will appear here automatically. To learn about using this node, click here.
Voice input node will work only for voice AI-agents, i.e you should have enabled Voice bot while creating your AI-agent.
