Voice Settings
Voice Settings is where you configure how an agent sounds and listens. It's the Voice Settings tab inside AI Agent → Profile, alongside Profile Settings, Conversation Rules, and Routing Logic.
Step 1: Open Voice Settings
In your bot, go to AI Agent → Profile and click Voice Settings in the left menu.
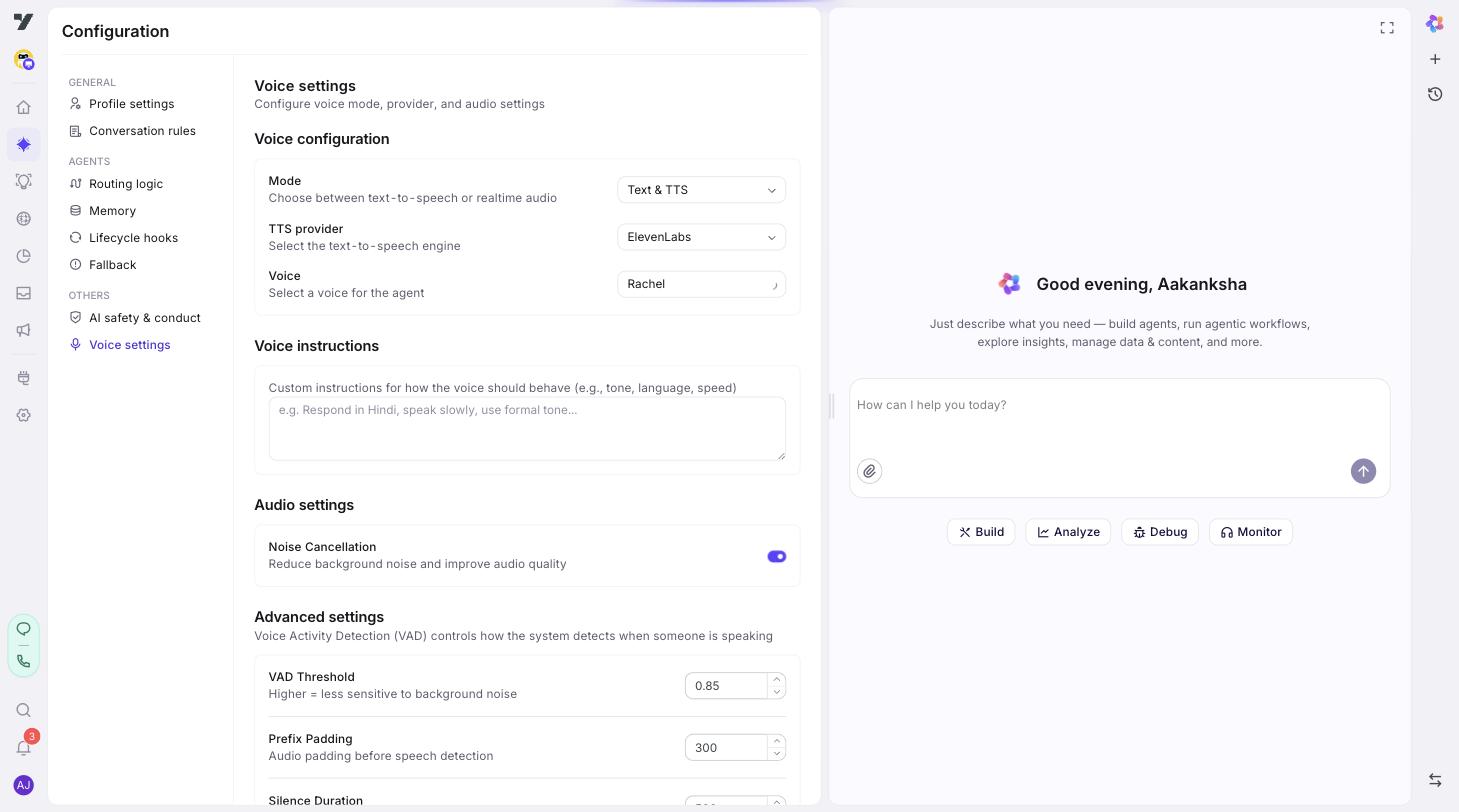
The page is split into four sections:
- Voice Configuration (mode, provider, voice).
- Voice Instructions.
- Audio Settings.
- Advanced VAD.
You can leave most defaults alone for a first build — the only sections you must touch are the first two.
Step 2: Pick a mode
The first decision is Mode. Two options:
| Mode | What you get |
|---|---|
| Text & TTS (default) | Speech recognized → text answered by your agent → text spoken back. Three independent stages, lots of provider choice. |
| Realtime Audio | Realtime audio API (OpenAI today; multi-provider adapters in flight for Gemini Live, Anthropic, MiniMax). Audio straight in, audio straight out — lowest end-to-end latency. Now supports registered tools (DynamicTool / MCP / KB), mid-call agent switch, greet-on-connect, per-turn traces. |
How to choose:
- Stick with Text & TTS when you need the widest provider catalog, broadest language coverage, and access to your custom voices.
- Pick Realtime Audio when end-to-end latency matters more than fine-grained provider control. With the May 2026 update, realtime has reached parity with pipeline mode on tools, agent switching, and traces — it's a viable production option for new builds, not just demos.
You can switch between modes any time. Each mode has its own voice and provider list, so you'll re-pick a voice if you change.
Realtime mode internals: routing is driven by the existing UI-editable
voiceOptions.mode === "realtime"field — no separate feature flag. Schema config (provider,audio.{input,output}SampleRate,audioFormat,greetOnConnect) is exposed through the same Voice Settings sub-page; defaults are sensible for the OpenAI provider.
Step 3: Pick a provider (Text & TTS mode)
The TTS Provider dropdown lists what's available for the speak-back stage. Currently:
| Provider | Notes |
|---|---|
| Yellow AI | The default. Good general quality, broad language coverage, and full access to your custom voices. |
| ElevenLabs | Premium voice quality, strong English. 10 built-in presets (Rachel, Domi, Bella, Antoni, Adam, etc.). |
| MiniMax | Multilingual presets including Mandarin, Japanese, French, Spanish. |
Speech-to-text (STT) provider is configured separately in pipeline runtime config. Yellow AI is the default STT choice.
Step 4: Pick a voice
The Voice dropdown shows every voice available for the chosen provider:
- Built-in presets (Rachel, Domi, Bella, etc. for ElevenLabs; Mandarin and multilingual options for MiniMax).
- Yellow's global curated voices.
- Your custom voices — anything you've cloned for this bot. See Custom Voices.
Click the play icon next to a voice to preview it before saving.
Best practice: match the voice to your audience. A persuasive sales bot wants a different voice than a calm support bot. Preview a few before committing.
Step 5: (Realtime Audio mode) Pick an OpenAI voice
If you switched to Realtime Audio, the voice list narrows to OpenAI's options: Alloy, Ash, Ballad, Coral, Echo, Sage, Shimmer, Verse, Marin, Cedar.
Each has a distinct character — preview to pick.
Step 6: Write voice instructions
The Voice Instructions field (≤500 characters) is freeform text that biases the bot's spoken behavior:
- "Respond only in Hindi, even if the user types in English."
- "Speak slowly and clearly. Pause briefly between sentences."
- "Sound friendly but concise — keep replies under two sentences."
Best practices:
- Use this for delivery (pace, tone, language); use bot identity for what to say.
- Don't repeat your bot identity here. Voice instructions layer on top.
- For multilingual bots, this is often the cleanest place to lock the spoken language.
Step 7: Audio Settings
There's currently one option here:
- Noise Cancellation — on by default. Suppresses background noise on the user's mic. Leave it on unless you have a specific reason (some studio setups can do better with raw audio).
Step 8: Advanced VAD (Voice Activity Detection)
VAD is what tells the bot "the user has finished speaking, my turn." Default values work for most calls; tune only if testing reveals a specific problem.
| Setting | Default | What it does |
|---|---|---|
| VAD Threshold | 0.85 | How aggressively to detect speech vs silence. Higher = stricter (less likely to trigger on background noise but may cut off quiet speech). |
| Prefix Padding | 300 ms | How much audio before detected speech to include. Keeps the start of words from being clipped. |
| Silence Duration | 500 ms | How long the user must be silent before the bot considers the turn ended. Lower = snappier, more interruptions; higher = more natural pauses, but a small delay. |
Tuning by use case:
- Outbound sales / fast-paced chat → drop Silence Duration to ~300 ms; you'll feel more responsive.
- Slow / elderly / non-native speakers → raise Silence Duration to 700–800 ms so the bot doesn't cut them off.
- Noisy environments (vehicles, public spaces) → raise VAD Threshold to 0.9.
Step 9: Save
Click Save. The configuration applies to all conversations on this bot from the next call onward.
Best practices
- Pick the mode that matches your goal, not the newest one. Pipeline (Text & TTS) is right for most production bots.
- Preview voices before committing. A 10-second preview saves a lot of "this voice is wrong" feedback later.
- Keep voice instructions short and behavioral. This isn't where you re-state the agent's purpose.
- Don't change VAD without a measurement. Test the bot, find a specific problem, then tune. Random changes can make things worse.
- For multilingual bots, set the spoken language explicitly in Voice Instructions. Don't rely on auto-detection unless you've tested it on real calls.
Continue to: Custom Voices.