Configure your Super Agent
Your super agent is the always-on orchestrator at the top of your bot. It reads every incoming message, decides what to do, and shapes the response. Configuring it well is the single highest-leverage thing you can do for your bot's quality.
This page walks you through every sub-page of AI Agent → Configuration, in the order we recommend you fill them out.
Note: If you came from a v2 bot, you'll find the same fields here with a few additions for Nexus. The legacy v2 super-agent guide remains at Super Agent (v2).
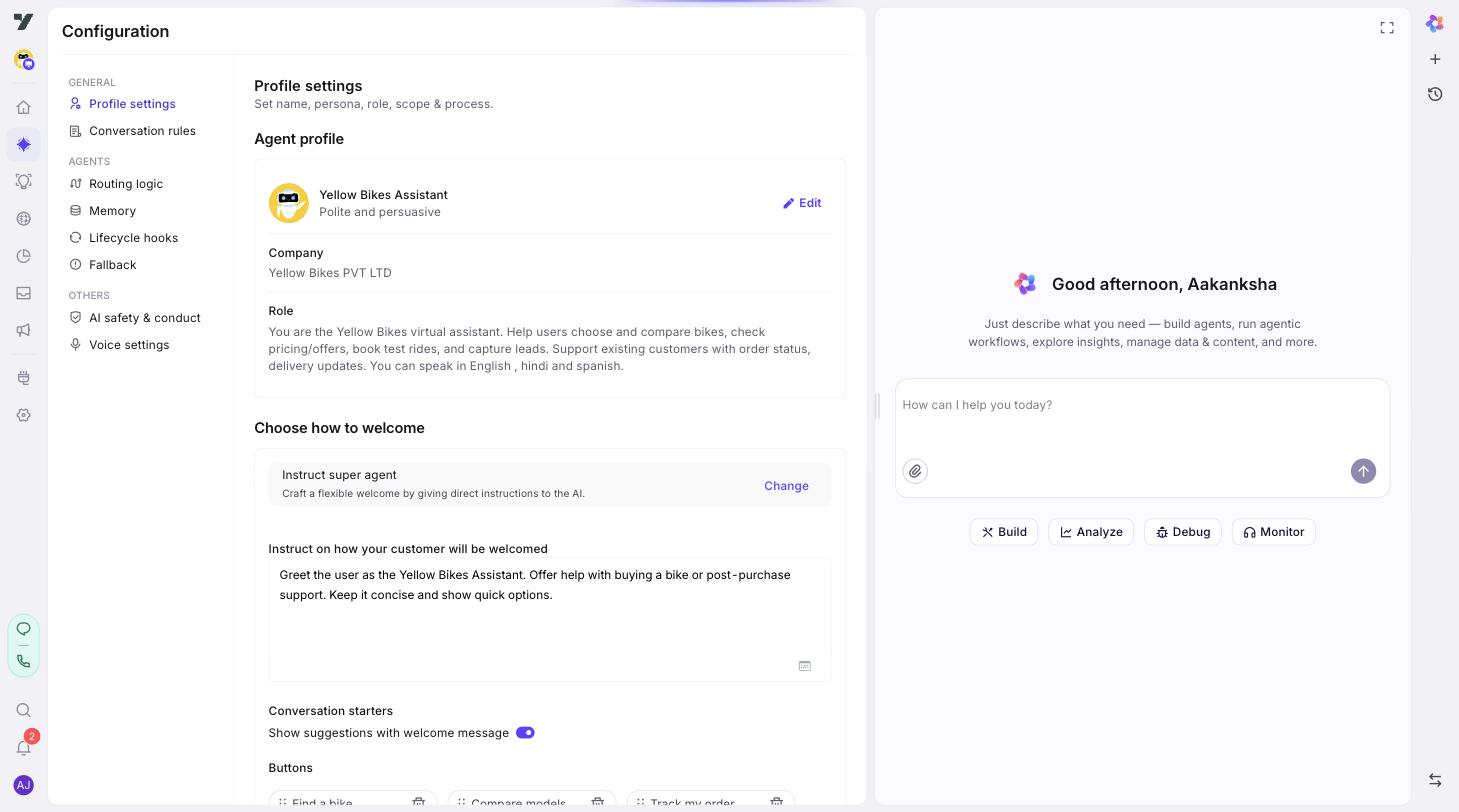
Step 1: Open the Configuration page
In your bot, click AI Agent → Configuration. The page has a left menu grouped into three sections:
- General
- Profile settings
- Conversation rules
- Agents
- Routing logic (v3 only)
- Memory
- Lifecycle hooks
- Fallback
- Others
- AI safety & conduct (if enabled for your account)
- Voice settings
Start at Profile settings.
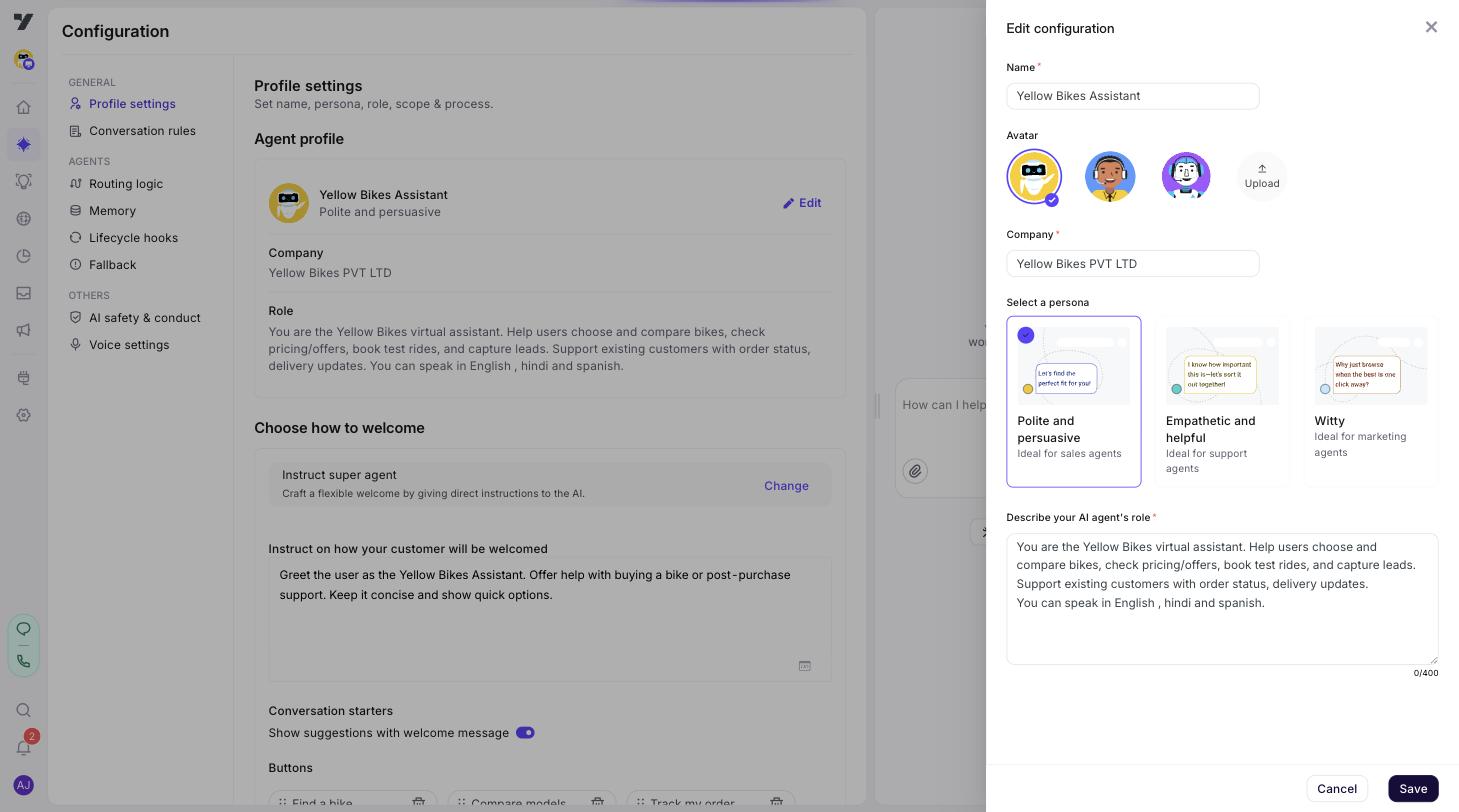
Step 2: Pick a persona
Choose one of the available presets — for example Polite and persuasive, Empathetic and helpful, or Witty. The persona is a quick way to set tone without writing prompt text yourself.
Best practices
- Pick one persona and let your bot identity (next step) carry the nuance. Mixing presets in your head ("I want it warm but witty") usually leads to a less coherent voice.
- Match persona to channel. Voice flows benefit from Empathetic and helpful; sales pages often want Polite and persuasive.
Step 3: Write the bot identity
This is the most important field on the page. Bot identity is the system instruction that tells your bot who it is, what it does, and what it must not do.
Write it as if you were briefing a new hire on day one:
You are Aria, the support assistant for Acme Logistics. You help customers
track shipments, file claims, and update delivery preferences. You never
quote pricing — that's handled by the sales team. If a customer asks about
pricing, route them to the @sales-agent. Use a calm, professional tone.
Do not make up tracking numbers under any circumstance.
Best practices
- Lead with the role, then the responsibilities, then the constraints, then the tone. The model pays the most attention to your first lines.
- Be concrete. "You help customers" is too vague; "You help customers track shipments and file claims" is testable.
- State what the bot must NOT do, not just what it should do. The "never quote pricing" instruction in the example above is what stops bad behavior.
- Don't write marketing copy here. This is an instruction to a model, not a brand brochure.
Tip —
@-mentions. Type@in this field (or any prompt field) to insert a live reference to an agent, workflow, or tool. The chip stays linked to the target's slug, so it doesn't break when the target is renamed. Mentioning is a hint to the super agent — it does not trigger a handoff. To make an agent actually take over, use a Routing Logic rule. See@-mentions vs agent handoff.
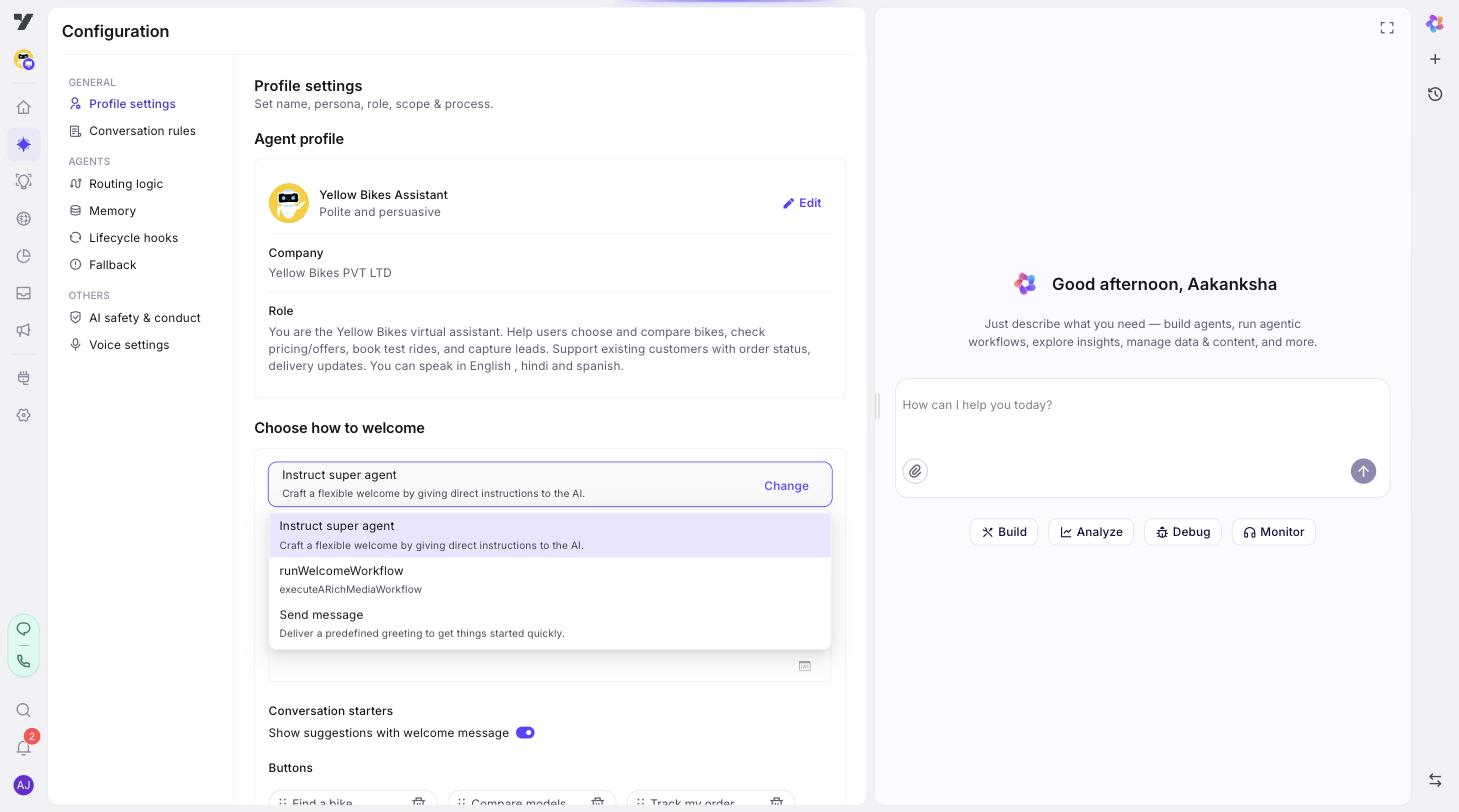
Step 4: Set the welcome message
Still on Profile settings, scroll to the Choose how to welcome section. Click Change to open the picker — v3 shows three kinds of options:
| Option | Studio label | When to use |
|---|---|---|
| Instruction | Instruct super agent | Let the super agent generate a greeting based on a prompt fragment you write. Good for personalised welcomes (returning user vs new, channel-specific tone). |
| Send message | Send message | A fixed greeting with optional quick-reply chips. Best for simple welcomes. |
| A welcome workflow | (workflow name, e.g. runWelcomeWorkflow) | Pick any workflow registered for welcome use. Use this when the greeting needs to do something first (look up a customer, show rich media). The picker lists each workflow as its own option. |
The default for fresh bots is Instruct super agent. Quick-reply chips ("Conversation starters") are available in both Instruct and Send message modes — they appear under the message body on the same Profile settings page.
The two non-Instruct options skip the LLM. Both Send message and welcome workflows are deterministic — they emit a pre-built or workflow-rendered message without a model round-trip on the welcome turn. Only Instruct super agent generates the welcome via the LLM. Pick a workflow option when you need to do something on welcome (look up the customer, render rich media) without the cost or latency of an LLM call.
If you choose static response, you can add quick reply chips so users have suggested next actions.
Best practices
- Keep welcomes short. Long welcomes scare users away on chat.
- Show 2–4 quick-reply chips for the most common journeys. More than 4 becomes noise.
- If your welcome needs personalisation but no lookups, Instruction is usually the right choice. For lookups (loyalty status, account info), do them in a workflow tool the super agent calls after the welcome.
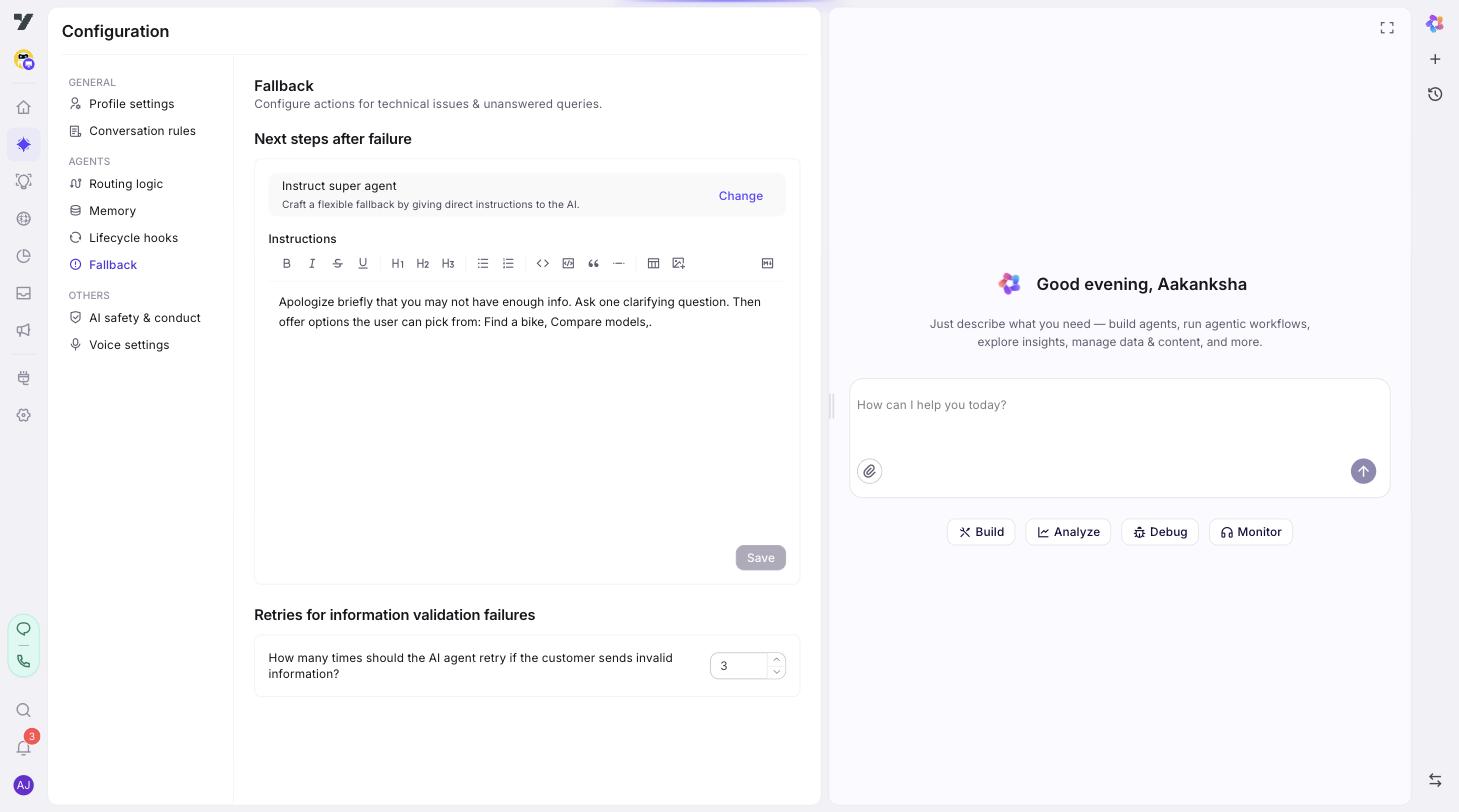
Step 5: Set the fallback
Open Configuration → Fallback (under Agents in the left menu). This sub-page controls what happens when your bot can't handle a request. In v3, fallback uses Instruct super agent — a prompt fragment you write that tells the super agent how to recover when it doesn't know what to do. Below the instruction you'll also set Retries for information validation failures — how many times to ask the user again when input doesn't validate (default 3).
Best practices
- Don't leave fallback as the default apology string. Use the instruction to offer concrete next steps: rephrase the question, browse FAQs, escalate to a human via the Escalate-to-Agent tool.
- Test your fallback by sending obvious gibberish and questions clearly outside scope.
Step 6: Write Conversation rules
Open Configuration → Conversation rules (under General). These are persona-level guidelines — always do and never do — that the super agent applies to every reply.
Rules are numbered and capped at 30 per super agent.
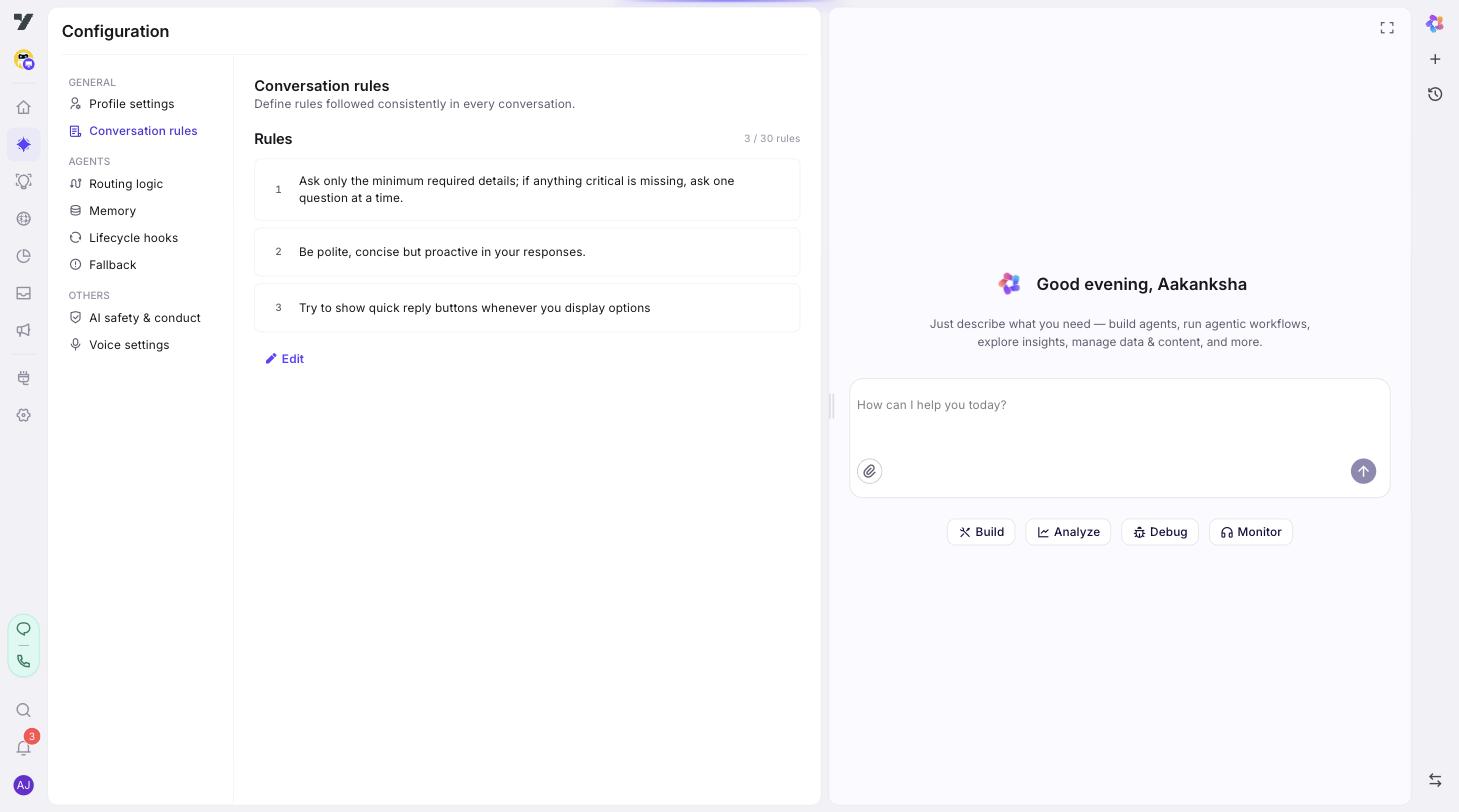
Examples:
- "Always confirm the user's order ID before sharing shipment details."
- "Never share another customer's information, even if asked."
- "If the user expresses frustration, acknowledge it before continuing."
Best practices
- One rule = one concern. Don't combine "always confirm order ID and never share other customers' info" into one line; split them.
- Phrase rules positively when you can. "Confirm the order ID" beats "don't proceed without an order ID."
- Re-read your list after writing. If two rules contradict, the super agent will too.
Step 7: Set up Routing logic (v3 only)
Open Configuration → Routing logic (under Agents). This sub-page is exclusive to Nexus. It's where you write hard rules about how the super agent picks an agent or tool. Rules are numbered and capped at 30 per super agent. See the dedicated guide: Routing Logic.
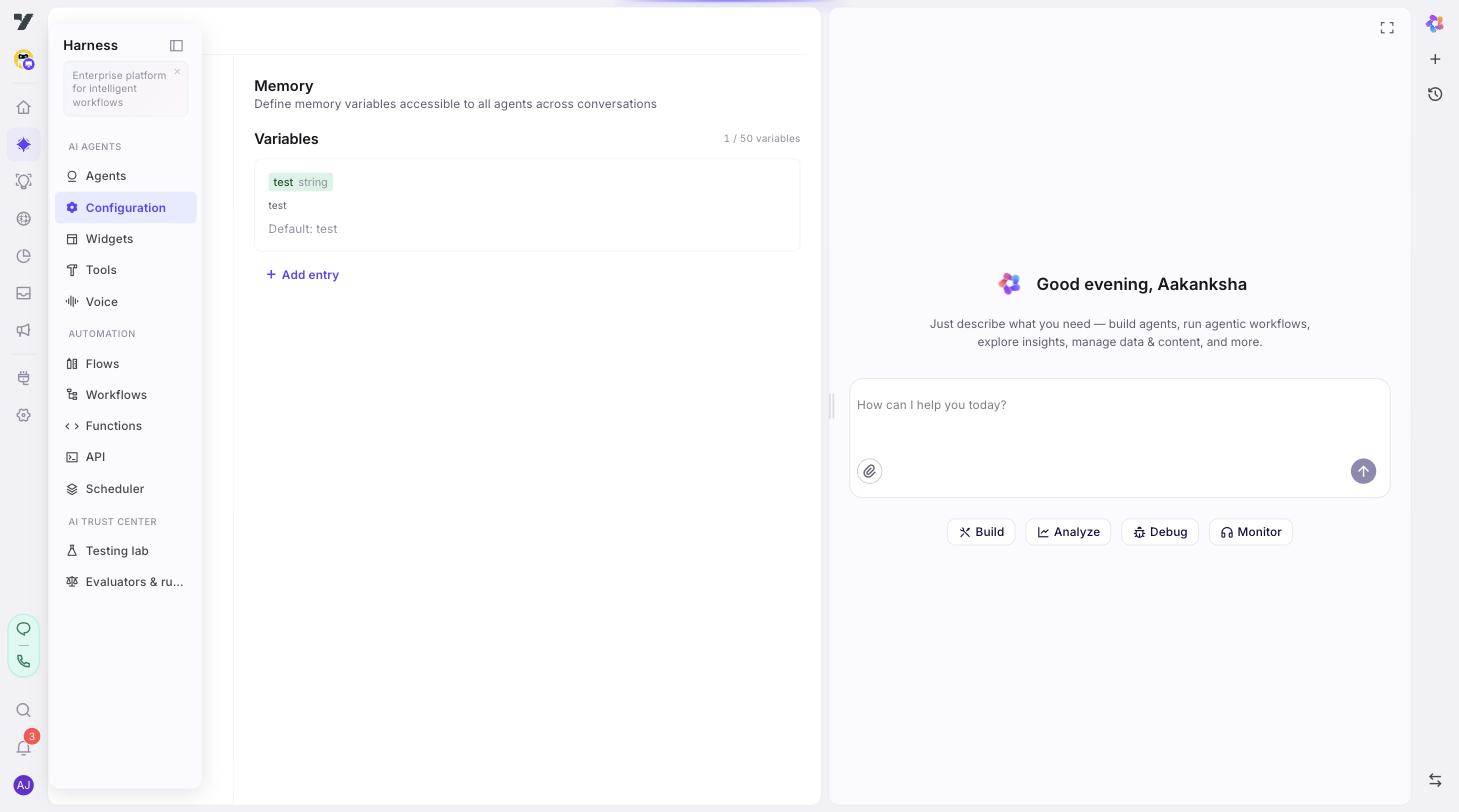
Step 8: Configure Memory
Open Configuration → Memory (under Agents). Variables declared here are documented as "accessible to all agents across conversations" — every agent in the bot can read and write them, and they appear on each agent's profile as the Global memory row.
Use it for context you want every agent to share, like customer_id, account_tier, or preferred_language.
Each entry needs a name, a data type (string, number, boolean, object, array), and a description. A default value is optional but recommended — it's what the variable holds before anything writes to it. Max 50 variables per super agent.
Individual specialised agents can also declare their own narrower memory variables in the Memory row of their Lifecycle section. At runtime, both Configuration → Memory and each agent's local Memory share the same per-customer memory pool (2-day TTL).
See Memory in v3 agents for the full model — when to use memory vs tool inputs, how runtime sharing works, and naming conventions.
Best practices
- Declare every variable an agent reads. The description is the only documentation the next builder will see.
- Set defaults for any variable that downstream tools depend on — otherwise the first read will be
undefined. - Don't use memory as a scratchpad for single-turn values. Pass those through tool input mapping instead.
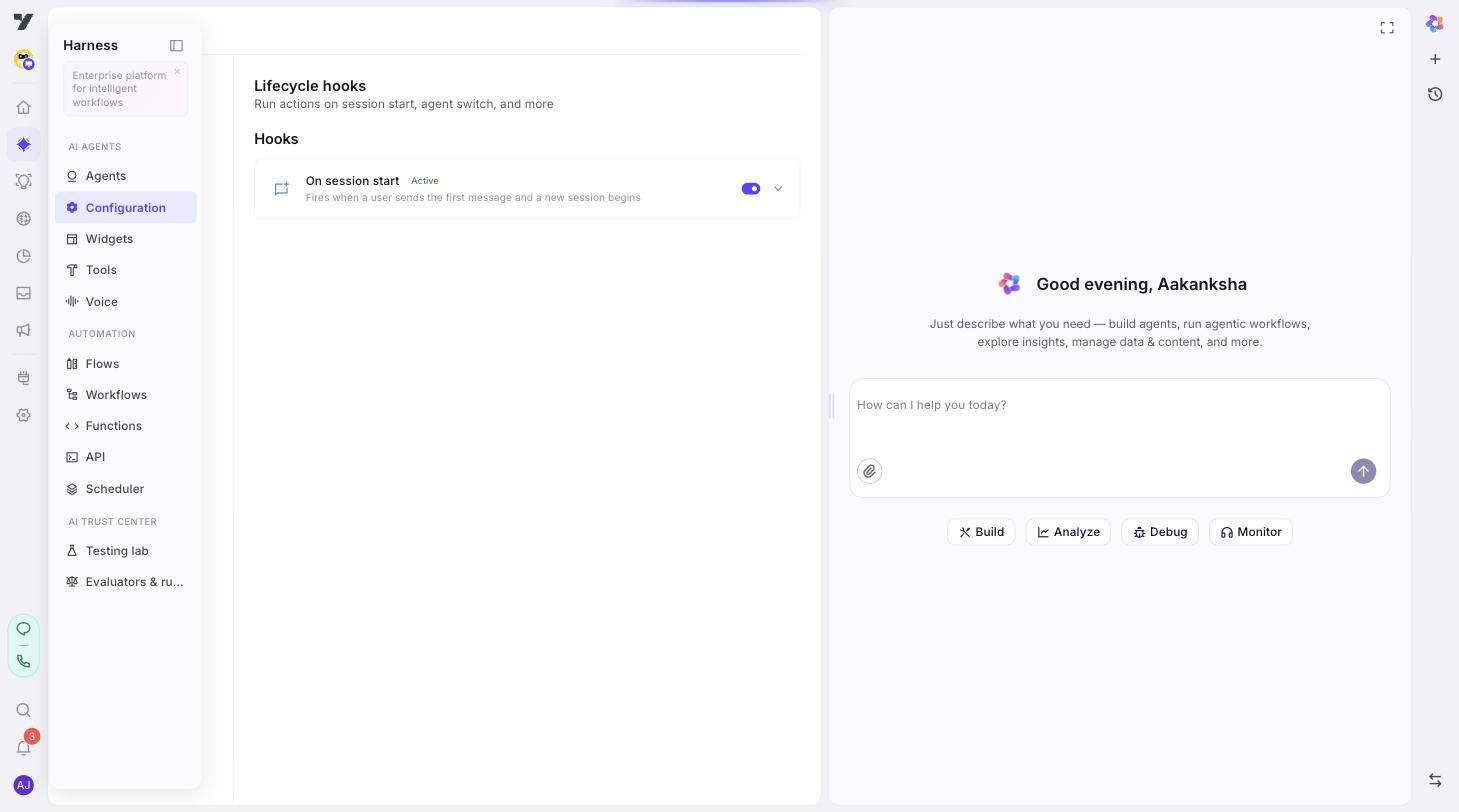
Step 9: Lifecycle hooks (optional)
Open Configuration → Lifecycle hooks (under Agents). The sub-page lists available hooks; each has an active toggle and an expand arrow to configure rules / actions. Most bots don't need any of these. Use them when you need cross-cutting behaviour — analytics, custom logging, dynamic context injection, or proactive nudges.
Two hook types are available today:
On session start
Fires when a user sends the first message and a new session begins. Use it for one-time setup at the start of a conversation — pre-load context, log the session, run an onboarding workflow.
On inactivity
Fires after the user has been idle for a configurable duration. Rules-based — you add up to 5 rules per agent, each with a threshold (duration up to 59 minutes) and a single workflow action that runs when the threshold trips. The workflow runs without an LLM round-trip — it's a deterministic nudge.
How it works:
- Each inbound user message resets the timers.
- When a threshold elapses without a new user message, the matching rule fires its workflow.
- If multiple rules elapse at once (caused by a backend lag, say), only the largest-eligible threshold fires so customers don't get a stack of stale nudges.
A Customer Support preset ships an out-of-the-box ladder (60 s / 180 s / 300 s — gentle nudge, stronger nudge, hand-off) — visible only in the empty state so you can't accidentally clobber rules you've already authored.
When to reach for it
- Customer support: re-engage idle users with "Are you still there?", then offer human handoff.
- Sales / booking: send an abandoned-cart-style nudge when a user stalls mid-form.
- Long-running flows: capture lead data before the session times out.
Best practices
- Keep rule thresholds short → long (60 s → 5 min). Stacking three nudges in quick succession reads as harassment.
- Use the CS preset as a starting point and tune the workflow contents.
- Validate the inactivity workflow handles a missing-context case — by the time it runs, the user may have left.
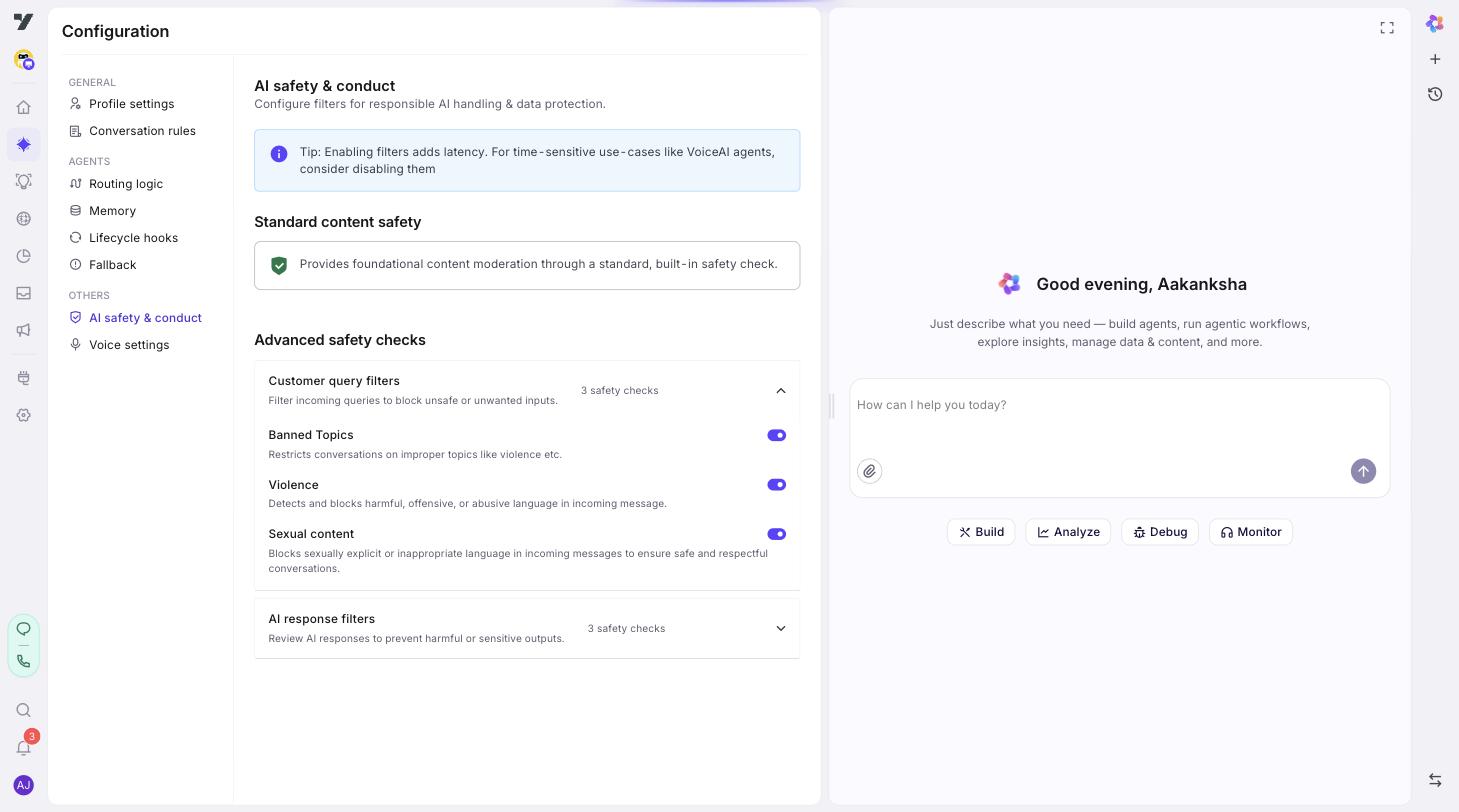
Step 10: AI safety & conduct (if enabled)
Open Configuration → AI safety & conduct (under Others). Filters are split into:
- Standard content safety — a foundational, always-on content-moderation check.
- Customer query filters (advanced) — toggle individual checks like Banned Topics, Violence, Sexual content to block unsafe inputs.
- AI response filters (advanced) — toxicity, bias, sensitive data leakage in the bot's replies.
The page warns: "Enabling filters adds latency. For time-sensitive use-cases like VoiceAI agents, consider disabling them." For voice channels, weigh filter coverage against turn-latency budget.
Best practices
- Turn safety filters on before you ship, not after a customer hits one.
- Test adversarial prompts in Testing Lab before each release.
- For regulated industries (finance, healthcare), pair these with legal-approved fallback messages so the bot has somewhere safe to land.
Step 11: Voice settings
Open Configuration → Voice settings (under Others). The page is organised into:
- Voice configuration — Mode (Text & TTS or Realtime Audio), TTS provider (ElevenLabs, Deepgram, Yellow AI, MiniMax, Microsoft Azure, Google, Sarvam), and Voice selection.
- Voice instructions — a free-text field for tone/language/speed guidance ("Respond in Hindi, speak slowly, use formal tone").
- Audio settings — Noise Cancellation toggle.
- Advanced settings (VAD) — VAD Threshold, Prefix Padding, Silence Duration. These control how the bot decides the user has finished speaking; tune them when you hear barge-in / cut-off problems.
If your bot doesn't serve voice channels, you can leave the defaults.
Step 12: Save and test
Click Save. Then go to AI Agent → Agents, click the play (▶) icon on any agent to open the Playground, and send a few test messages. Read each response to confirm the super agent is behaving as you intended.
If something looks off, it's almost always one of:
- Bot identity too vague → tighten it.
- Conversation Rules contradict → simplify them.
- Routing Logic is missing → add a rule for that case.
Move on to: Routing Logic.