Agents and Tools
Once you've configured your super agent, the next question is: does it need help? That's where agents and tools come in.
Agents in one minute
An agent is a specialised assistant designed for one job. You might have an order-status agent that answers "Where's my order?", a demo-booking agent that helps prospects pick a time, a billing agent that handles refunds and invoices. Each has its own:
- Persona and identity
- Conversation rules
- Welcome and fallback
- Tools
When the super agent decides a message belongs to a specialty — say, the user asks "Can I get a refund on order #4421?" — it hands off to the billing agent. That agent runs the conversation until it's done, then control returns to the super agent.
Agents can also follow their own rules (separate from the super agent's). Most of the time the super agent's rules are enough; reach for per-agent rules only when one agent genuinely needs a different policy (a stricter tone for legal, a softer one for support).
When to add an agent
Add an agent when:
- You have a clearly distinct domain with its own knowledge, vocabulary, or process. Example: order-tracking lives in a different world from demo-booking — make them separate agents.
- The domain has its own tools or workflows that other parts of the bot don't need. Example: the billing agent calls a refund workflow; no other agent needs it.
- You'd describe the work as belonging to a different "team" if humans were doing it. Example: a sales-development rep books demos; a support rep handles complaints. Different agents.
Don't add an agent when:
- The work is just a short detour (use a flow or a tool call instead). Example: "look up the user's tier" doesn't need its own agent — it's one tool call.
- You only need to change tone for one topic (use Conversation Rules on the super agent).
- Splitting the work makes the conversation feel choppy to the user.
A common mistake: building five agents on day one. Start with one super agent. Add an agent when you have a real reason — usually when you can name the task it owns ("books demos", "looks up order status") and explain why the super agent shouldn't just handle it itself.
Step 1: Create an agent
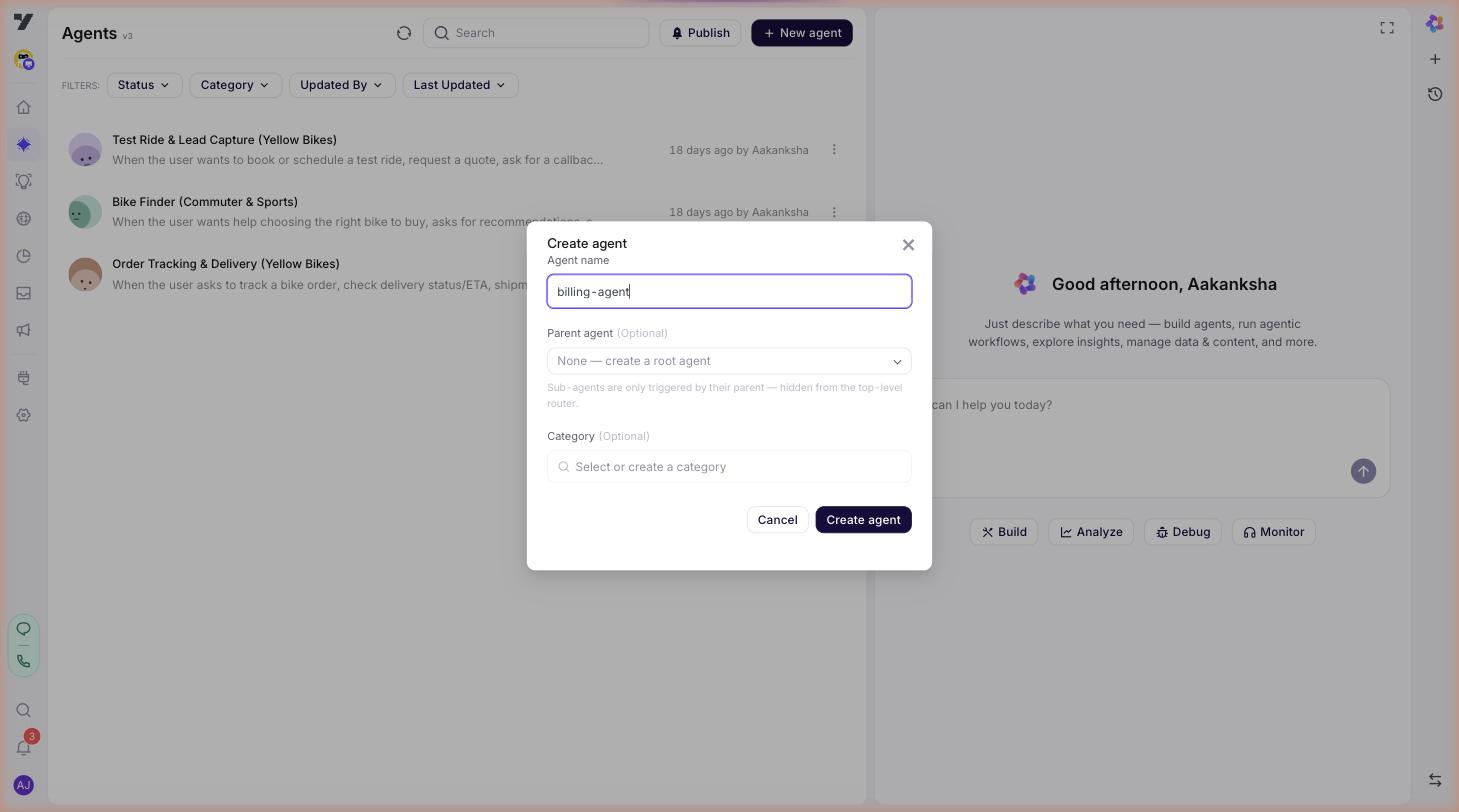
Go to AI Agent → Agents. Click New agent. The Create agent dialog asks for the bare minimum:
- A clear name that says what the agent does —
order-status-agent,demo-booking-agent,billing-agent. This is the slug your routing rules and@-mentions will reference, so make it self-explanatory. - An optional Parent agent. Leave this on
None — create a root agentto make a peer of the super agent. Pick an existing agent to make this a sub-agent. - An optional Category for grouping in the Agents list.
Click Create. The agent's profile page opens — that's where you'll fill in the rest.
Step 2: Configure the agent's behaviour
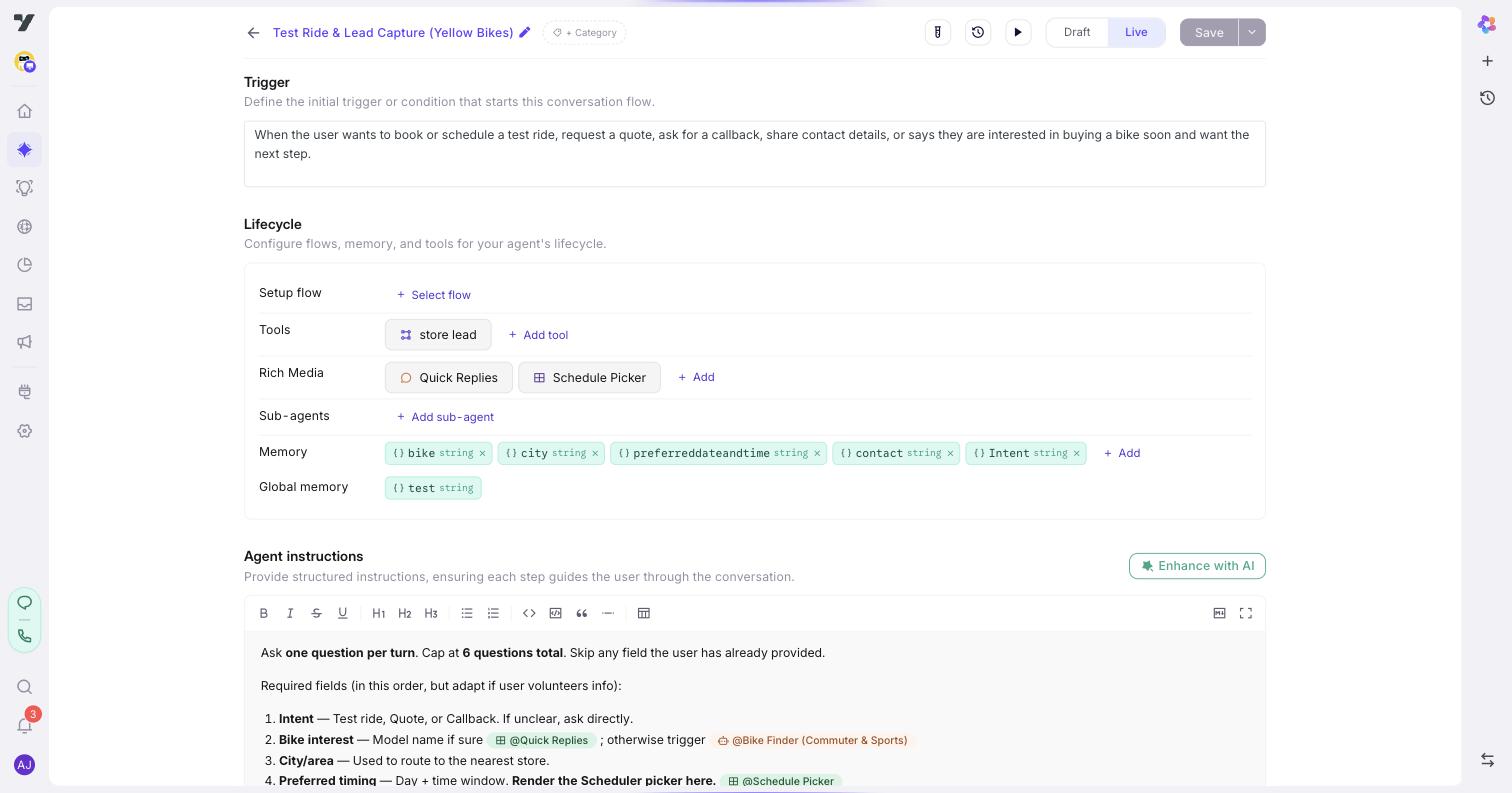
The agent's profile has three sections, top to bottom:
- Trigger — a one- or two-sentence description of when this agent should take over. This is the agent's pitch to the super agent and the single most important field for routing. Example: "When the user asks about billing, invoices, refunds, payment-method changes, or charges. Do not handle pricing questions." A sharp Trigger ("invoices, refunds, payment-method changes") leads to predictable routing; a vague one ("handles money stuff") doesn't.
- Lifecycle — Setup flow, Tools, Rich Media, Sub-agents, Memory, Global memory. This is where the agent's actual behaviour lives. Each row is covered in the rest of this guide and the related pages.
- Agent instructions — the agent's identity, scope, and rules. A rich-text editor where you describe the persona and any do/don't constraints. Example: "You handle billing inquiries for Acme. You can look up invoices and process refunds, but never quote new pricing — route pricing questions back to the super agent."
Keep Trigger for when to take over, and Agent instructions for how to behave once you have the conversation. Mixing them up — putting persona in the Trigger or routing hints in the Instructions — is the most common source of confused routing.
Note: Every agent's profile shows two memory rows — Memory (local to that agent) and Global memory (bot-wide). They're a documentation/scope convention; at runtime both flow into a single shared pool keyed by
(botId, userId), so the super agent and every other agent can read each other's writes. See Memory in v3 agents for the full model.
Best practice: keep agent identity tight. If the billing agent's identity tries to also handle shipping, you'll get unpredictable handoffs because the super agent now sees two agents that both look like good candidates for a shipping question.
Sub-agents (hierarchical children)
In an agent's Lifecycle section you'll also see a Sub-agents row with an + Add sub-agent button. Sub-agents are a different concept from the peer agents you create from the main Agents page:
| Specialised agents (peers) | Sub-agents (hierarchical children) | |
|---|---|---|
| Created from | Agents page → New agent (root) | Inside another agent's Lifecycle → + Add sub-agent, or New agent with a Parent agent selected |
| Who routes to them | The super agent's router (driven by descriptions + Routing Logic) | Only their parent agent — they are hidden from the top-level router |
| Use when | The work is a distinct journey the super agent should consider for any incoming message (billing, order status, demo booking, …) | The work is a narrower step inside an agent's flow that benefits from its own persona, tools, or memory (e.g. a refund-eligibility-check sub-agent under the billing agent) |
For most bots you'll only need peer agents. Reach for sub-agents when one agent's flow has a self-contained sub-task that's complex enough to warrant its own identity, tools, or memory.
Step 3: Make the handoff explicit (optional but recommended)
By default, the super agent uses each agent's Trigger (the textarea at the top of every agent's profile) to decide when to hand off. For simple bots with very distinct Triggers, that's enough — open the Playground (the ▶ icon in any agent's title bar) and send a test message; if the right agent picks it up, you're done. You do not need any routing rules to ship.
Reach for Routing Logic rules when you want a deterministic override on top of trigger-based routing. Example:
"If the user mentions billing, invoices, refunds, or charges, hand off to the @billing-agent. Do not answer billing questions yourself."
A routing rule is harder than a Trigger — Triggers are signals the super agent weighs alongside the message, rules are explicit instructions ("always", "never") it must follow. Use rules when:
- Two agents have Triggers that overlap and routing isn't picking the one you want.
- A topic is sensitive enough that you don't want the super agent to even attempt to answer it (legal, regulated content, escalations).
- You need to express a compound condition the description can't capture ("If the user is in region X and asking about feature Y, route to…").
See Routing Logic for the full guide on writing rules. See also Routing Logic vs Start triggers if you're wondering whether an agent's Start trigger could replace this step.
Step 4: Add tools
Tools are the actions an agent can take in the real world: run a workflow, search a knowledge base, escalate to a human, transfer a call. You define them once in AI Agent → Tools and any agent in this bot can use them — including the super agent itself. Tools aren't required to live under an agent; the super agent can call a tool directly if that's all the answer needs.
When you attach a tool to a specific agent, you're telling the super agent "this tool belongs to this agent's job" — which is a useful routing hint. Example: attach the getOrderStatus workflow to the order-status agent, and the super agent learns to route order-tracking questions to that agent (with that tool available) instead of trying to answer with a different tool.
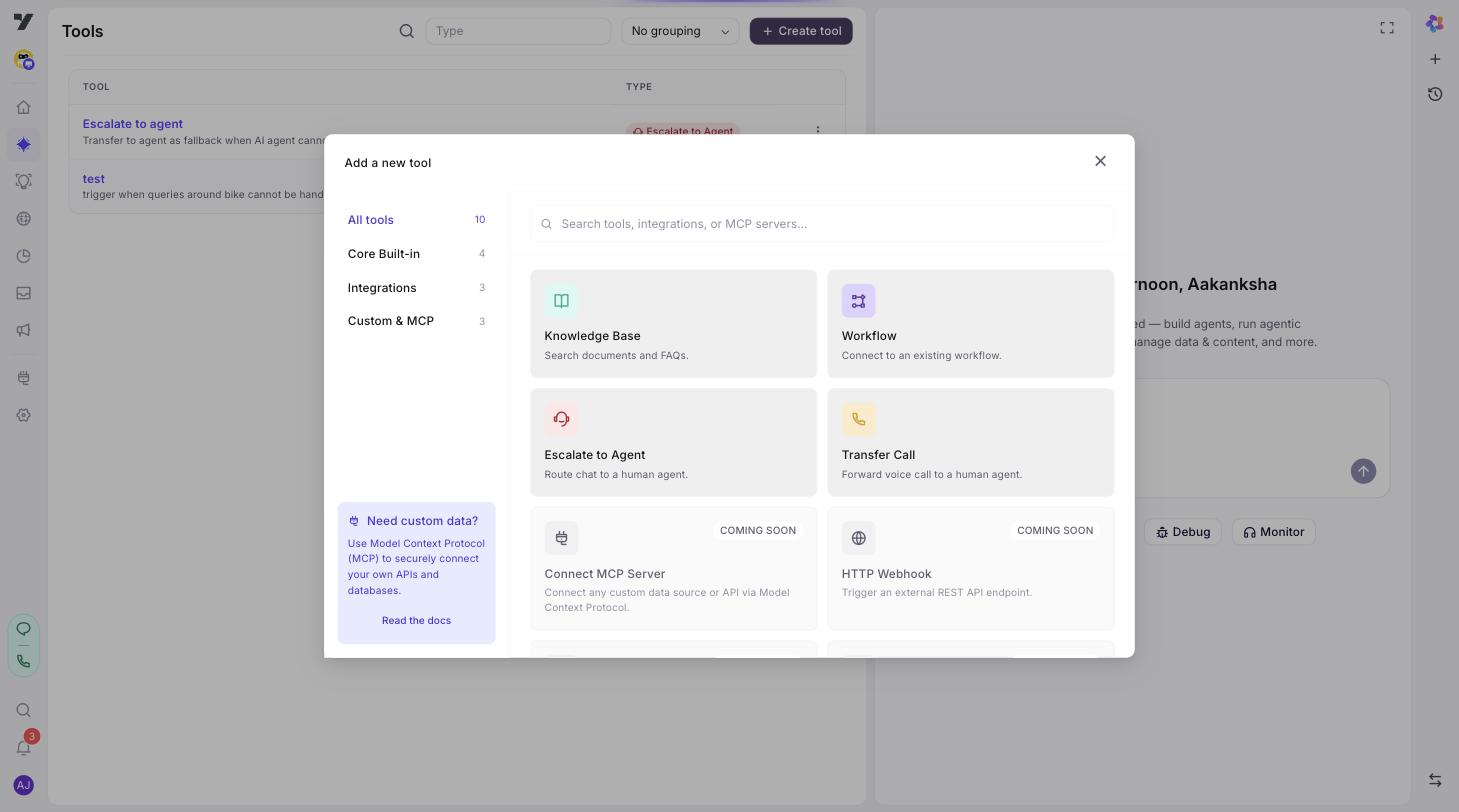
The four built-in tool types available today:
| Tool | What it does | Common use |
|---|---|---|
| Workflow | Connect to a workflow you built in the workflow editor. | Multi-step business logic, API integrations. Example: the getOrderStatus workflow inside an order-status agent. |
| Knowledge Base | Search documents and FAQs. | Product questions, policy lookup. Example: a returns-policy KB attached to the support agent. |
| Escalate to Agent | Route a chat to a human agent in Inbox. | Customer support escalation. Example: hand off when the user types "talk to a human". |
| Transfer Call | Forward a voice call to a human or SIP extension. | Voice escalation. |
More are coming (Connect MCP Server, HTTP Webhook, Custom Function, Slack/PostgreSQL/Google Calendar) — they appear in the picker today as "coming soon".
The full guide for each lives under Tools — Overview:
- Workflow tool — connect a workflow as a tool.
- Knowledge Base tool — answer from your docs and FAQs.
- Escalation tools — Escalate to Agent (chat) and Transfer Call (voice).
- Tools best practices — naming, descriptions, schemas, and routing.
Step 5: Test the handoff
Open the Playground on any agent (▶ in the title bar) and send a message that should trigger your agent — e.g. "Can I get a refund?" for the billing agent. Watch:
- The chat — did the right agent's persona take over?
- Read the bot's response — did the right agent's persona take over on the first try? Did the right context carry over?
If the handoff didn't fire, two places to look: (1) sharpen the agent's Trigger — vague Triggers lead to fuzzy routing; (2) add or tighten a Routing Logic rule. If the handoff fired but the agent answered poorly, the issue is inside the agent — revisit its identity, rules, and tools.
Tip — manage tests from the agent page. Each agent's detail page has a Tests button in the topbar (next to Version History). Open it to see linked test count, latest run summary, and live progress for any in-flight run. From there you can deep-link straight to the Testing Lab with this agent's tests pre-selected, or create a new test case pre-populated with this agent. See Testing → Manage tests from the agent detail page.
@-mentioning vs handing off to an agent
These two are easy to mix up — they look similar in the studio but do very different things. Understand the distinction once and you'll save yourself a lot of confusing routing bugs.
@-mention — In any markdown prompt field (bot identity, conversation rules, welcome and fallback messages, routing logic), type @ to open a picker. You can mention four kinds of things: an agent, a workflow, a tool, or a rich-media item. The mention shows up as a colored chip whose label stays linked even if you rename the target — so your prompts don't go stale. Behind the scenes the chip stores the slug, not the name.
A mention is a reference, not an action. It puts the slug into the prompt so the super agent sees a semantic hint ("the user can ask the @billing-agent for refunds"). It does not trigger a handoff. The super agent may consider what's mentioned when composing a reply, but a handoff only fires when something actually tells it to route.
Agent handoff — An agent only takes over the conversation when the super agent explicitly hands off to it. Two things make a handoff fire:
- A Routing Logic rule that names the agent (
"If the user asks about billing, hand off to the @billing-agent…"). - A Call agent / tool invocation that targets the agent.
Once the handoff fires, the agent owns the conversation until it returns control.
Side-by-side comparison
@-mention | Agent handoff | |
|---|---|---|
| Purpose | Reference an agent / workflow / tool inline in prose. | Hand the conversation to a specialist. |
| Where you set it | Anywhere a markdown prompt editor accepts text (bot identity, rules, welcome, fallback, routing logic). | AI Agent → Profile → Routing Logic or a Call-agent / tool invocation. |
| What's stored | A markdown chip referencing the target's slug, e.g. @[agent:billing-agent]. | A first-class routing rule or tool config. |
| Runtime effect | None on its own — it's a hint the super agent may consider. | Hard handoff: the named agent takes over. |
| What can be referenced | Agents, workflows, tools, rich-media items. | Agents (or workflows / tools via dedicated tool types). |
| Survives a rename? | Yes — the chip resolves the live name from the slug. | Yes for tool / agent slugs; routing rules that hard-code names should also use @-mentions to stay current. |
When to use which
| You want to… | Use |
|---|---|
| Tell the super agent that a billing agent exists, so it can mention it in conversation. | @-mention inside bot identity. |
| Make sure billing questions always go to the billing agent. | Routing Logic rule (agent handoff). |
| Reference a workflow inside an instruction without binding the agent to call it. | @-mention. |
| Make the bot call a workflow when a condition fires. | Add it as a Workflow tool and reference from a routing rule. |
| Suggest a self-service path ("you can also visit our @help-center workflow") without forcing it. | @-mention. |
| Force escalation when the user asks for a human. | Routing Logic rule + Escalate-to-Agent tool. |
A pattern that uses both
The strongest setup combines them:
"If the user asks about billing, invoices, or refunds, hand off to the @billing-agent. Do not answer billing questions yourself."
The Routing Logic rule makes the handoff deterministic. The @-mention inside the rule keeps the agent's name resolved live — rename billing-agent to billing-team and the rule keeps working without an edit.
Best practice: in any rule, instruction, or message that names an agent, workflow, or tool, use @-mentions instead of typing the name as plain text. Plain text rots when slugs are renamed; chips don't.
Best practices
- Name agents by the task.
order-status-agent,demo-booking-agent,billing-agentbeatagent2. The name shows up in routing rules and traces — make it self-explanatory. - Sharp descriptions beat clever rules. A precise one-sentence description ("Handles billing: invoices, refunds, payment-method changes — does not quote new pricing.") routes correctly without any rule at all. Reach for rules only when descriptions can't disambiguate.
- Don't double up. If two agents have overlapping Triggers, you'll get inconsistent routing. Either merge them or sharpen the boundary.
- Limit tool sprawl. An agent with 20 tools is harder to predict than one with 4. If you find yourself adding many tools, consider whether some belong in a different agent.
- Reuse with Global Components. If multiple agents need the same policy text, brand voice, or disclaimer, define it as a Global Component and pull it in. One source of truth.
- Document handoffs as you build. Keep a short list: "Routing rule X sends Y type of question to Z agent." Future-you (or the next builder) will thank you.
- Use
@-mentions for any name that might be renamed. The chip resolves to the current name; plain text doesn't.
Continue to: Best Practices or Test your agent.