PayU Business
PayU Business integration enables your AI agent to receive PayU payments from your users. You can generate payment links, UPI intents for whatsapp pay and receive notifications on the success/failure of the payments.
Integrating PayU with Yellow.ai
To connect your PayU account with yellow.ai, follow these steps:
1.1 Get keys required for your PayU account integration
- Login to PayU Dashboard
- Switch to Live Mode from the toggle option on the menu bar.
- Select Developer from the menu on the left-pane and select the API Details tab if required. Here
- Key: The API key required for all payment requests.
- Salt (32-bit): A 32-character string (v1) used to generate a hash. Any one hash codes is required along with the other parameters when submitting a payment request to PayU.
- Salt (256-bit): A more secure, 256-bit string (v2) used for hash generation. Any one hash codes is required along with the other parameters when submitting a payment request to PayU.
- Alternatively, you can write to PayUBiz team for the API keys. They will provide the keys for both the modes.
- For comprehensive guide to PayU Dashboard, see here
1.2 Connect PayU Business to yellow.ai
In a two-tier environment, you can connect an integration app in the Development environment. In a three-tier environment, you can connect the integration app either in Staging or Sandbox. All connected integrations are available in the live environment.
-
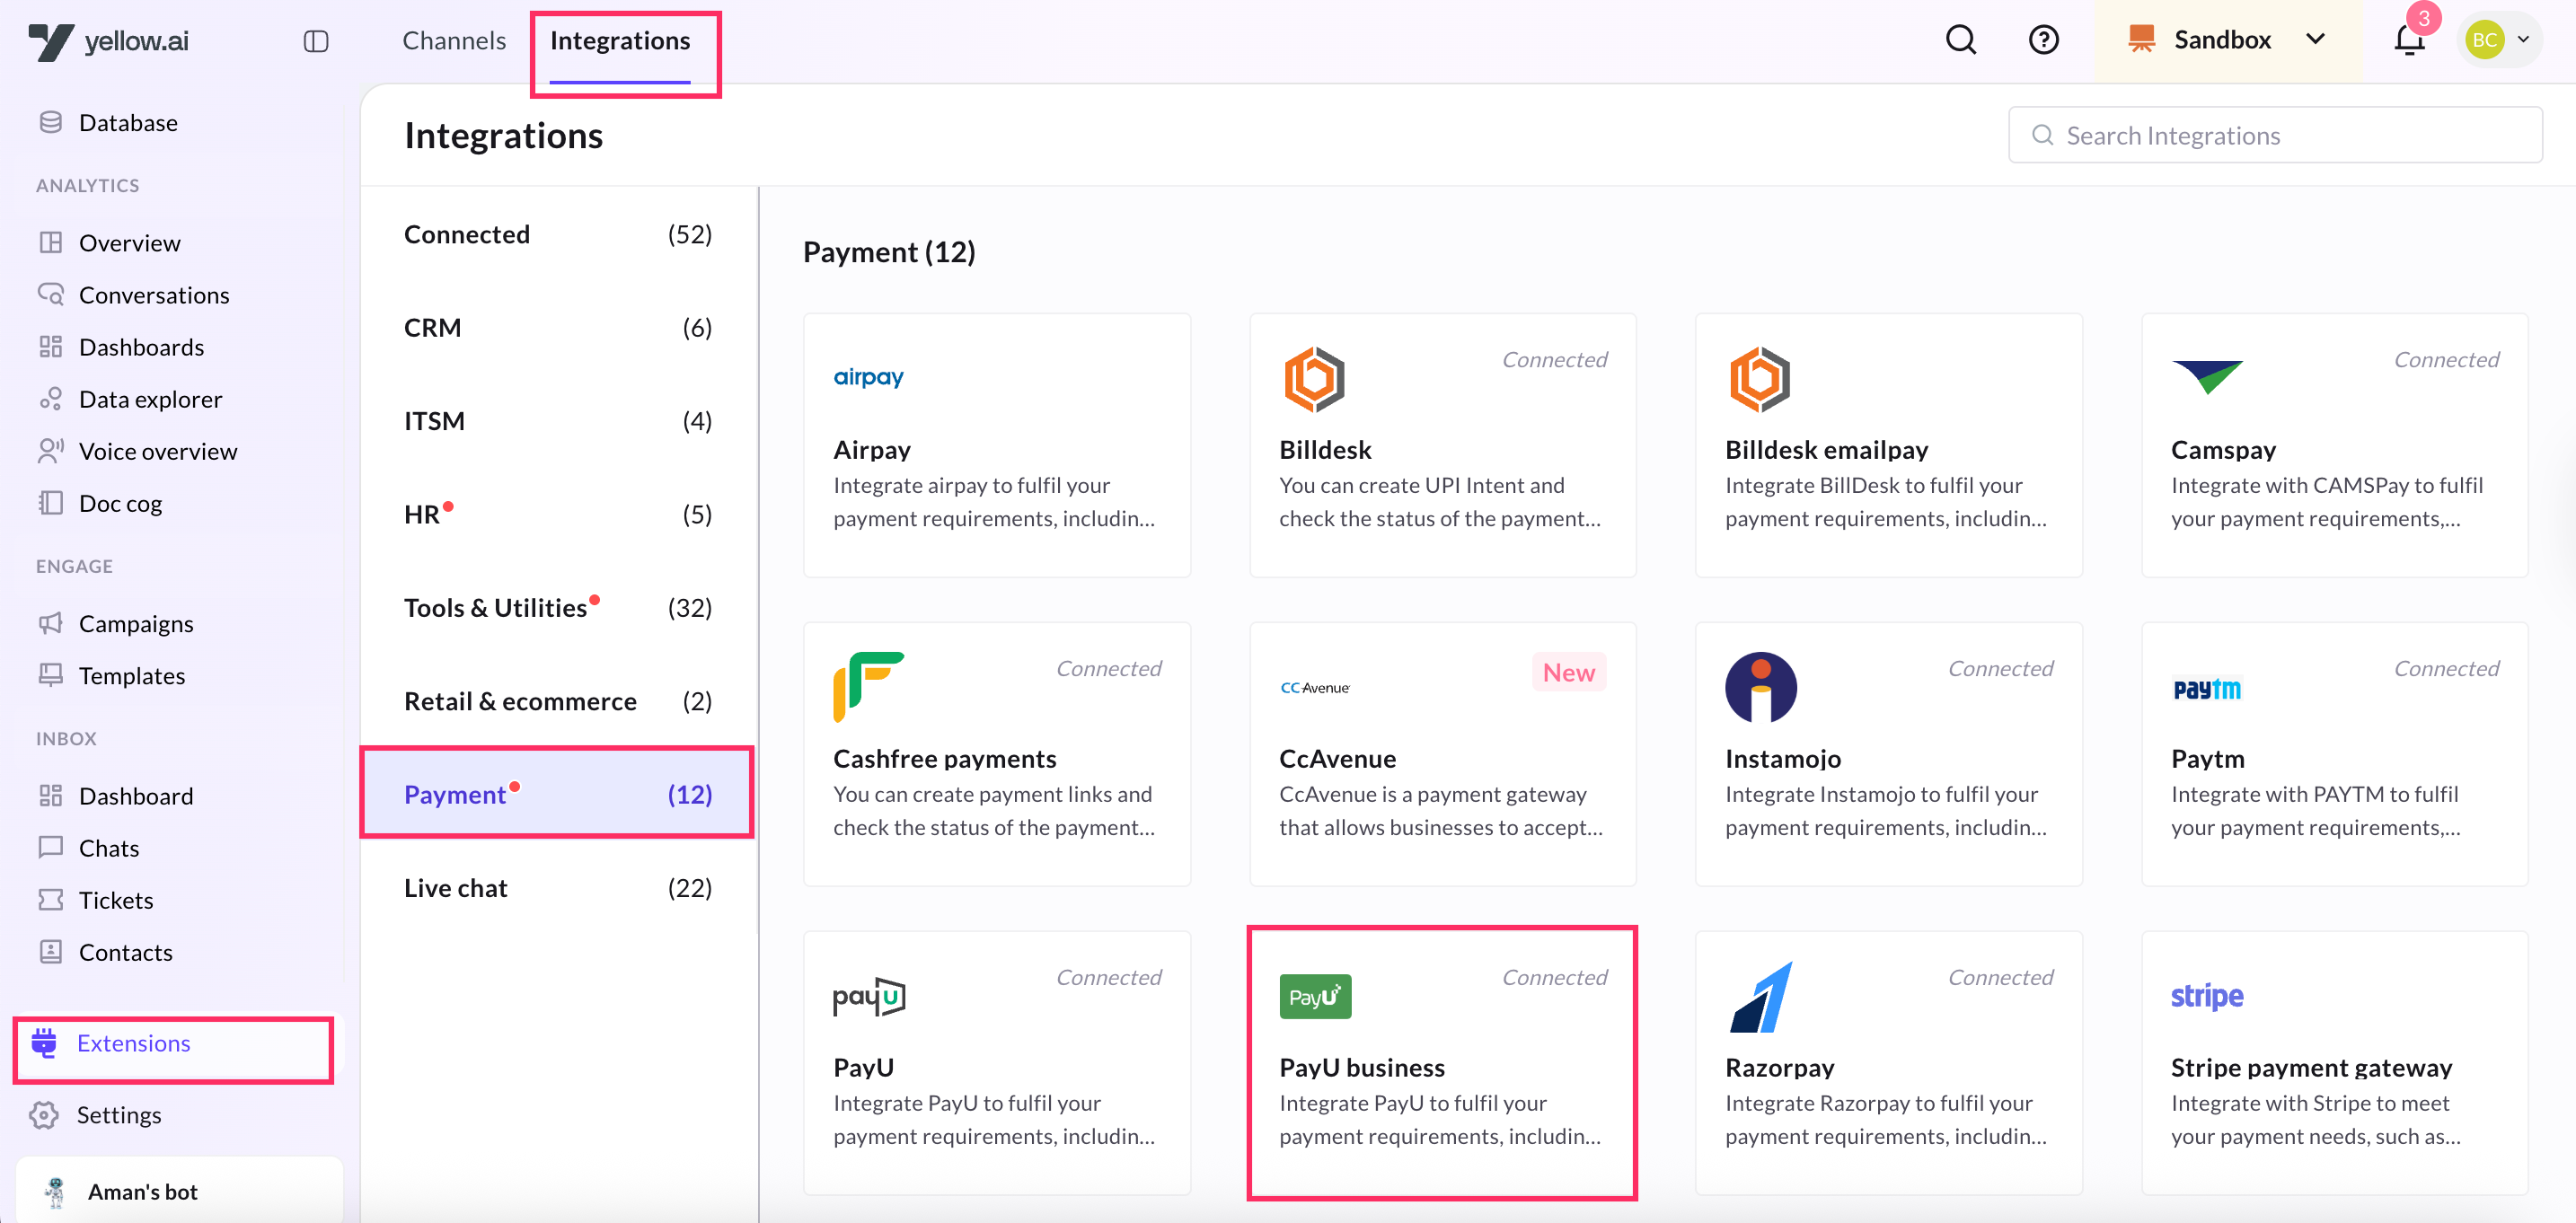
Navigate to the Development/Staging environment and go to Extensions > Integrations > Payment > PayU Business.
-
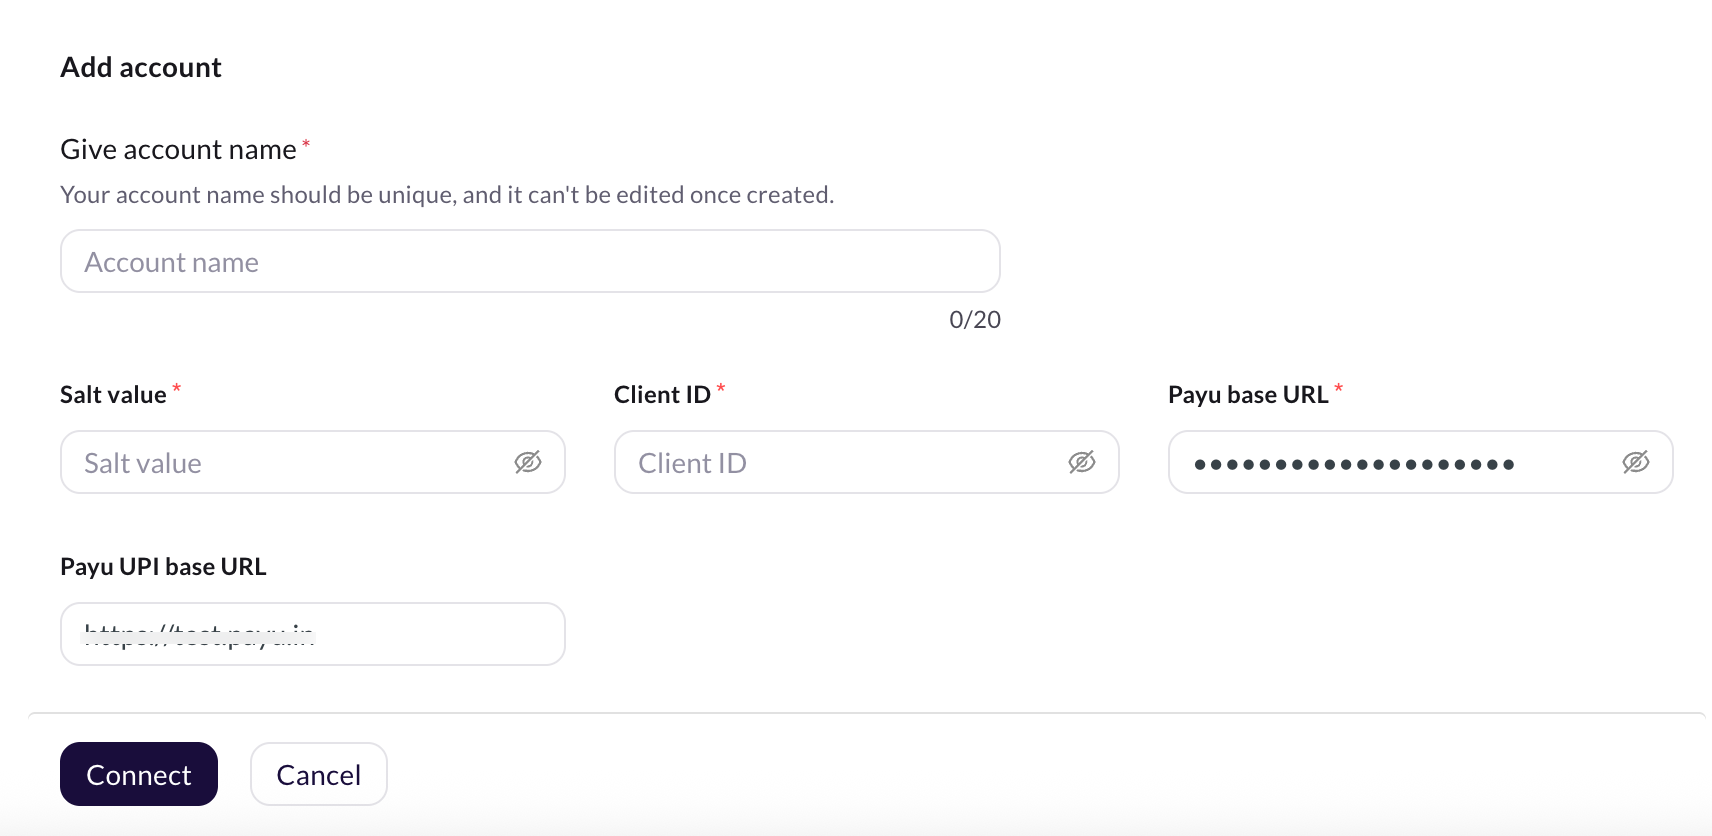
In Give account name, enter a unique name for the integration. You can use only lowercase alphanumeric characters and underscores (_).
-
In Salt value, enter the unique hash for each transaction, which is then used to verify the authenticity of the transaction. The Salt Value is provided by PayU and should be kept confidential.
-
Enter the Client ID, enter your PayU account's client ID.
-
In Payu base URL, enter the base URL to send API requests to the PayU payment gateway for payment processing.
-
In Payu UPI base URL, enter the base URL of the PayU UPI to send API requests to the PayU UPI payment gateway for UPI payment processing.
Payu base URL and and Payu UPI base URL will differ for test and live modes. Example:
- Test mode - https://test.payu.in
- Live mode - https://info.payu.in
- Click Connect when you're done.
- To add another account, click + Add account and proceed with the previous steps. You can add a maximum of 15 accounts.
1.3 Configure webhook URL
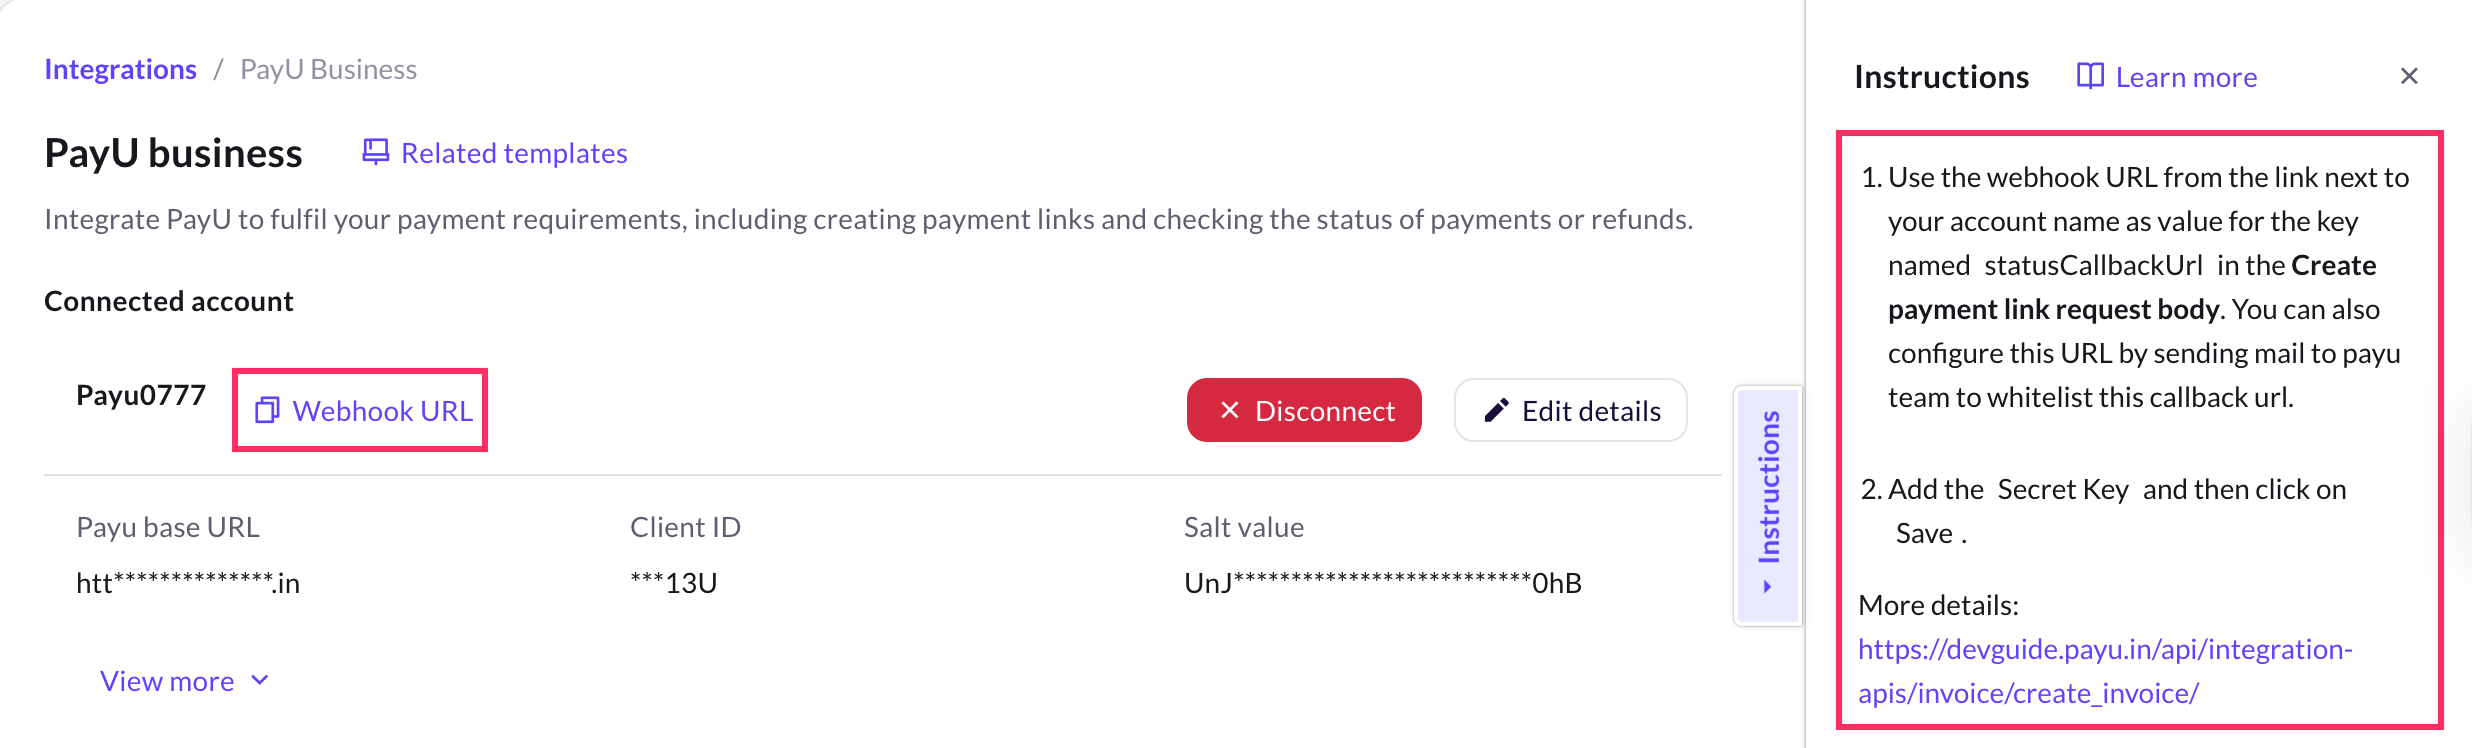
To receive real-time notifications about payment status updates, you need to set up a webhook URL
Copy the webhook URL and the API key mentioned in the Instructions section of the PayUBiz Integration section in the yellow.ai platform.
Use the webhook URL specific to your region - India, MEA, Jakarta, Singapore, USA, and Europe.
To ensure secure communication and enable PayU Business to send payment status updates, you must get the webhook URL whitelisted. Contact the PayU Integration team for assistance.
PayUBiz will whitelist the webhook URL provided by the merchant in their systems. You also need to get the webhook URL whitelisted from the can write to the PayU Integration team for more information.
1.4 Enable PayU event to receive event in AI agent
-
On the Cloud Platform go to Staging/Development environment.
-
On the left navigation bar, click Automation > Build > Event > Integrations and search for
PayU Payment Status.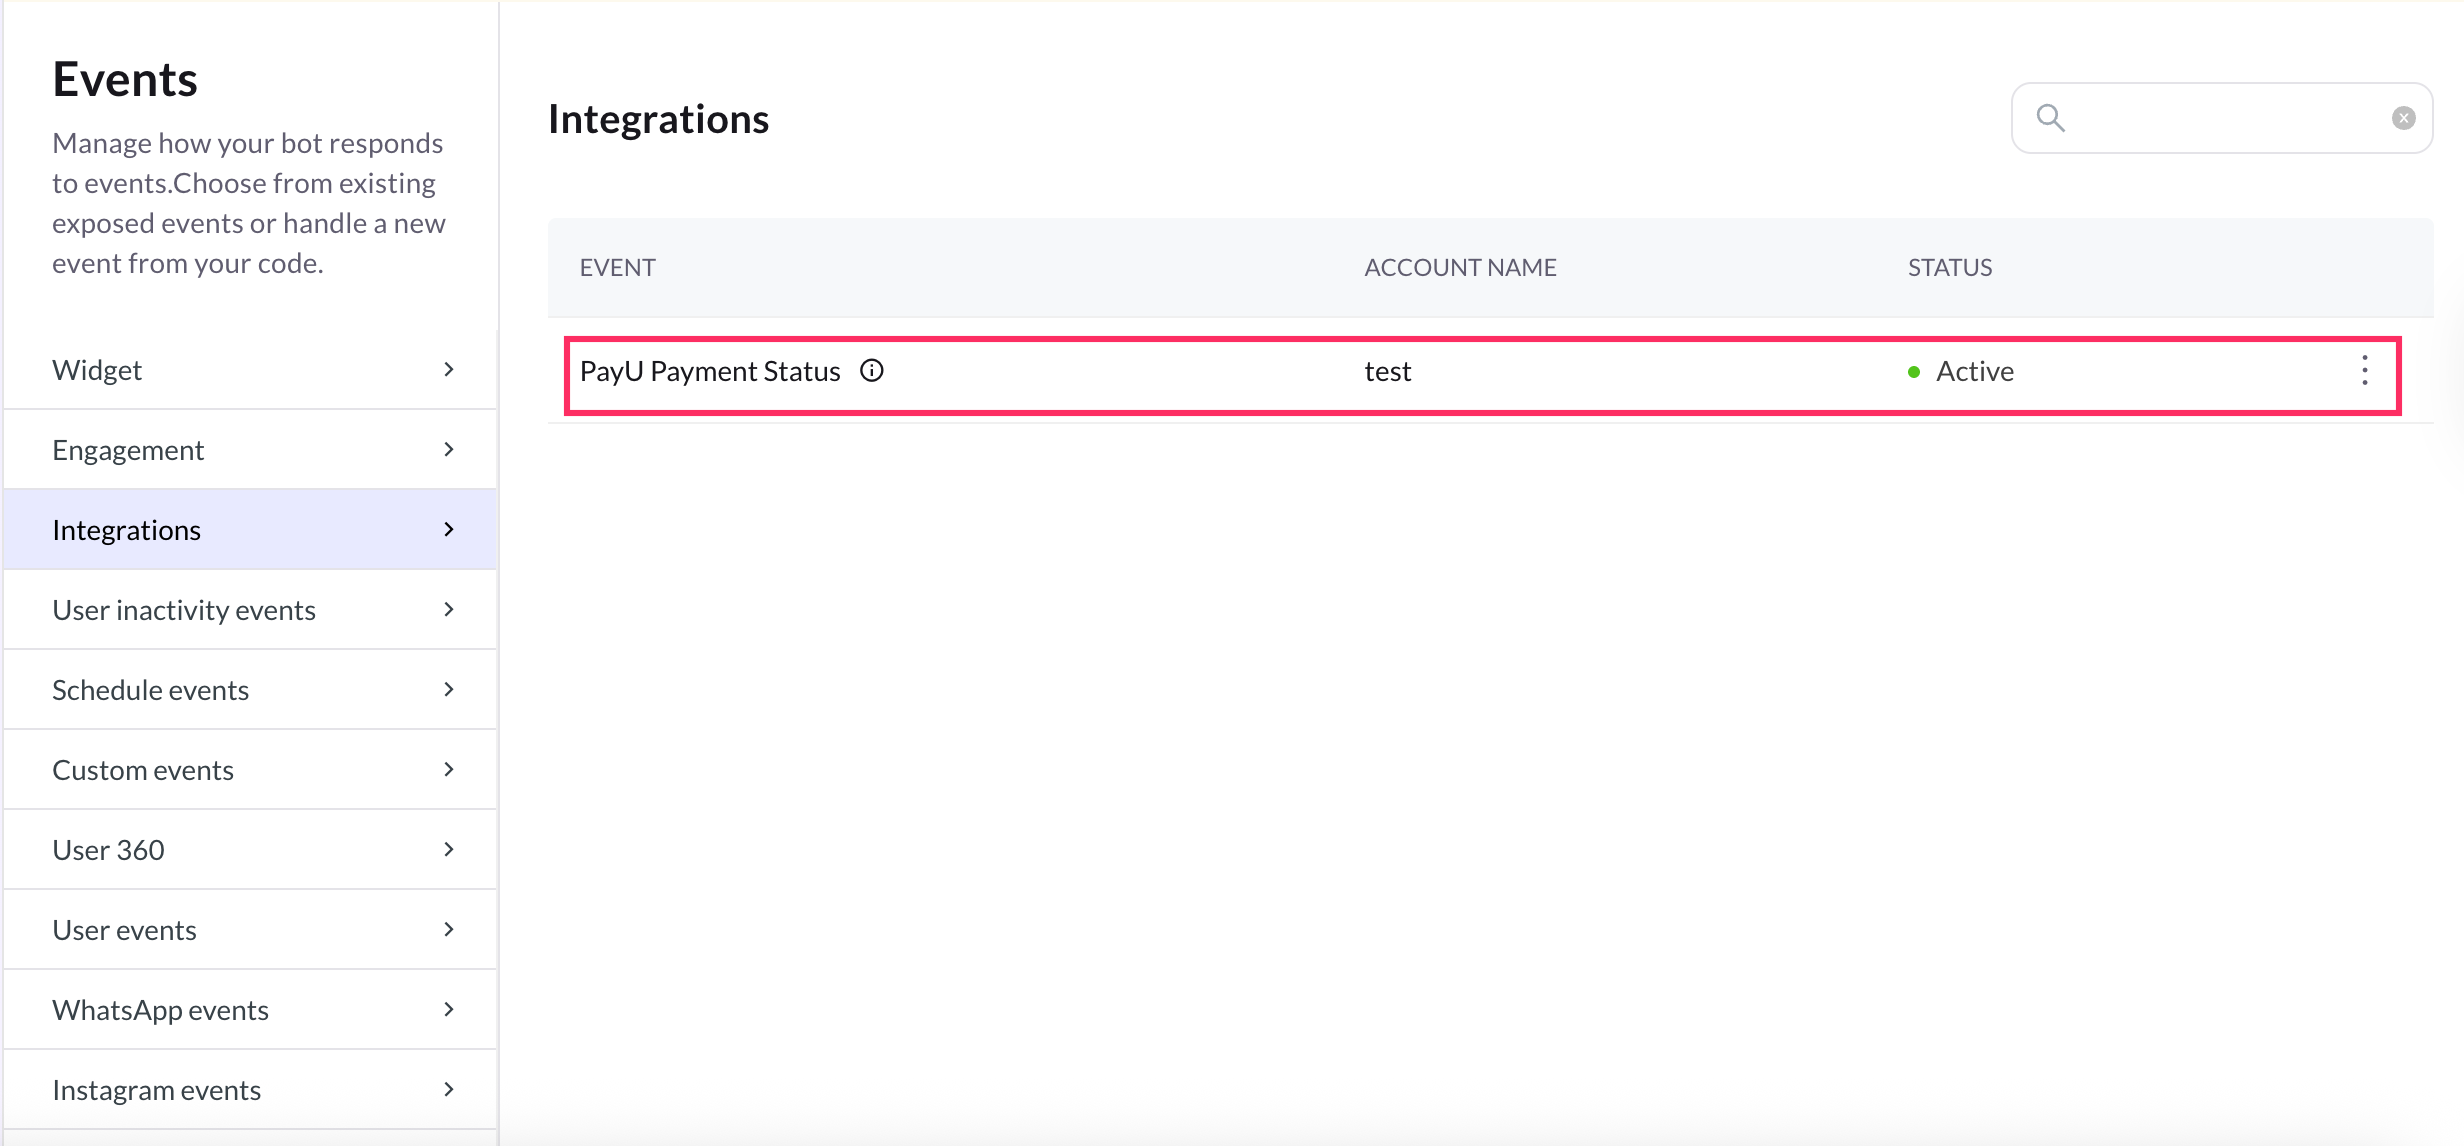
-
Click on the more options icon and select Activate. If you have connected multiple accounts, you need to enable the event for each account.
-
Once the event is activated, you can create a flow in the Automation > Build and use the event at the start of the flow to trigger a specific action, such as displaying a message indicating that the payment is completed.

Manage PayU payments from AI Agent conversations
If there are multiple accounts, you can select from which account you want to perform the action.
2.1 Generate payment link
-
When building Conversation flows, add an Integration action node and select PayU Business from the list of enabled integrations.

-
When you click the node, you will see a drop-down with supported actions in this integration. Select Generate Payment Link.

-
Fill in the fields based on the details provided in the following table.
Field name Sample value Data type Description Amount 100 String Amount to be paid using the payment link. ProductInfo Iphone String Name of the product the user wants to purchase. Description Test String Description of the product. CustomerName Manish String Name of the customer. CustomerEmail [email protected] String Email address of the customer. CustomerMobileNumber 9999933344 String Contact number of the customer. txnID Order123 String The unique transaction ID that is generated dynamically. CustomerAddress Ashoka Road, Mysore, Karnataka String Address of the customer. CustomerCity New york String City of the customer. CustomerResidentState Karnataka String State of the customer. CustomerZipcode 845309 String Pincode of the customer. Send Email false Boolean The email address of the customer to send the invoice. Time Unit h String Frequency(in days, hours, minutes) at which a recurring payment will be charged. UDF Shipping Method String User defined field - used to store any information corresponding to a particular transaction. Validation Period 1 Number Determines how long PayU will continue trying to charge the customer if the initial payment fails.
To use this Integration Action Node in an app.yellow.ai AI agent, refer the following example:
app.executeIntegrationAction({
"integrationName": "payu-payment-gateway",
"action": "Generate Payment Link",
"dynamicParams": {
"amount": "1",
"productInfo": "testProduct",
"customerFirstName": "Test Customer",
"customerMobileNumber": "9999999999",
"txnid": "123456789"
}
}).then((res)=>{
console.log("response from action node", res);
app.log(res, '||Response from action node||')
}).catch((err)=>{
console.log("Error in action node",err);
app.log(err, '||Error in action node||')
})
2.2 Generate UPI intent
-
From the PayU Business node, select Create UPI intent.

-
Provide the necessary inputs by selecting the relevant variable for each parameter. Below is a table containing sample values, data types, and descriptions for each of these fields.
Field name Sample value Data type Description Amount 100 String Amount to be paid using the payment link. CustomerEmail [email protected] String Email address of the customer. CustomerPhoneNumber 9999933344 String Contact number of the customer. CustomerName Manish String Name of the customer. Fail URL https://alpha6.yellowmessenger.com/ String The redirection URL in case there's a payment failure. Success URL https://alpha6.yellowmessenger.com/ String The redirection URL in case of successful payment. TXN S2S flow 4 number Txn S2S flow. Transaction ID Order123 String The unique transaction ID that is generated dynamically. Product Info Iphone String Description of the product. UDF CustomField String User defined Field - used to store any information corresponding to a particular transaction. -
The Generate UPI intenrt Integration Action Node has two outcomes, success or failure. If the payment link is generated successfully, the Integration Action Node returns a Success response code as shown below:
{
       "metaData": {
         "message": null,
         "referenceId": "af65159e8566652849bc12a3450a8fca",
         "statusCode": null,
         "txnId": "wa5iy6b82pvquxcd1vby",
         "txnStatus": "pending",
         "unmappedStatus": "pending"
       },
       "result": {
         "paymentId": 15961819086,
         "merchantName": "wwwmerchantnamecom",
         "merchantVpa": "payumoney@hdfcbank",
         "amount": "1.00",
         "intentURIData": "pa=payumoney@hdfcbank&pn=Gaurav Dua&tr=15961819086&tid=wa5iy6b82pvquxcd1vby&am=1.00&cu=INR&tn=UPI Transaction for wa5iy6b82pvquxcd1vby",
         "acsTemplate": "PGh0bWw+PGJvZHk+PGZvcm0gbmFt"
       }
     }
If generating UPI intent fails, the Integration Action Node returns a Failure response code as shown below:
{
  "message": "[INTG ERROR] Node API Execution failed for payu-payment-gateway_Create UPI Intent in bot x1645073590274: 4xx or 5xx series code encountered",
  "name": "IntegrationNodeAPIError",
  "apiResponseBody": {
    "result": null,
    "status": "failed",
    "error": "EX117",
    "message": "Invalid amount #~#Please ensure that you send all mandatory parameters in the transaction request to PayU.<br /><div style='font-size: 13px;padding: 0 150px; padding: 0 150px; line-height: 18px;'>Mandatory parameters which must be sent in the transaction are: <br /><b>key, txnid, amount, productinfo, firstname, email, phone, surl, furl, hash</b></div>.<br /><div style='font-size: 13px;padding: 0 150px; line-height: 18px;'>The parameters which you have actually sent in the transaction are: <br /><b> key, txnid, amount, productinfo, surl, hash, firstname, email, phone</b>.</div><br /><div style='font-size: 13px;padding: 0 150px; line-height: 18px;'>Mandatory parameter missing from your transaction request are: <br /><b></b>.</div><br /><div style='font-size: 13px;padding: 0 150px; line-height: 18px;'>Please re-initiate the transaction with all the mandatory parameters.</div></p> "
  },
  "apiResponseStatusCode": 500
}
To use this Integration Action Node in an app.yellow.ai AI agent, refer the following example:
app.executeIntegrationAction({
"integrationName": "payu-payment-gateway",
"action": "Create UPI Intent",
"dynamicParams": {
"amount": "1",
"customerName": "farhan",
"customerMobileNumber": "9643999539",
"productInfo": "test",
"txnid":"wa5iy6b82pvquxcd1vby",
"successUrl":"https://staging.yellow.ai",
"failUrl":"https://staging.yellow.ai",
"txnFlow": 4
}
}).then((res)=>{
console.log("response from action node", res);
app.log(res, '||Response from action node||')
}).catch((err)=>{
console.log("Error in action node",err);
app.log(err, '||Error in action node||')
})
2.3 Generate WhatsApp pay
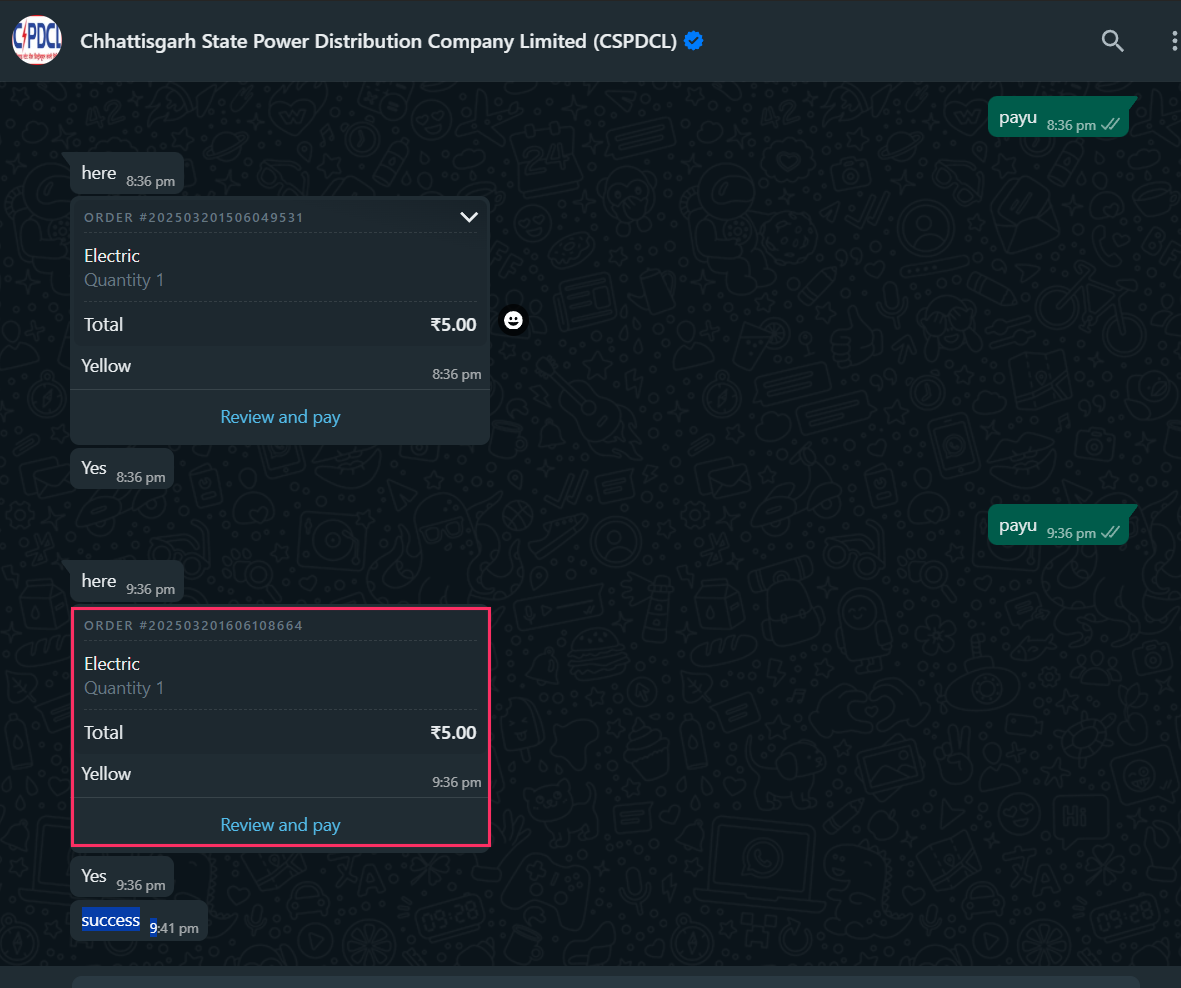
PayU business integration allows your AI agent to accept payments from users via WhatsApp Pay
To configure WhatsApp Pay in the PayU business node, follow these steps:
-
From the PayU business node, select WhatsApp pay.
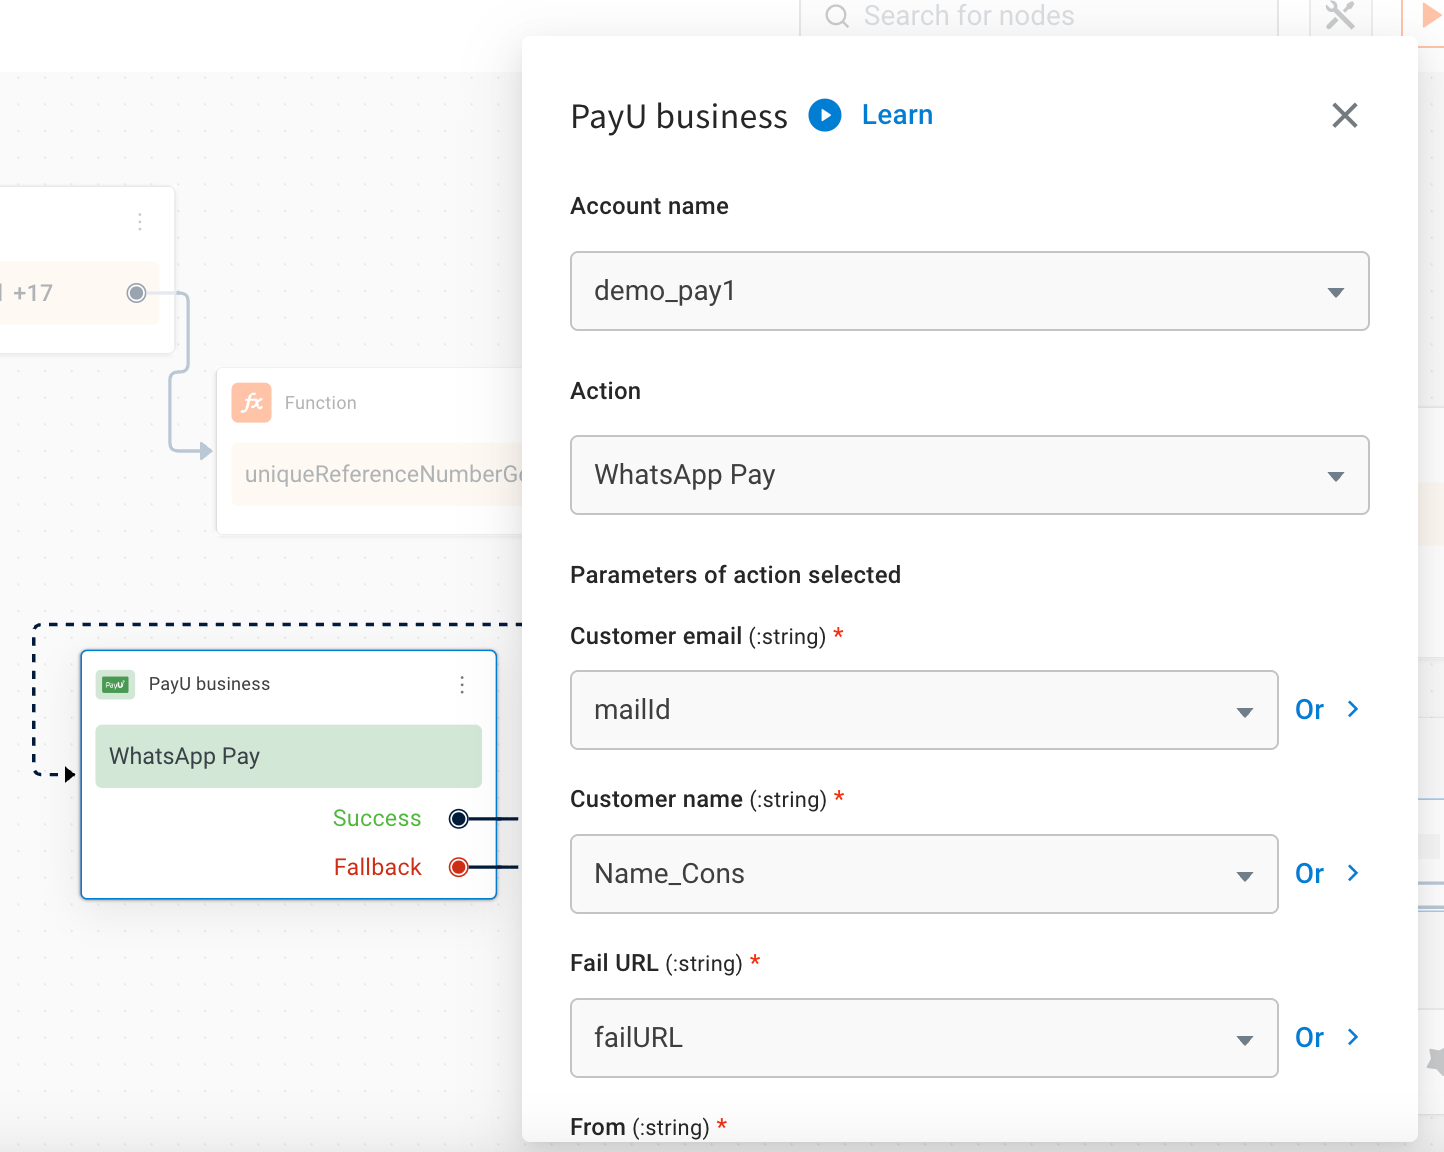
-
Provide the necessary inputs by selecting the relevant input for each parameter. Below is a table with sample values, data types, and descriptions for each field:
| Field name | Sample value | Data type | Description |
|---|---|---|---|
| Customer email | [email protected] | String | Email address of the customer. |
| Cutsomer name | Rio | String | Name of the customer. |
| Fail URL | https://example.com/payment-failed | String | URL to redirect to if payment fails.. |
| From | +91 98800XXXXX | String | Enter the WhatsApp number that is connected to the AI agent. |
| Card description | Mobile charger | String | Deatil of the product |
| Order details | { "subTotal": 10, "tax": "...", "items": [...] } | Object | Contains complete order details. |
| Success URL | https://example.com/payment-success | String | URL to redirect after a successful payment. |
| Total amount | 1000 | Number | Total payment amount |
| Transaction ID | TXN987654321 | String | Unique identifier for the transaction. |
| Type of Product | Digital goods Physical goods | String | Specifies whether the product is digital or physical. |
| Image URL | https://example.com/product-image.jpg | String | URL of the product image. |
| UDF1(User defined fileds), UDF2, ......, UDF5 | Custom metadata | String | User-defined fields for passing metadata. |
| Vpa name | rio@upi | String | Virtual Payment Address (VPA) name. |
Preview the WhatsApp AI agent to verify the WhatsApp payment link: