Paytm Payment Gateway
Yellow.ai Integration with Paytm Payment Gateway enables the end user to do the following:
- Generate a payment link and receive an intimation regarding the status of the payment as to whether it was a success or failure.
- Initiate the process of refund.
- Check the status of the refund that was initiated.
Connect Paytm payment gateway with Yellow.ai
In a two-tier environment, you can connect an integration app in the Development environment. In a three-tier environment, you can connect the integration app either in Staging or Sandbox. All connected integrations are available in the live environment.
To integrate the Paytm payment gateway, follow these steps:
-
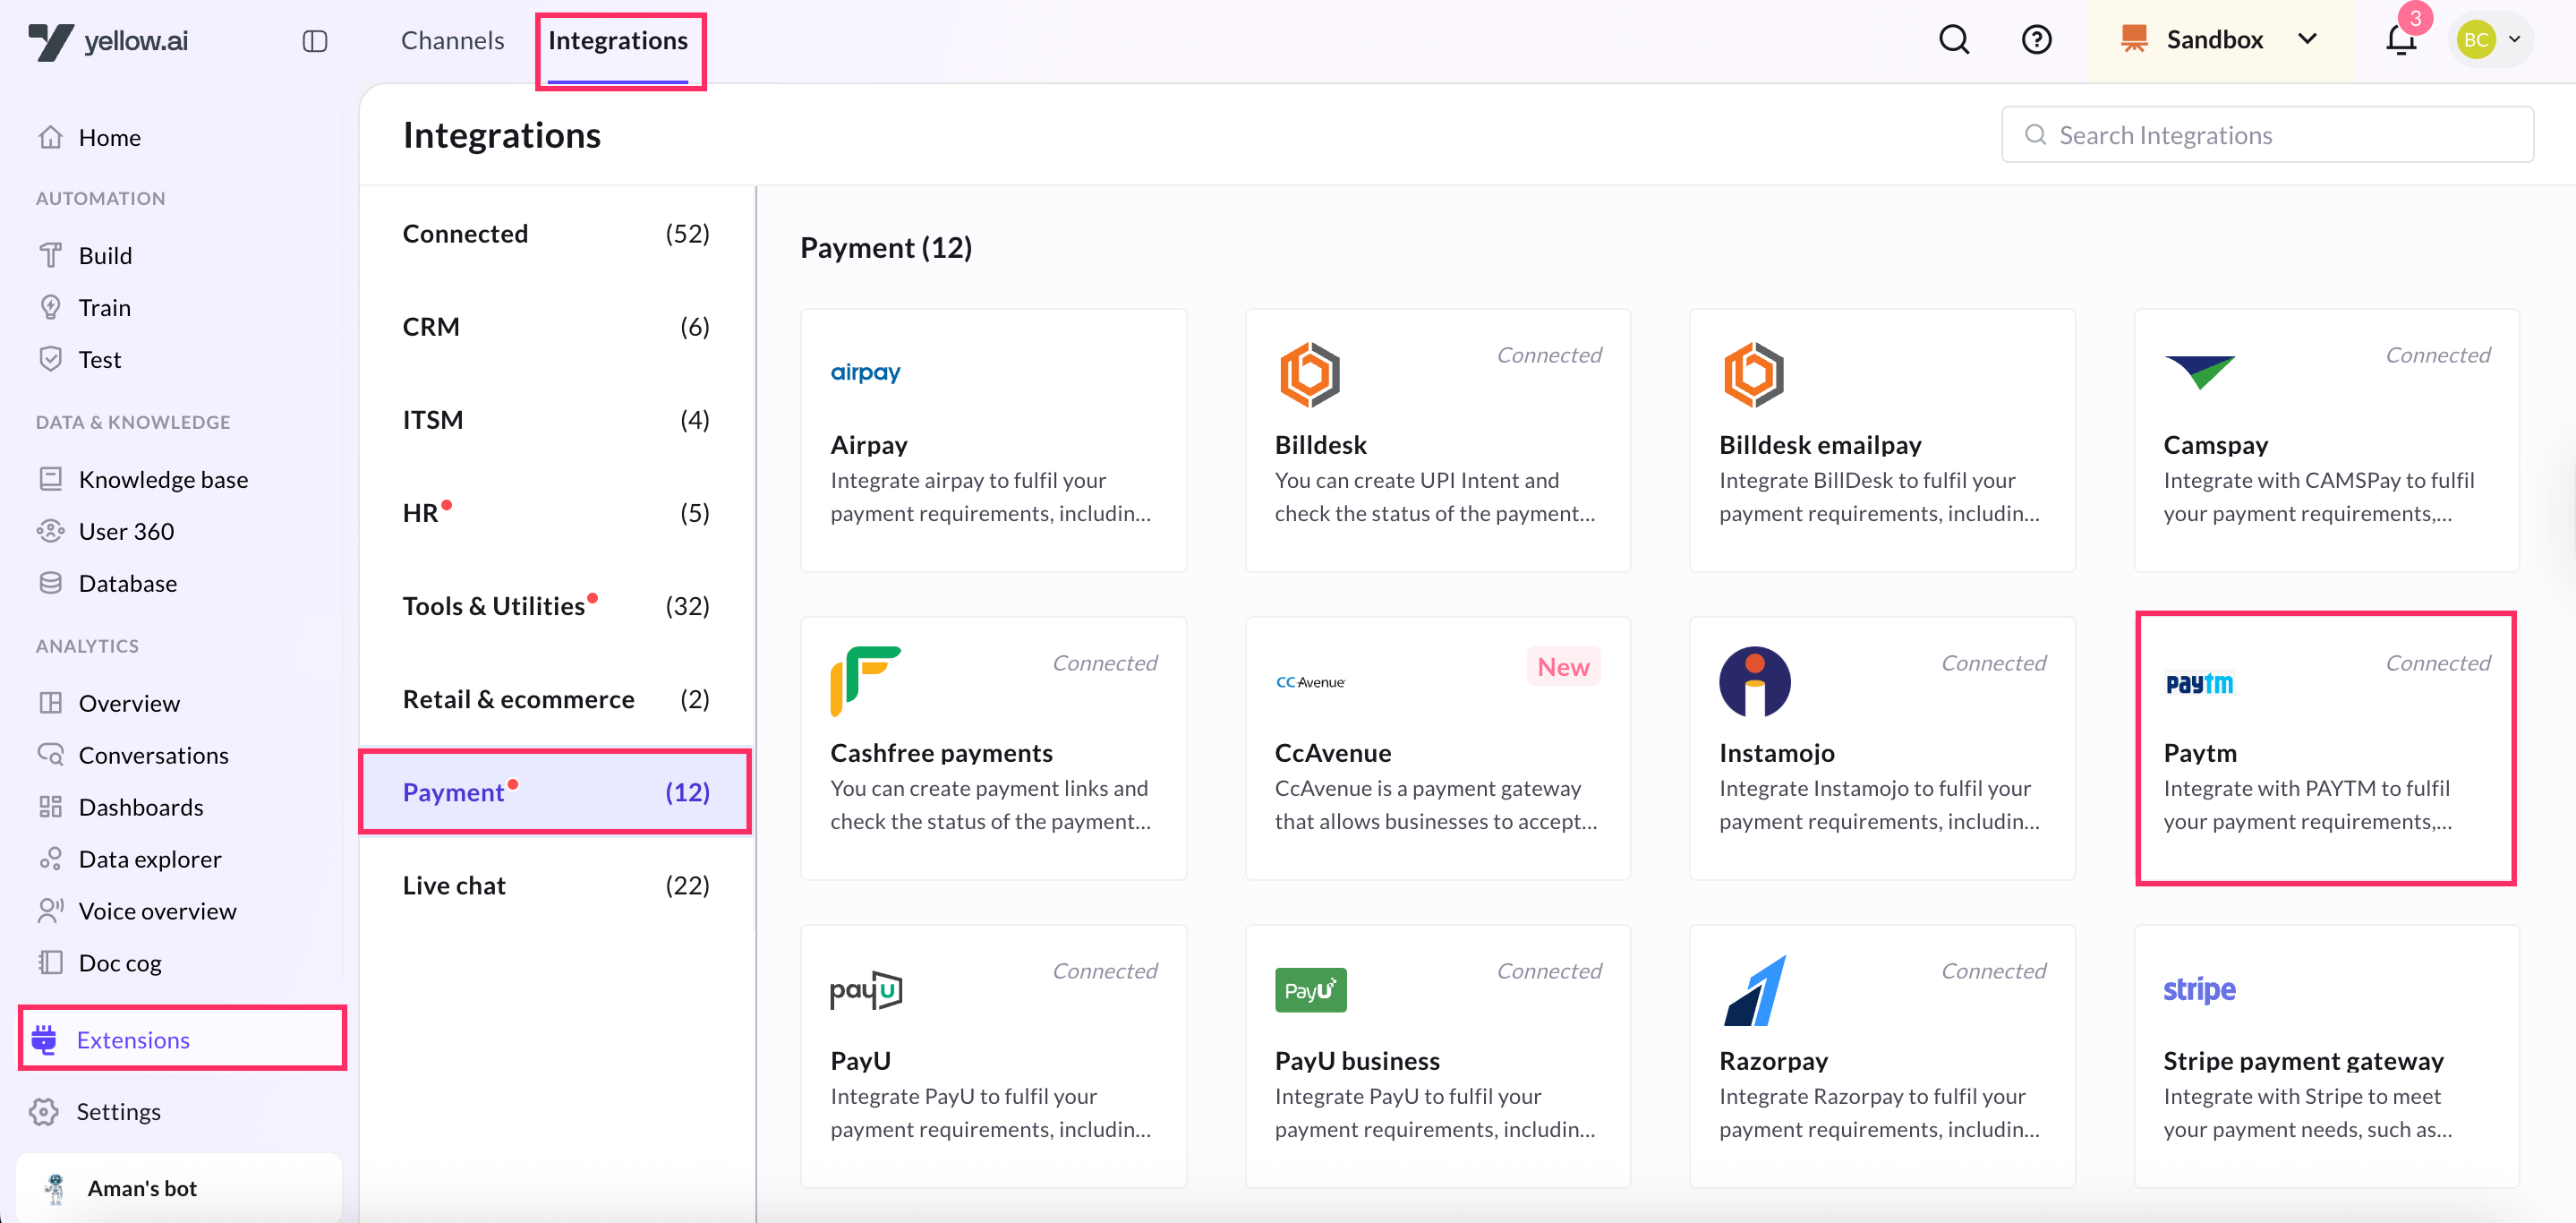
Navigate to the Development/Staging environment and go to Extensions > Integrations > Payment > Paytm. You can also search the integration by name Paytm using the Search box.
-
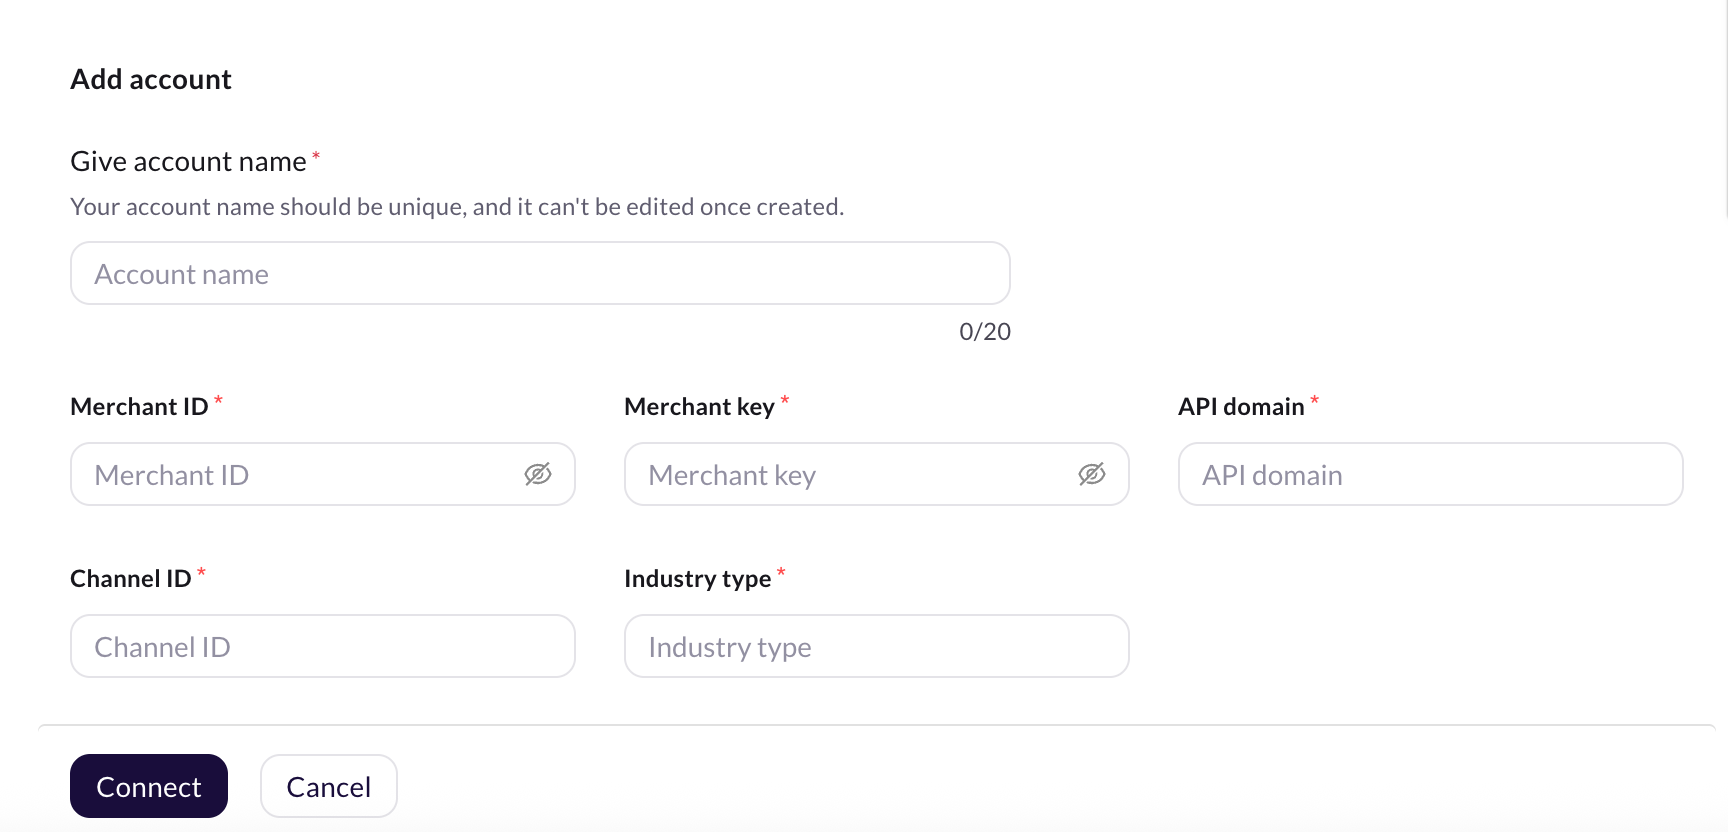
In Give account name, enter a unique name for the integration. You can use only lowercase alphanumeric characters and underscores (_).
-
In Merchant ID, enter the Merchant ID provided by the client or Paytm SPOC.
-
In Merchant Key enter the Merchant Key provided by the client or Paytm SPOC.
-
In API Domain, If you intend to use the staging domain of Paytm, enter
https://securegw-stage.paytm.in. If you're using the production domain, enterhttps://securegw.paytm.in. -
In Channel ID, enter the Channel ID provided by the client or Paytm SPOC.
-
Industry Type: Enter the Industry Type provided by the client or Paytm SPOC.
-
To add more accounts, click + Add account and proceed with the previous steps. You can add a maximum of 15 accounts.
Configure Webhook URL in Paytm
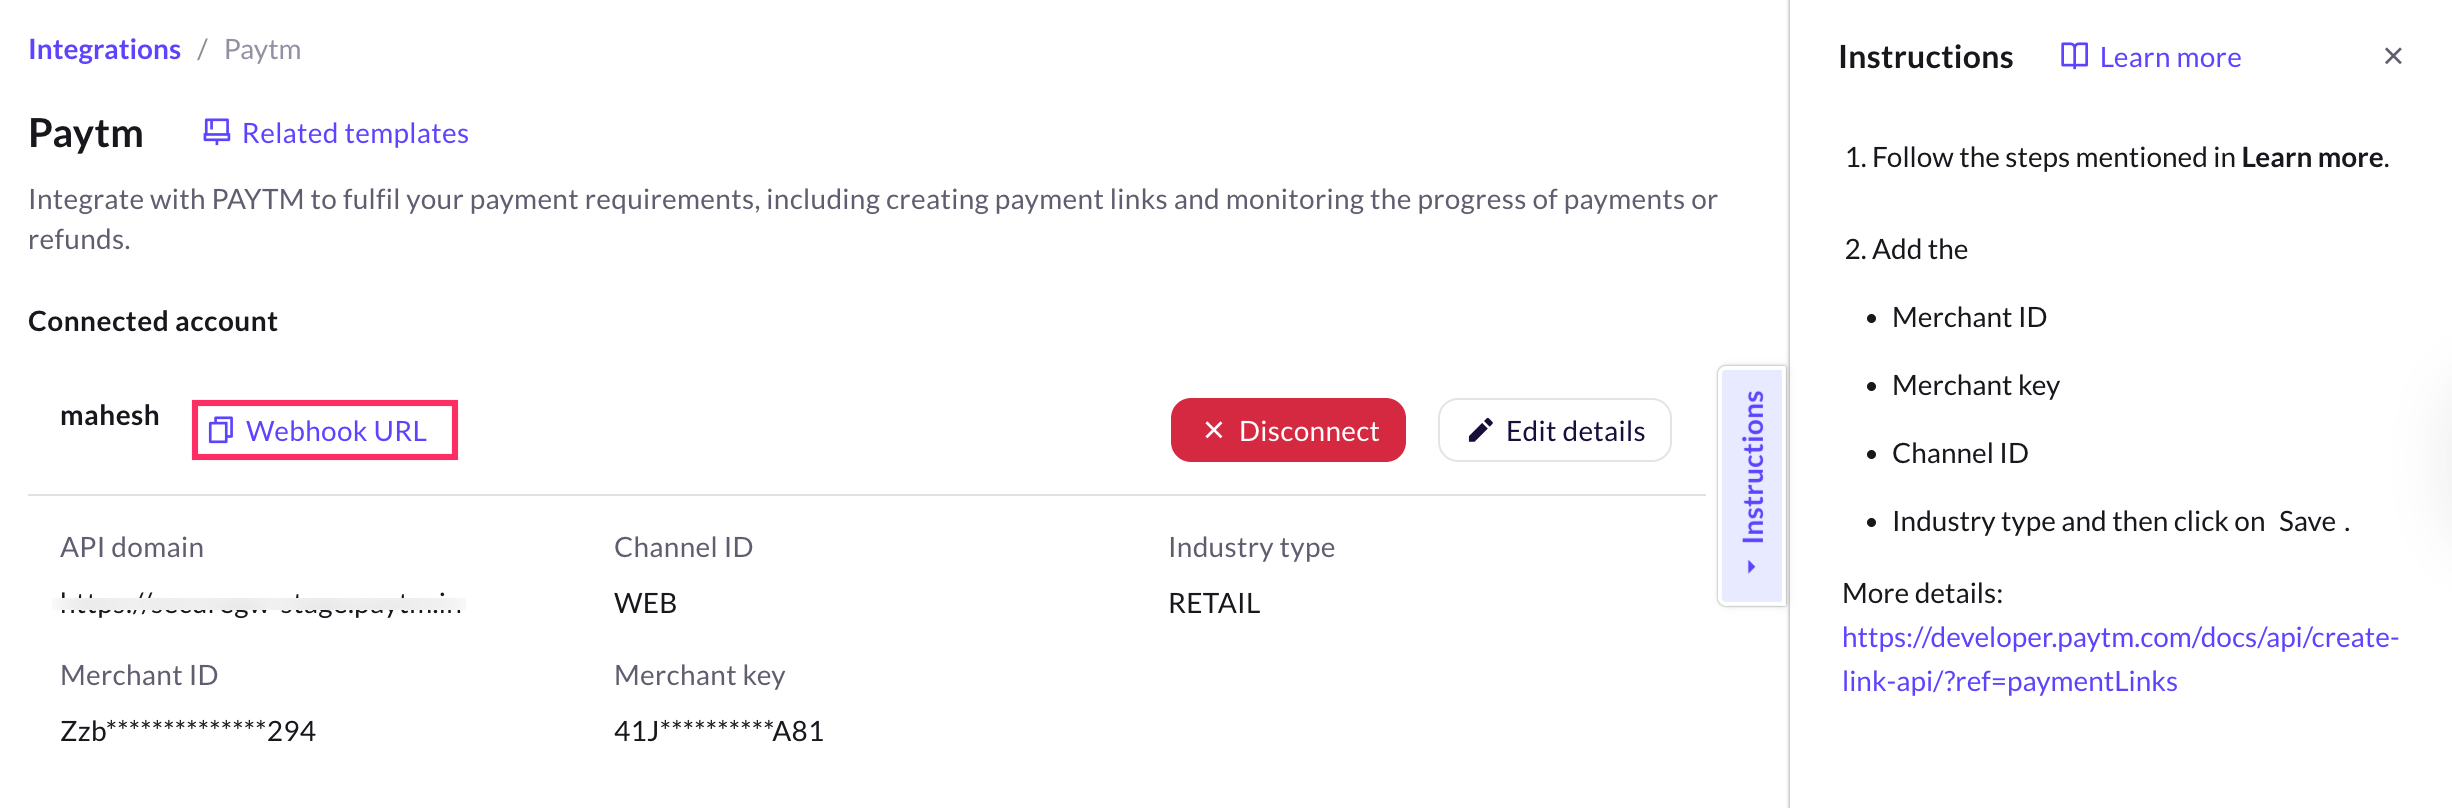
The webhook URL serves as a callback endpoint where Paytm can send notifications or updates regarding payment events, enabling your application to respond accordingly.
-
Go to the connected Paytm integration and copy the webhook URL.
-
Add domain URL. Append the region of your AI agent to the domain of the webhook url. r1/r2/r3/r4/r5 are the regions of your AI agent, you can refer the following list for the same. (r1 = MEA, r2 = Jakarta, r3 = Singapore, r4= USA, r5 = Europe)
-
Login to your Paytm account and navigate to the Webhook URL Configuration section and add the provided webhook URL.
Enable Paytm event for your AI agent
-
On the Cloud Platform go to Staging/Development environment.
-
On the left navigation bar, click Automation > Event > Integrations and search for
Paytm Payment Status. -
Click on the more options icon and select Activate. If you have connected multiple accounts, you need to enable the event for each account.
-
Once the event is activated, you can create a flow in the Automation > Build and use the event in a flow to trigger a specific action, such as displaying a message indicating that the payment is completed successfully.

Sample webhook event data sent by Paytm
{
 "PAYMENTEMAILID": "[email protected]",
 "PAYMENTMOBILENUMBER": "7777777777",
 "GATEWAYNAME": "WALLET",
 "RESPMSG": "Txn Success",
 "BANKNAME": "WALLET",
 "PAYMENTMODE": "PPI",
 "CUSTID": "CUST_001",
 "MID": "INTEGR7769XXXXXX9383",
 "MERC_UNQ_REF": "LI_12345",
 "RESPCODE": "01",
 "TXNID": "202005081112128XXXXXX68470101509706",
 "TXNAMOUNT": "1.00",
 "ORDERID": "ORDERID_98765",
 "STATUS": "TXN_SUCCESS",
 "BANKTXNID": "63240520",
 "TXNDATETIME": "2020-09-10 13:03:05.0",
 "TXNDATE": "2020-09-10",
 "CHECKSUMHASH": "PMXJocjUUKGq7MXGwHO0LNOV+YxwuYi4gKjRgFOIZVGVqyxqfFuec+A8boUq5Q3c87yYM9DOeCmjIj5mH20SfIiDjOJiU4eFzNxu0J1qKdc=",
 "LINKNOTES": "Link Note Description"
}
Paytm actions through AI agent conversation
Once your Paytm account is successfully connected, your AI agent can perform the following actions:
If there are multiple accounts, you can select from which account you want to perform the action.
Generate Paytm payment link in AI agent conversation
-
Go to Development/Staging environment and navigate to Automation > Build > Select the flow where you want to add the Generate payment link node.
-
Click Add node > Integrations > Paytm.

-
You will see the Paytm node. In the first drop-down (actions), choose Generate Payment Link.

-
Configure the input parameters needed to generate the payment link by referring to the descriptions provided in the table below.
Field name Sample value Data type Description Timestamp 1588402269 String EPOCH timestamp of the time at which the request is being sent Amount 3500 String Transaction amount LinkName Test String Name of the link that you want to display to the customer, link name is used to generate a long URL LinkType FIXED String Type of link LinkDescription Test String Description of the link that you want to display to the customer SendSms true/false Boolean Flag whether SMS is to be sent to the customer by Paytm SendEmail true/false Boolean Flag whether Email is to be sent to the customer by Paytm CustomerName Mahesh String Name of the customer CustomerEmail [email protected] String Email ID of the customer CustomerMobile 9870000000 String Mobile number of the customer LinkNotes Reference details String Add additional notes to your link. This won’t be shown to the customers
An easy way to determine the success or failure of an action is by inspecting the key tokenType in the head object. If its value is AES, the response indicates success.
Sample response for success
In case of success, you must extract the key shortUrl present in the body object and display it to the end user with an appropriate message with the help of any of the Message type nodes.
{
    "head": {
        "version": null,
        "timestamp": "1566994462639",
        "channelId": null,
        "tokenType": "AES",
        "clientId": null
    },
    "body": {
        "linkId": 5861,
        "linkType": "GENERIC",
        "longUrl": "https://securegw-stage.paytm.in/link/PAYMENTLINKNAME/LL_5861",
        "shortUrl": "https://paytm.me/ID-PBo7",
        "expiryDate": "27/08/2020 17:44:22",
        "isActive": true,
        "merchantHtml": "",
        "createdDate": "28/08/2019 17:44:22",
        "notificationDetails": [],
        "resultInfo": {
            "resultStatus": "SUCCESS",
            "resultCode": "200",
            "resultMessage": "Payment link is created successfully"
 }
}
}
Sample response for fallback
{
    "head": {
        "version": "v2",
        "timestamp": "28/08/2019 17:47:22",
        "channelId": null,
        "tokenType": null,
        "clientId": null
    },
    "body": {
        "resultInfo": {
            "resultStatus": "FAILED",
            "resultCode": "302",
            "resultMessage": "link name contains sepcial character."
        }
    }
}
To use this Integration Action Node in an app.yellow.ai AI agent, refer to the below-mentioned example:
 app.executeIntegrationAction({
    		"integrationName": "paytm",
    		"action": "Generate Payment Link",
"dynamicParams": {
    "amount": "5",
    "timestamp": "1658203708983",
    "linkName": "Test",
               "linkType": "FIXED",
               "linkDescription": "Test Description",
                          "sendSms": false,
                          "sendEmail": false,
                          "customerName": "John Doe",
                          "customerEmail":"[email protected]",
                          "customerMobile":"9955995500",
                          "linkNotes":"test note"
}
}).then((res)=>{
    console.log("response from action node", res);
    app.log(res, '||Response from action node||')
}).catch((err)=>{
    console.log("Error in action node",err);
    app.log(err, '||Error in action node||')
})
Initiate Paytm Refund
-
In the Paytm node, choose the action Initiate refund.

-
Configure the input parameters needed to generate the payment link by referring to the descriptions provided in the table below.
| Field name | Data type | Description | Sample value |
|---|---|---|---|
| RequestTimestamp | String | POCH timestamp of the time at which the request is being sent | 1588402269 |
| OrderId | String | It is a unique reference ID for a transaction passed in the transaction request. Order ID should be passed to raise the refund | OREDRID_98765 |
| ReferenceId | String | Unique Reference ID for refund transaction which is generated by merchant. Duplicate REFID will be rejected by the Paytm gateway | REFUNDID_98765 |
| TransactionId | String | TXNID is the Paytm payment Transaction ID against which the refund transaction is being placed.TXNID is provided in response payload for every payment transaction | 202005081112128XXXXXX68470101509706 |
| RefundAmount | String | Amount for which the refund is to be made. It can be equal to or less than the transaction amount and should be up to two decimal places. The only special character allowed is (".") | 30.00 |
Sample response for success
In case of success, you need to extract the key resultStatus, and resultMsg in the resultInfo object and display them to the end user with an appropriate message with the help of any of the Message type nodes.
{
    "head": {
        "responseTimestamp": "1567421120859",
        "signature": "WaFdplm36GmfBtZ6jPIFClLSEffhAk9fTpJ6i8WpgqiZvtUNl53mLL7mu4JWwxPpfSa5pdexyxK/68WtoTmd53TI+R9GffjGc3USoLgWcKI=",
        "version": "v1"
    },
    "body": {
        "txnTimestamp": "2019-09-02 12:31:49.0",
        "orderId": "YOUR_ORDER_ID",
        "mid": "YOUR_MID_HERE",
        "refId": "UNIQUE_REFUND_ID",
        "resultInfo": {
            "resultStatus": "PENDING",
            "resultCode": "601",
            "resultMsg": "Refund request was raised for this transaction. But it is pending state"
        },
        "refundId": "PAYTM_REFUND_ID",
        "txnId": "PAYTM_TRANSACTION_ID",
        "refundAmount": "1.00"
    }
}
Sample response for fallback
{
    "head": {
        "responseTimestamp": "1567421388384",
        "signature": "ry2bNQ+iq+geNezbFNBfIkXXWTFPUnavG6XkxciEJUNLmL7Op9S7qWP8V1TGHNYvggw2IsIt1OmprSfq92pODO5xiNJ+6pFyVtBUxnRrdL8=",
        "version": "v1"
    },
    "body": {
        "orderId": "YOUR_ORDER_ID",
        "mid": "YOUR_MID_HERE",
        "resultInfo": {
            "resultStatus": "TXN_FAILURE",
            "resultCode": "607",
            "resultMsg": "Refund can not be initiated for acanceledd transaction."
        },
        "txnId": "PAYTM_TRANSACTION_ID",
        "refundAmount": "1.00"
    }
}
To use this Integration Action Node in an app.yellow.ai AI agent, refer to the below-mentioned example:
app.executeIntegrationAction({
    		"integrationName": "paytm",
    		"action": "Initiate Refund",
"dynamicParams": {
    "requestTimestamp": "1658203708983",
    "orderId": "OREDRID_98765",
    "referenceId": "REFUNDID_98765",
               "transactionId": "202005081112128XXXXXX68470101509706",
               "refundAmount": "30.00"
}
}).then((res)=>{
    console.log("response from action node", res);
    app.log(res, '||Response from action node||')
}).catch((err)=>{
    console.log("Error in action node",err);
    app.log(err, '||Error in action node||')
})
Check Refund Status
-
In the Paytm node, choose the action Check Refund Status.
-
Configure the input parameters needed to generate the payment link by referring to the descriptions provided in the table below.

| Field name | Sample value | Data type | Description |
|---|---|---|---|
| RequestTimestamp | 1588402269 | String | EPOCH timestamp of the time at which the request is being sent |
| OrderId | OREDRID_98765 | String | It is a unique reference ID for a transaction passed in the transaction request and the Initiate Refund Integration Action Node. Order ID should be passed to check the actual status of the refund |
| ReferenceId | REFUNDID_98765 | String | Merchant's Reference ID unique for every refund transaction. This is REFID for which refund status is being inquired |
The easiest way to identify success/failure is by looking at the key resultStatus in the resultInfo object. If its value is TXN_SUCCESS, the response is a success.
Sample response for success
In case of success, extract the key(s) and display to the end user an appropriate message with the help of any of the Message type nodes.
{
"head": {
"clientId": "C11",
"responseTimestamp": "1556719120393",
"signature": "Stx6P9HpnEG3GADkMuOcj50dm7ZHmvMPd29b8K5rxi4aVzRcJ5hklZo//RZdtTA+zcll8sdelyAYsxqPxFs66RVE0F2b9RElTMqYSfBj89I=",
"version": "v1"
},
"body": {
"orderId": "YOUR_ORDER_ID",
"userCreditInitiateStatus": "SUCCESS",
"mid": "YOUR_MID_HERE",
"merchantRefundRequestTimestamp": "2019-05-01 19:27:25.0",
"resultInfo": {
"resultStatus": "TXN_SUCCESS",
"resultCode": "10",
"resultMsg": "Refund Successfull"
},
"txnTimestamp": "2019-05-01 19:25:41.0",
"acceptRefundTimestamp": "2019-05-01 19:27:25.0",
"acceptRefundStatus": "SUCCESS",
"refundDetailInfoList": [{
"refundType": "TO_SOURCE",
"payMethod": "BALANCE",
"userCreditExpectedDate": "2019-05-02",
"userMobileNo": "91-******7777",
"refundAmount": "1.00"
}],
"userCreditInitiateTimestamp": "2019-05-01 19:27:26.0",
"totalRefundAmount": "1.00",
"refId": "UNIQUE_REFUND_ID",
"txnAmount": "10.00",
"refundId": "PAYTM_REFUND_ID",
"txnId": "PAYTM_TRANSACTION_ID",
"refundAmount": "1.00",
"refundReason": "Testing refund reason",
"agentInfo": {
"name": "Lalit",
"employeeId": "Em1-00`",
"phoneNo": "7777777777",
}
}
}
Sample response for fallback
{
    "head": {
        "clientId": "C11",
        "responseTimestamp": "1556719175104",
        "signature": "gJD0EM+p9rGekkXKRt1M0aTUTaqZ6SVcmWfysIO9s9tJKhjrfpySlCEG8Tb97G1h4iYyJuhCglTr1obhO7xX+TIFwlaIgrundaj7dyt2SdA=",
        "version": "v1"
    },
    "body": {
        "orderId": "YOUR_ORDER_ID",
        "mid": "YOUR_MID_HERE",
        "refId": "UNIQUE_REFUND_ID",
        "resultInfo": {
            "resultStatus": "PENDING",
            "resultCode": "501",
            "resultMsg": "System Error."
        }
    }
}
To use this Integration Action Node in an app.yellow.ai AI agent, refer to the below-mentioned example:
  app.executeIntegrationAction({
    		"integrationName": "paytm",
    		"action": "Check Refund Status",
"dynamicParams": {
    "requestTimestamp": "1658203708983",
    "orderId": "OREDRID_98765",
    "referenceId": "REFUNDID_98765"
}
}).then((res)=>{
    console.log("response from action node", res);
    app.log(res, '||Response from action node||')
}).catch((err)=>{
    console.log("Error in action node",err);
    app.log(err, '||Error in action node||')
})