SMS template
1. Create SMS template
- For Indian phone numbers, ensure that the information provided here exactly matches the details entered in the DLT portal. Any discrepancy may result in rejection.
- In certain countries, details like entity ID and template ID may not be applicable. In such instances, you're only required to provide the Sender ID and the template message you wish to send.
-
In the left navigation bar, go to Engage > Templates.
-
Click Create new template > SMS.

-
Create the template using the available options. For descriptions, refer to the following table.
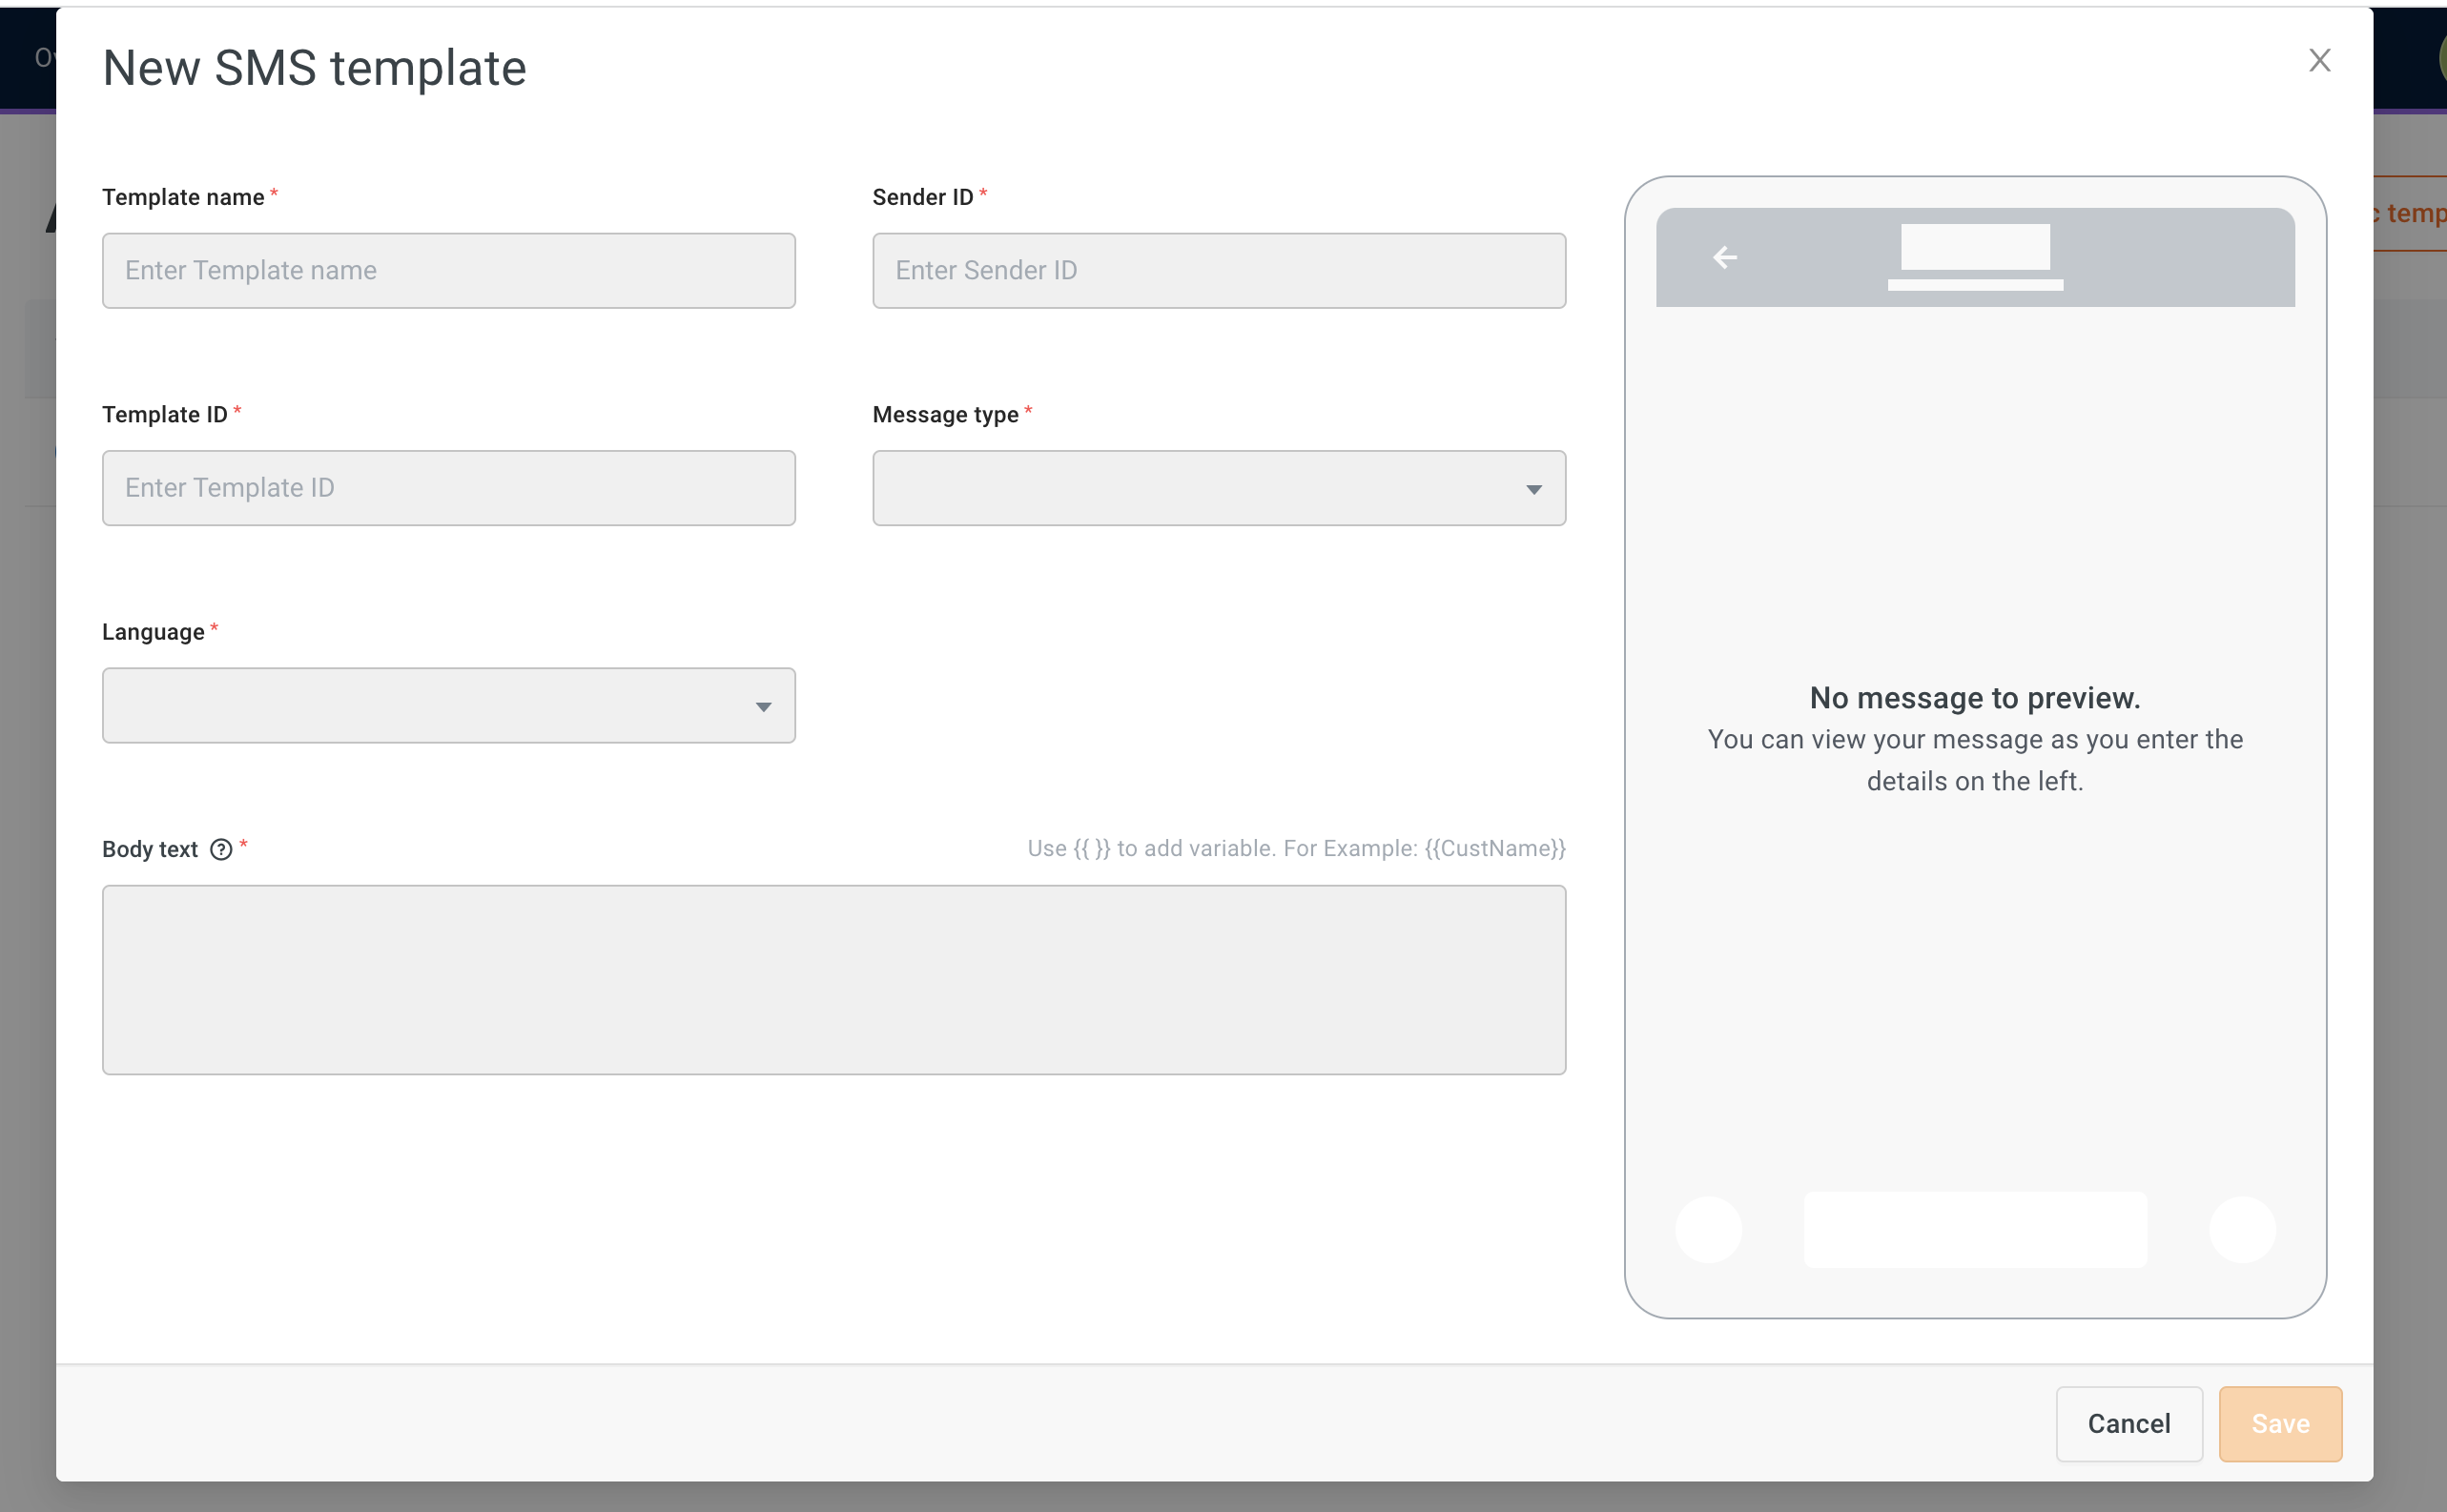
Option Description Template name Name the template. Name should be in lower case, and you can only use underscore as a special character. Example: sms_name Sender ID Provide the number from which you want to send the SMS. For example, you can use a numeric ID like 12345 or a custom name such as MYSHOP. For example, this could be a numeric identifier like 9876543210 or a custom alphanumeric ID such as MYSHOP. Template ID Template ID associated with the SMS message.
For Indian numbers, this identifier is mandated by the DLT (Distributed Ledger Technology) platform to comply with local regulations. It is a numeric value with length between 12 and 19 characters. You can find this against the template from the DLT portal of the brand.
However, for numbers in other regions, such as the US, this may not apply. In such cases, you can input any value or leave it blank, depending on the provider's specifications. Requirements may vary across geographies, so it's best to confirm with the Engage/Channels team for region-specific guidelines.Language Choose the language of the message. Body text Enter the message body. To add variables such as verification code, payment links, or first name, use {{ }}. For Example:{{CustName}}
To create a new variable, use the structure{{*variable_name_comes_here*}}- i.e., the variable name between double curly brackets.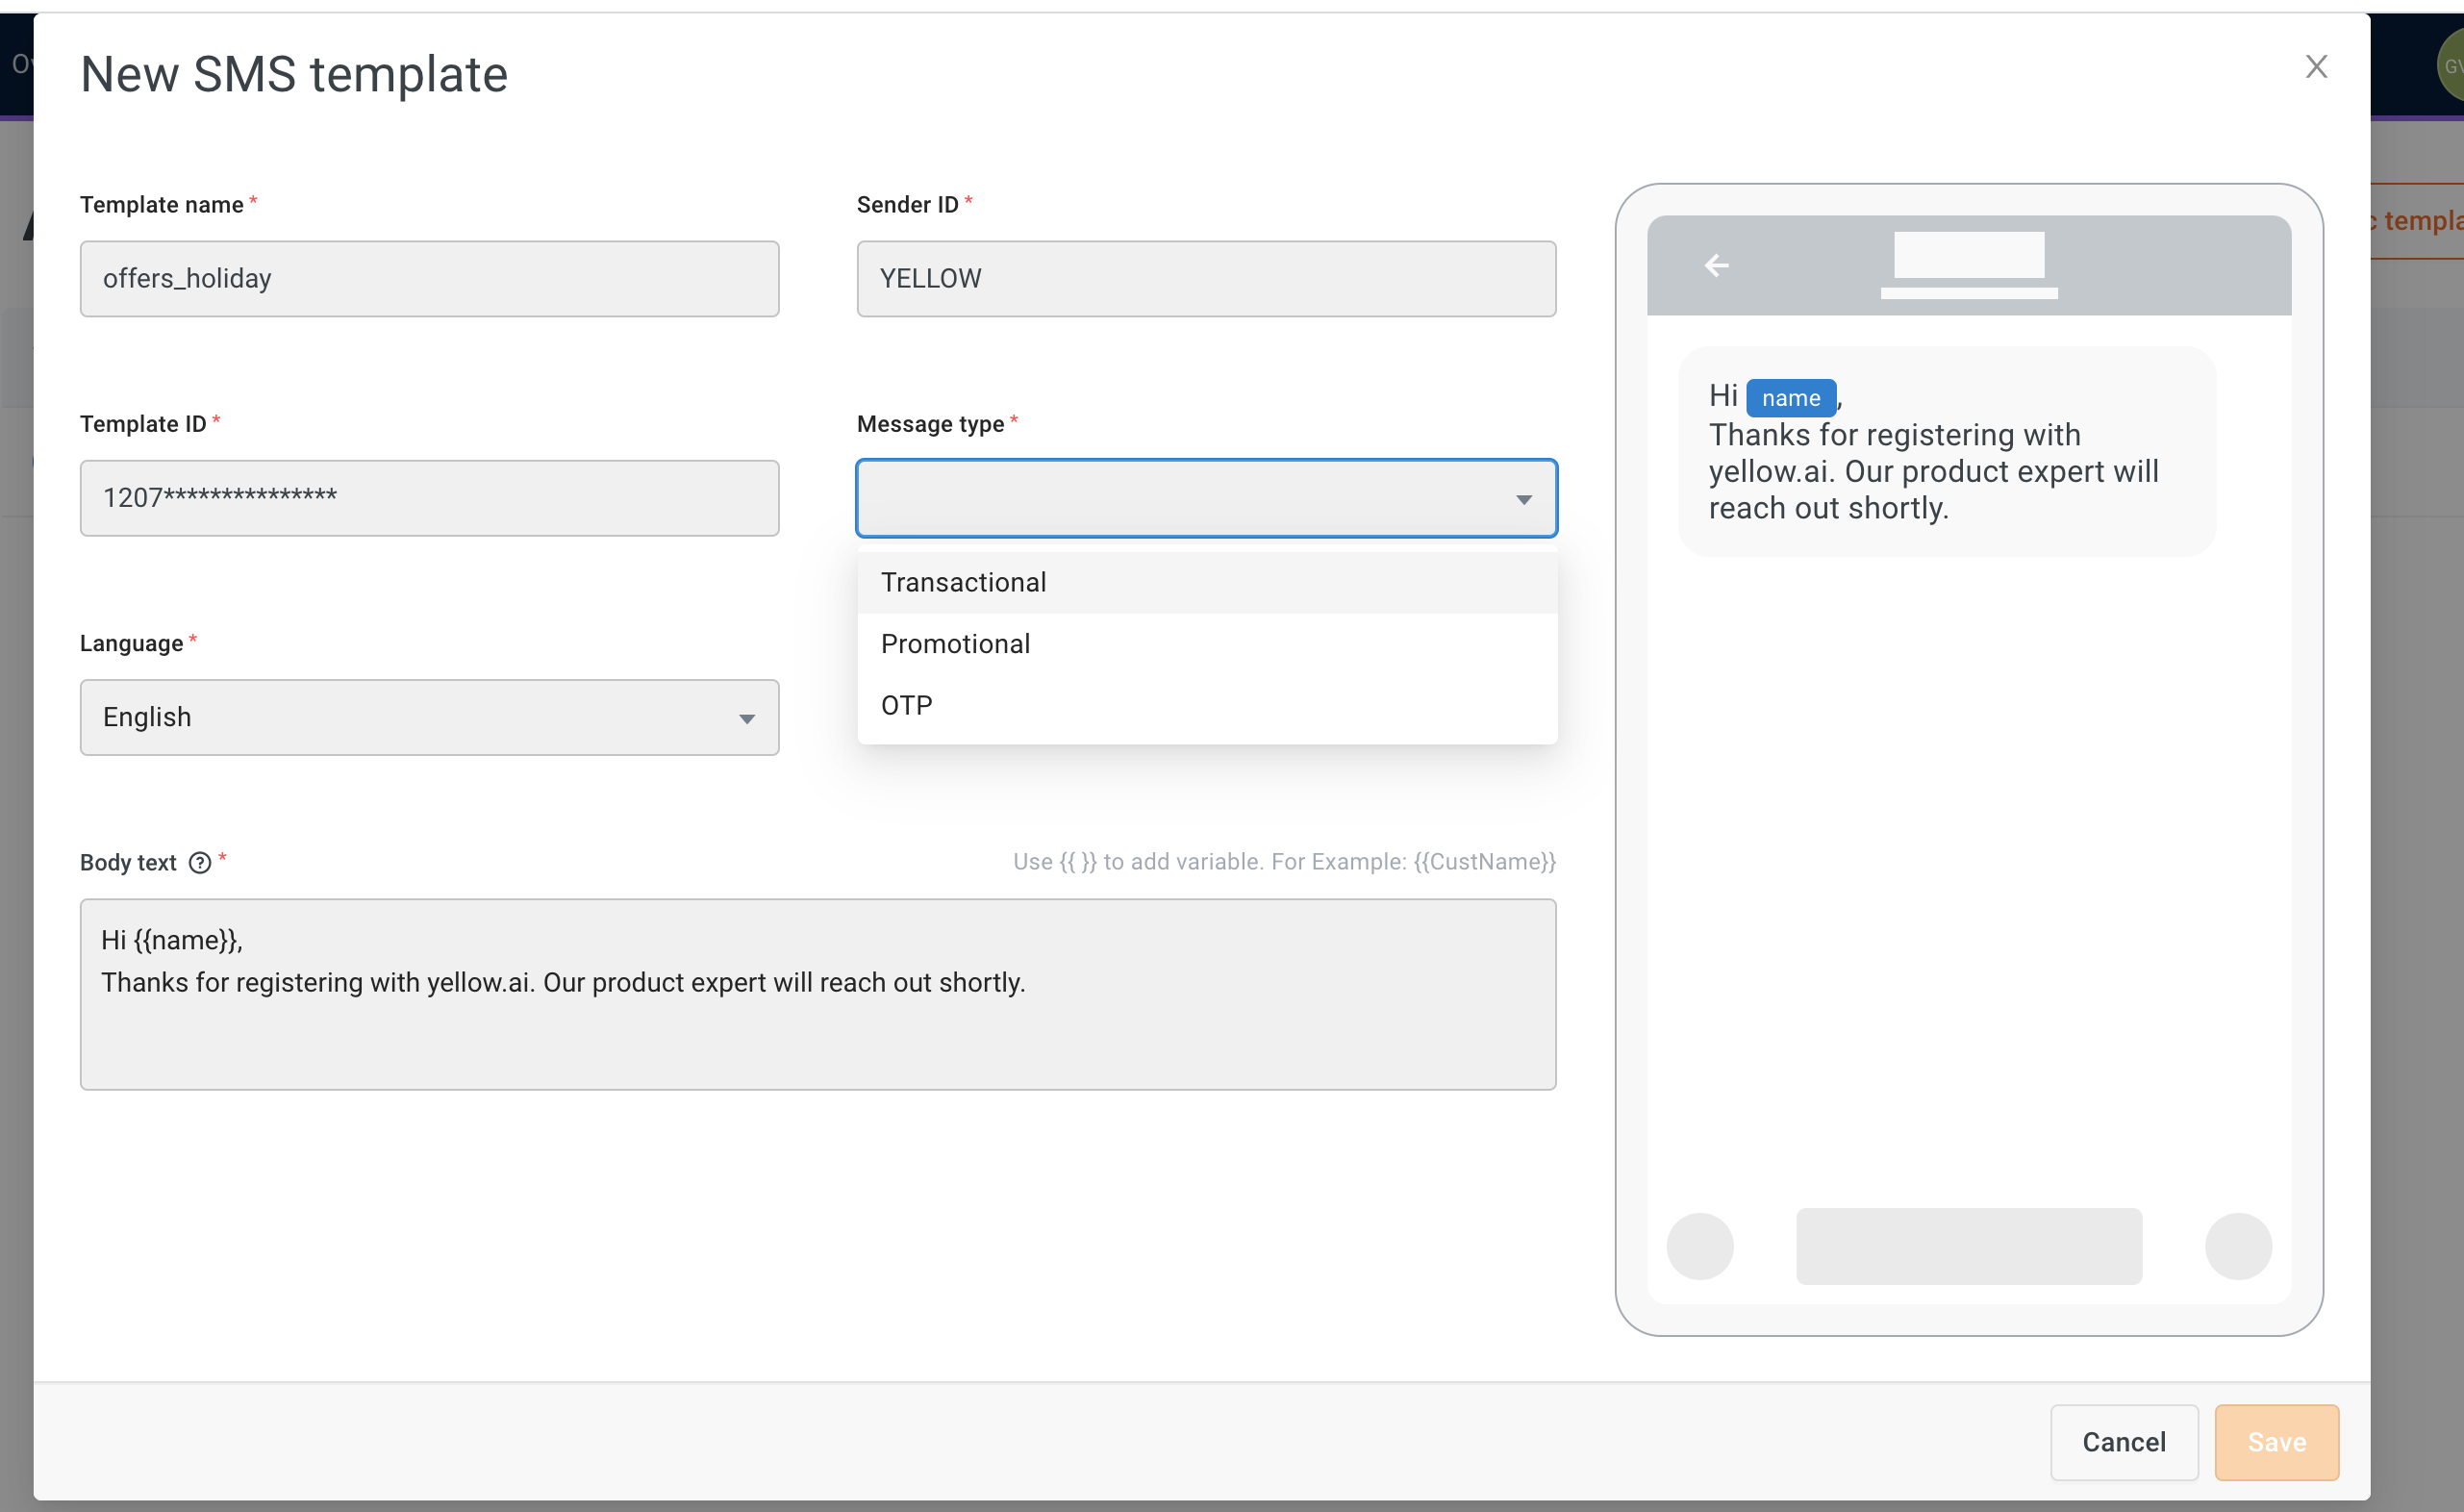
-
In URL click tracking, select the URLs for which you want to track clicks. Learn more about URL click tracking. URL click tracking is available only for Premium users.

When URL tracking is enabled, the CTA button type changes from STATIC to DYNAMIC. This ensures URL tracking requires a dynamic CTA template.
1.1 Setup URL clicks tracking in SMS campaigns
URL click tracking in Campaigns allows you to monitor user clicks on links used in messages. Before sending out the actual message, the URLs in the template are shortened, and each user is provided with a unique identifier. This allows you to track individual clicks on the links, providing valuable insights into user engagement and campaign performance.
URL click tracking is currently
- Supported for SMS and WhatsApp campaigns. If you need it for URLs in other channels, please contact us.
- Available only for Premium users.
You can track URL clicks in three different elements of your template - Template body, CTA, and variable.
Sample use cases:
- E-commerce: Track how many users clicked on the link to a specific product or offer in your online store.
- Surveys: Measure the response rate by tracking the number of users who clicked on the survey link.
- Event invitations: Monitor the interest level by tracking clicks on event registration links.
To set up URL clicks tracking:
-
Create your marketing campaign with the URLs.
-
Navigate to the URL click tracking section and select the URL(s) that you want to track. You will see all the URLs used in the template in the respective sections - this includes URLs in Body text, variables and CTAs.
-
Click Create template.
-
Send out the campaign to users with the template. The URLs in the tracked list are shortened, and a unique identifier is provided to each user before sending.
1.2 Track URL clicks in SMS campaigns
To track URL clicks:
-
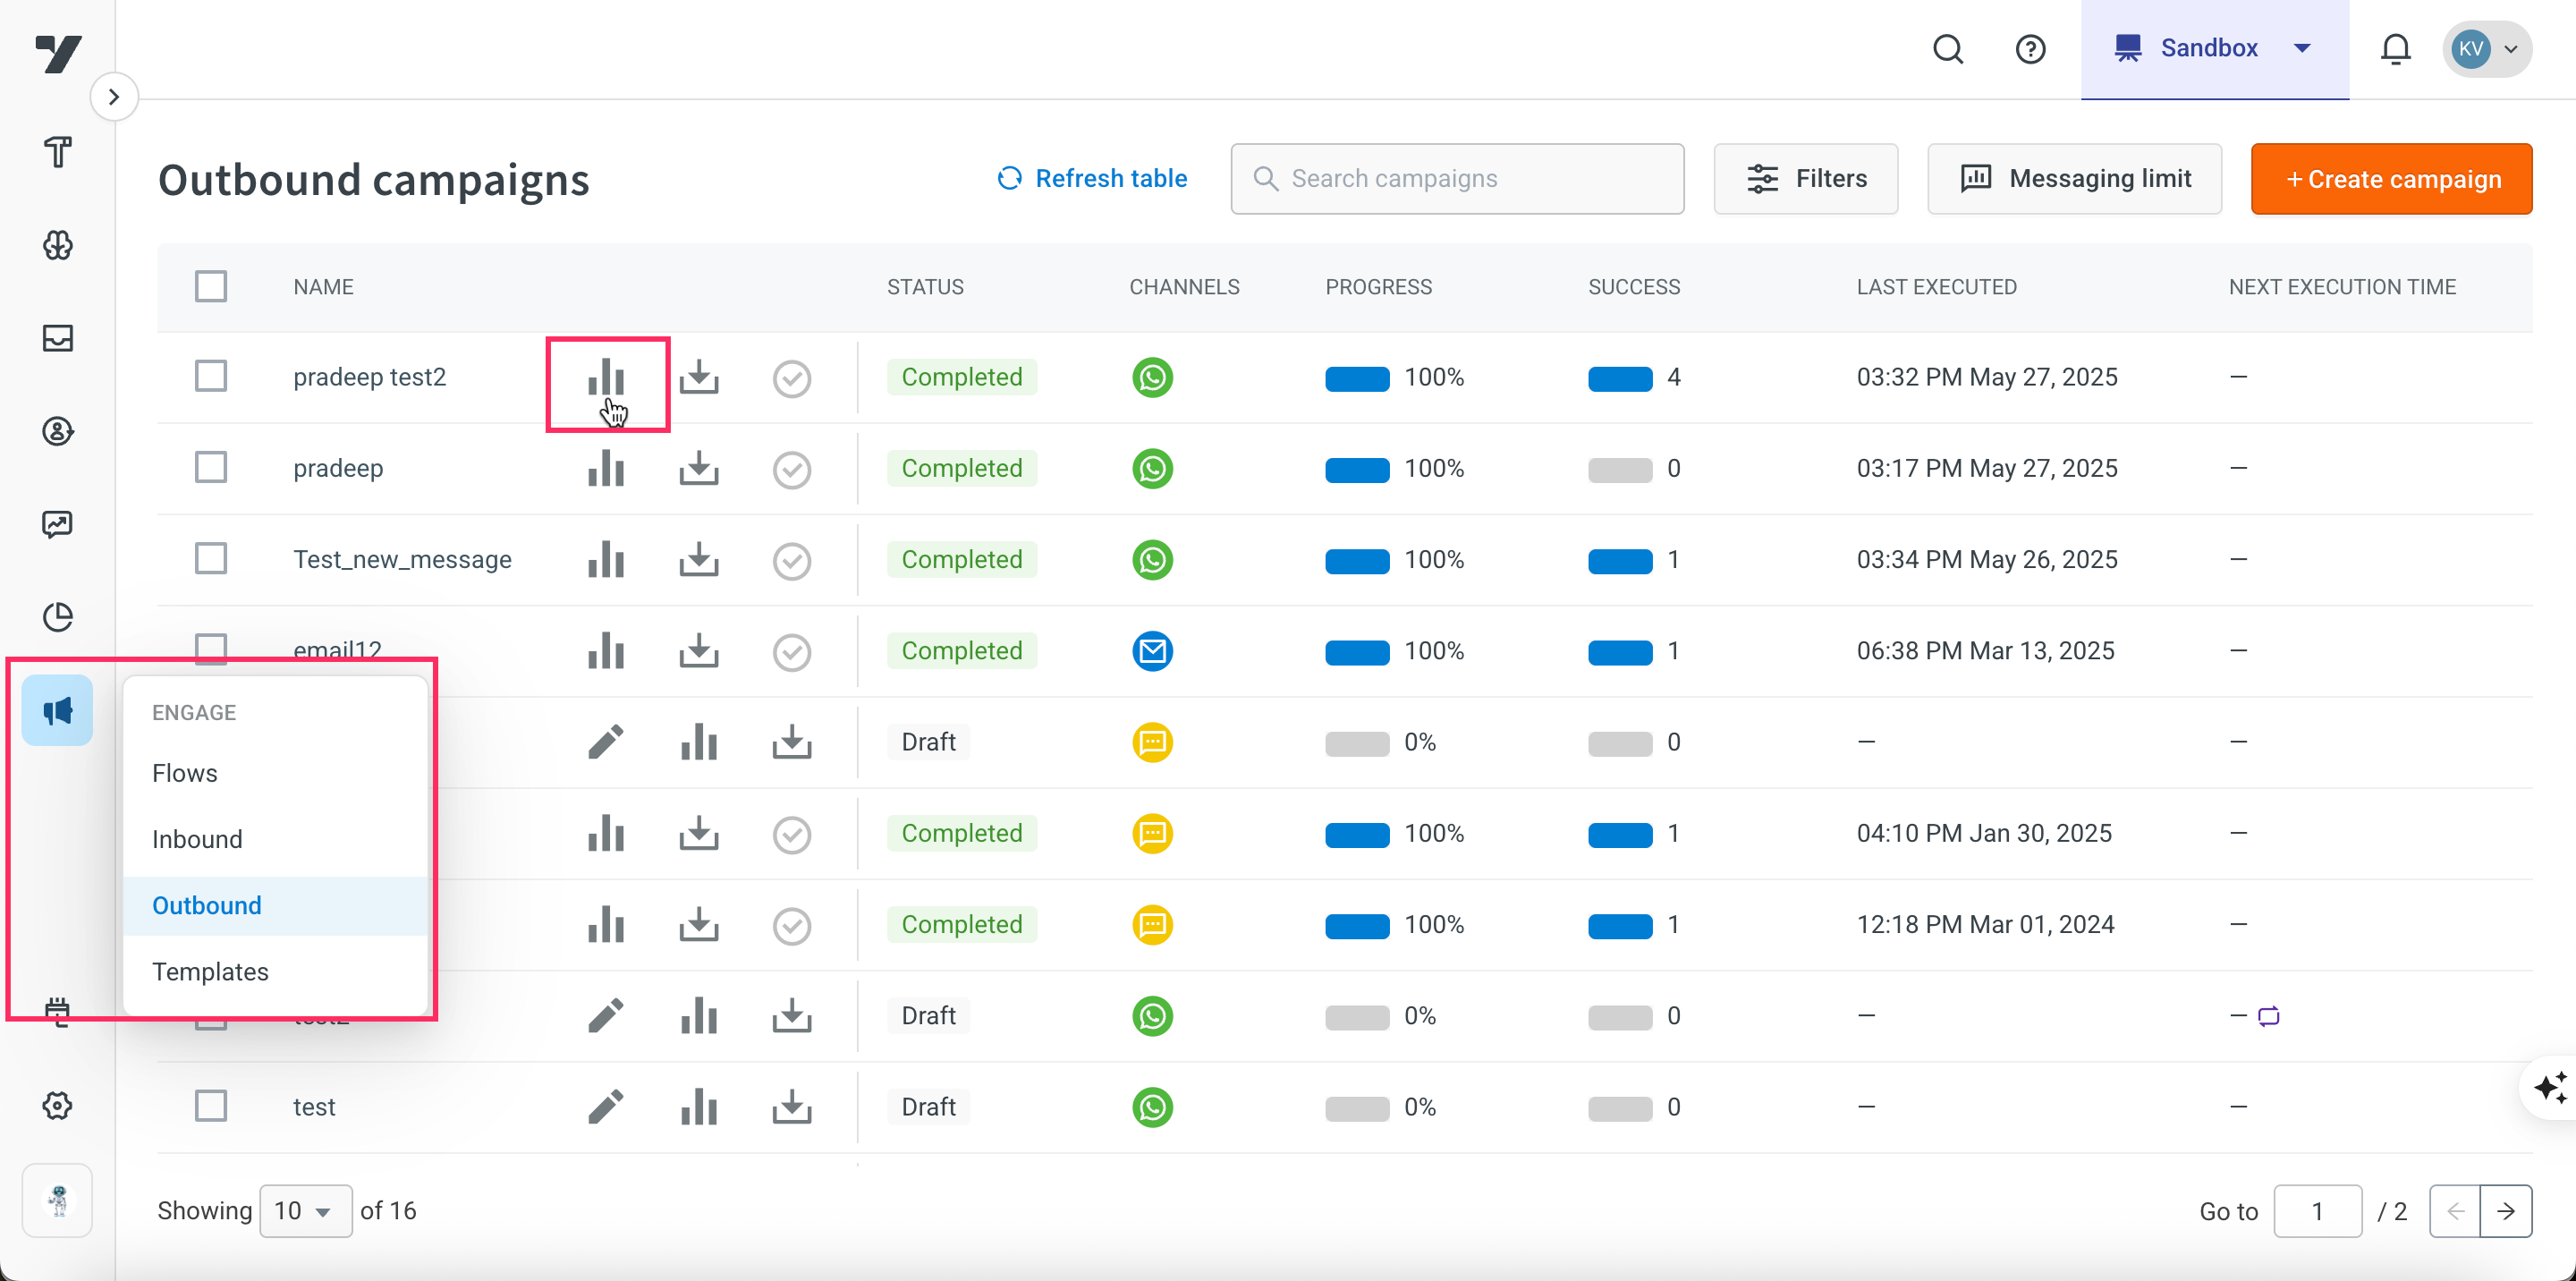
Go to Engage > Outbound > Click on the respective Campaign analytics icon.
-
Scroll down to the bottom of the report.
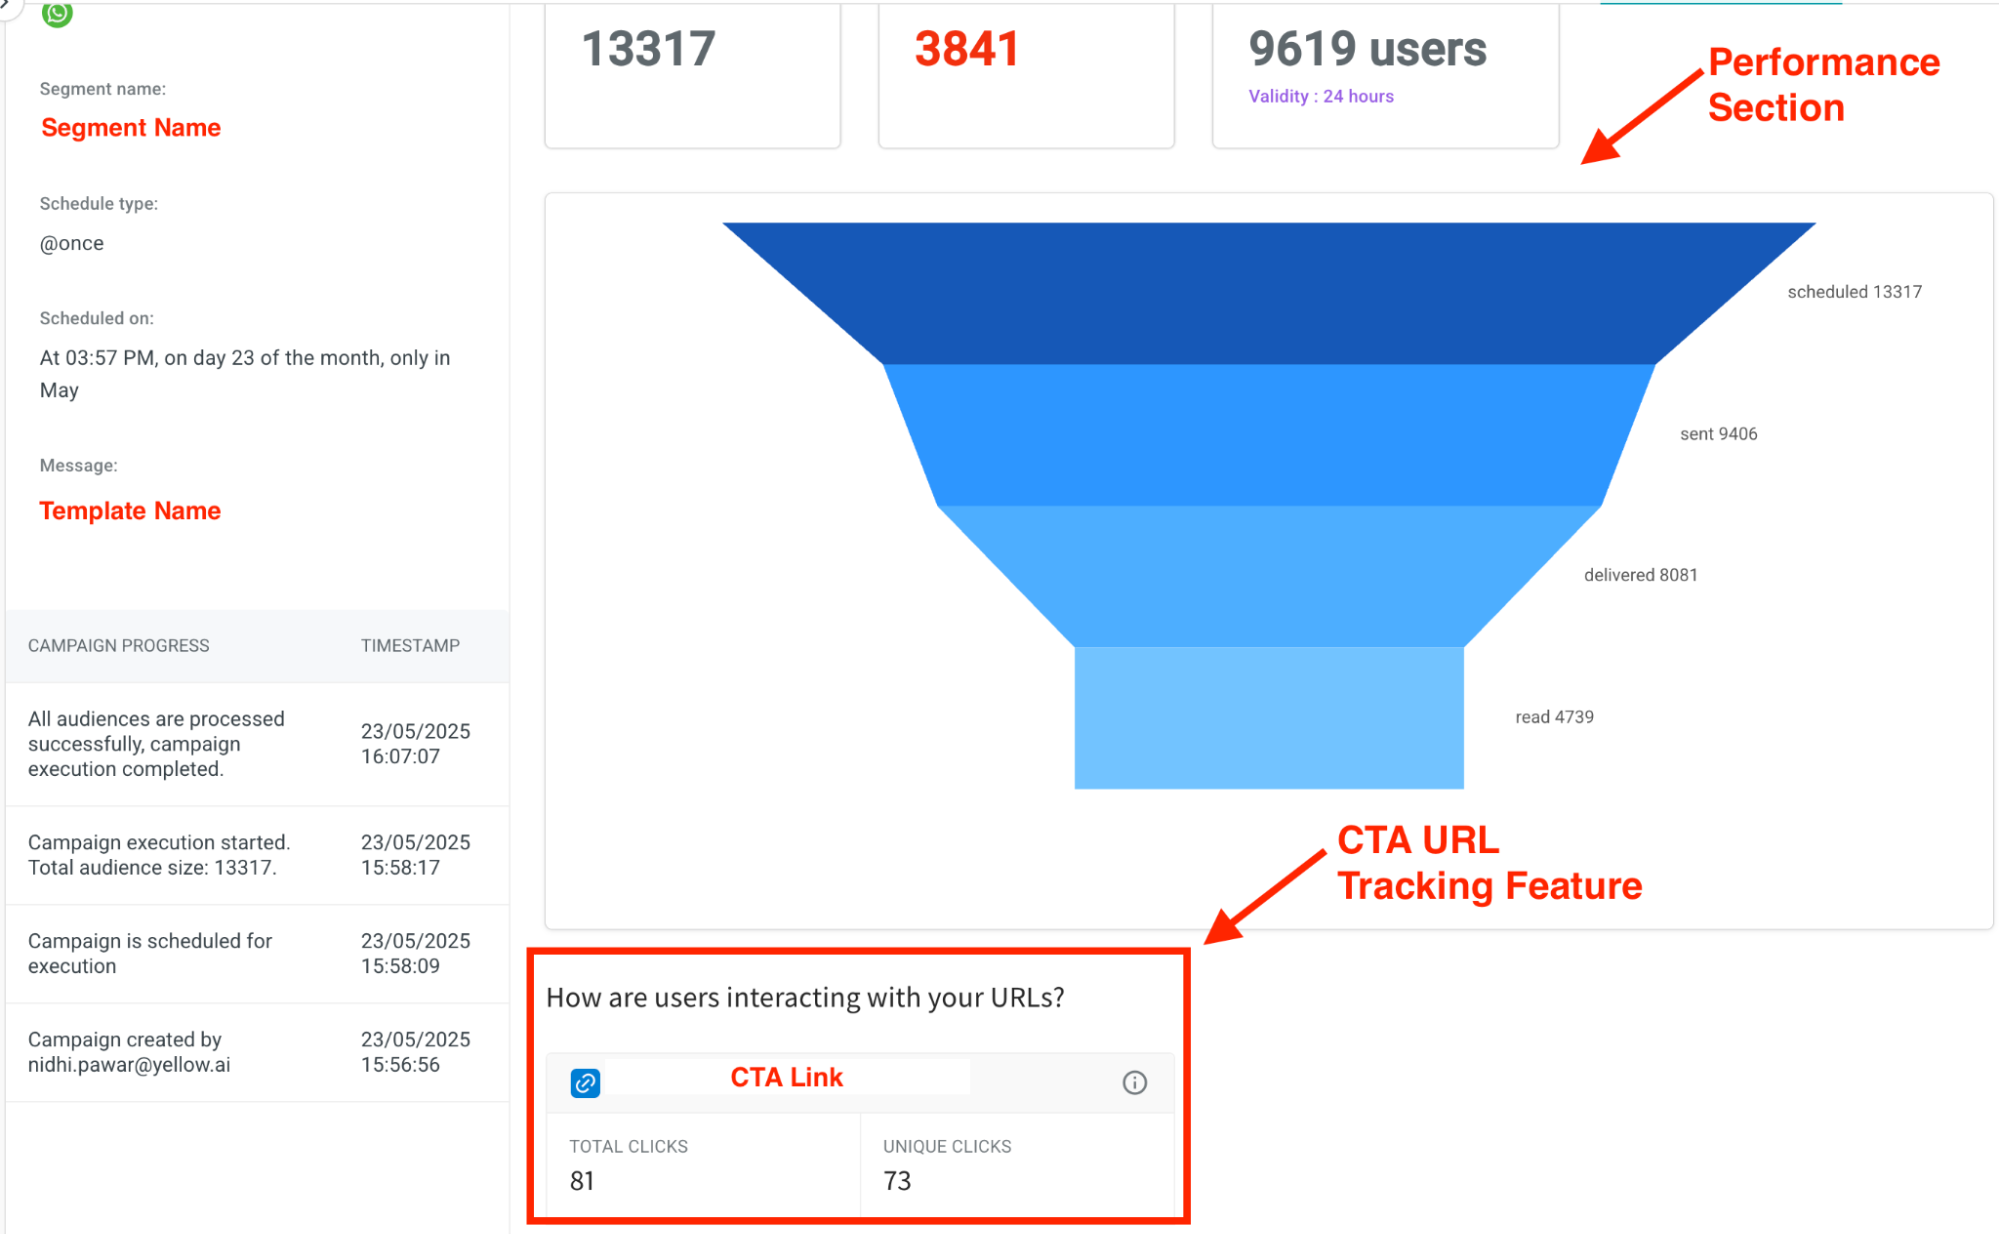
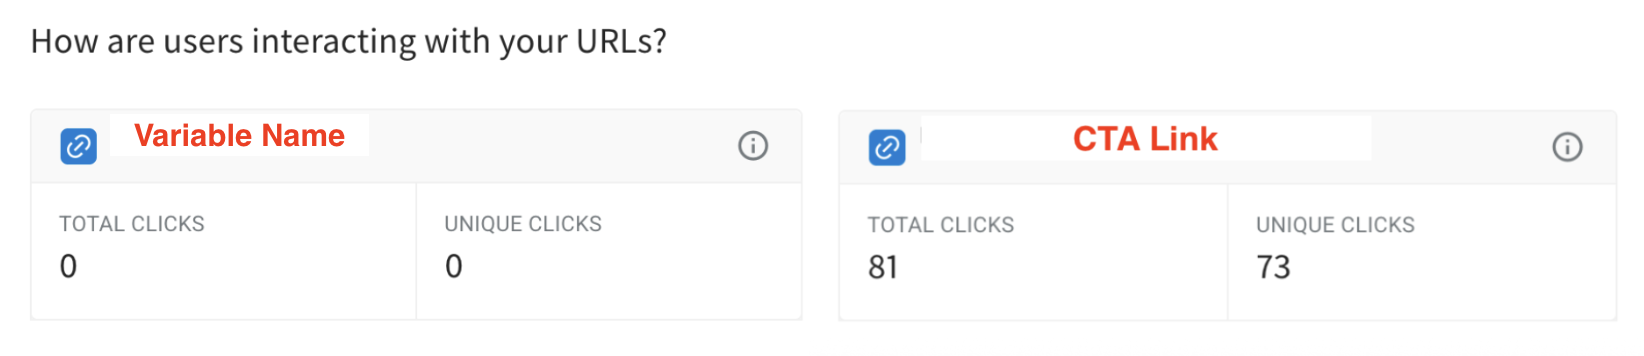
- Total clicks: Represents the total number of times the CTA was clicked, including repeated clicks by the same user.
- Unique clicks: Represents the number of distinct users who clicked the CTA. Multiple clicks by the same user are counted only once.
If CTA URL tracking is enabled for a single CTA button, you will see the details of CTA link. If CTA URL tracking is enabled for variable and CTA button, you will see both the metrics as shown below.
2. DLT compliance for Indian users
Distributed Ledger Technology (DLT) is an account which brands need to create by giving relevant business info. The DLT account is in place to prevent customers from being SMS-spammed.
Template content will undergo review by the DLT portal to ensure message quality. The template can be approved or rejected which you can check from the DLT portal itself.
DLT account is mandatory for the brands to communicate with the customers with transactional & promotional messages.
DLT registration can be done via one of the Telecom operators (in no particular order - Jio, Vodafone, Airtel, BSNL, Tata, PingConnect). Yellow.ai does not recommend any DLT vendor here.
Common details that will be expected during the DLT registration are:
- Business PAN Number
- GST number (GST certificate)
- Business Established Certificate
- Complete Business Address
- Business Identity proof (PAN Card)
- GST registration
- Letter of Authorization
2.1 Register as an enterprise/business entity/principle entity
You can create the DLT account with your preferred telecom provider.
Search Google for <_telecom_name DLT registration_> (e.g, Airtel DLT registration) or refer to relevant link below. Follow the steps as directed by the selected telecom operator.
Upon successful creation of the DLT account, your brand will be assigned with the 19-digit Entity ID.
2.2 Find the Entity ID
On Airtel DLT: 👇

On Jio DLT: 👇

On Vodafone DLT: 👇

On Tata DLT: 👇

On PingConnect DLT: 👇

Charges involved
- Subject to the Telcom operator.
Turn around time
- 2 to 5 days (subject to Telecom operator).
Please use the brand’s email ID for the DLT registration.
2.3 Sender ID (or) Header creation & approval
SMS Sender ID or SMS Header should be created in the DLT portal as follows:
- For Jio DLT → Refer this: https://messaging.kaleyra.com/support/solutions/articles/3000102267-jio-s-header-senderid-registration-process
- For Airtel DLT → Refer this: https://messaging.kaleyra.com/support/solutions/articles/3000102282-airtel-s-header-senderid-registration-process
- For Tata DLT → Refer this: https://messaging.kaleyra.com/support/solutions/articles/3000102289-tata-s-header-senderid-registration-process
- For BSNL DLT → Refer this: https://messaging.kaleyra.com/support/solutions/articles/3000102292-bsnl-s-header-senderid-registration-process
- For Vodafone → Refer this: https://messaging.kaleyra.com/support/solutions/articles/3000102265-vodafone-idea-s-senderid-header-registration-process
- For PingConnect → Refer this: http://hexasupport.kaleyra.io/support/solutions/articles/3000102269-videocon-s-header-senderid-registration-process
Other information
| Turn around time | The Turnaround time (TAT) for successful/unsuccessful registration of Sender ID/Header will vary vendor wise and will be mentioned in the respective links. On an average, 2 days will be taken for approval or rejection of the Sender ID. |
| Template creation & approval | Once the Sender ID/Header has been approved, next step is to proceed with template creation |
| TAT for approval or rejection | 3–5 days |
2.4 Steps to create template
The User interface may slightly differ for DLT portal from one telecom operator to others. Follow the specific steps as directed by the portal during registration. Below points are for overall understanding of the process.
- Choose the Template type as SMS
- Choose the Type of communication as Promotional or Transactional as needed
- Choose the appropriate Category of the business
- Choose from one or more already created headers
- Give an appropriate name to the template
- Write the exact message content with or without variables as per need
- Send for approval
2.5 DLT Limitations
- Promotional are for non-customers.
- Service-explicit, Service-inferred/service implicit, transactional for customers.
- There is no limit on number of variables inside a template.
- A Maximum of 30 characters can be passed as a variable.
- Brand name should be mentioned in the message template.
2.6 Run campaigns
Once the SMS channel configuration is successful, next is to send notifications.
Two types of notifications can be achieved with yellow.ai platform.
- Blast campaigns to a large audience using the Campaign manager
- 1-o-1 transactional updates to the customers
For bulk outbound campaign:
If the bot is on the app platform, use the Engagement module to send blast campaigns. For transactional updates, it should be handled by the bot developer at the bot level.
Sending blast campaign from the engagement platform:
- Upload the CSV in the audience
- Create a segment based on the desired tags
- Schedule campaign
If the bot is on the cloud platform, to run blast campaigns:
- Go to Engage > Templates > Select SMS > Create the same template that you created and got approved in the DLT portal. Ensure you add the exact details as added in the DLT portal - without any changes in the line space, case (upper/lower case) and
- Add the audience CSV
- Schedule the campaign as explained in Create outbound campaign.
For transactional 1-o-1 updates 👇
If the bot is on cloud platform
- Go to Engagement > Templates > Select SMS > Create the same template that you created and got approved in the DLT portal. Add the exact details as added in the DLT portal. Make sure the message content is JUST THE SAME without any changes in the line space, case (upper/lower case) and such
- Make use of the V2 Notification API and/or Workflow campaign as per need.
What next?
After creating an SMS template, create an SMS campaign as explained here