Create & manage Inbound campaign
Inbound engagement is a method to attract customers by providing relevant information on the brand's website about their product or service offerings to attract more leads. The Inbound engagement helps in converting casual visitors into prospective leads.
1. Create Inbound campaign
To create an inbound campaign, follow these steps -
- Navigate to your project and go to the Engage > Inbound.
- Click + Create Campaign.

- Provide Basic information.

a. Enter a suitable Campaign name that resonates well with the purpose of the campaign.
b. Select your preferred widget type from Overlay widgets or Chat widgets.
c. Click Next. You will be navigated to the Widget configuration screen.
-
Configure the widget (Widget configuration) using the descriptions provided in the following table and click Next. For more details on different types of widgets see here

| Option | Description |
|---|---|
| Card placement | Choose the place of the widget on the destination site - Right or Left. |
| Card / Button | Select your preferred color for the widget and the button that better suit your website theme.  |
| Header text | Specify your preferred title for the widget. Applicable only for Slide in and Bar widgets. To modify font style and color, hover over the box and use the styling options that appear.  |
| Subheader text | Specify your preferred text for the subheading. This is applicable only for the Slide in widget.  To modify font style and color, hover over the box and use the styling options that appear. |
| Button text | Specify a label name for the button. Applicable only for Slide in and Bar widgets. Similar to the Header text box, you can hover over the box to see the font styling options. You can customize the font's color, size, and family. |
| Button Type | Choose the intended behavior of the button (in Slide in or Bar widget) - FlowTriggers (to trigger a bot flow), WhatsappChat (to start a WhatsApp conversation).  |
| Flow triggers | For FlowTriggers, choose the flow that you want to trigger. Available for Slide In, Bar, and Chat Auto Popup. |
| Select WhatsApp profile | For WhatsappChat, choose the WhatsApp business number that you want to connect with. |
| Default user message | Specify the first message to show up in the WhatsApp chat when the user clicks on WhatsApp chat. |
Also, see the different types of widgets in Types of Inbound Widgets.
At any point, you can click
- Previous to go back to the previous step in the campaign builder
- Cancel to exit the campaign builder without saving the campaign
- Save as drafts to save the current settings as draft and exit the campaign builder
-
In Web behavior, define the condition under which visitors should see this campaign. For more details, see here

| Option | Description |
|---|---|
| Cookie | Show the campaign either to visitors who have or do not have a specific cookie attached to them. You will have to define the cookies using key-value pairs. |
| CTA | Show the campaign when the visitor clicked on a specific page element. Use the selector and define the key-value pair. |
| Custom Event | Show the campaign based on custom events. |
| Device | The device from which the visitor accessed the website - mobile, desktop, or tablet. |
| Element Clicked | Show the campaign when the user clicked on a specific element on the page. Format: key=value You can use the element's id or class. Example: class=ri-thumb-up-fill or id=liked_docs.  |
| Element hovered over | Show the campaign when the vision hovered on a specific element of the page. Use the selector and define the key-value pair. Format: key=value You can use the element's id or class. Example: class=ri-thumb-up-fill or id=liked_docs. Supported operators: is and isn't. |
| Referrer | The source (URL) from which the visitor has been redirected to the current page. |
| Site visits | Shows the campaign based on the number of times the user visited the site. |
| Number of site visits | The number of times a user has visited the specified website site (It considers sessions, not page views). |
| On exit intent | Show the campaign when a visitor's cursor leaves the window on the top half of the screen (an indication of changing the browser tab or closing the current tab/window). |
| Seconds on page | Show the campaign if the visitor has been on the page for a certain number of seconds. |
| Seconds of inactivity | Show the campaign when the visitor is inactive for certain seconds. |
| Scroll percentage | Show the campaign when a visitor scrolls down to a specific percentage of the page. |
| URL | Show the campaign only when visitors are on a particular URL or if the URL includes/excludes a specific keyword. You can use is/is not, or includes/ does not include. You can also use Wildcard (*), an asterisk to mention any keyword in the URL that is not specific. For example, the URL http://yellow.ai/*/blog considers any value in the URL in place of *.  |
-
In Frequency, define how frequently you want a visitor to see the campaign.

- Show campaign to the same user after: Set the minimum duration between two consecutive occurrences for a user.
- If button clicked by a user, show after: Set the duration after which you want to show the campaign for users who clicked on the campaign button.
- If manually closed by a user, show after: Set the duration after which you want to show the campaign for users who have closed the campaign widget manually.
- If a visitor just sees the campaign and does not interact, then the first frequency is referred to the next time the campaign is to be displayed
- If the visitor clicks on the button/engage with the campaign, then the second frequency is considered, and
- If the visitor dismisses the campaign, then the third frequency is considered
- Click Launch campaign.
2. Duplicate an existing campaign
When creating a new campaign, if there is a similar type of campaign created already, you can duplicate the campaign instead of recreating the same flow from scratch. You can then customize it as per your requirement. Besides saving time, it also increases your productivity.
To duplicate an existing campaign -
-
On the Inbound home page, navigate to the campaign that you want to duplicate.
-
Click the more options icon > Duplicate. You will see a new campaign with the name
{campaign-name}-duplicate
-
Make the required changes to the campaign using the more options icon > Edit.
3. Test Inbound campaigns
Once you create a campaign, test it to ensure it's working as desired and has the defined look and feel.
To test an inbound campaign widget, follow these steps -
-
Install the Chrome extension using this link.
-
Copy the chat widget code as explained here.
-
Open the extension in your Chrome browser.
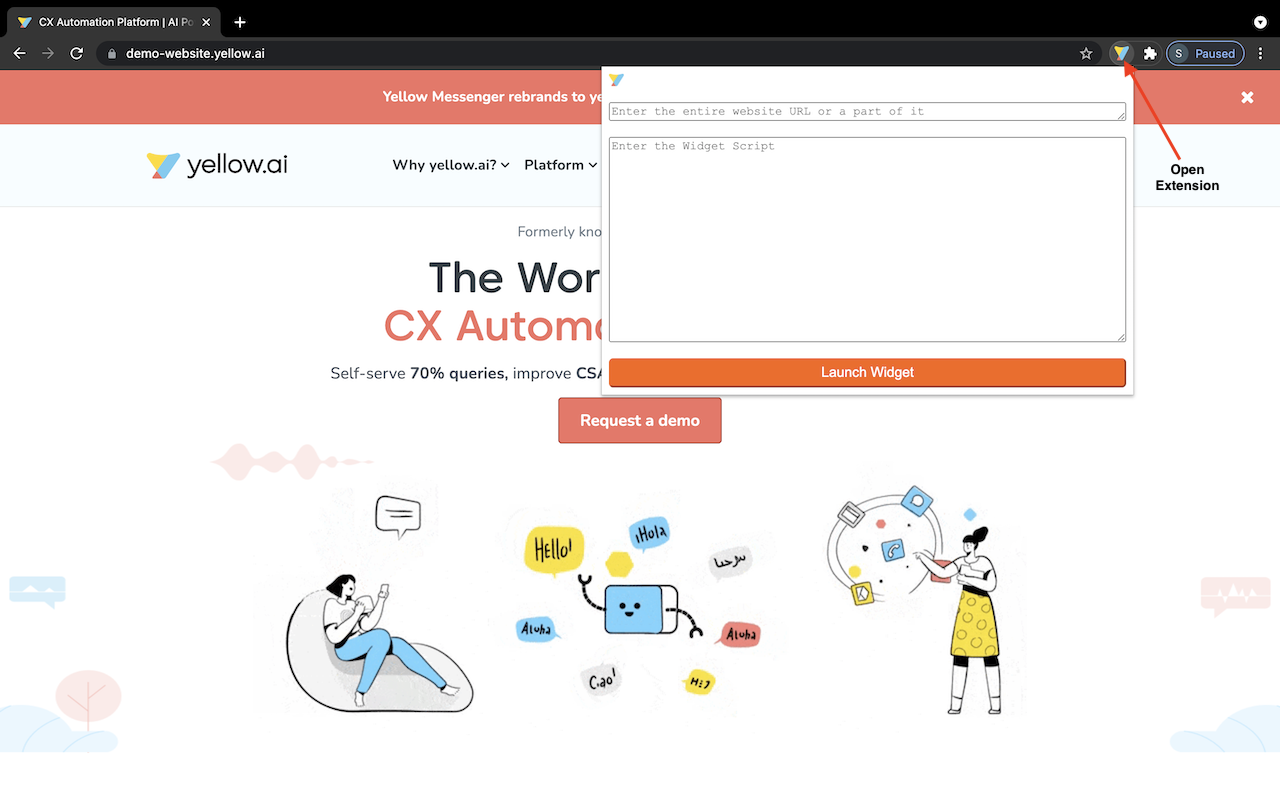
-
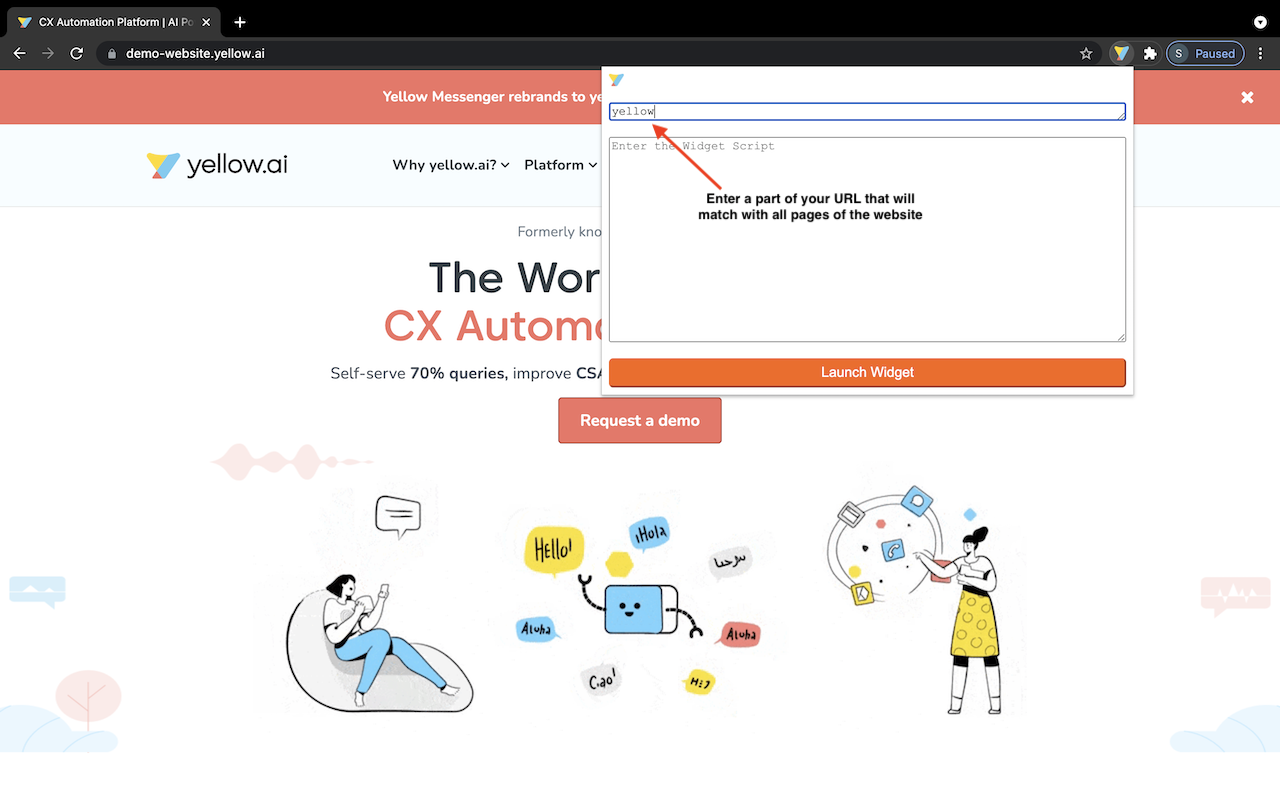
In the first input box, enter the entire website URL or a part of it.
The chat widget, overlay widgets, and inbound campaigns will start running on all website URLs that include the value you enter here.
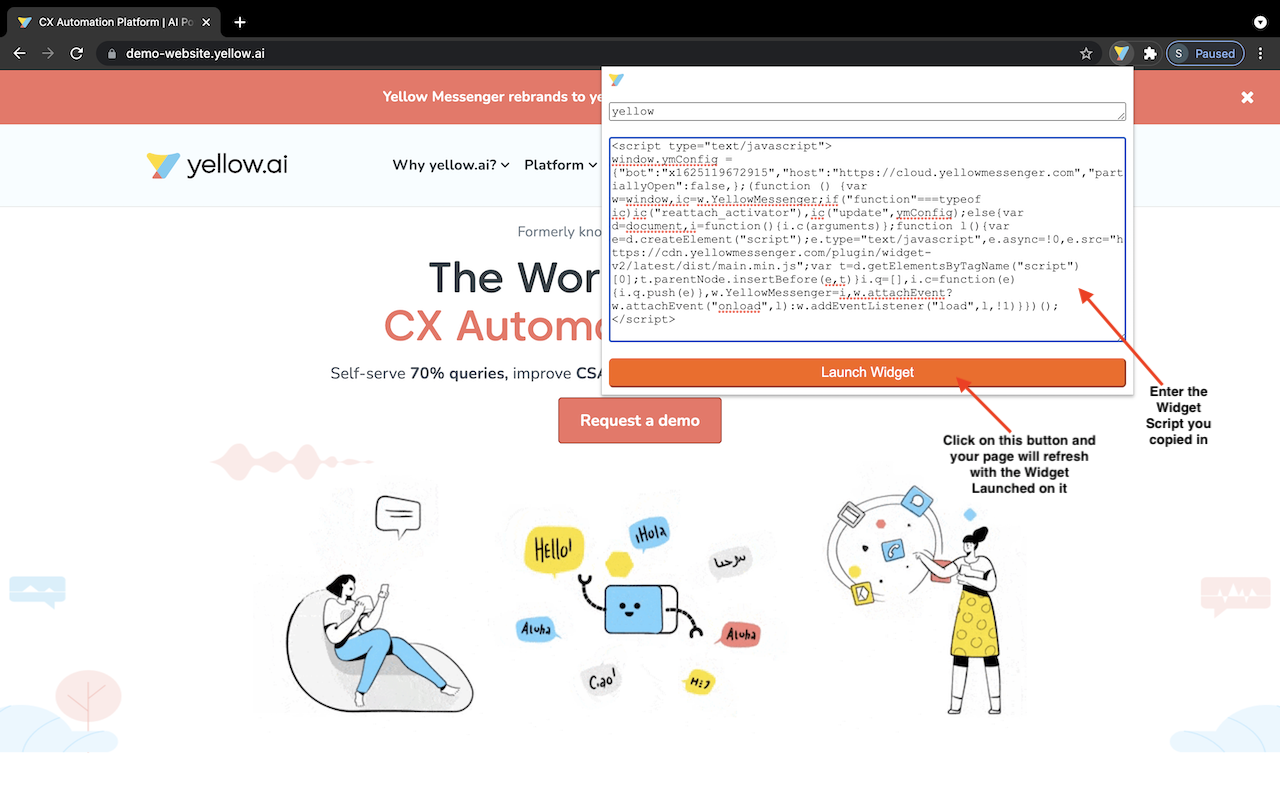
-
In the second input field, paste the chat widget script you copied in step 2.
-
Click on Launch Widget.
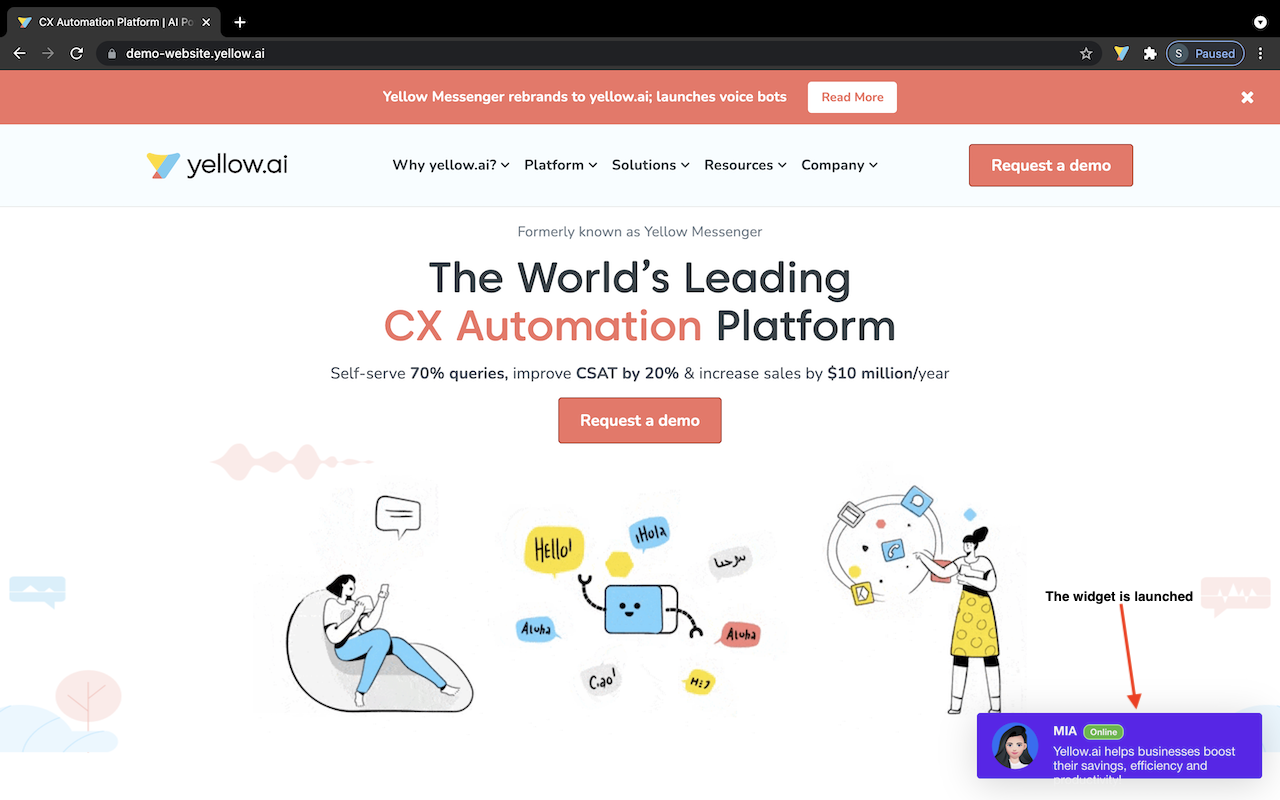
-
Open any Website URL that contains the value you entered in the first input field, and your chatbot should appear.
4. Prioritize campaign
When multiple campaigns were triggering at the same instant, you can prioritize which campaign to run. Campaign prioritization ensures that no two campaigns are triggered at the same time.
By default, the first campaign that you create will have the highest priority and the new campaign will have the least priority. You can change the priority of a campaign as per your preference so that the highest priority campaign when there are multiple campaigns at the same instant.
To change the priority of a campaign -
-
On the Inbound home page, click on the Priority drop-down and choose your preferred priority. 1 will have the highest priority and the highest number will have the least priority.

You can see the campaigns will get rearranged based on the newly assigned priorities.
5. Manage campaigns
Once you create a campaign, you can modify it, change the activation status, or delete if not required.
To manage your campaigns -
-
Log on to https://cloud.yellow.ai, and navigate to Engage > Inbound. You will see the list of Inbound campaigns created for the project with their current statuses.
- Active: This campaign has been successfully created and would be triggered if the conditions are met.
- Inactive: The campaign is currently inactive. It will not be triggered even if the conditions are met.
- Draft: This campaign creation is not completed yet. You can edit Drat campaigns and complete the setup.
-
Click on the More options icon as shown in the following and choose your preferred option.

- Deactivate/Activate: Select the desired option - Activate an inactive campaign or Deactivate an active campaign as required.
- Archive: Select to delete a campaign.
- Duplicate: This action creates a duplicate of that specific campaign. The newly created duplicate will have the lowest priority(more on priority later) and will also have “-duplicate” suffixed to its name
- Edit: Select this to make changes to the campaign. It takes you back to the campaign setup page.
To archive, activate or deactivate multiple campaigns at a time, select your preferred campaigns and click on the desired option in Actions.

6. Inbound widgets
Widget types appear in Step 3, configuring Basic information. A user can do the following with a widget -
- View the widget without interacting with it.
- Interact with the widget by clicking the widget button (+Explore in this case) to trigger the CTA.
- Close the widget by clicking on
x.
6.1 Bar Widget
A Bar widget is an overlay widget that appears as a horizontal banner on the top portion of your website, as can be seen above.

Supported button types for a bar widget
- Trigger a journey
- Redirect to WhatsApp chat
6.2 Slide in widget
It is an overlay widget that slides from either to the left or right on your website as shown here.

Sample report

Supported Button types
- Trigger a Journey
- Redirect to WhatsApp Chat
6.3 Chat auto-popup
Unlike the preceding two overlay widgets, this one is a part of the chat widget itself that sits at the bottom right of your website.
Whenever this type of campaign is executed, the chat widget opens up with the pre-configured journey, as can be seen in the following image.

When an inbound campaign is executed, a pop-up message is displayed on a mobile device. If there is more than one message and other components such as Quick Replies, Multi-select and so on, then a notification message is displayed. Upon clicking the message in the pop-up, the bot will open and display the respective message configured in the inbound campaign.
On desktop, bot will fully open when a respective journey is triggered.
Following are the behavior of the pop-up messages on the mobile device when a campaign is executed:
| Message type | Behavior |
|---|---|
| Single text message | Displays a text message in the pop-up. |
| Single text message + any other component | Displays New message received. |
| Component + no text message | Displays New message received. |
| Multiple texts | Displays first text message |
| Multiple texts + any other component (irrespective of order) | Displays first text message |
| Multiple other components (no text) | Displays New message received. |

Sample report

Supported button types
- Trigger a journey