Documents
Documents (Document/Doc)is a feature on yellow cloud and app that allows the customer to upload the documents, integrate their knowledge source to the yellow platform and enable the end users to extract relevant information from these documents quickly.
Doc can process both unstructured textual data and structured tables.
When you have multiple documents(20+) containing mostly(~70%) text, it is humanly impossible to convert this large pile of data into a structured format to feed it to a AI-agent. In such cases, you can leverage this knowledge by feeding it to the Doc engine which utilizes its NLP model and directly searches for the most relevant response from within these documents.
By using the Documents feature, you can expect the model to answer queries and take you to the right page/paragraph content with ~75-85% accuracy depending on the type and size of documents.
In this article, you will learn:
- Examples where you can use documents
- How to add files to Document section?
- What is Extract QNA?
- How to add Acronyms?
1. Examples where you can use Documents
These use cases can be leveraged only after the Documents are successfully uploaded on the Documents section. To upload the document in the Document section:
- Open Automation> Train > Document.
- Add the required file.
Learn how to upload files to Documents in the next section.
The document knowledge can be used in two different methods:
-
Fallback: Doc can be used as a fallback mechanism for unidentified queries for the bot. When the AI-agent is not able to understand the query from the intent, it goes as a fallback to document search and fetches the response from the uploaded doc.
- On the Automation landing page, click Document Search.
- Enable the toggle button next to Actions.

-
Node: Doc can be used as a node in flows. Document Search - action node can be added in a flow and used as a searching tool for any user query.
i. Open Automation > Build > Flows.
ii. Add a prompt node to recieve the response from the user(the data that needs to be searched in the doc). Store the response in a variable.
iii. Add a Document Search node. Select Query value as the previously stored variable.
iv. Metadata filters can be added when you only specific documents are required to be searched for the user query via tags.

View report on Document search
To view the report of search performance such as queries answered/unanswered and search categories, go to Data explorer.
2. Add files to Document section
To upload a file, follow the steps:
-
On Automation > Train.
- Open Documents-> Files section.
- Click +Upload Documents.

-
Select a source you want to upload the file from:
- Your local system
- Upload URL- integrate your AI-agent with customer’s external knowledge base integrations
- AWS-S3
- Sharepoint

2.1 Upload files from local system
-
After selecting Your Computer. Click Upload File (you can also select multiple files at once). You will be redirected to your computer file storage from where you can select files to upload.

-
Click Add (x) after enabling the options below (x indicates the number of documents that will be uploaded).
- Select Generate Q&A when you want to generate questions and answers automatically from the document. Otherwise, leave it as it is. (These questions and answers will be visible on the Document QnA tab, just beside the ‘Files’ tab at the top left.
- Select Enable table parsing if there are tables in the document. That will help index the documents better for tables.
- Select the language in which the document is.
Apart from English, it also supports German, French, Spanish, Romanian and Polish. For that, you will have to upload your documents in these languages.
When a user enters a query in a specific language from the list, the AI-agent detects the language of the query and searches for relevant documents uploaded in the same language. It then provides the user with results corresponding to their query.

-
After clicking Add, wait for the indexing to complete. The status changes to Completed.
-
If you want to upload more documents, click +Upload documents.

-
To see the properties of the documents, hover over the information - icon.

- To preview the uploaded document, click on Preview
Other Settings
-
Click the three dots on right to view different action items:
- Edit Tags: This allows you to limit the search results to certain documents. For example: If you assign a tag to this Sample.pdf doc as “Department: HR” then it can limit the search to HR only.
- Edit properties: It allows you to change the file name and if the customer has the requirement of redirecting the search results to a certain static URL, then it can be configured from here.
- Preview: It enables to preview of the uploaded document.
- Delete: This will delete the file from the cloud.
2.2 Upload files from an URL
Yellow.ai’s document feature supports integration with external knowledge database by adding a URL.
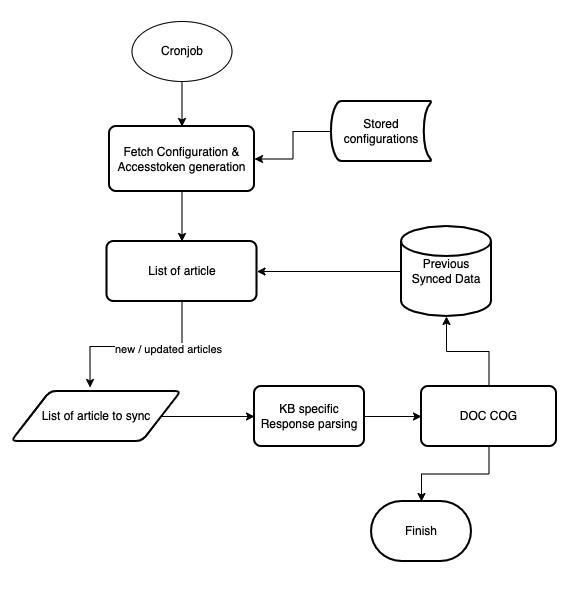
A KnowledgeBase(KB) gives centralized and organize access to solutions in form of FAQs and documentation (eg. Prismic, Salesforce, Confluence, Service-now, etc). Doc provides seamless integration and powerful search on these API-based KBs without requiring to upload it on the yellow.ai platform. It is a generic integration framework that can help to sync external knowledge base articles with the Yellow.ai Doc.
Key features
- Capable of fetching the article's content directly from online KBs based on GET rules.
- Articles' contents are automatically synced at regular intervals.
Prerequisites
- KB should have knowledge APIs(Article listing API and Article content API).
- Auth(Basic/token/Bearer(with long duration token)) or API to generate the key.
- Structured response(JSON/HTML).
Validation of prerequisite (predefined in yellow.ai)
| KB | Listing API | Article API | Auth Type | Response Type |
|---|---|---|---|---|
| Prismic | Yes | Yes | Token | JSON |
| Salesforce | Yes | Yes | Bearer | JSON |
| Confluence | Yes | Yes | Token | JSON + HTML |
| ServiceNow | Yes | Yes | Bearer | JSON + HTML |
:::
2.2.1 Salesforce KB integration
-
Open Setup in salesforce admin > Platform Tools > Apps > App Manager > New Connected app.
-
Fill out the details and enable OAuth Setting.
-
Add the following scopes.
-
Add Callback URL (any webhook/logging URL): a public URL which can listen & log any request on it. (You will receive a code on that URL post OAuth login in step 8). Click on Save.
-
Goto App Manager > select the created app > View. Copy the Consumer key (client id) & Consumer secret (client secret) and save them for future use. Share these credentials with your Yellow.ai SPOC responsible for configuring your KB.
-
Go to Manage Connected Apps > Select the created app > Edit.
-
Set Permitted users to All users may self-authorize & IP Relaxation > Relax IP Restrictions > Save.
-
Open the following URL after replacing the client id and callback URL accordingly.

https://login.salesforce.com/services/oauth2/authorize?client_id=<client_Id>&redirect_uri=<callback_url>&response_type=code
- Click Allow in the permission window, and you will receive a code in the callback_url logs.
- Use the following curl in postman to generate a refresh token.
curl --location --request POST 'https://login.salesforce.com/services/oauth2/token' \
--header 'Content-Type: application/x-www-form-urlencoded' \
--data-urlencode 'grant_type=authorization_code' \
--data-urlencode 'code=<code>' \
--data-urlencode 'client_id=<cliend_id>' \
--data-urlencode 'client_secret=<client_secret>' \
--data-urlencode 'redirect_uri=<callback_url>'
- Share the instance_url, refresh_token, and api_version with the Doc team.
- Share the token generation curl (if required/exist).
2.2.2 Service-Now integration
Prerequisites
- Instance URL (eg:
https://dev76197.service-now.com). - Basic Authentication key or Bearer Authentication with the long-duration access token.
- Share the token generation CURL (if any / exist): If the Authentication token (Step 2) is not fixed and needs to be generated using an additional API.
- API enabled for listing and details page
- Listing URL:
https://dev76197.service-now.com/api/now/table/kb_knowledge?sysparm_fields=sys_id,number,short_description,categoy,sys_updated_on - Article Url:
https://dev76197.service-now.com/api/now/table/kb_knowledge?sysparm_fields=sys_id,number,short_description,category,text,sys_updated_on&sysparm_query=number={{article_id}}
- Listing URL:
2.2.3 Confluence integration
Prerequisites
- Instance URL
- Authentication Token (
https://id.atlassian.com/manage-profile/security/api-tokens) - Token generation CURL (if any): If the Authentication token (Step 2) is not fixed and needs to be generated using an additional API.
2.3 Upload file via. AWS
Yellow.ai’s document feature supports integration with AWS S3.
Key Features
- Capable of fetching the documents from AWS sites (along with all sub-sites) which include documents uploaded to document libraries, documents created online and list attachments.
- Allows selecting a list of folders/subfolders/sites.
- Documents’ contents are automatically synced at regular intervals.
- Supports '.docx', '.doc', '.pptx',' .ppt', ‘.txt' & ‘.pdf’ document extensions.
- Supports AWS S3 Rest APIs.
Follow to steps below to upload documents the using AWS:
- Give User Access To Only One S3 Bucket Only.
- Click the s3 bucket and copy its ARN.
- Select Policy Type as IAM policy.
- Add Statement(s): past the ARN in the Amazon Resource Name twice first the actual value ‘,’ and then ARN.
For example:
arn:aws:s3:::testbucketpritam<br /> arn:aws:s3:::testbucketpritam/
-
Click Add statements.
-
Open the IAM dashboard select policy > create policy, and paste the JSON generated from the previous step.
-
Go to the user in the IAN dashboard and create a user.
-
Open attach existing policies.
-
You can add the s3 bucket policy you just created to the user.
-
You have created a new user with access to only a single bucket. Click the AWS console link in the above screenshot and login with this new user as an IAN user, you will have access to the s3 bucket.
2.3.1 Validate AWS credentials
The only way to verify AWS credentials is to use them to sign a request and see if it works. Simply creating the connection object tells you nothing because it doesn’t perform a request.
2.3.2 Introduction to Amazon S3 REST API
Making REST API calls directly from your code can be cumbersome. It requires you to write the necessary code to calculate a valid signature to authenticate your requests.
The following alternatives are recommended:
Use the AWS SDKs to send your requests. With this option, you don’t need to write code to calculate a signature for request authentication because the SDK clients authenticate your requests by using the access keys that you provide. Unless you have a good reason not to, you should always use the AWS SDKs.
Use the AWS CLI to make Amazon S3 API calls.
AWS SDK is available in a lot of different languages like JS, PYTHON, JAVA, DOTNET, PHP etc.
AWS SDK for JavaScript (Alternative approach):
For Python: pip install boto3
Configuring credentials
Boto3 will look in several locations when searching for credentials. The mechanism in which Boto3 looks for credentials is to search through a list of possible locations and stop as soon as it finds credentials. The order in which Boto3 searches for credentials is:
- Passing credentials as parameters in the
boto.client()method. - Passing credentials as parameters when creating a
Sessionobject. - Environment variables.
- Shared credential file (~/.aws/credentials).
- AWS config file (~/.aws/config).
- Assume a Role provider.
- Boto2 config file (/etc/boto.cfg and ~/.boto).
- Instance metadata service on an Amazon EC2 instance that has an IAM role configured.
Passing credentials as parameters in the boto.client
import boto3
client = boto3.client('s3',
   aws_access_key_id=ACCESS_KEY,
   aws_secret_access_key=SECRET_KEY,
   aws_session_token=SESSION_TOKEN
   )
Shared credential file (~/.aws/credentials)
You need to create a credential file at ~/.aws/credentials. and add credentials-
Default
 aws_access_key_id = YOUR_ACCESS_KEY
 aws_secret_access_key = YOUR_SECRET_KEY
The shared credentials file also supports the concept of profiles. Profiles represent logical groups of configuration. The shared credential file can have multiple profiles:
Default
aws_access_key_id=foo
aws_secret_access_key=bar
Dev
aws_access_key_id=foo2
aws_secret_access_key=bar2
Prod
aws_access_key_id=foo3
aws_secret_access_key=bar3
You can then specify a profile name via the AWS_PROFILE environment variable or the profile_name argument when creating a Session.
For example, you can create a Session using the “dev” profile and any clients created from this session will use the “dev” credentials:
import boto3
session = boto3.Session(profile_name=‘dev’)
dev_s3_client = session.client(‘s3’)
Boto3 makes it easy to integrate your Python application, library, or script with AWS services including Amazon S3, Amazon EC2, Amazon DynamoDB, and more.
Client and Resource are two different abstractions within the boto3 SDK for making AWS service requests. You would typically choose to use either the Client abstraction or the Resource abstraction to make AWS service requests.
Client
- This is the original boto3 API abstraction.
- Provides low-level AWS service access.
- All AWS service operations are supported by clients.
- Exposes botocore client to the developer.
- Typically maps 1:1 with the AWS service API.
- Snake-cased method names (e.g. ListBuckets API => list_buckets method).
- Generated from AWS service description.
Resource
- This is the newer boto3 API abstraction.
- Provides high-level, object-oriented API.
- Does not provide 100% API coverage of AWS services.
- Uses identifiers and attributes.
- Has actions (operations on resources).
- Exposes subresources and collections of AWS resources.
- Generated from resource description.
Code to list all buckets
This only works if the user has the proper access eg: ListAllMyBuckets access.
    “Resource”: “arn:aws:s3:::*”
    import boto3<br />
    s3 = boto3.resource(‘s3’)
    for bucket in s3.buckets.all():
    print(bucket.name)
Code to list all files in a bucket
      import boto3
      s3 = boto3.resource(‘s3’)
      objects = s3.Bucket(name='<YOUR AWS S3 BUCKET NAME>’).objects.all()
      for o in objects:
      print(o)

       s3.ObjectSummary(bucket_name='<YOUR AWS S3 BUCKET NAME>’, key=‘Algorithms to Live By_ The Computer Science of Human Decisions ( PDFDrive ).pdf’),
       s3.ObjectSummary(bucket_name='<YOUR AWS S3 BUCKET NAME>’, key=‘All the fundamental React.js concepts, jammed into this single Medium article (updated August 2019) _ by Samer Buna _ EdgeCoders _ Medium.pdf’)
Code to upload a file
       import boto3
       s3_client = boto3.client(‘s3’)
       s3_client.upload_file(‘hello.txt’, '<YOUR AWS S3 BUCKET NAME>’, ‘hello.txt’)
       upload_file(<name of the file in local>, <bucket name>, <name of the file in s3>)
Code to Download a file from s3
       import boto3
       s3_client = boto3.client(‘s3’)
       s3_client.download_file('<YOUR AWS S3 BUCKET NAME>’, ‘hello.txt’, ‘hello2.txt’)
       download_file(<Bucket Name>, <FileName in S3>,<file name that u want in local)
Code to Edit a file in s3
        import boto3
        s3_client = boto3.client(‘s3’)
        open(‘hello.txt’,‘a+’).write(‘Hello, world!’)
        `13`
        s3_client.upload_file(‘hello.txt’, '<YOUR AWS S3 BUCKET NAME>’, ‘hello.txt’)
Code to get all file metadata
    import boto3
    s3client = boto3.client(‘s3’)
    paginator = s3client.get_paginator(‘list_objects_v2’)
    page_iterator = paginator.paginate(Bucket='<YOUR AWS S3 BUCKET NAME>’)
    for bucket in page_iterator:
     for file in bucket[‘Contents’]:
     print(file[‘Key’])
     try:
     metadata = s3client.head_object(Bucket='<YOUR AWS S3 BUCKET NAME>’, Key=file[‘Key’])print(metadata)
     except:
     print(“Failed {}”.format(file[‘Key’]))
Algorithms to Live By_ The Computer Science of Human Decisions ( PDFDrive ).pdf
{‘ResponseMetadata’: {‘RequestId’: ‘7C74267CF4193023’, ‘HostId’: ‘IasZHHYmUPug6/qe4W53fJSSxcrnPerVCt5xOB/WsPDr2qgQcs0xqb7zJxPYxtxEogvQ552LrA4=’, ‘HTTPStatusCode’: 200, ‘HTTPHeaders’: {‘x-amz-id-2’: ‘IasZHHYmUPug6/qe4W53fJSSxcrnPerVCt5xOB/WsPDr2qgQcs0xqb7zJxPYxtxEogvQ552LrA4=’, ‘x-amz-request-id’: ‘7C74267CF4193023’, ‘date’: ‘Tue, 02 Mar 2021 08:26:57 GMT’, ‘last-modified’: ‘Tue, 02 Mar 2021 06:13:44 GMT’, ‘etag’: ‘“b926ad30c85d7bb4bd5da12ee2651e37”’, ‘accept-ranges’: ‘bytes’, ‘content-type’: ‘application/pdf’, ‘content-length’: ‘2732141’, ‘server’: ‘AmazonS3’}, ‘RetryAttempts’: 0}, ‘AcceptRanges’: ‘bytes’, ‘LastModified’: datetime.datetime(2021, 3, 2, 6, 13, 44, tzinfo=tzutc()), ‘ContentLength’: 2732141, ‘ETag’: ‘“b926ad30c85d7bb4bd5da12ee2651e37”’, ‘ContentType’: ‘application/pdf’, ‘Metadata’: {}}
All the fundamental React.js concepts, jammed into this single Medium article (updated August 2019) _ by Samer Buna _ EdgeCoders _ Medium.pdf
{‘ResponseMetadata’: {‘RequestId’: ‘7FBA9FCC1B69CC4B’, ‘HostId’: ‘hCZxPciVILDGXJvfjtac9irPOkFDEjwr9BKG8Dq69DIdgv7YmFVuoD3p0Z7srI/3YeLZkkN4F9U=’, ‘HTTPStatusCode’: 200, ‘HTTPHeaders’: {‘x-amz-id-2’: ‘hCZxPciVILDGXJvfjtac9irPOkFDEjwr9BKG8Dq69DIdgv7YmFVuoD3p0Z7srI/3YeLZkkN4F9U=’, ‘x-amz-request-id’: ‘7FBA9FCC1B69CC4B’, ‘date’: ‘Tue, 02 Mar 2021 08:26:57 GMT’, ‘last-modified’: ‘Tue, 02 Mar 2021 06:13:42 GMT’, ‘etag’: ‘“4f6f8b7d2de81151f34170777c301ba6”’, ‘accept-ranges’: ‘bytes’, ‘content-type’: ‘application/pdf’, ‘content-length’: ‘3668501’, ‘server’: ‘AmazonS3’}, ‘RetryAttempts’: 0}, ‘AcceptRanges’: ‘bytes’, ‘LastModified’: datetime.datetime(2021, 3, 2, 6, 13, 42, tzinfo=tzutc()), ‘ContentLength’: 3668501, ‘ETag’: ‘“4f6f8b7d2de81151f34170777c301ba6”’, ‘ContentType’: ‘application/pdf’, ‘Metadata’: {}}
hello.txt
{‘ResponseMetadata’: {‘RequestId’: ‘2893E89438DCAFC9’, ‘HostId’: ‘1bQ8mGMeZh+nQSYsirplyuk67yHabWl7q1Cv/GKsJFk+RlfAmG6cgPCvPdQBucXfHqlRjnz1A3E=’, ‘HTTPStatusCode’: 200, ‘HTTPHeaders’: {‘x-amz-id-2’: ‘1bQ8mGMeZh+nQSYsirplyuk67yHabWl7q1Cv/GKsJFk+RlfAmG6cgPCvPdQBucXfHqlRjnz1A3E=’, ‘x-amz-request-id’: ‘2893E89438DCAFC9’, ‘date’: ‘Tue, 02 Mar 2021 08:26:57 GMT’, ‘last-modified’: ‘Tue, 02 Mar 2021 08:23:43 GMT’, ‘etag’: ‘“738de4578efc7f327bb3897d162fb758”’, ‘accept-ranges’: ‘bytes’, ‘content-type’: ‘binary/octet-stream’, ‘content-length’: ‘27’, ‘server’: ‘AmazonS3’}, ‘RetryAttempts’: 0}, ‘AcceptRanges’: ‘bytes’, ‘LastModified’: datetime.datetime(2021, 3, 2, 8, 23, 43, tzinfo=tzutc()), ‘ContentLength’: 27, ‘ETag’: ‘“738de4578efc7f327bb3897d162fb758”’, ‘ContentType’: ‘binary/octet-stream’, ‘Metadata’: {}}
hello1.txt
{‘ResponseMetadata’: {‘RequestId’: ‘8445E9AC02B726B7’, ‘HostId’: ‘gsMC+IZY8hzl77Z8Gmuad1kNlMmBCIfNppu85lGK0AvzgZ8Uxvqb+sDXmH0mITLPeFNiq9pi+aw=’, ‘HTTPStatusCode’: 200, ‘HTTPHeaders’: {‘x-amz-id-2’: ‘gsMC+IZY8hzl77Z8Gmuad1kNlMmBCIfNppu85lGK0AvzgZ8Uxvqb+sDXmH0mITLPeFNiq9pi+aw=’, ‘x-amz-request-id’: ‘8445E9AC02B726B7’, ‘date’: ‘Tue, 02 Mar 2021 08:26:58 GMT’, ‘last-modified’: ‘Tue, 02 Mar 2021 08:15:21 GMT’, ‘etag’: ‘“d41d8cd98f00b204e9800998ecf8427e”’, ‘accept-ranges’: ‘bytes’, ‘content-type’: ‘binary/octet-stream’, ‘content-length’: ‘0’, ‘server’: ‘AmazonS3’}, ‘RetryAttempts’: 0}, ‘AcceptRanges’: ‘bytes’, ‘LastModified’: datetime.datetime(2021, 3, 2, 8, 15, 21, tzinfo=tzutc()), ‘ContentLength’: 0, ‘ETag’: ‘“d41d8cd98f00b204e9800998ecf8427e”’, ‘ContentType’: ‘binary/octet-stream’, ‘Metadata’: {}}
Code to download previous versions
    import boto3
    from boto3.s3.transfer
    import S3Transfer<br /> ACCESS_KEY = ‘<YOUR AWS ACCOUNT ACCESS KEY>’
    SECRET_KEY = ‘<YOUR AWS ACCOUNT SECRET ACCESS KEY>’
    BUCKET_NAME = '<YOUR AWS S3 BUCKET NAME>’
    key = ‘hello1.txt’
    client = boto3.client(
        ‘s3’,
        aws_access_key_id=ACCESS_KEY,
        aws_secret_access_key=SECRET_KEY)
    s3 = boto3.resource(‘s3’)
    versions = s3.Bucket(BUCKET_NAME).object_versions.filter(Prefix=key)
    transfer = S3Transfer(client)
    for version in versions:
        obj = version.get()
        print(obj[‘LastModified’].strftime("%Y%m%d%H%M%S")+ "_" + key)
        transfer.download_file(BUCKET_NAME, key,
        obj[‘LastModified’].strftime("%Y%m%d%H%M%S")+ "_" + key, extra_args={‘VersionId’: obj[‘VersionId’] })
2.4 Upload file via. SharePoint
Yellow.ai's document search feature supports integration with SharePoint.
Key Features
- Capable of fetching the documents from SharePoint sites (along with all sub-sites) which includes documents uploaded to document libraries, documents created online and list attachments.
- Allows selecting a list of folders/subfolders/sites.
- Document contents are automatically synced at regular intervals.
- Supports '.docx', '.doc', '.pptx',' .ppt', ‘.txt' & ‘.pdf’ document extensions.
- Supports Sharepoint Rest APIs and AAD Graph APIs.
2.4.1 Integration using SP Rest APIs
Follow the steps below to integrate using SharePoint REST APIs:
-
Login: Login to your SharePoint account (
https://{{tenantname}}.sharepoint.com) and click on the site you want to access. -
App Registration.
i. Click +New > App.
ii. To register an app in SharePoint, navigate to the New App Registration page by replacing 'addanapp.aspx' with 'appregnew.aspx'.
- The URL of that page will be similar to
https://{{tenantname}}.sharepoint.com/_layouts/15/appregnew.aspx
iii. Fill in the details on that page as per the following table and click Create.
- Client Id - Click Generate
- Client Secret - Click Generate
- Title - Any value
- App Domain -
localhost - Redirect URI -
https://localhost
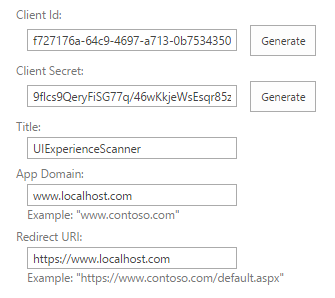
- The URL of that page will be similar to
Copy and save the generated Client Id and Client Secret as these will be required in later steps.
iv. On the next screen, Click OK.
-
Add Permissions.
- Now that the app is registered, provide the app with the required permissions to access data. To do that, replace
settings.aspxwithappinv.aspx.
The URL of that page will be similar to the one below
https://{yourtenantname}.sharepoint.com/_layouts/15/appinv.aspx) - Now that the app is registered, provide the app with the required permissions to access data. To do that, replace
- On that page, paste the Client Id in the "App Id" text box and click "Lookup". This will load the details of the app we registered previously In the "Permission Request XML" paste the following XML. This XML says that the app can have full control over the current web.
<AppPermissionRequests AllowAppOnlyPolicy="true"> <AppPermissionRequest Scope="http://sharepoint/content/sitecollection/web" Right="Read"/></AppPermissionRequests>
-
Once that is added click Create.
-
On the next screen click "Trust It" and this will mean that the app will have the required permissions.
-
Check Tenant ID.
- Navigate to app permissions page by replacing 'settings.aspx' by
appprincipals.aspx.
- Navigate to app permissions page by replacing 'settings.aspx' by
The text after '@' in the app identifier is the 'tenant id' or 'realm'.
Required Permissions
Run the following commands on PowerShell. Without these steps, your app won't have the required permissions.
Install-Module -Name Microsoft.Online.SharePoint.PowerShell
$adminUPN="<the full email address of a SharePoint administrator account, example: [email protected]>"
$orgName="<name of your Office 365 organization, example: contosotoycompany>"
$userCredential = Get-Credential -UserName $adminUPN -Message "Type the password."
Connect-SPOService -Url [](https://$orgName-admin.sharepoint.com) -Credential $userCredential
set-spotenant -DisableCustomAppAuthentication $false
Once an app is created you can give access to any site to it. You can view all the apps that have access to the site and add new apps to a site.
-
Update on yellow.ai configuration
- Open the yellow platform. Automation > Train > Documents > Upload documents > Select Sharepoint.
- Fill in the following details and select the required folders.

-
Click the upload button, and your docs will be scheduled for the sync.
2.4.2 Integration using AAD Graph APIs
- Login to AAD.
Follow the AAD app registration: https://docs.yellow.ai/docs/platform_concepts/appConfiguration/azure-ad
Required permissions
| Scope | Description |
|---|---|
| OpenID, email, profile, User. Read | Used to retrieve login details & their profile using Graph API |
| offline_access | Required to obtain refresh token |
| Sites.Read.All | To fetch the site/folders structure |
| Files.Read.All | To read the content of files |
- Updating on yellow.ai configuration
- Open the yellow platform. Automation > Doc > Upload documents > Select Sharepoint
- Fill in the following details > Sync > select the required folders.
| Client ID, Client Secret, Realm | Obtain from AAD App, Realm (tenant ID) |
|---|---|
| Target Host | azure_api |
| Site URL | Site ID |

- Click the upload button, and your docs will be scheduled for sync.
3. QNA extraction from documents
The Yellow.ai platform can auto-generate questions and answers from the uploaded documents. You can choose between two different models(Yellow DNLP and OpenAI API) to genereate them.
Yellow DNLP:
The T5(Text-to-Text Transfer Transformer) model is a pre-trained language model developed by Google that can handle a wide range of natural language processing tasks, including question generation. To do so, the model is fine-tuned on specific datasets such as SQuAD(Stanford Question Answering Dataset) and TriviaQA, where it learns to generate questions when given an answer or a piece of text.
The T5 Q&A model architecture is based on the transformer architecture, which is a neural network designed for sequence-to-sequence learning tasks. The encoder processes the input, which is a combination of the question and the context, and produces a sequence of hidden states that are passed to the decoder. The decoder generates the answer to the question using a self-attention mechanism, which focuses on relevant parts of the context to generate the answer one word at a time.
Overall, the T5 Q&A model architecture is an effective approach to answering questions using natural language processing techniques, similar to the GPT-3 Q&A model architecture.
OpenAI API
GPT-3 is a state-of-the-art language model developed by OpenAI that can generate questions from input text. It's a neural network-based model that uses the transformer architecture, which consists of an encoder and a decoder with self-attention mechanisms. The input to the encoder is a combination of the question and the context, which is typically a large body of text. The encoder processes the input and produces hidden states, which are passed to the decoder. The decoder generates the answer using a self-attention mechanism, predicting the probability distribution over all possible words in the vocabulary, and selecting the word with the highest probability as the next word in the answer. The quality of the generated questions can be evaluated using metrics such as BLEU and ROUGE.
GPT-3 has promising results for question generation and has potential applications in information retrieval, text summarization, and conversational agents. However, like any language model, it may generate incorrect or irrelevant questions in some cases.
To extract questions and answers from your docs, follow these steps:
-
Click the QNA Extract tab.

-
Click the file you want to generate QnA for.

-
Choose the QNA model you prefer - Yellow DNLP or OpenAI API.

-
Click each file to see the automatically generated Questions and Answers. Click the checkbox for the questions you want to add to FAQs and click Add FAQ.

-
In the following pop-up, you can edit the question(if you want to) in the FAQ name field, choose a category for the FAQ in the Category field.

-
Click Create. This question will be added to the FAQ section.
4. Add acronyms
There are cases when we expect the user to search for certain text, but the entered text is not present in our documents in that searched format. For example, if we have a document where it is written The “United States of America” but the user searches for the USA, US etc. In these cases, acronyms and synonyms can be configured to accept USA and US as input. This will look for the United States of America in documents and provide the results accordingly.
Follow the given steps to Configure:
- Open Acronyms Tab
- Click Add new acronym.

-
Add the Acronym Name and List item.

-
Acronyms have been configured.
