Create AI agent for a sample use cases
This guide walks you through the process of designing and configuring the Yellow Travels AI Agent step by step. It is designed for first-time users to build and deploy their own AI agent.
Yellow travels AI Agent use case
In this guide, we are considering the Yellow Travels use case to demonstrate how an AI Agent can be built and configured on the Yellow.ai platform.
Yellow Travels AI Agent is a conversational assistant built on the Yellow.ai platform to help customers with their travel needs. It automates flight bookings, hotel bookings, cancellations, and refund queries. It also allows handoff to live agents when required.
Sample scenarios of Yellow travels
| Agent | Description | Example Conversation |
|---|---|---|
| Book a flight ticket | Collects passenger details, trip info (departure, destination, date), generates a booking ID, and stores details in the database. | I want to book a flight from Delhi to Mumbai on 22nd Sept. |
| Cancel a flight ticket | Asks for booking ID, verifies it, and updates cancellation status. | Cancel my flight with Booking ID 12345. |
| Book a hotel room | Captures hotel stay details (location, check-in/out date, guest info), confirms booking, and captures data. | Book a hotel in Goa from 1st to 3rd Oct for 2 guests. |
| Check refund status | Takes the booking ID, checks refund progress, and informs user. | What's the refund status for Booking ID 12345? |
How to configure AI agent
Step 1: Configure Super agent
The Super Agent acts as the master controller for your AI Agent. It defines the persona, rules, and fallback behavior that apply across conversations.
- Create your AI agent based on your use case.
- Go to Super agent.
- Review and edit the following details (these attributes are cloned from the chosen template but editable anytime):
| Attribute | Description | Example |
|---|---|---|
| Name | Enter the name of the super agent | Yellow Travels Bot |
| Persona | Defines agent’s tone and behavior | Friendly travel assistant |
| Role | Purpose of the agent | Help users book, cancel, and manage travel |
| Scope | Boundaries of what the agent can and cannot do | Handles only travel-related tasks |
| Model | LLM powering the responses | GPT-powered model (default template) |
-
Define the welcome flow.
Example:
"Hi, I’m Yellow Travels Bot! I can help you book flights, cancel bookings, or check refund status. What would you like to do today?" -
Add conversation rules (optional). Example:
- Always respond within 50 words.
- Follow step-by-step guidance.
-
Configure Fallback behavior and Live agent transfer.
Step 2: Create individual Agents
Create one agent per use case:
- Flight ticket booking agent
- Cancel booking agent
Configure Agent documentation →

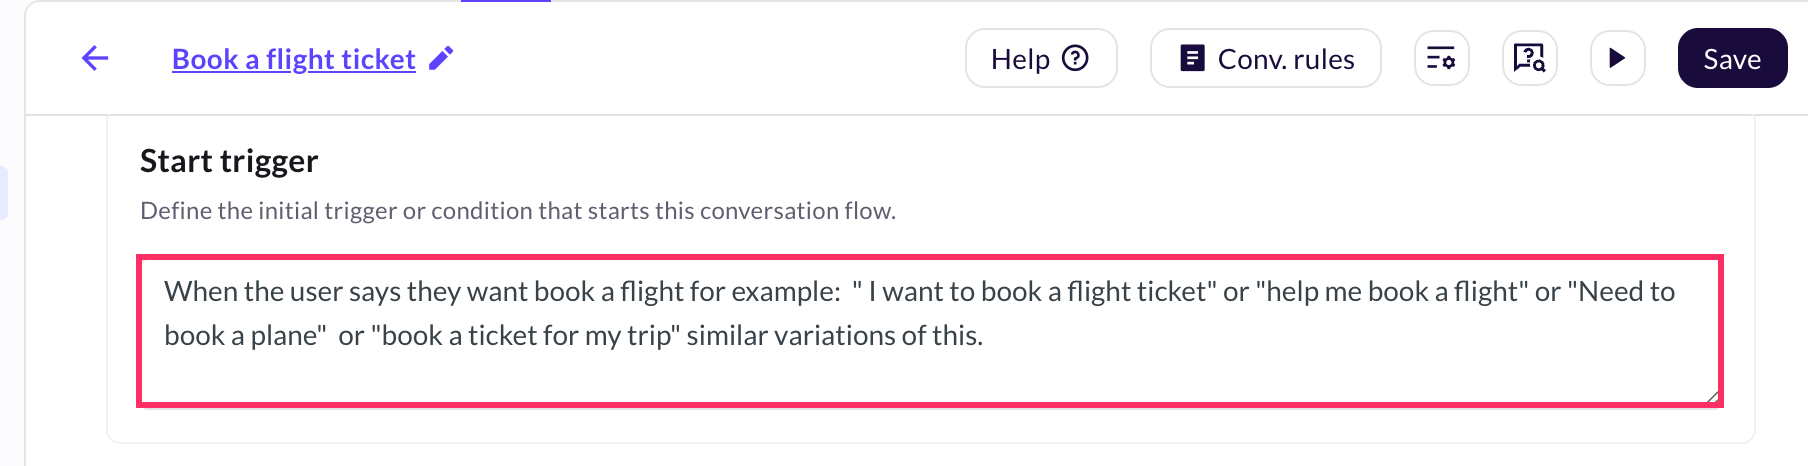
Step 3: Configure Start trigger
Set how conversations should begin for each agent.
Example triggers for Flight Booking:
- "I want to book a flight"
- "Help me book a flight"
- "Book a ticket for my trip"
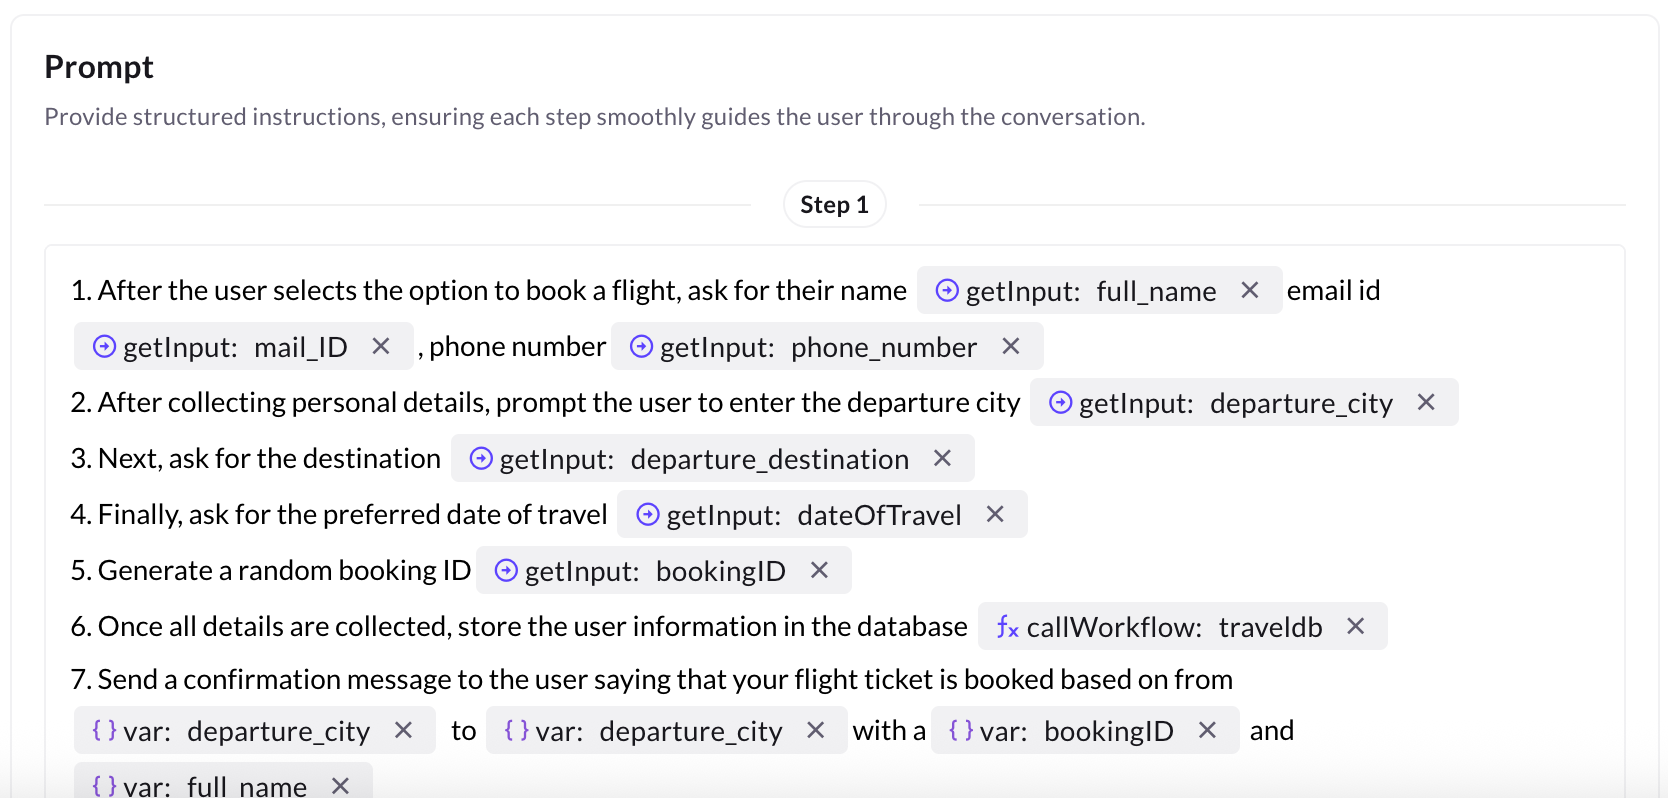
Step 4: Build Prompt — step-by-step
Prompts guide the conversation by collecting user input, validating it, and performing actions.
Sample sequence for booking a flight:
-
Collect user details:
getInput: full_namegetInput: mail_IDgetInput: phone_number
-
Collect trip details:
getInput: departure_citygetInput: departure_destinationgetInput: dateOfTravel
-
Generate booking ID and store details:
- Generate random bookingID.
callWorkflow: travelDB(pass collected variables).
-
Send confirmation message:
Thanks{full_name}!Your flight from{departure_city}to{departure_destination}on{dateOfTravel}is booked. Booking ID:{bookingID}. We emailed the details to{mail_ID}.
Map prompts to actions:
-
Use Get input to capture user responses.
-
Use Validation (built-in or custom) to validate email/phone/date.
-
Use Set variable to store temporary values.
-
Use Call workflow fetch details to database, call payment, generate booking ID, call external APIs.
-
Use Dynamic rich media (cards/carousel) to show flight/hotel options fetched from an API.
-
Use Transfer to Live agent action when the agent cannot resolve the issue or the user asks for human help.
Step 5: Preview & Test
Testing:
- Manual testing with Copilot.
- Automated Test suites.
What to check in tests:
- Input parsing.
- DB entries.
- Confirmation messages.
- Fallback.
- Live agent handoff.
Step 6: Publish AI agent
After successful testing, click Publish on the Agent page.