Setup & manage your Knowledge base
A Knowledge Base (KB) allows your AI agent to retrieve accurate, context-aware responses by accessing organizational content from sources like sitemaps, specific URLs, uploaded documents, or third-party platforms such as ServiceNow.
This setup enables your AI agent to respond to queries using existing help center articles, policy documents, product manuals, and other structured knowledge assets.
Configure a Knowledge base agent when :
- Your AI agent needs to respond using detailed references such as help center articles, user manuals, or policy documents.
- You already maintain structured content on websites, in document files (PDF, DOCX, CSV, TXT), or third-party platforms.
- You manage knowledge through platforms like ServiceNow and want to surface those articles within AI conversations.
Create your Knowledge base agent
- Only Admin or Developer can create or configure Knowledge base.
To create a knowledge base agent, follow these steps:
-
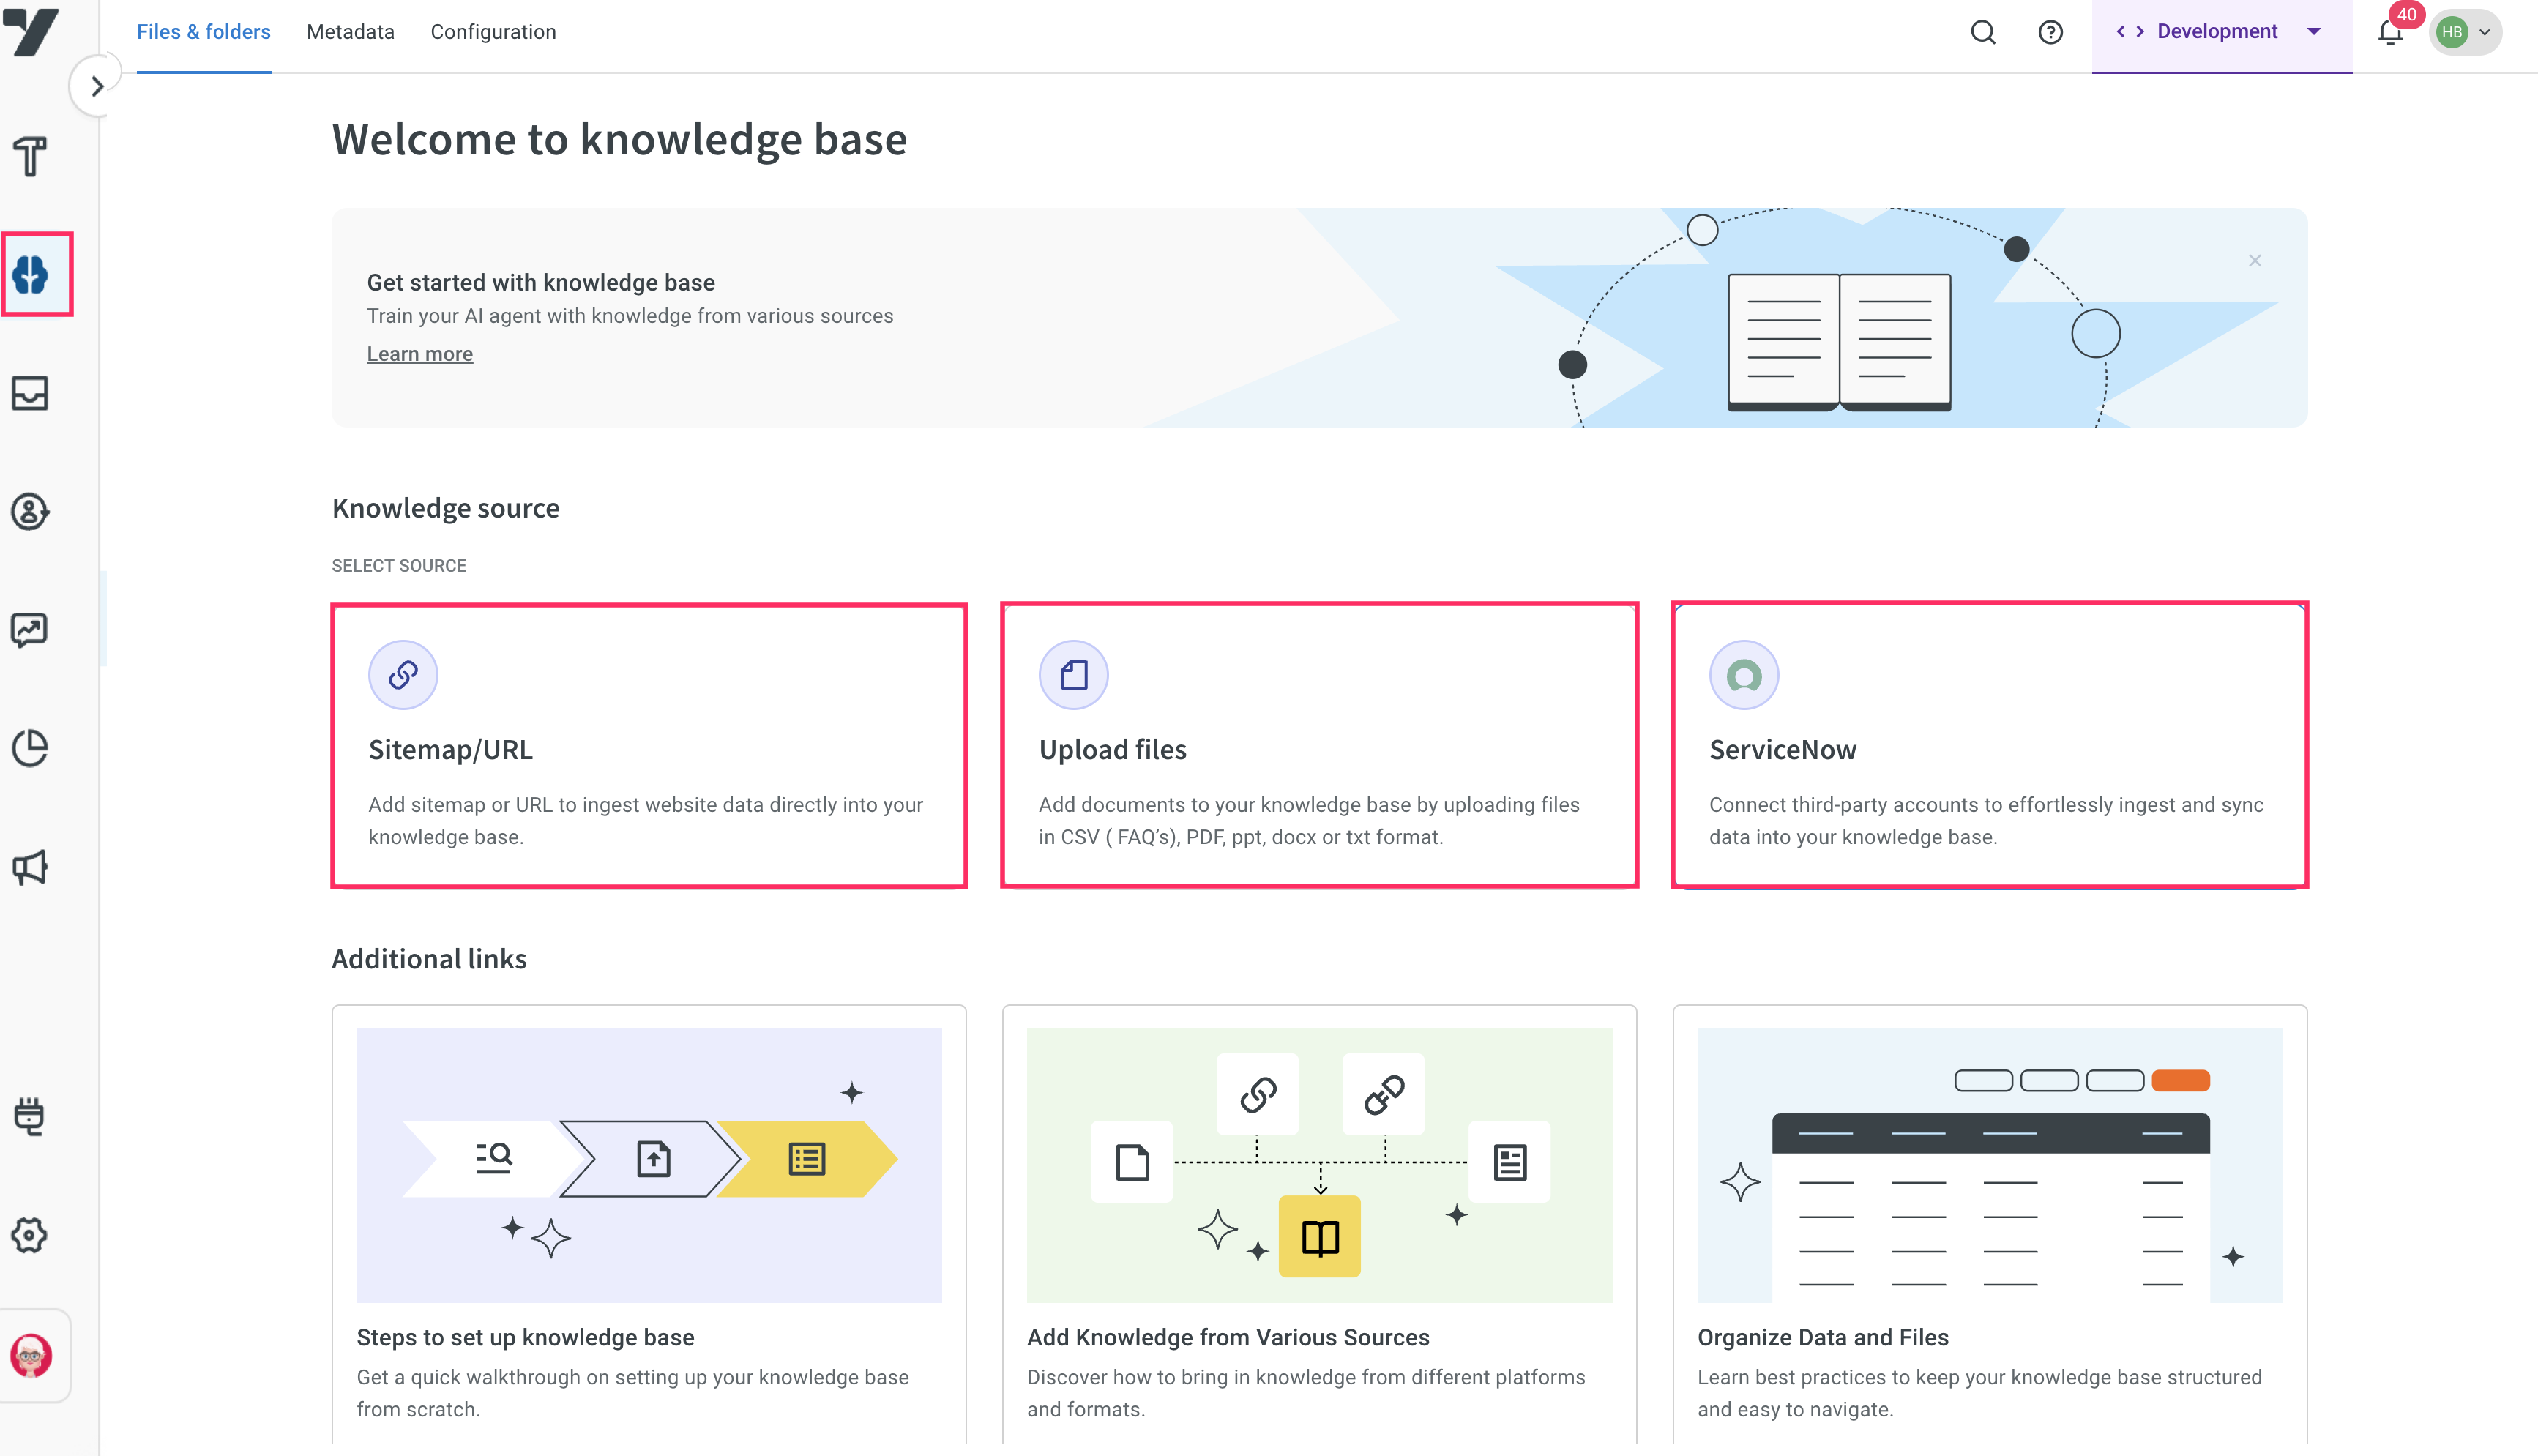
Go to Knowledge base > Files.
-
Select the source from which you want to add content (for example, upload documents, enter Sitemaps/URLs, or integrate with ServiceNow). For detailed steps on adding content, click here.
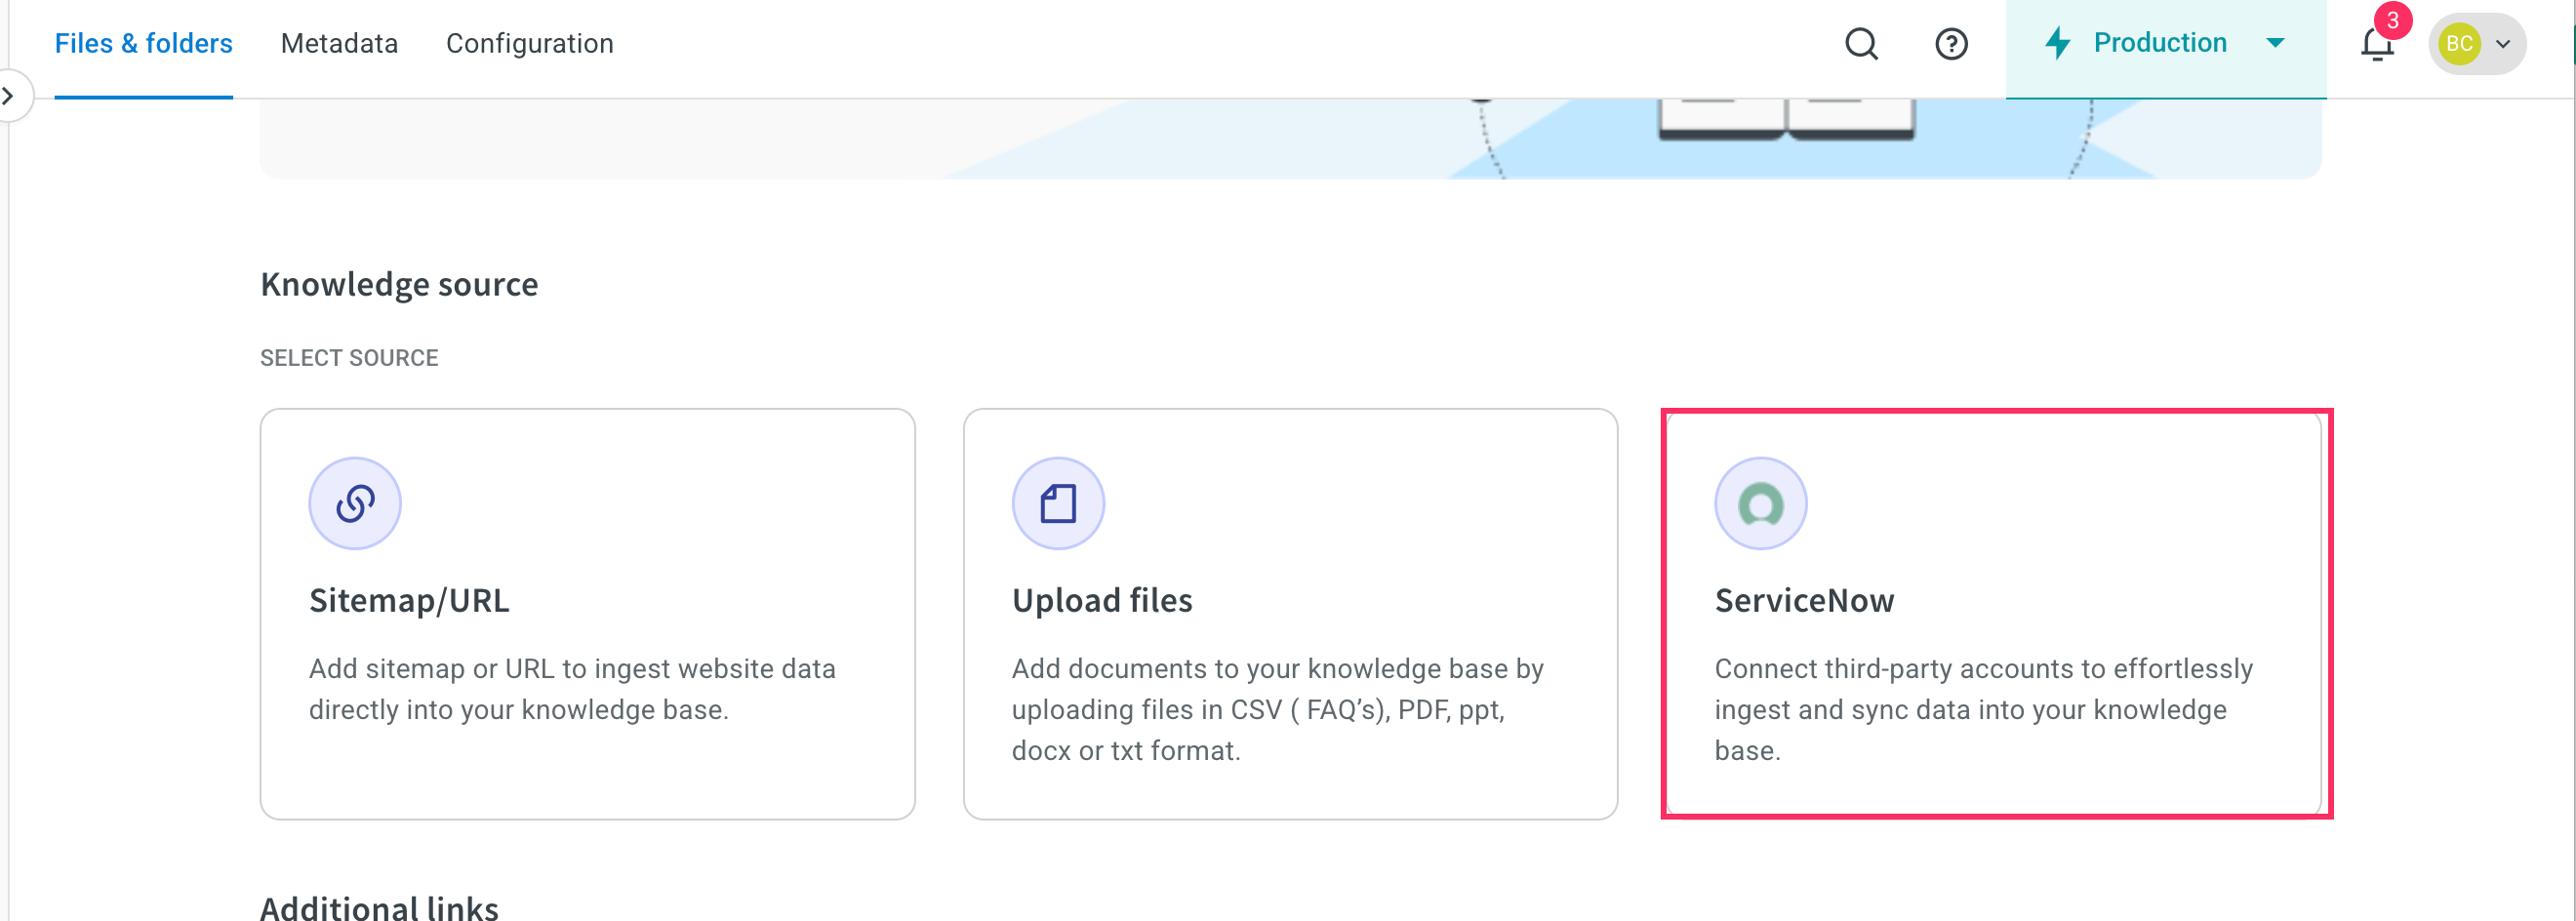
Add content sources to your Knowledge base
You can add content to the Knowledge base using any of the following sources:
-
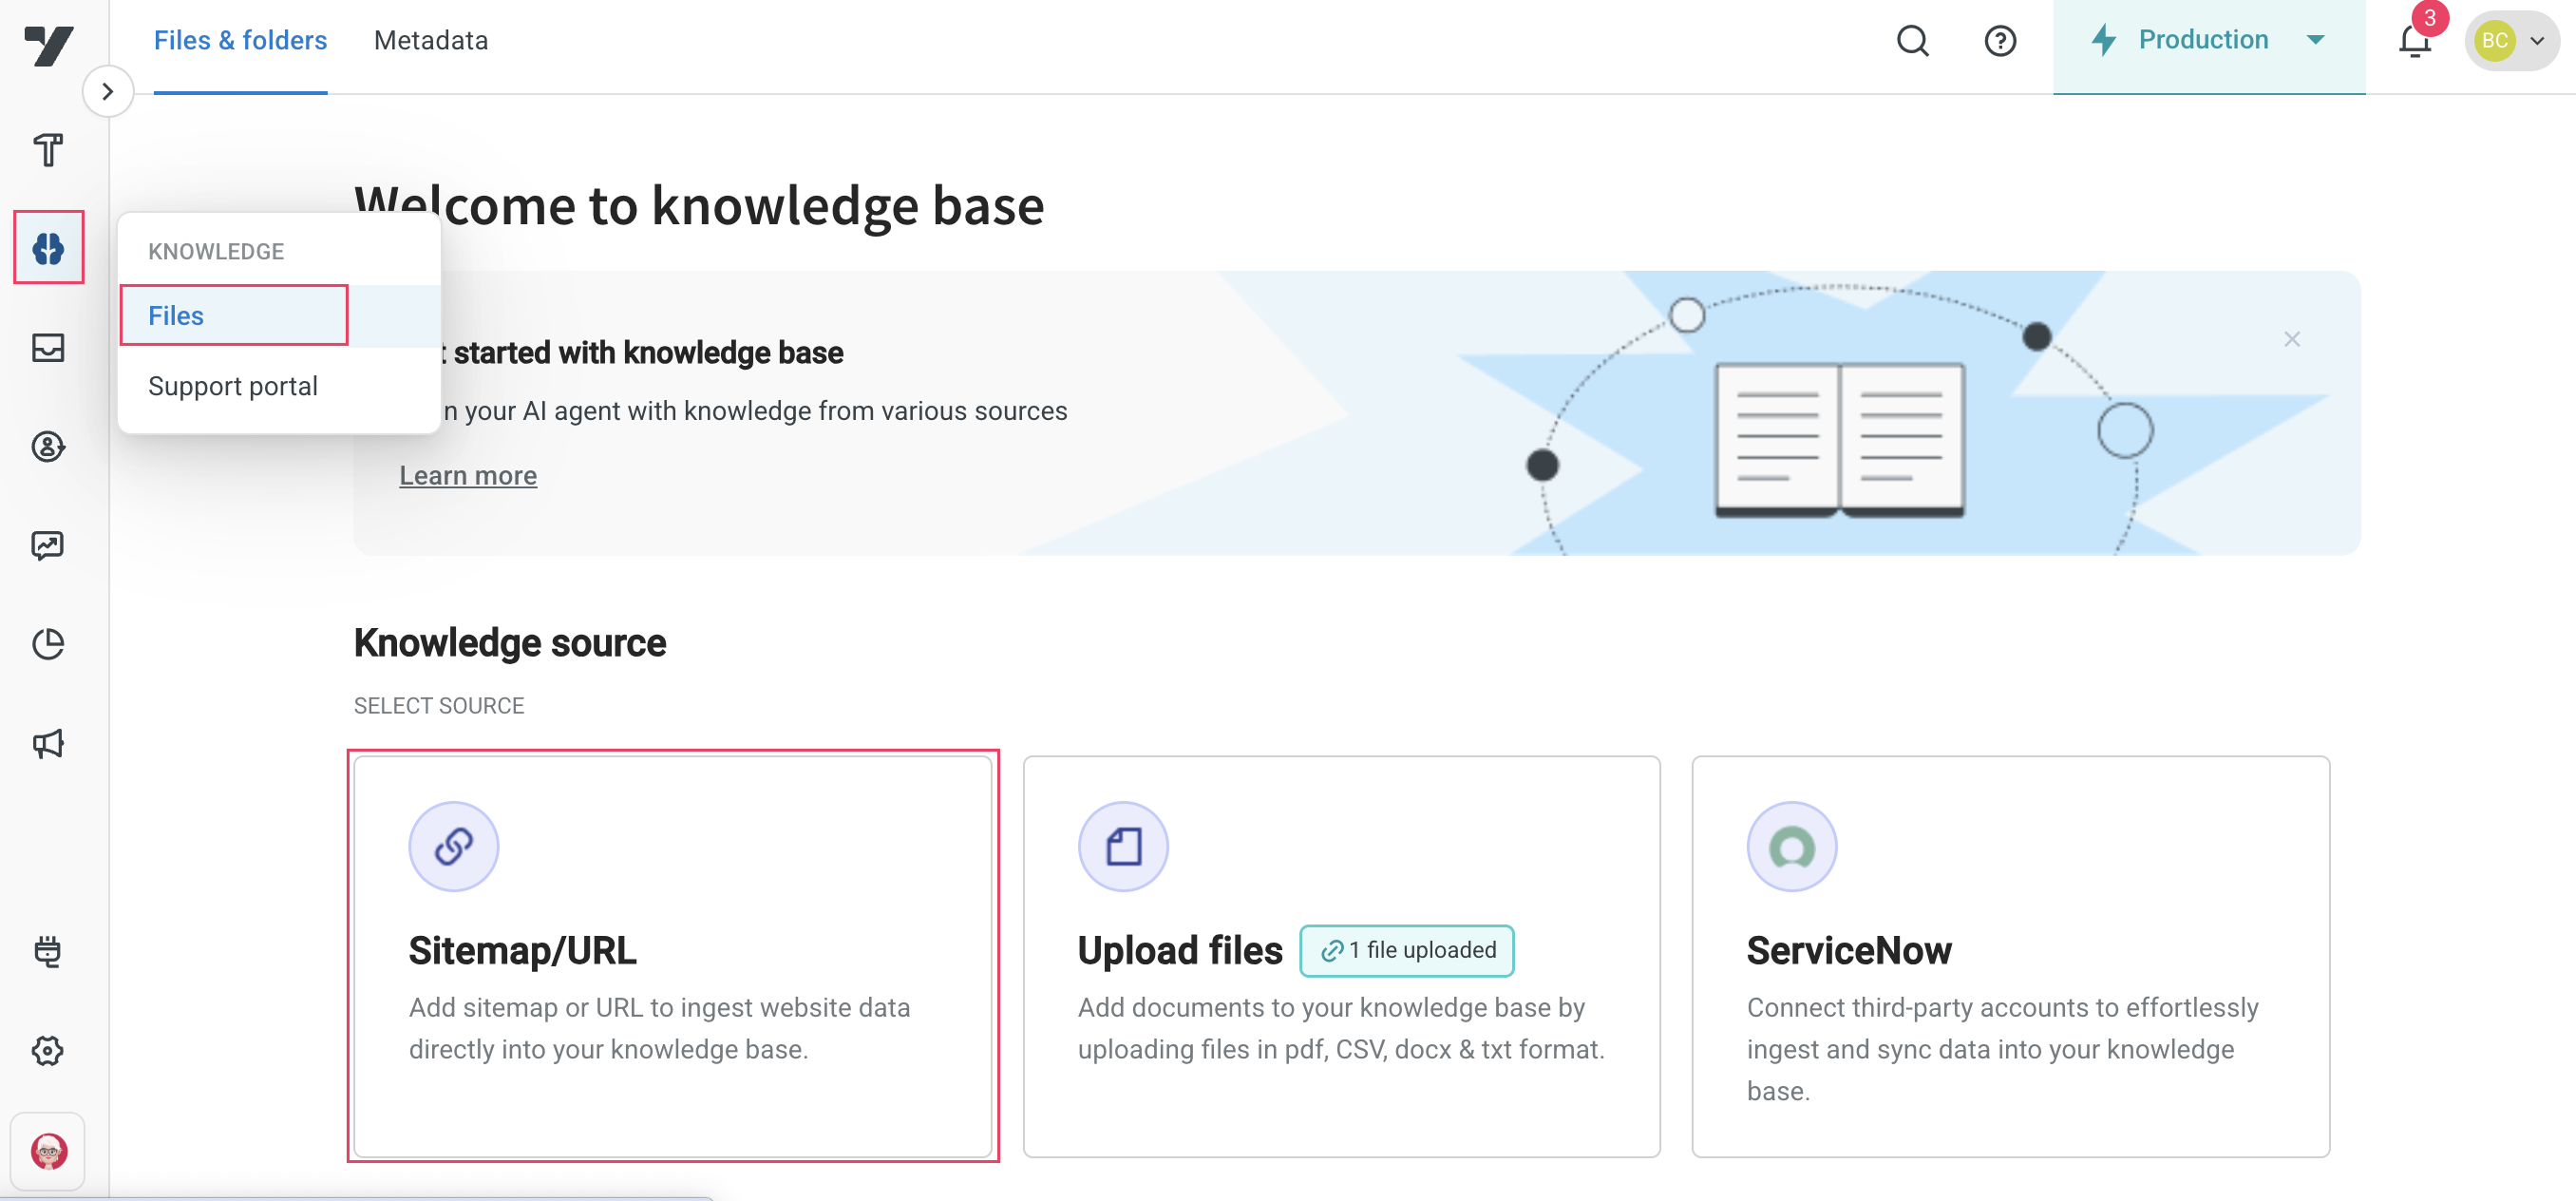
Sitemaps or URLs: This source allows you to add content directly from your website by either uploading a sitemap or entering specific URLs. It is useful for importing structured information from documentation sites, support portals, or help centers.
- Sitemaps: A sitemap is a XML file that lists all the important pages of a website.
- It usually ends in .xml (example, https://example.com/sitemap.xml)
- It helps fetch content from multiple web pages at once.
- It is used for adding content from large websites or documentation portals.
- URL: A URL (Uniform Resource Locator) is the web address of a specific page on your site. Example:
https://example.com/help/article1- Use this option if you want to add only specific web pages to your Knowledge base
- Useful when your site does not have a sitemap or you want to include select pages only.
- Sitemaps: A sitemap is a XML file that lists all the important pages of a website.
-
Upload files: Upload documents directly (PDF, DOCX, TXT, CSV) to add the content to Knowledge base.
-
ServiceNow articles: Connect your ServiceNow account to automatically sync and retrieve knowledge articles from the ServiceNow platform.
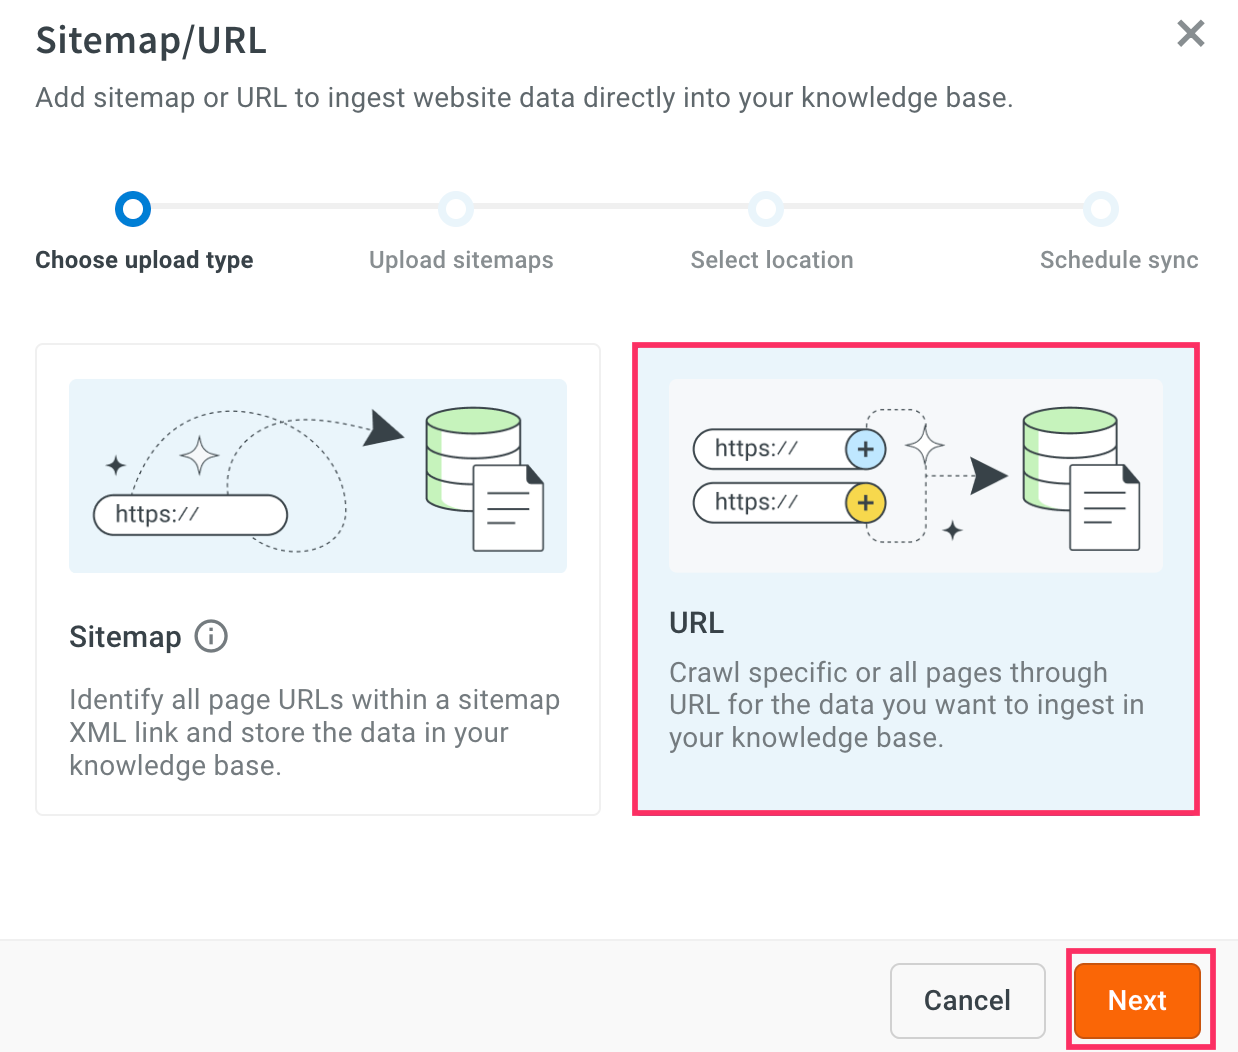
Add sitemap or URLs to your Knowledge base
To add a sitemaps or URLs, follow these steps:
-
Navigate to Knowledge base > Files > Sitemap/URL.
-
Choose your preferred source file of the content
Import content using a sitemap
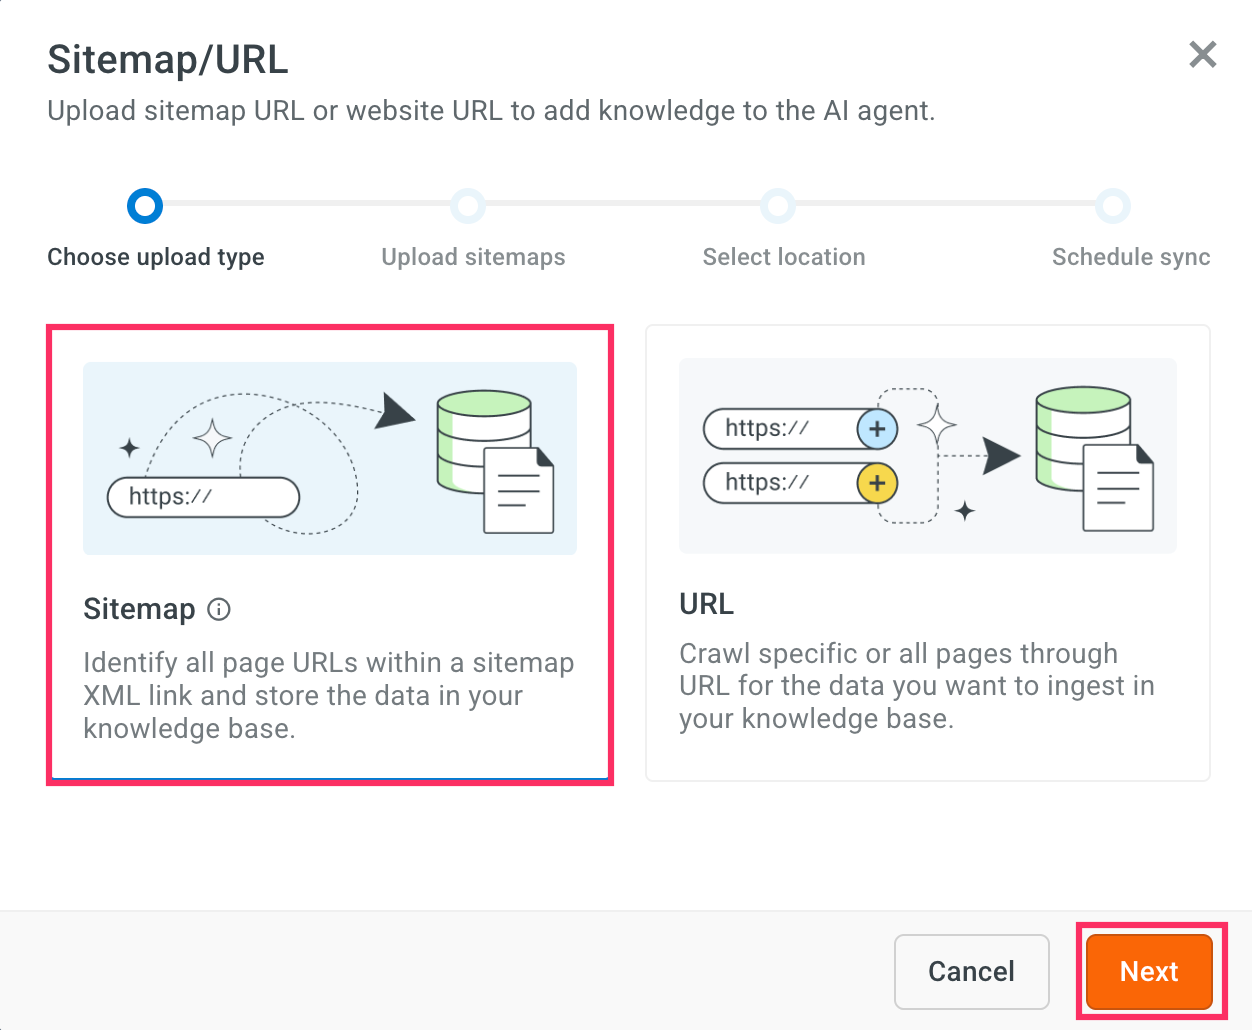
-
Select the upload type as Sitemap and click Next.
-
Enter the Sitemap URL. Example:
https://example.com/sitemap.xml.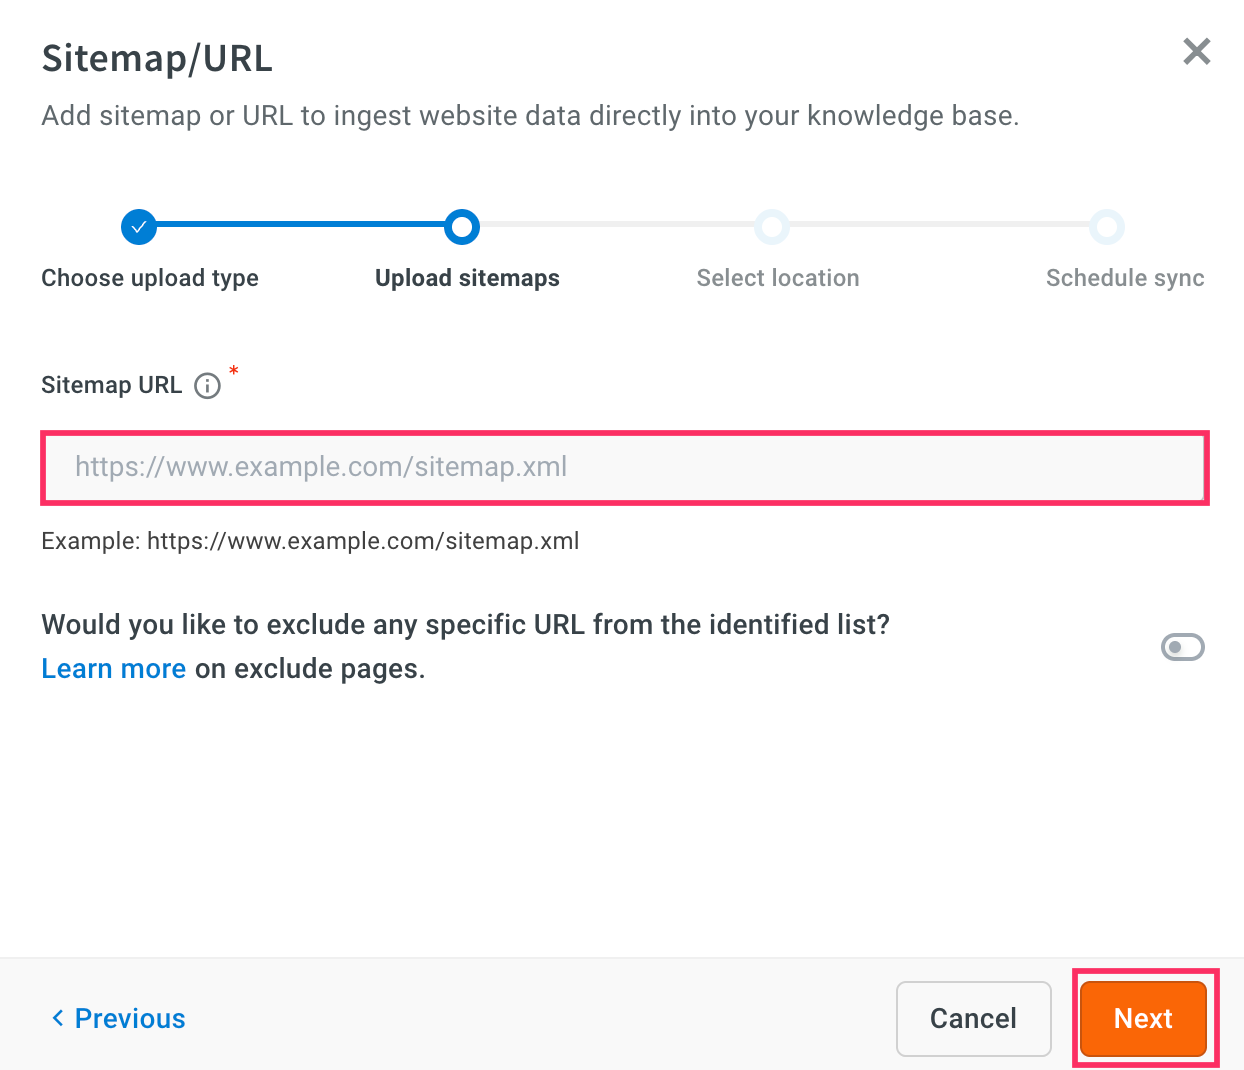
-
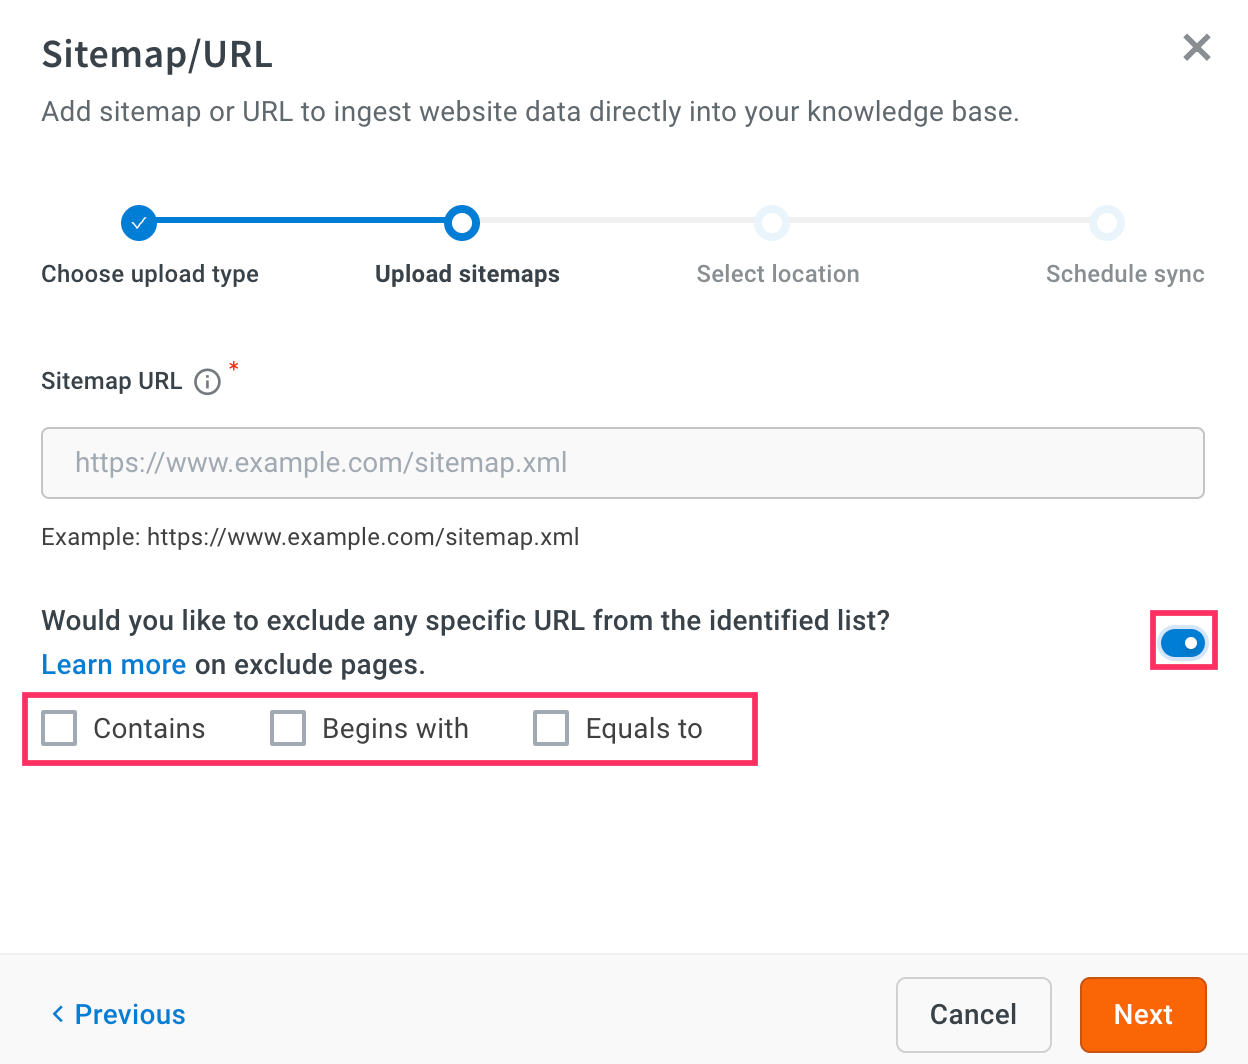
You can exclude specific pages from the Knowledge base. Enable the Exclude pages toggle and apply one of the available filters.
Use these options to control which URLs you want to exclude:
-
Contains Excludes any URL that contains the keyword or phrase you enter. Example: If you enter
?sessionid=, it will exclude URLs likewww.site.com/page?sessionid=123. -
Begins with Excludes all URLs that start with the prefix you specify. Example: If you enter
https://dev.example.com/, it will exclude every page under that path. -
Equals to Excludes only the URL that exactly matches the value you provide. Example: If you enter
https://example.com/old_page.html, only that exact page will be excluded.
-
-
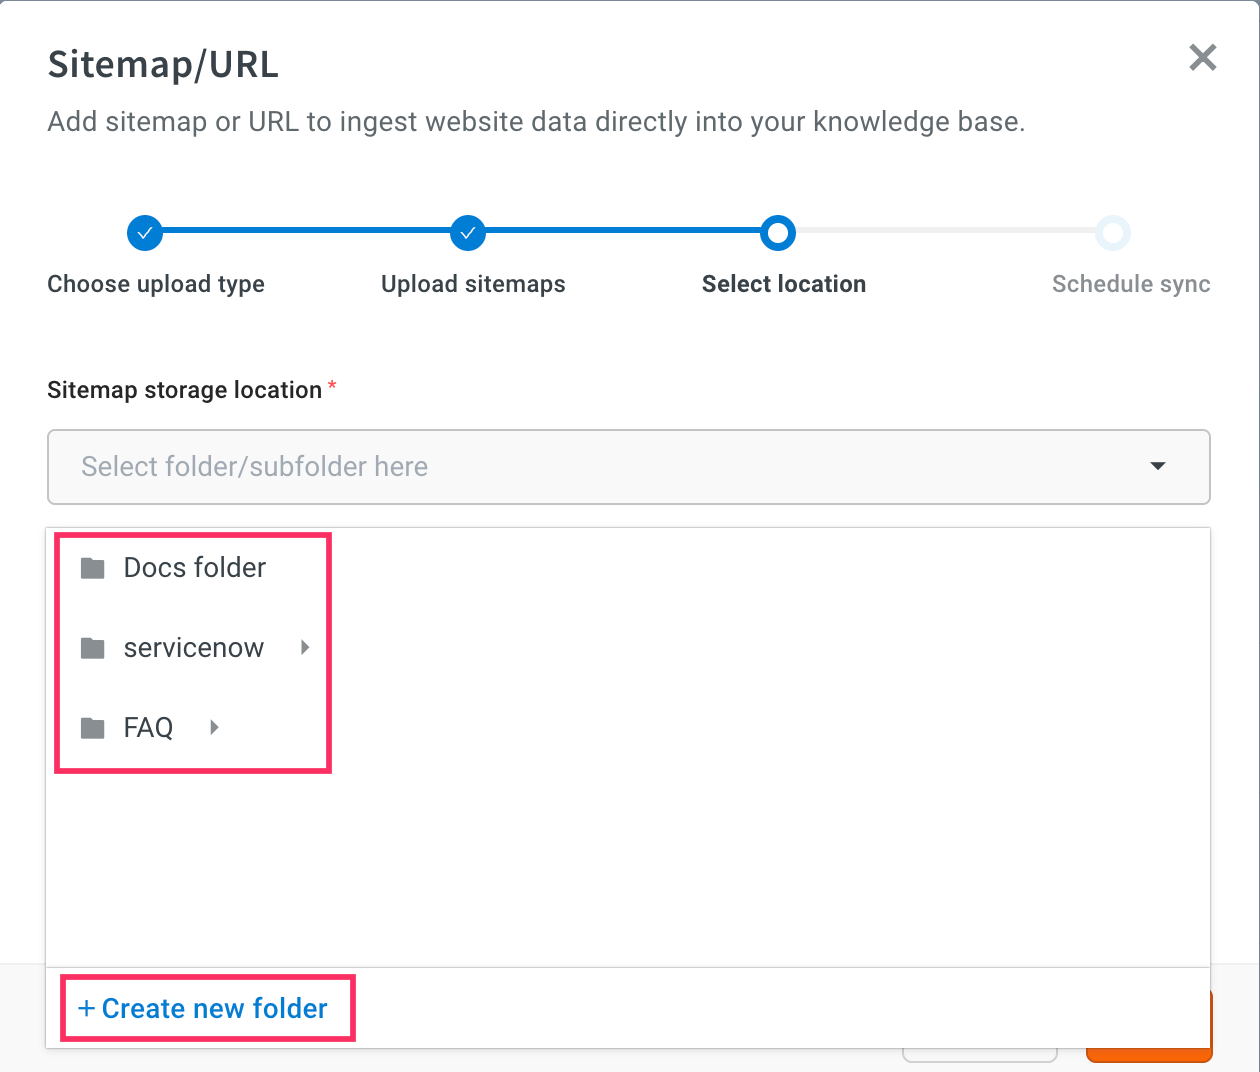
Choose the existing folder/subfolder where you want to store content. To store in a new folder, click + Create new folder.
-
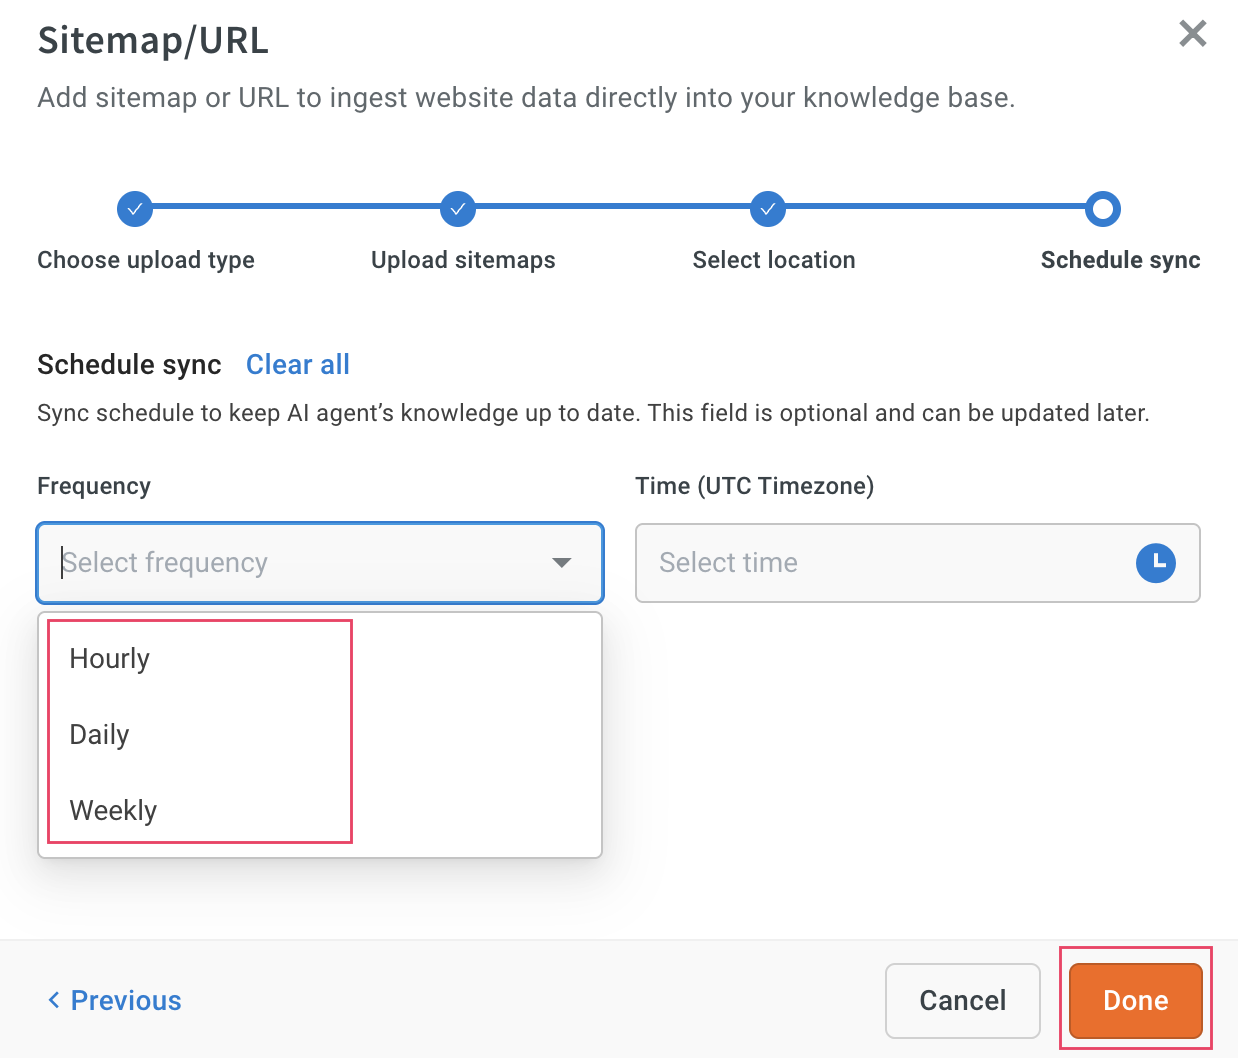
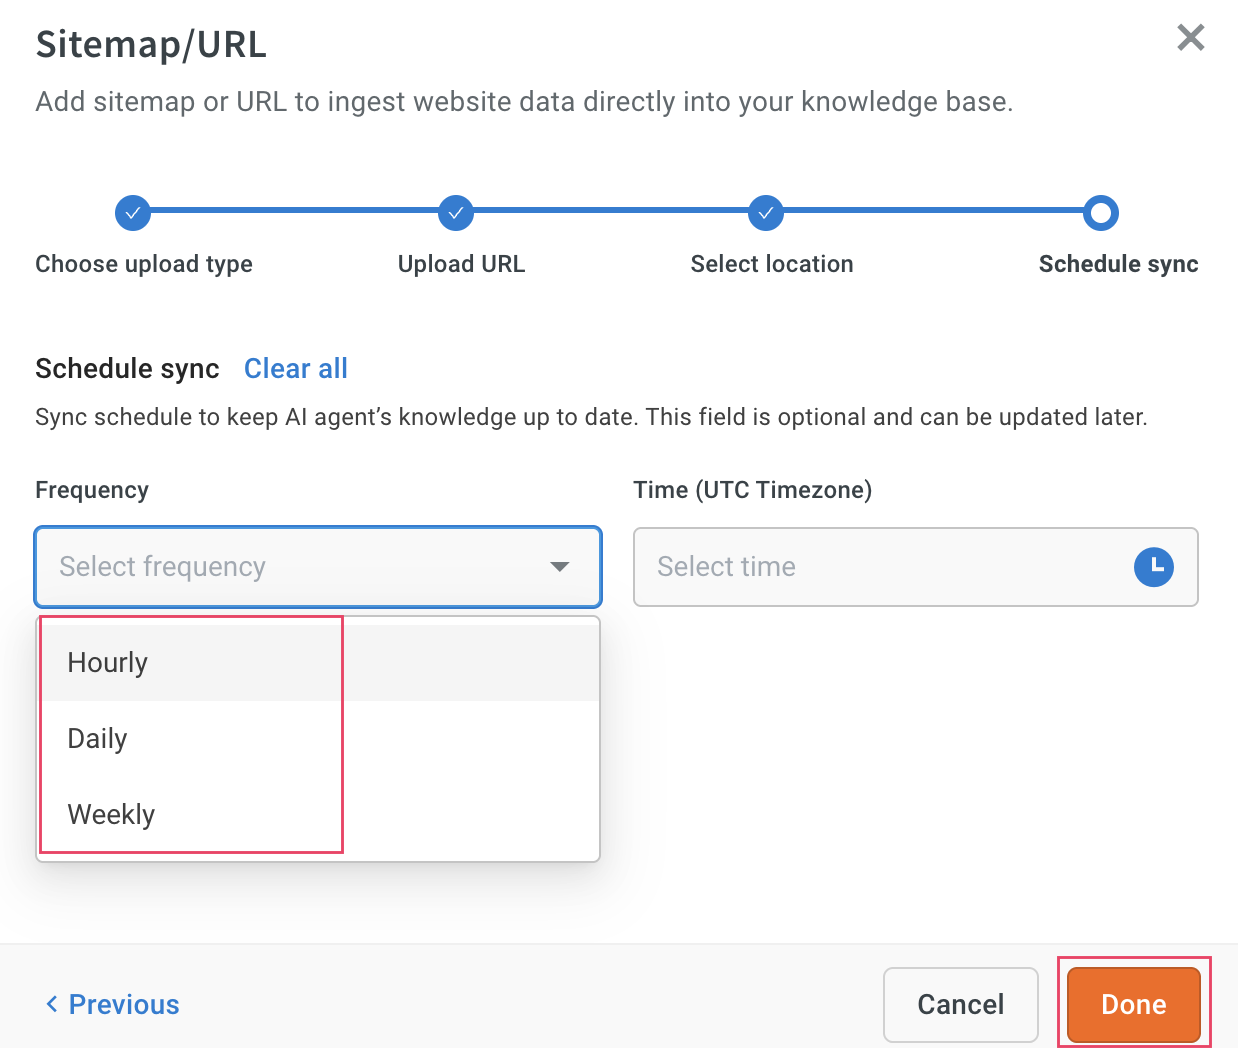
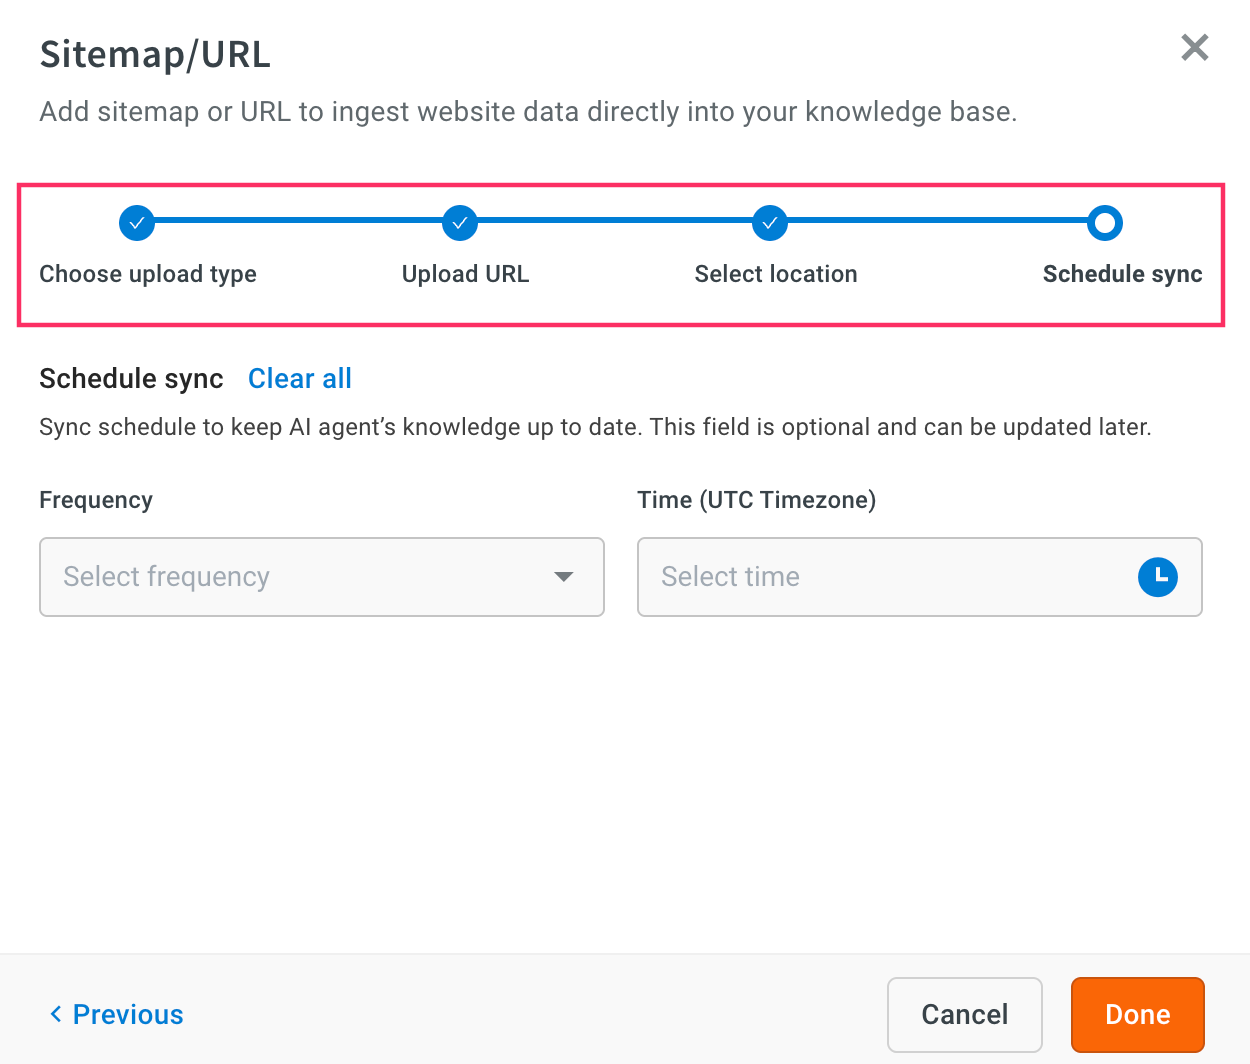
To keep your Knowledge base up to date going forward, you can schedule regular syncs by configuring:
-
Frequency: Choose from Hourly, Daily, or Weekly.
-
Time: Choose the time (in UTC) for the sync to run.
-
-
Click Done to complete the setup.
Import content using URL
You can add website content to your Knowledge base by providing specific URLs. The system uses a crawling method to automatically scan web pages and extract relevant information.
-
In Choose upload type, select URL and click Next.
-
In Crawling method, select the following options:
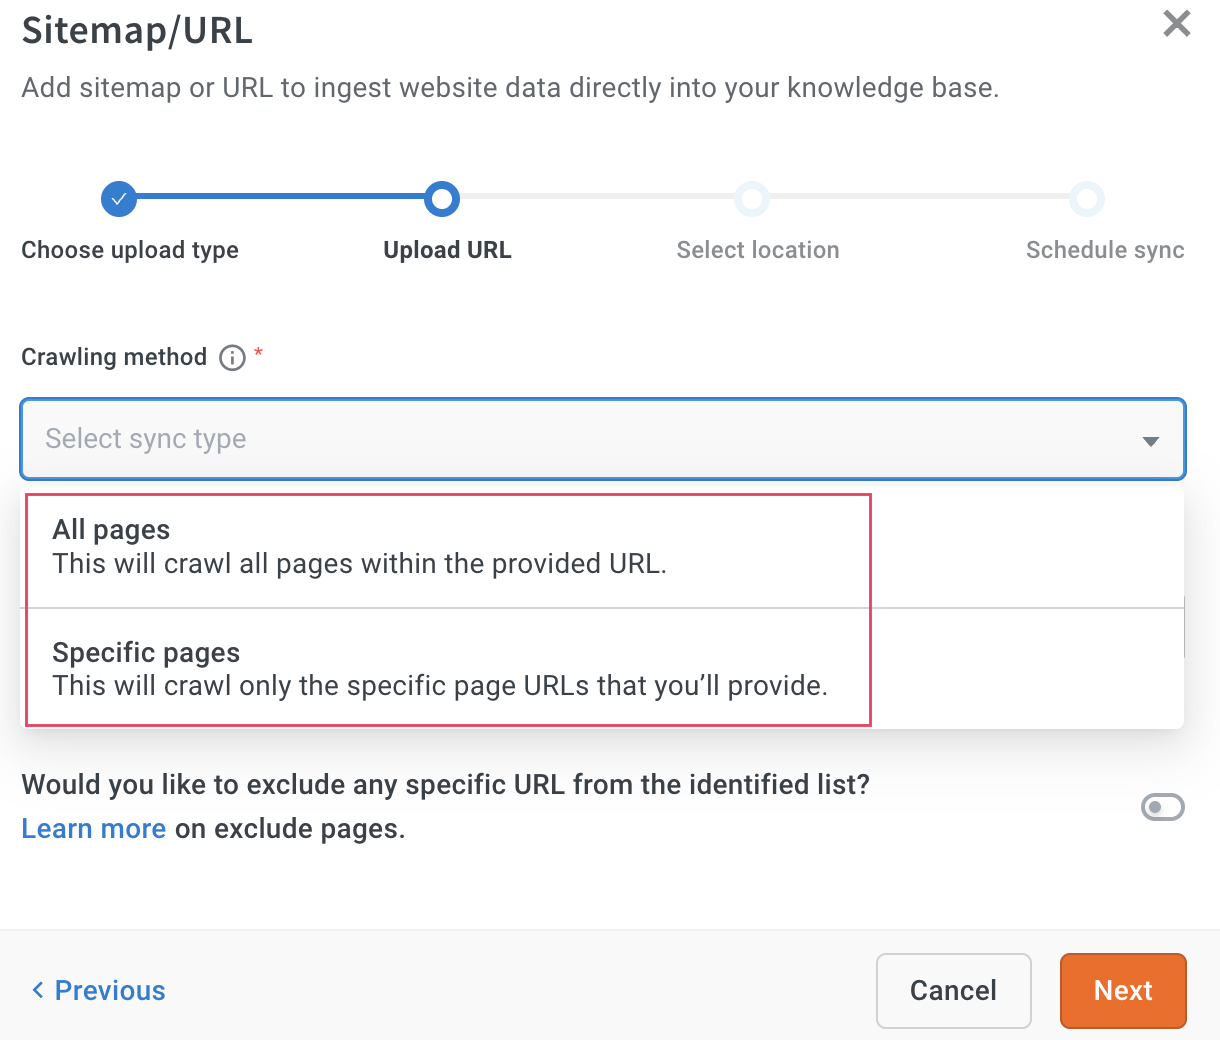
- All pages
The All pages option allows the system to crawl and extract content from all the web pages of the specified domain. This is most suitable if your website contains a large set of interlinked pages that you want to make searchable within the AI agent. Note that, your website has well-structured internal links so the system can effectively crawl to all pages.
Use case: Best suited for documentation sites, help centers, or blogs where all pages are accessible through internal links.
Example: If you enter https://docs.yellow.ai, the crawler will scan and collect content from every page linked under that domain.
To add all pages option, follow below steps:
- Enter your Website URL and click Next.
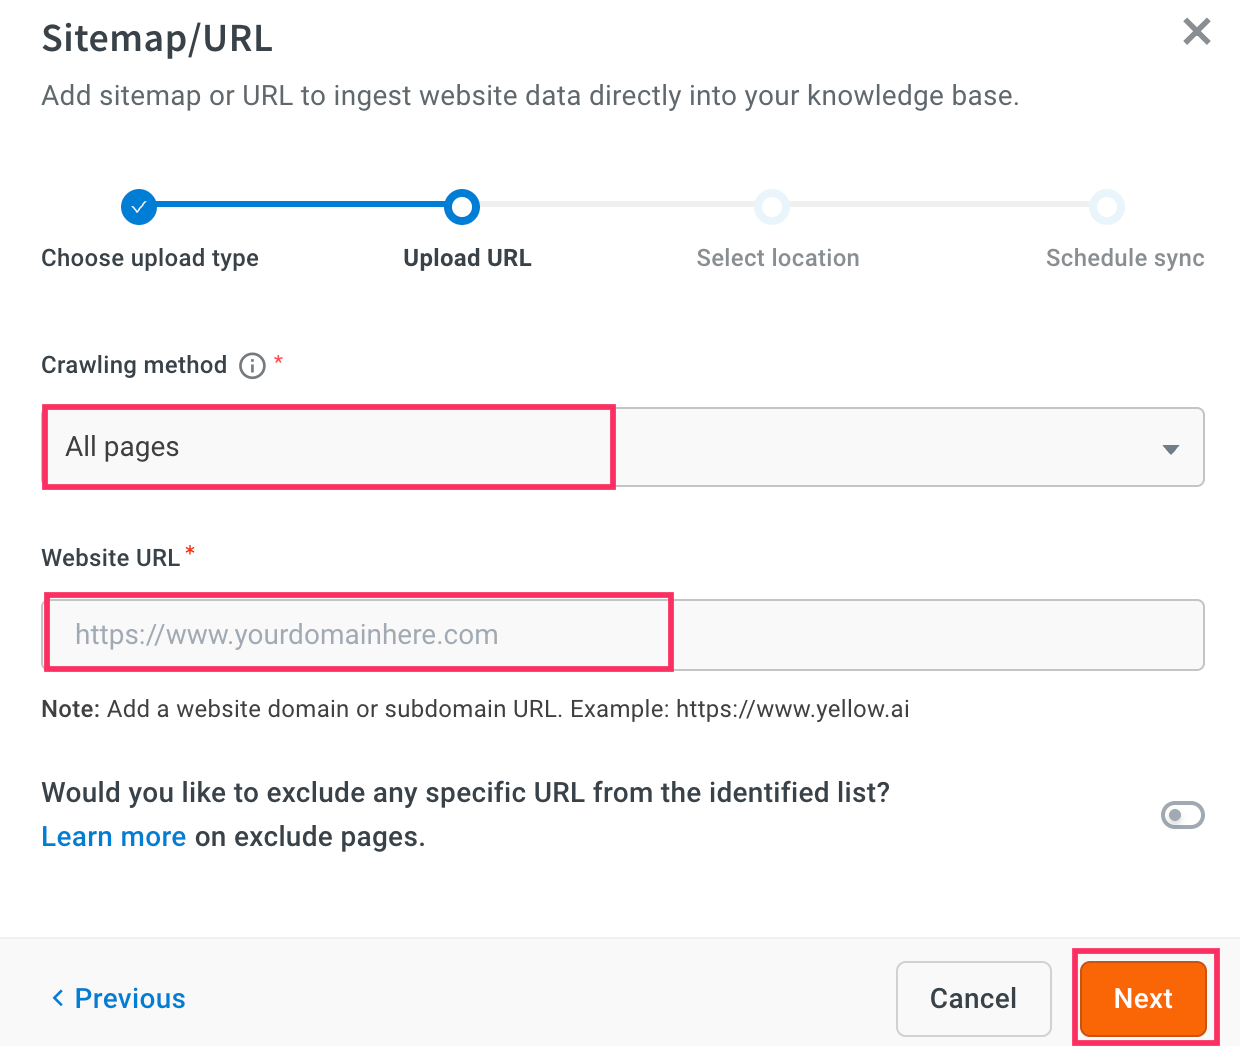
-
To exclude specific URLs from being crawled, turn on the toggle and choose a filter type:
i. Contains: This option will exclude any URL that contains the specified keyword or phrase. Example: Entering ?sessionid= excludes URLs like www.site.com/page?sessionid=123.
ii. Begins with: This option will exclude all URLs that start with the specified prefix. Example: Enteringhttps://dev.example.com/excludes all pages starting with that path.
iii. Equals to: This option will exclude only the URL that exactly matches the specified text. Example: Enteringhttps://example.com/old_page.htmlexcludes only that exact page.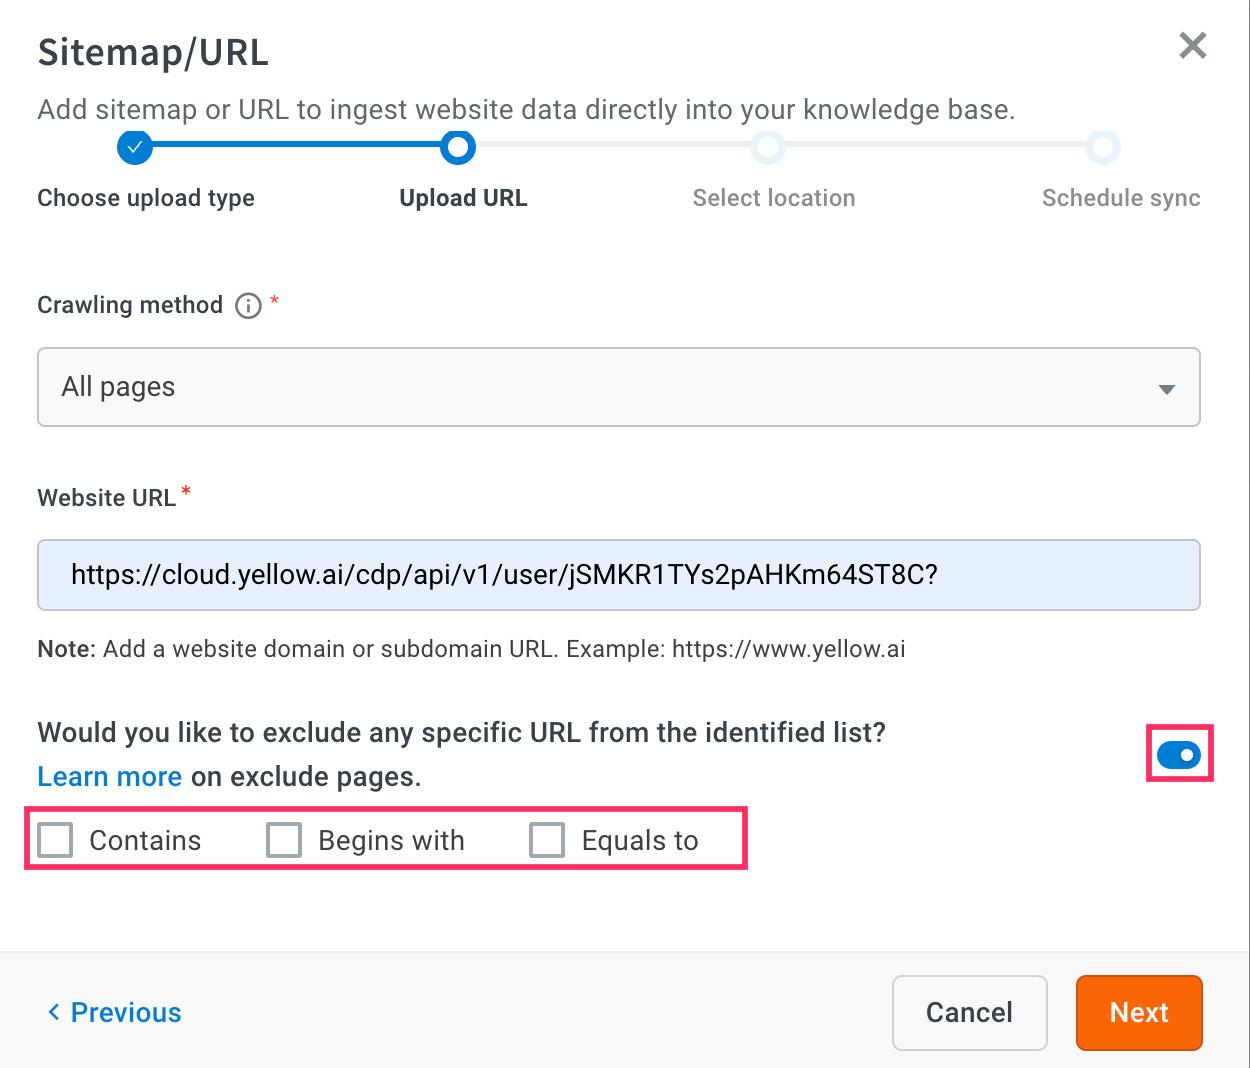
-
Select a folder or subfolder to store the crawled content or click + Create new folder to organize your files.

-
To keep content up to date going forward, you can schedule regular syncs by configuring:
- Frequency: Hourly, Daily, or Weekly.
- Time: Choose the time (in UTC) for the sync to run.
-
Click Done to complete the setup.
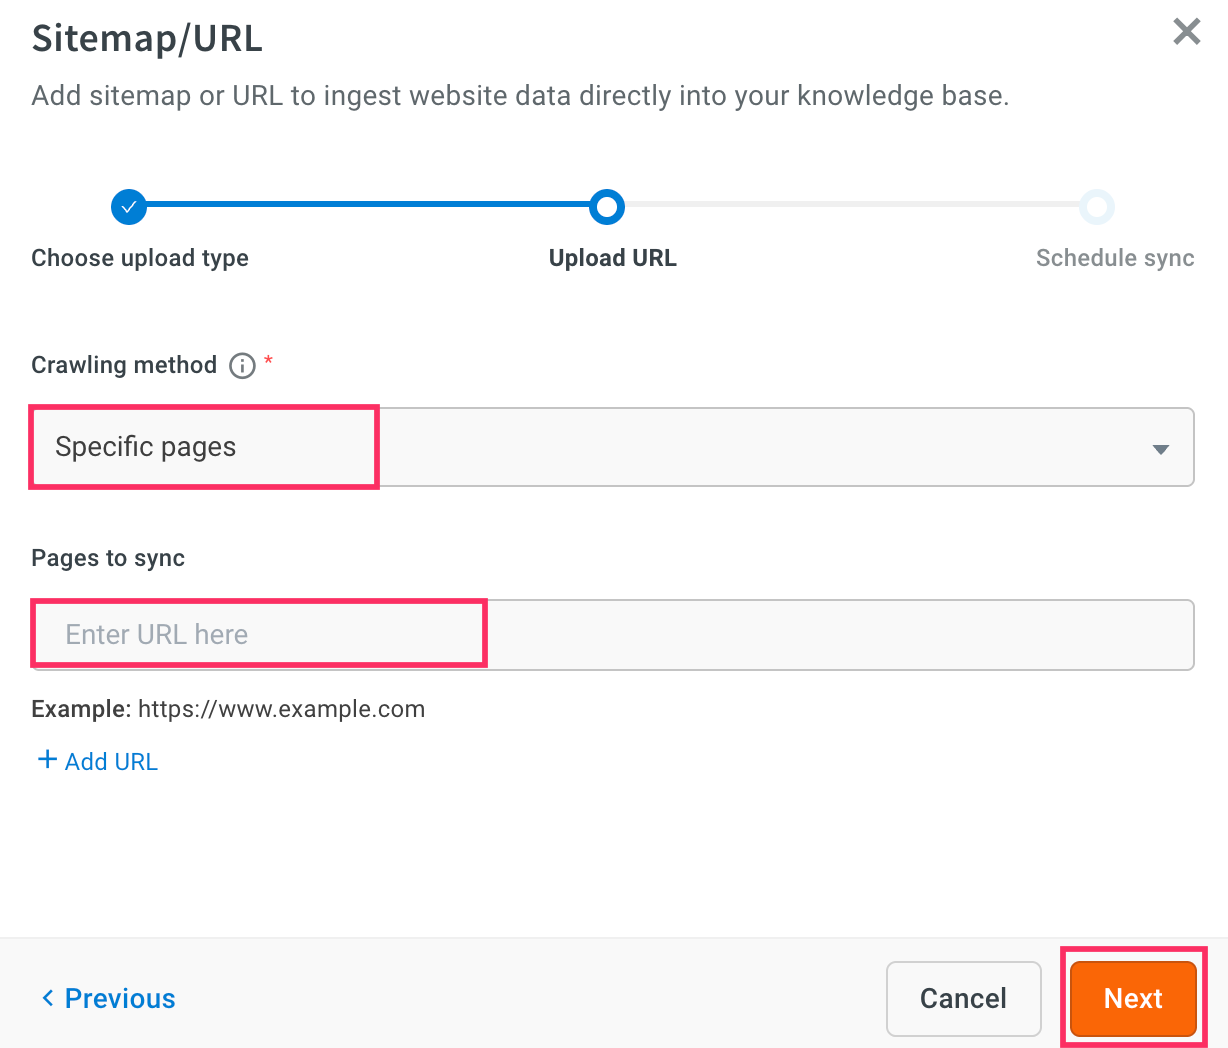
ii. Specific pages
The Specific pages option crawls only to the URLs you manually enter. This is recommended when you want to include only a few targeted pages or avoid crawling the entire site.
Use case: Useful for privacy policies, single-product pages, FAQs, or any specific page that contains useful standalone information.
Example: If you enter
https://yellow.ai/terms-and-conditions, only that single page will be crawled and added to the Knowledge Base.To add specific pages, follow these steps:
-
In Pages to sync, enter the specific URL.
-
Choose a folder or subfolder to store the crawled content or click + Create new folder.
-
To keep content up to date, you can schedule regular syncs by choosing the:
- Frequency: Hourly, Daily, or Weekly.
- Time: Choose the time (in UTC) for the sync to run.
-
Click Done to complete the setup.
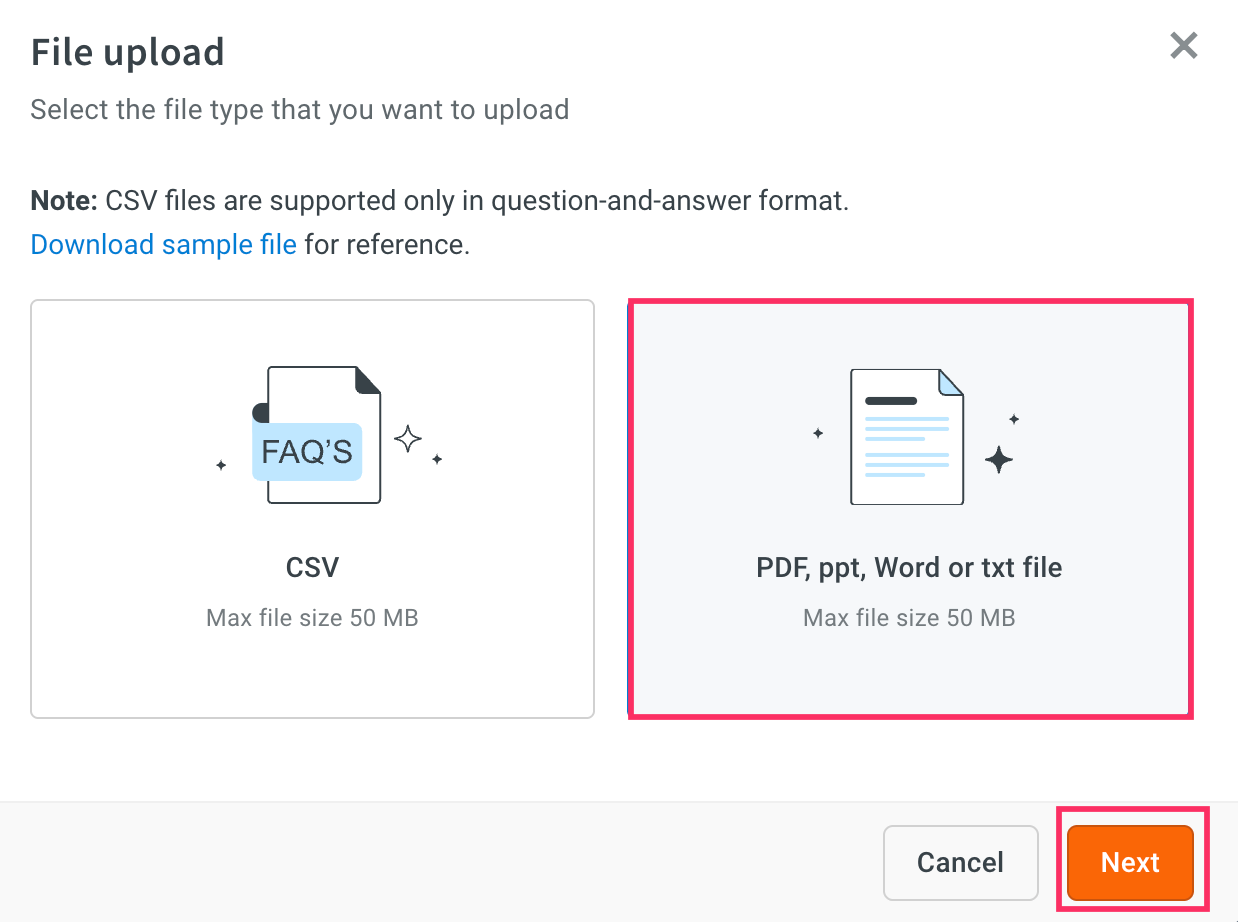
Upload documents to your Knowledge base
You can upload documents directly from your local system to provide the AI agent with access to reference materials and content. This is useful when you want to include internal guides, product manuals, policy documents, or FAQ data for answering user queries.
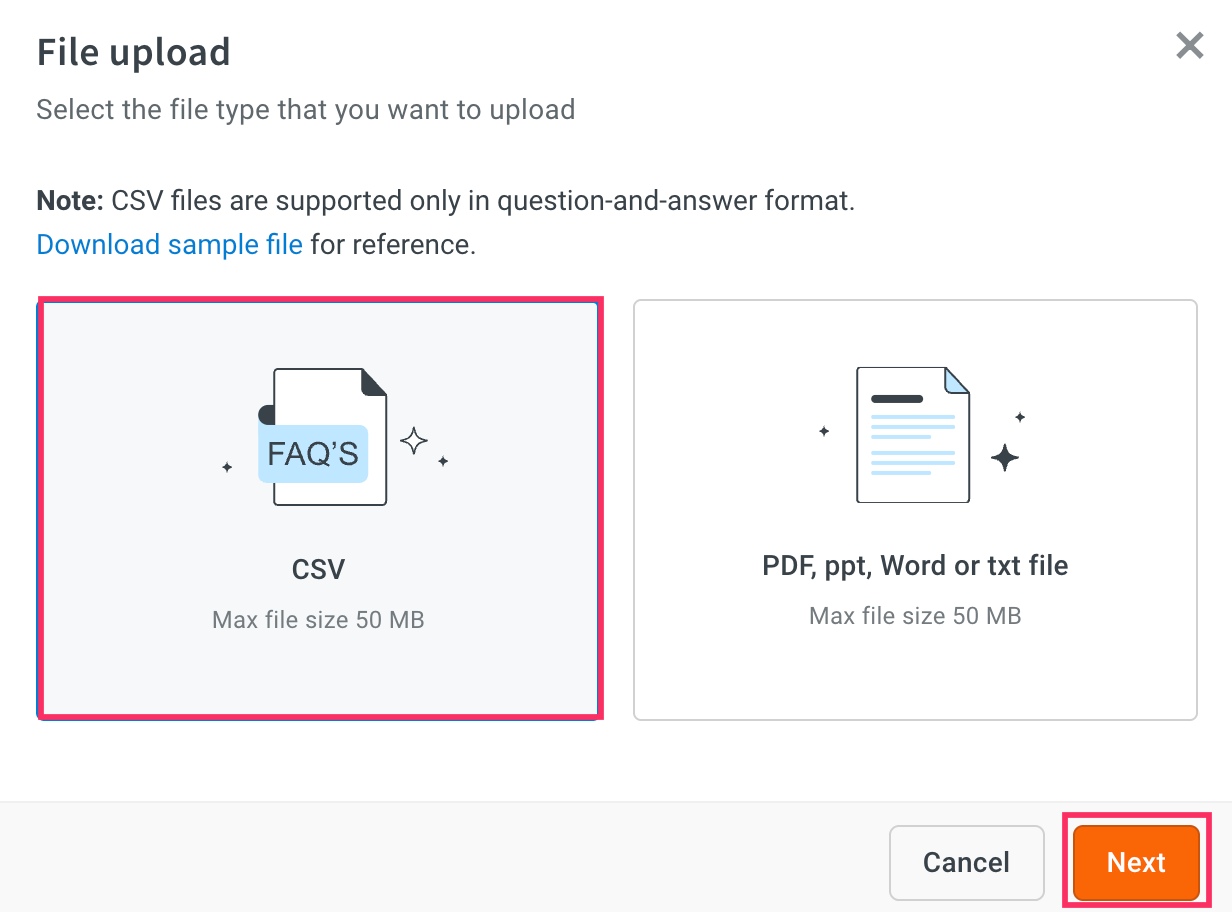
Supported file types
- CSV files (in Q&A format only)
- PDF, PPT, Word, or TXT files
Limitations
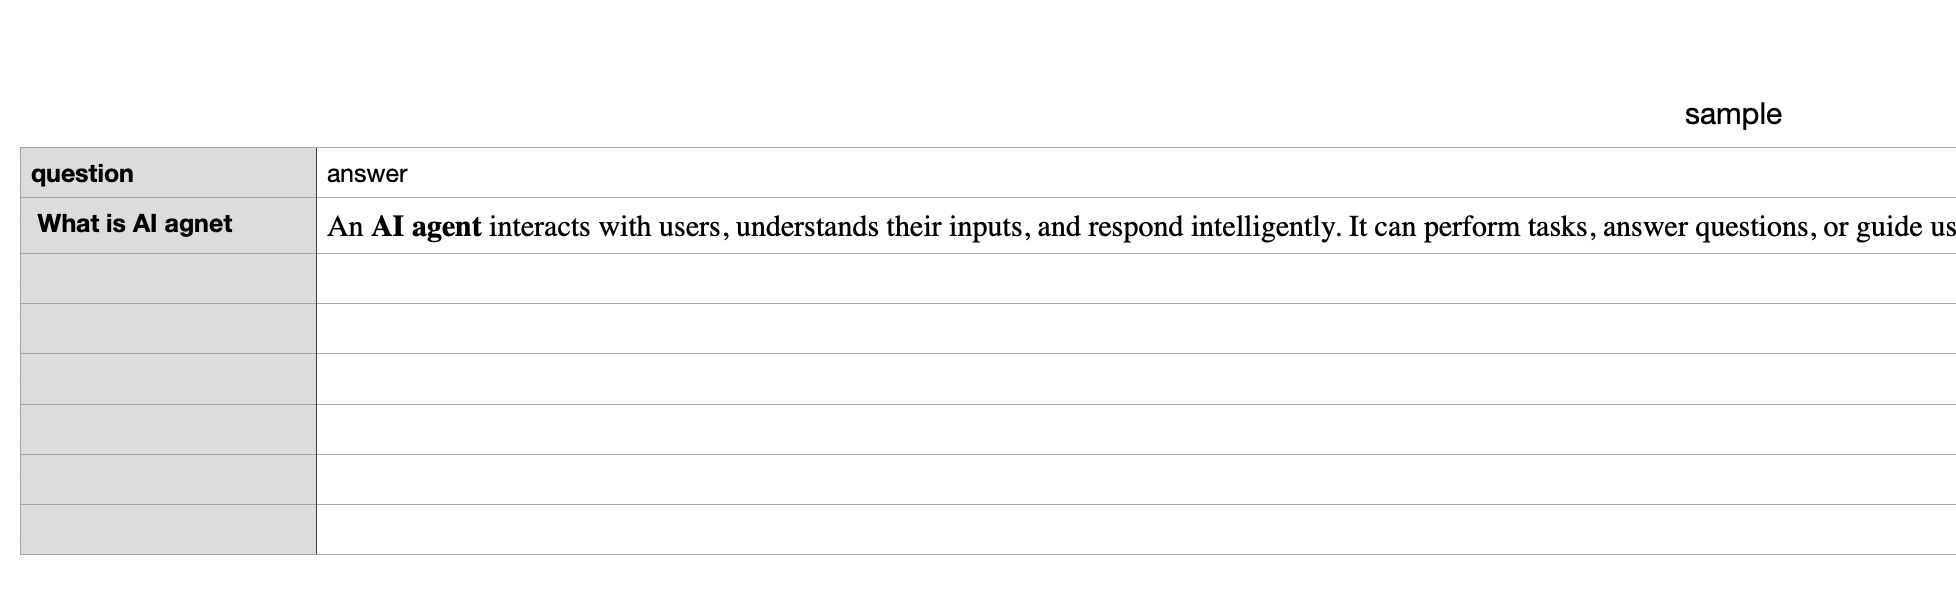
- CSV format restriction: You can use CSV file only for uploading FAQs or structured data. Each row should contain a question and its corresponding answer in separate columns.
- File size limit: Each uploaded file must be less than 50 MB.
Upload CSV file to your knowledge base
Before starting with the process, create a CSV file with two columns: question and answer. You can also download the sample CSV for your reference.
-
Navigate to Upload files.

-
Select CSV and click Next.
-
Drag & drop your file or click Upload file to browse and select it.
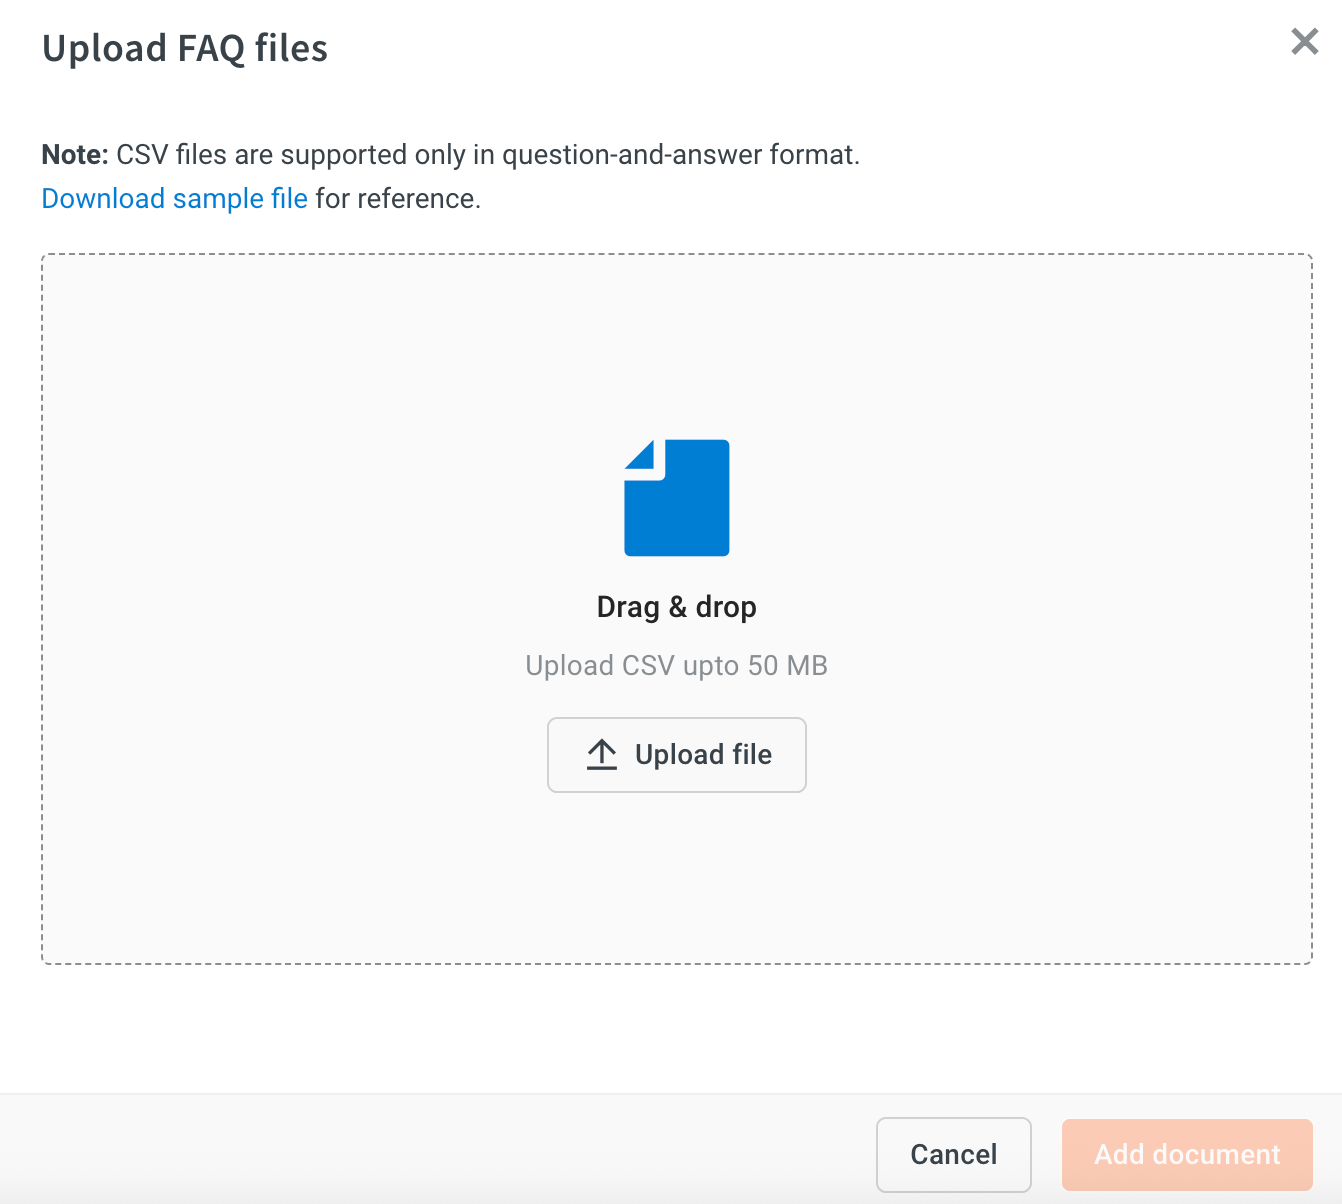
-
Click Upload.
Upload PDF, PPT, Word, or TXT
-
Navigate to Upload files.
-
Select PDF, PPT, Word, or TXT and click Next.
-
Either drag & drop the file or click Upload file to browse and select it (up to 50 MB).
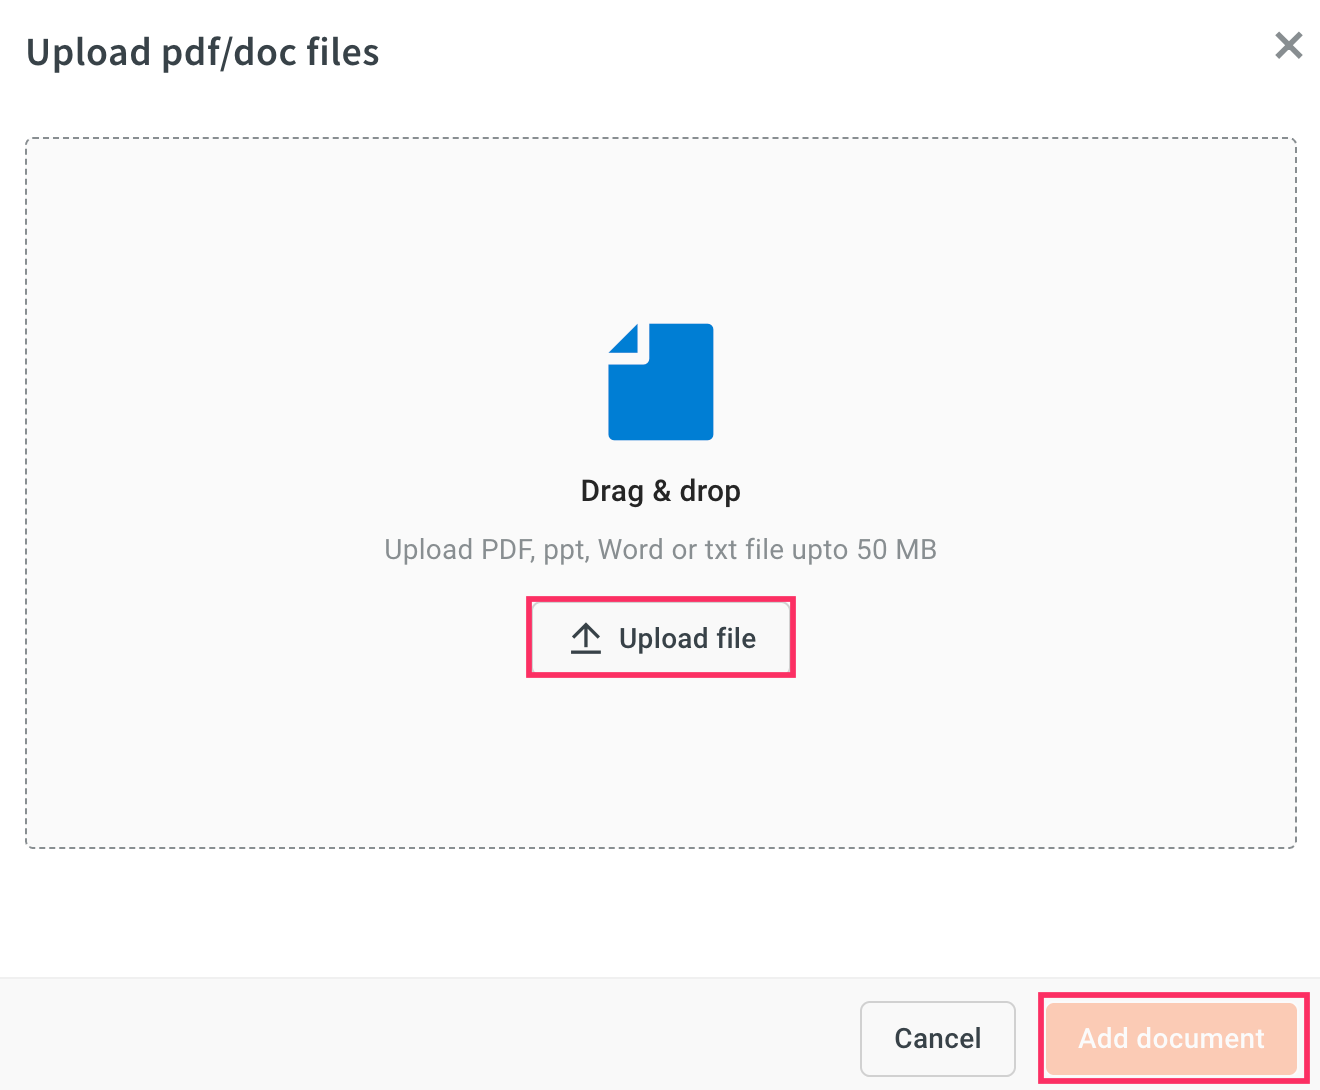
-
Click Upload to complete the process.
Import documentation from ServiceNow
If your knowledge base is hosted on ServiceNow, you can directly integrate your ServiceNow account to import existing content. Once connected, you can enable automatic syncs to keep your content up to date without manual imports. Scheduled syncs ensure that any updates made in ServiceNow are regularly reflected in your Yellow.ai Knowledge Base.
- You need Instance URL, Client ID and Client Secret of ServiceNow to connect with Yellow.ai.
To add your ServiceNow account, follow these steps:
-
Go to Knowledge base > Files > Service now.
-
This will redirect you to the Service now configuration page.
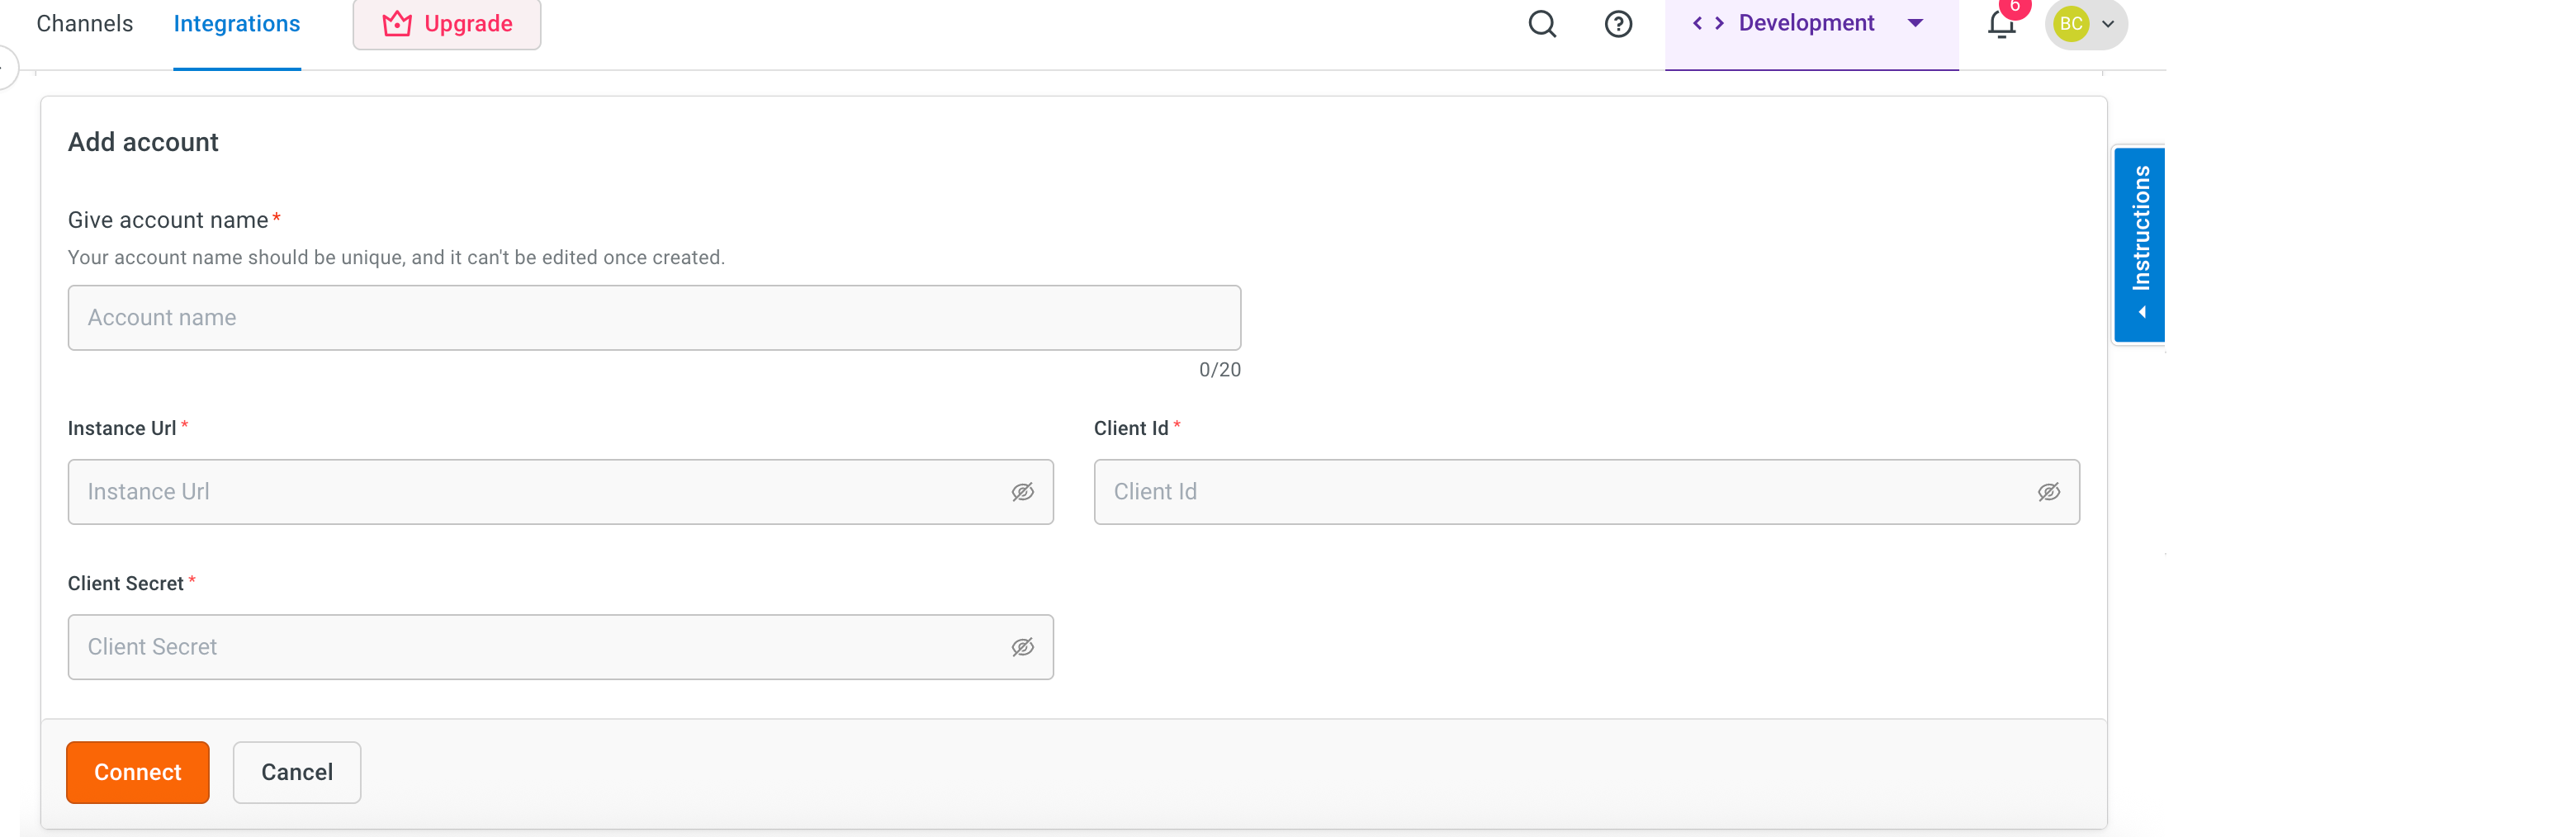
-
In Give account name, provide a name for the integration. You can use only lowercase alphanumeric characters and underscores (_).
-
Copy and paste the Instance URL, Client ID and Client Secret. For more information on how to get the credential, refer to this doc.
-
Click Connect.
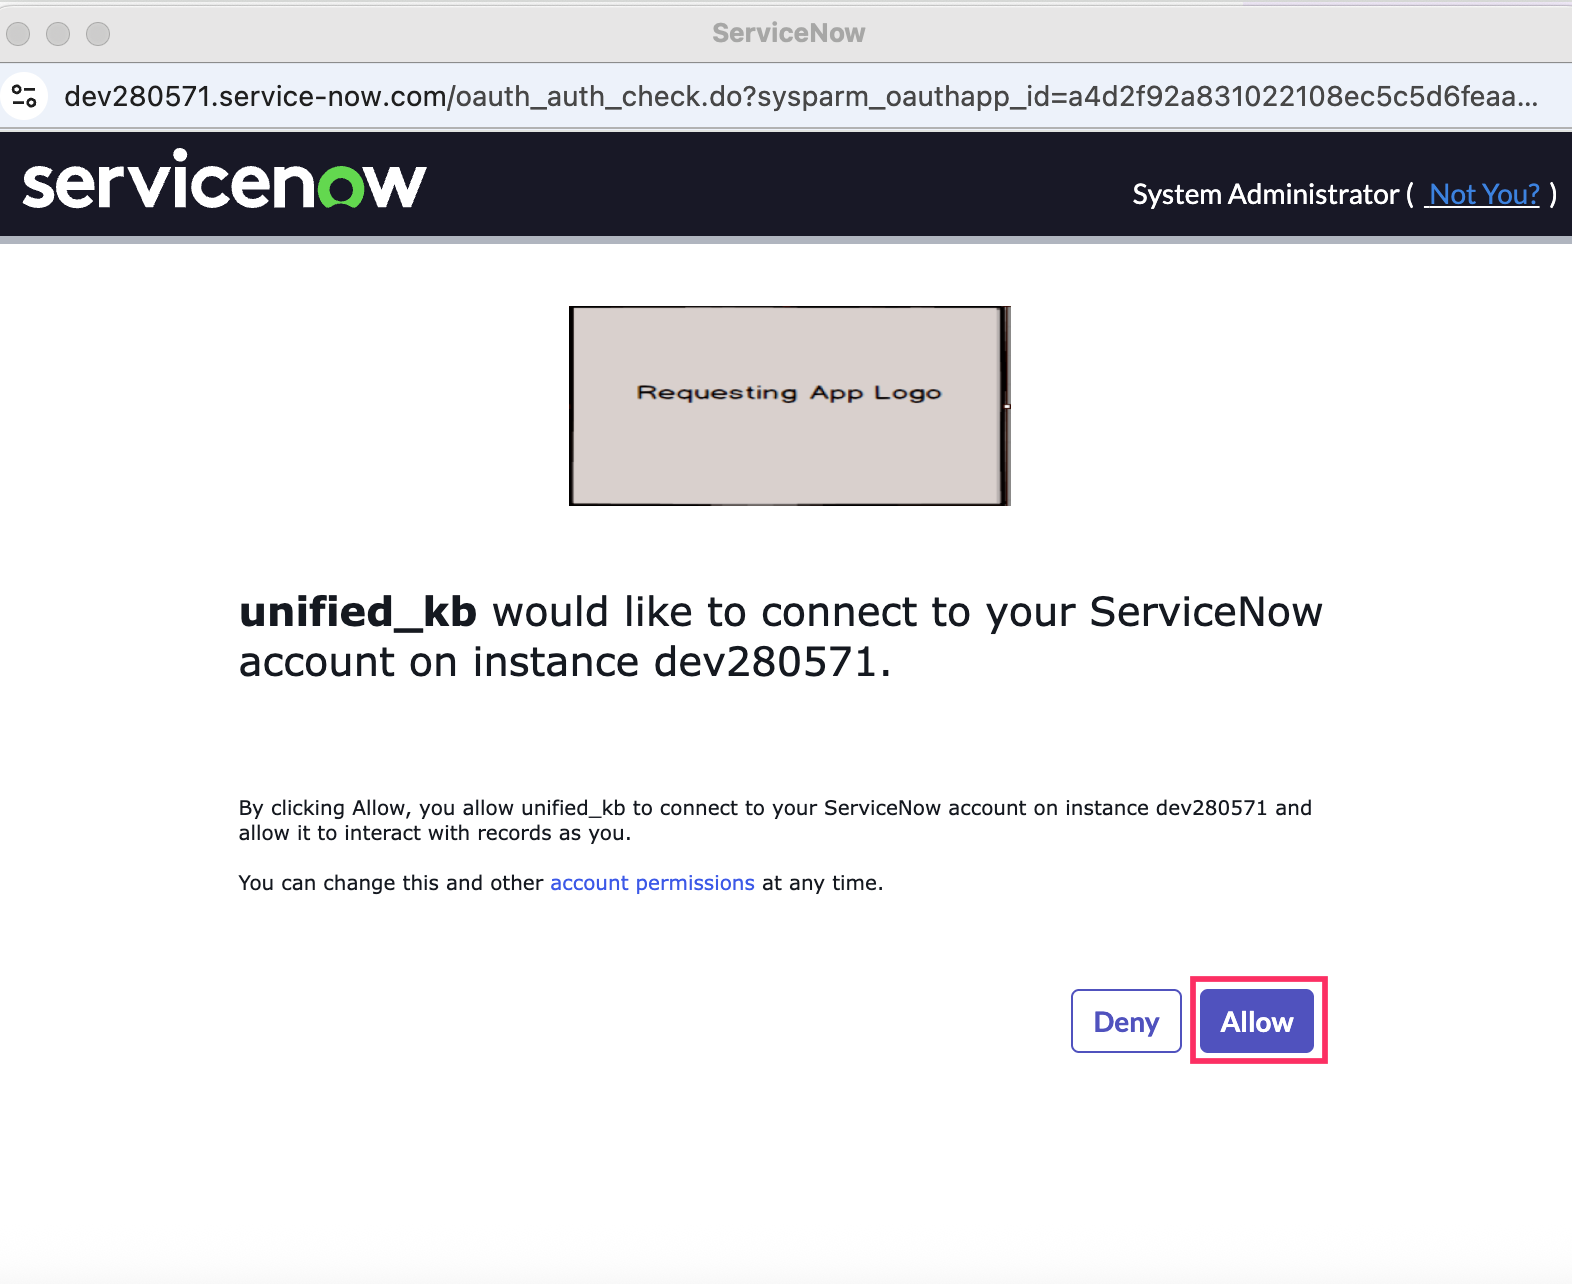
-
Click Allow to authorize the connection to your ServiceNow account.
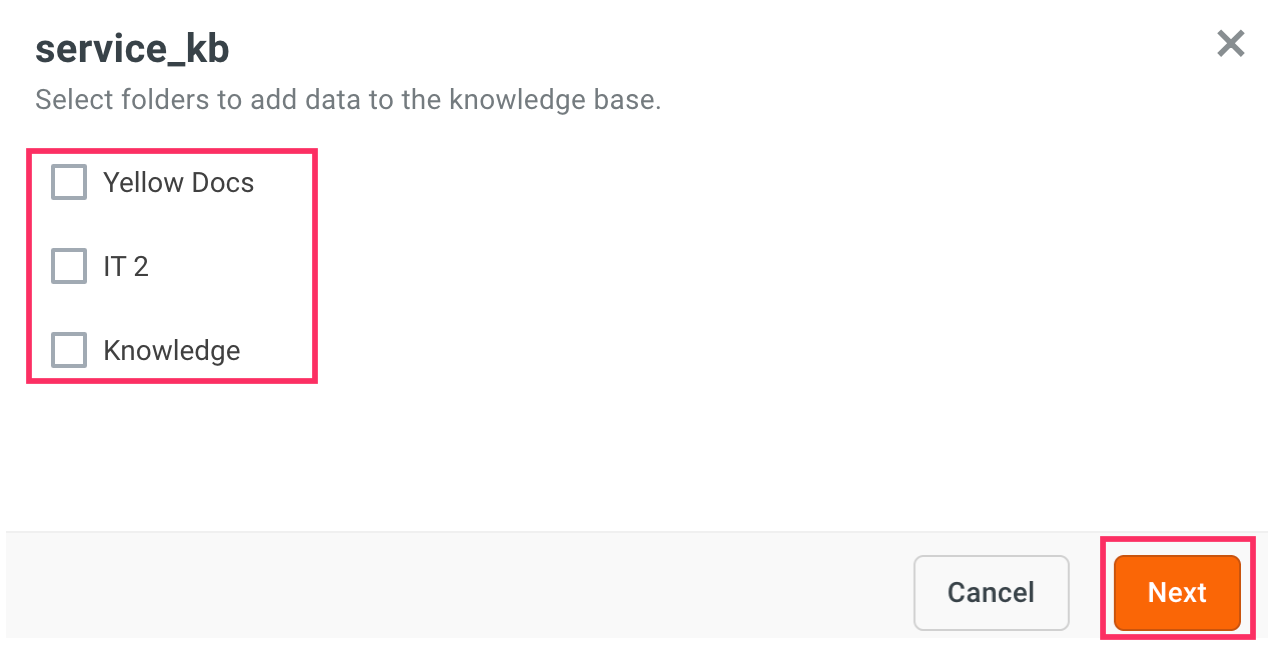
-
Select the folder(s) from the ServiceNow knowledge articles that you want to import into the Knowledge base. The folder structure is displayed based on the hierarchy configured in your ServiceNow account.
-
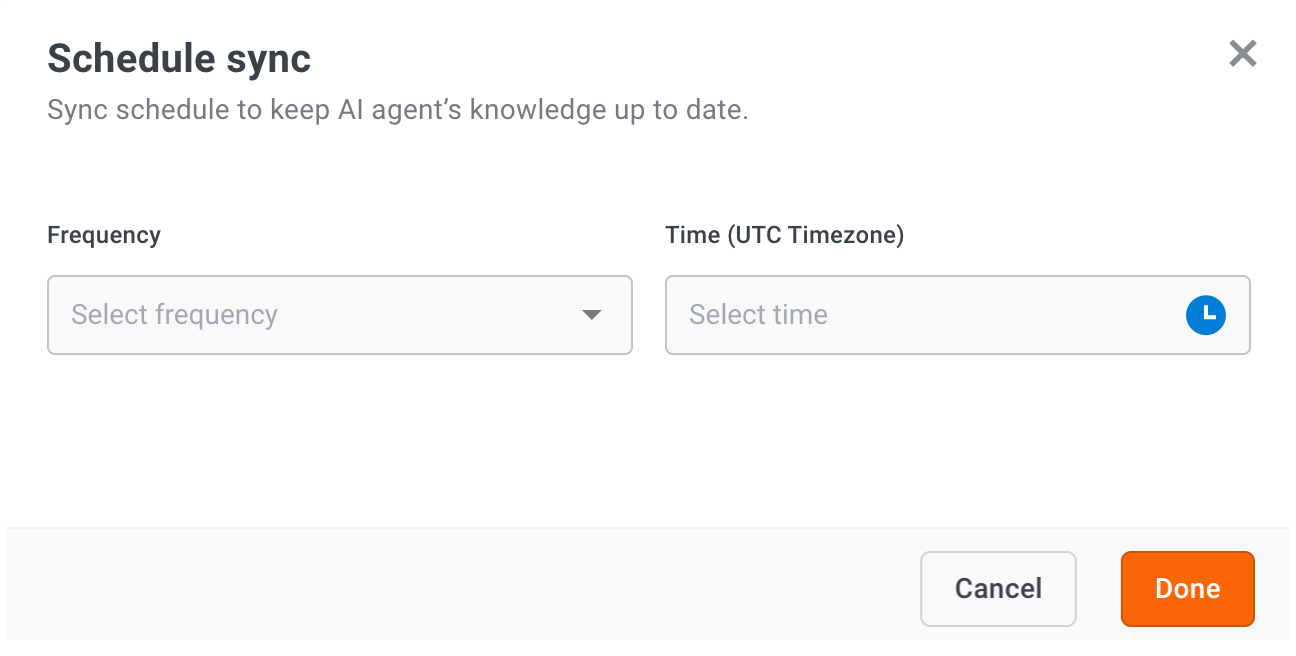
To keep your content up to date without manual imports, you can Schedule sync to automatically update content going forward. Learn more about Scheduler sync setup.
-
Click Done to start the import. You will see your selected ServiceNow content and structure in our Knowledge base. Going forward, based on the sync scheduled, the content will be updated automatically..
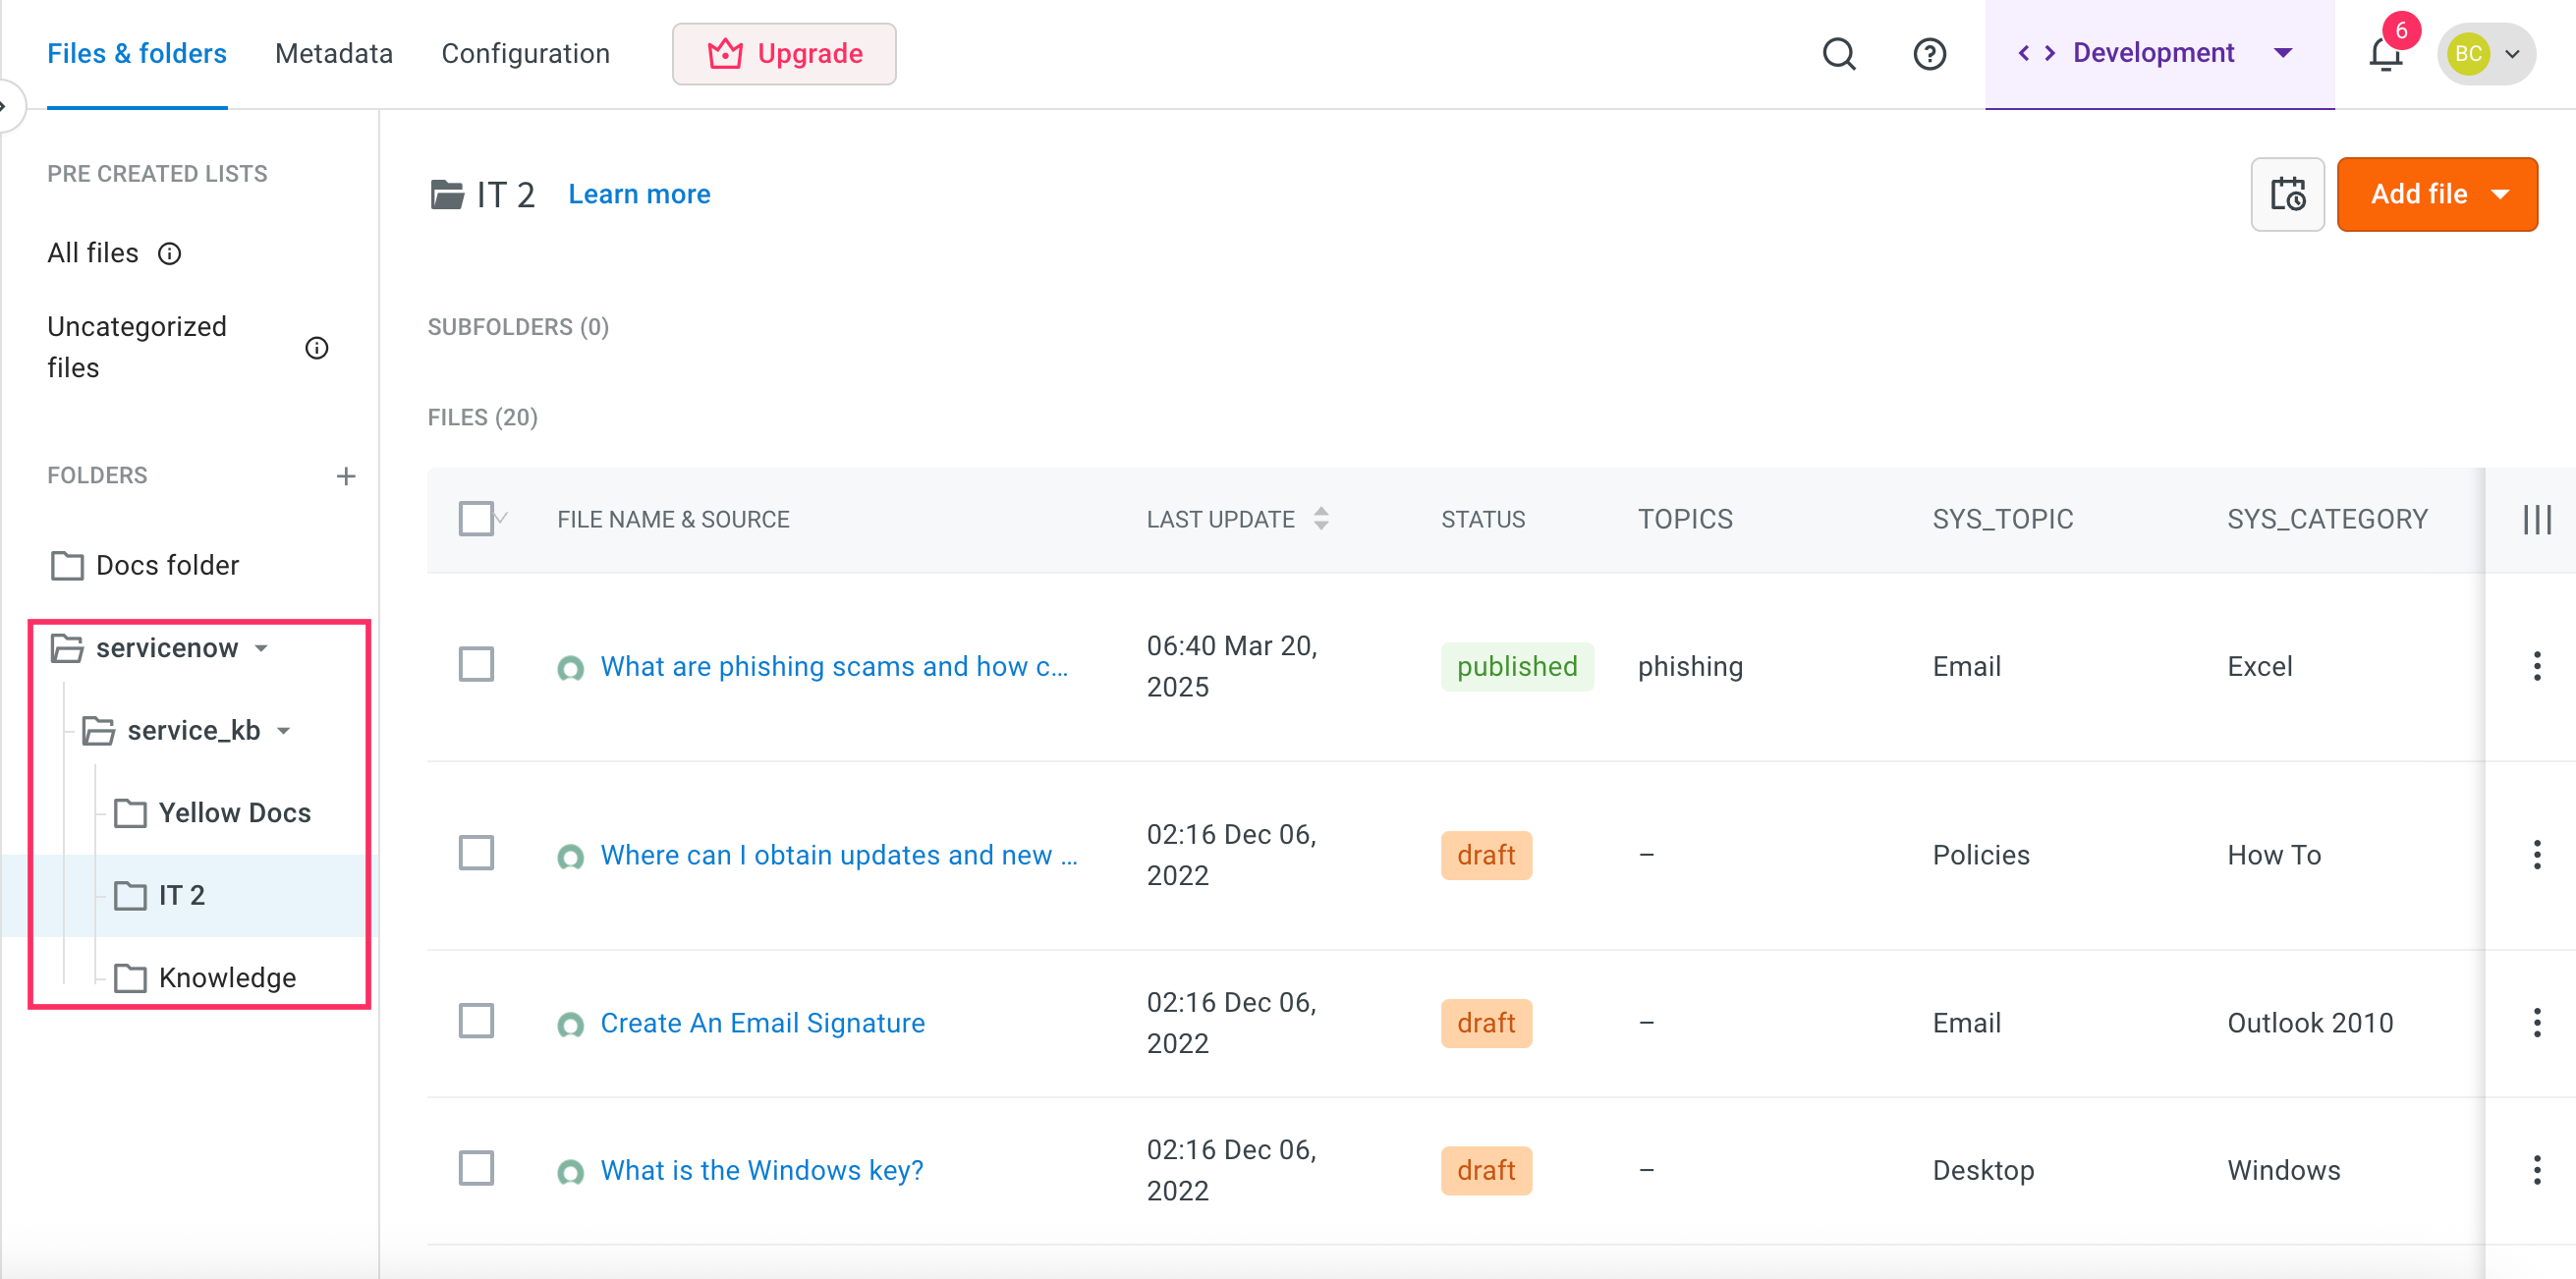
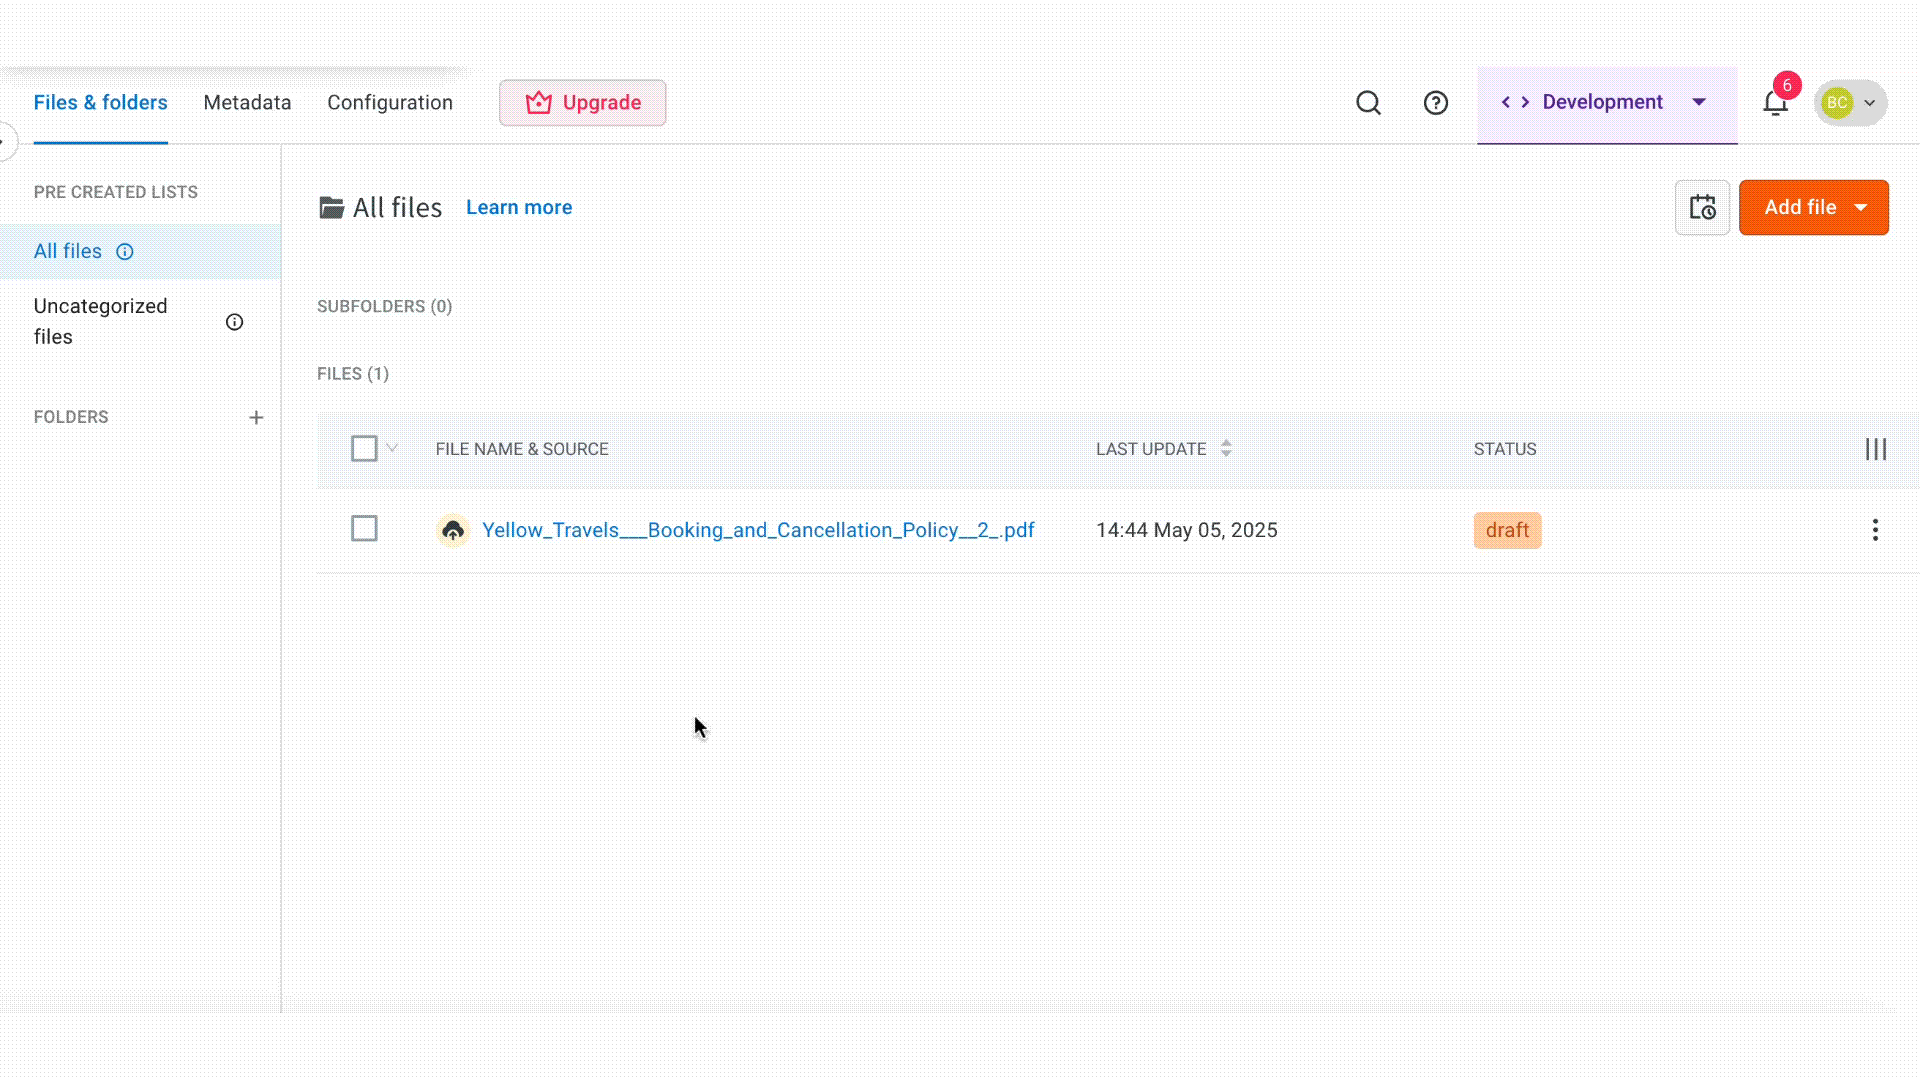
Organize and structure content
After completing the initial set up process, you can continue managing and adding additional Knowledge base sources directly from the Files & Folders section. This allows you to organize and expand your content as needed.
Schedule sync for imports based on URL, Sitemap and ServiceNow
Scheduler helps to keep your knowledge base up to date by automatically syncing content from connected sources.
You can set different sync schedules for each source type—Sitemap, URLs, or ServiceNow integration.
You can configure scheduler at two stages:
- During data source onboarding
- From the file management section
Set scheduler during onboarding
When adding a new data source like Sitemap, URL, or ServiceNow, you will go through a guided setup flow. One of the final steps in this flow allows you to configure your sync schedule.
To set the scheduler, follow these steps:
-
Choose your data source: Sitemap, URL, or ServiceNow. For more information, refer to Setup Knowledge base data source.
-
Complete the onboarding steps: i. Choose upload type ii. Upload URL iii. Select content location iv. Proceed to the Schedule Sync step
-
At the Schedule Sync step, select the following frequency and time:
Frequency Time Hourly 1, 3, 6, 12 hour Daily 12 AM to 11 PM Weekly Select Day (Sunday to saturday) and time from 12 AM to 11 PM 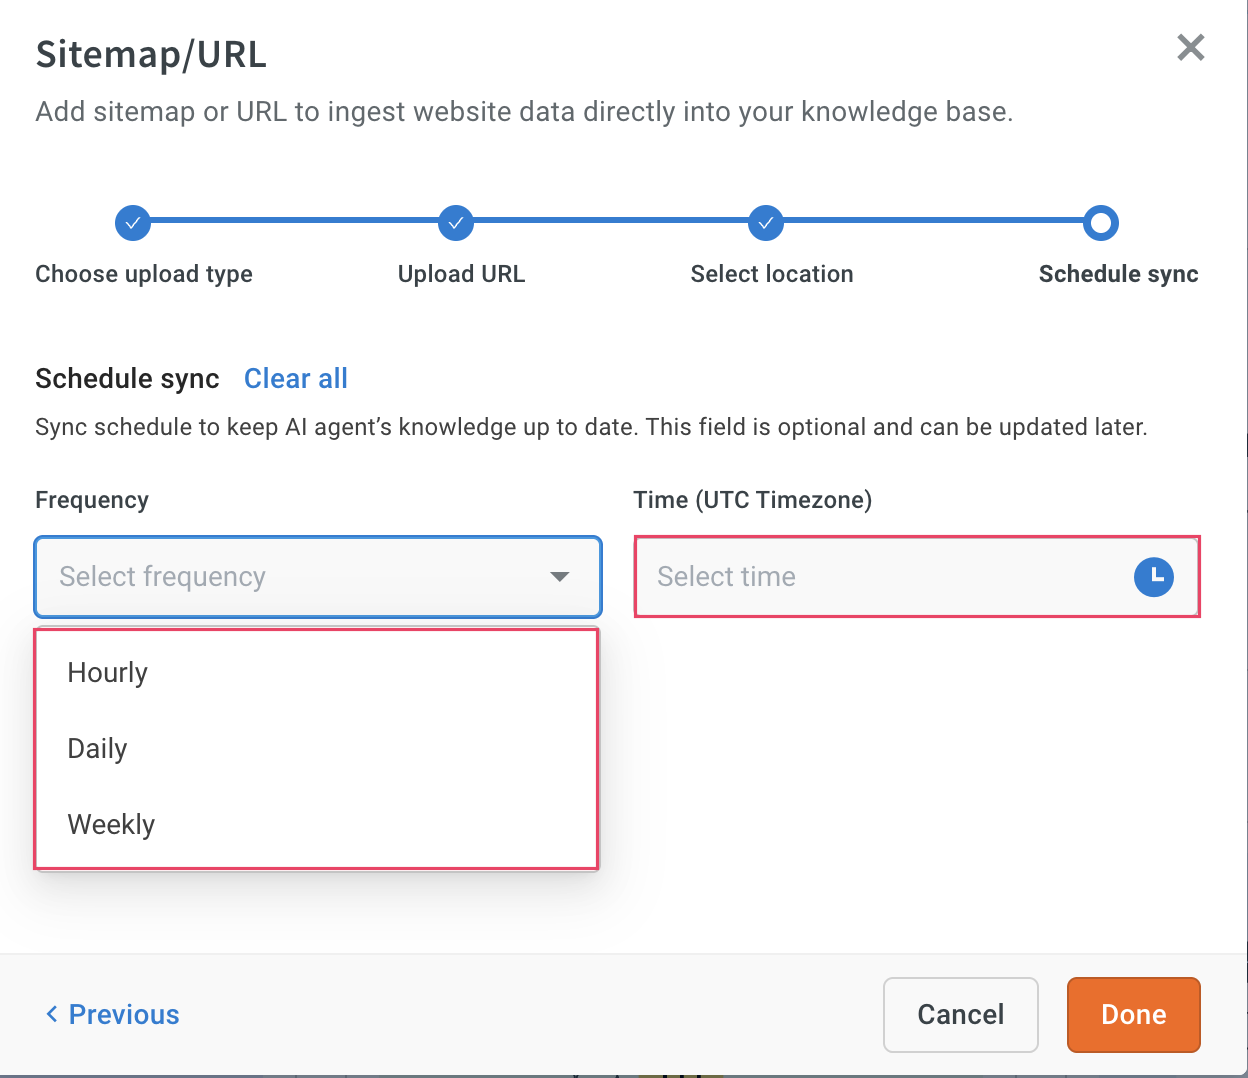
-
Click Done.
- You can also skip this step during onboarding and set or update the sync schedule later from the File Management section.
Set or modify scheduler from file management
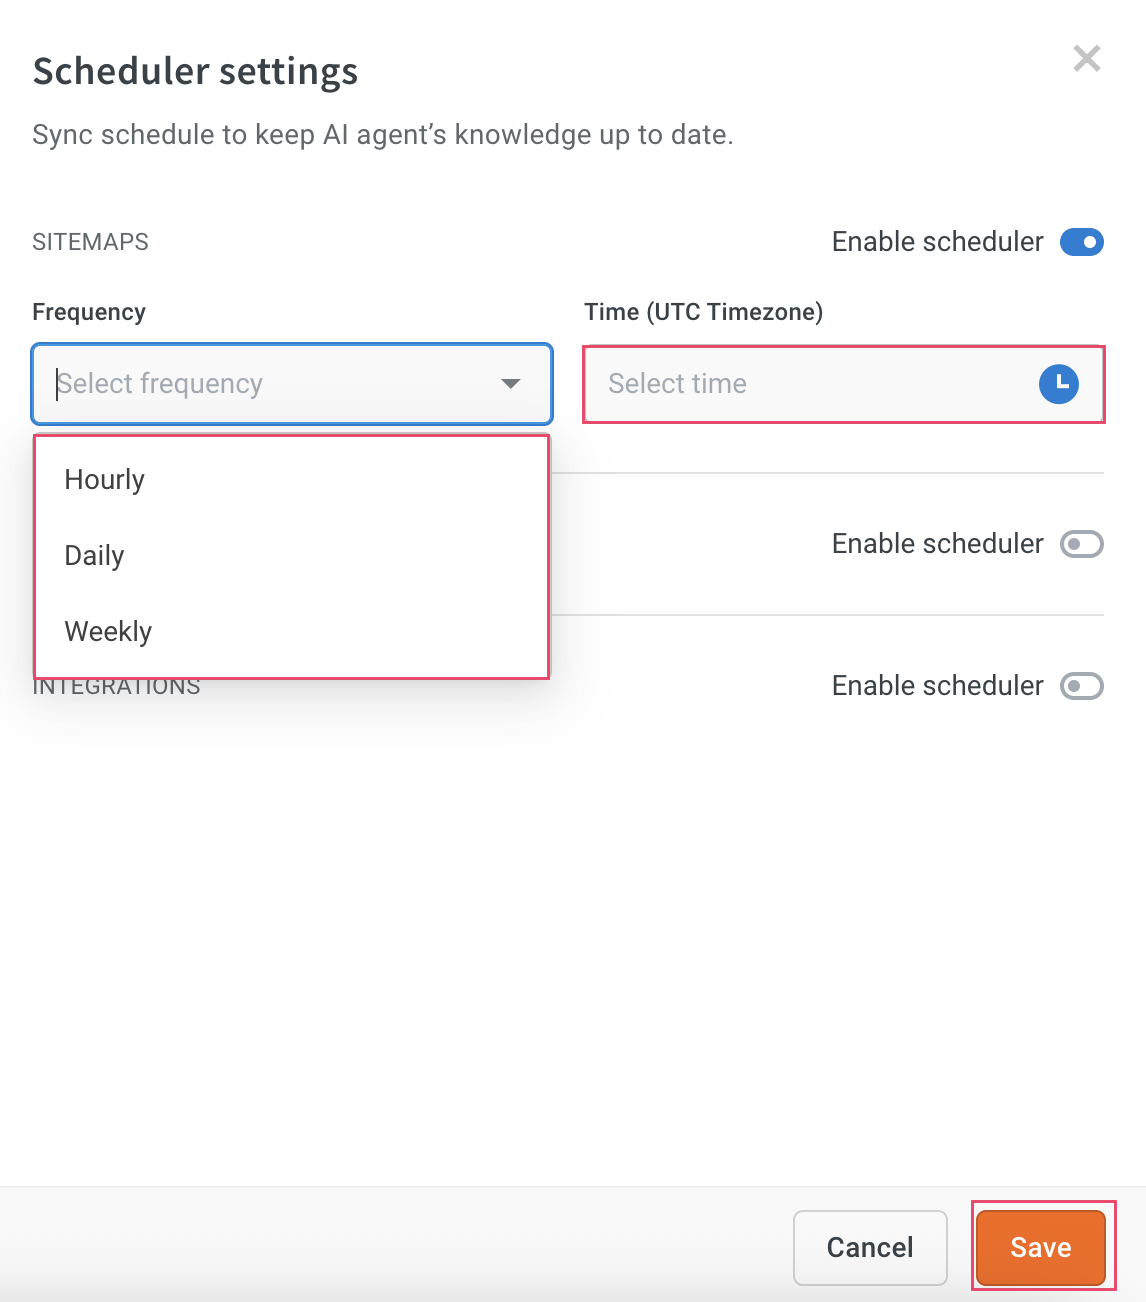
Once the source has been onboarded, you can update the scheduler settings from the Files & folders section.
In the scheduler panel, you can:
- Enable or disable automatic sync
- Change the sync frequency and time
- Manage scheduler settings separately for Sitemap, URLs, and Integrations
To access and configure the scheduler:
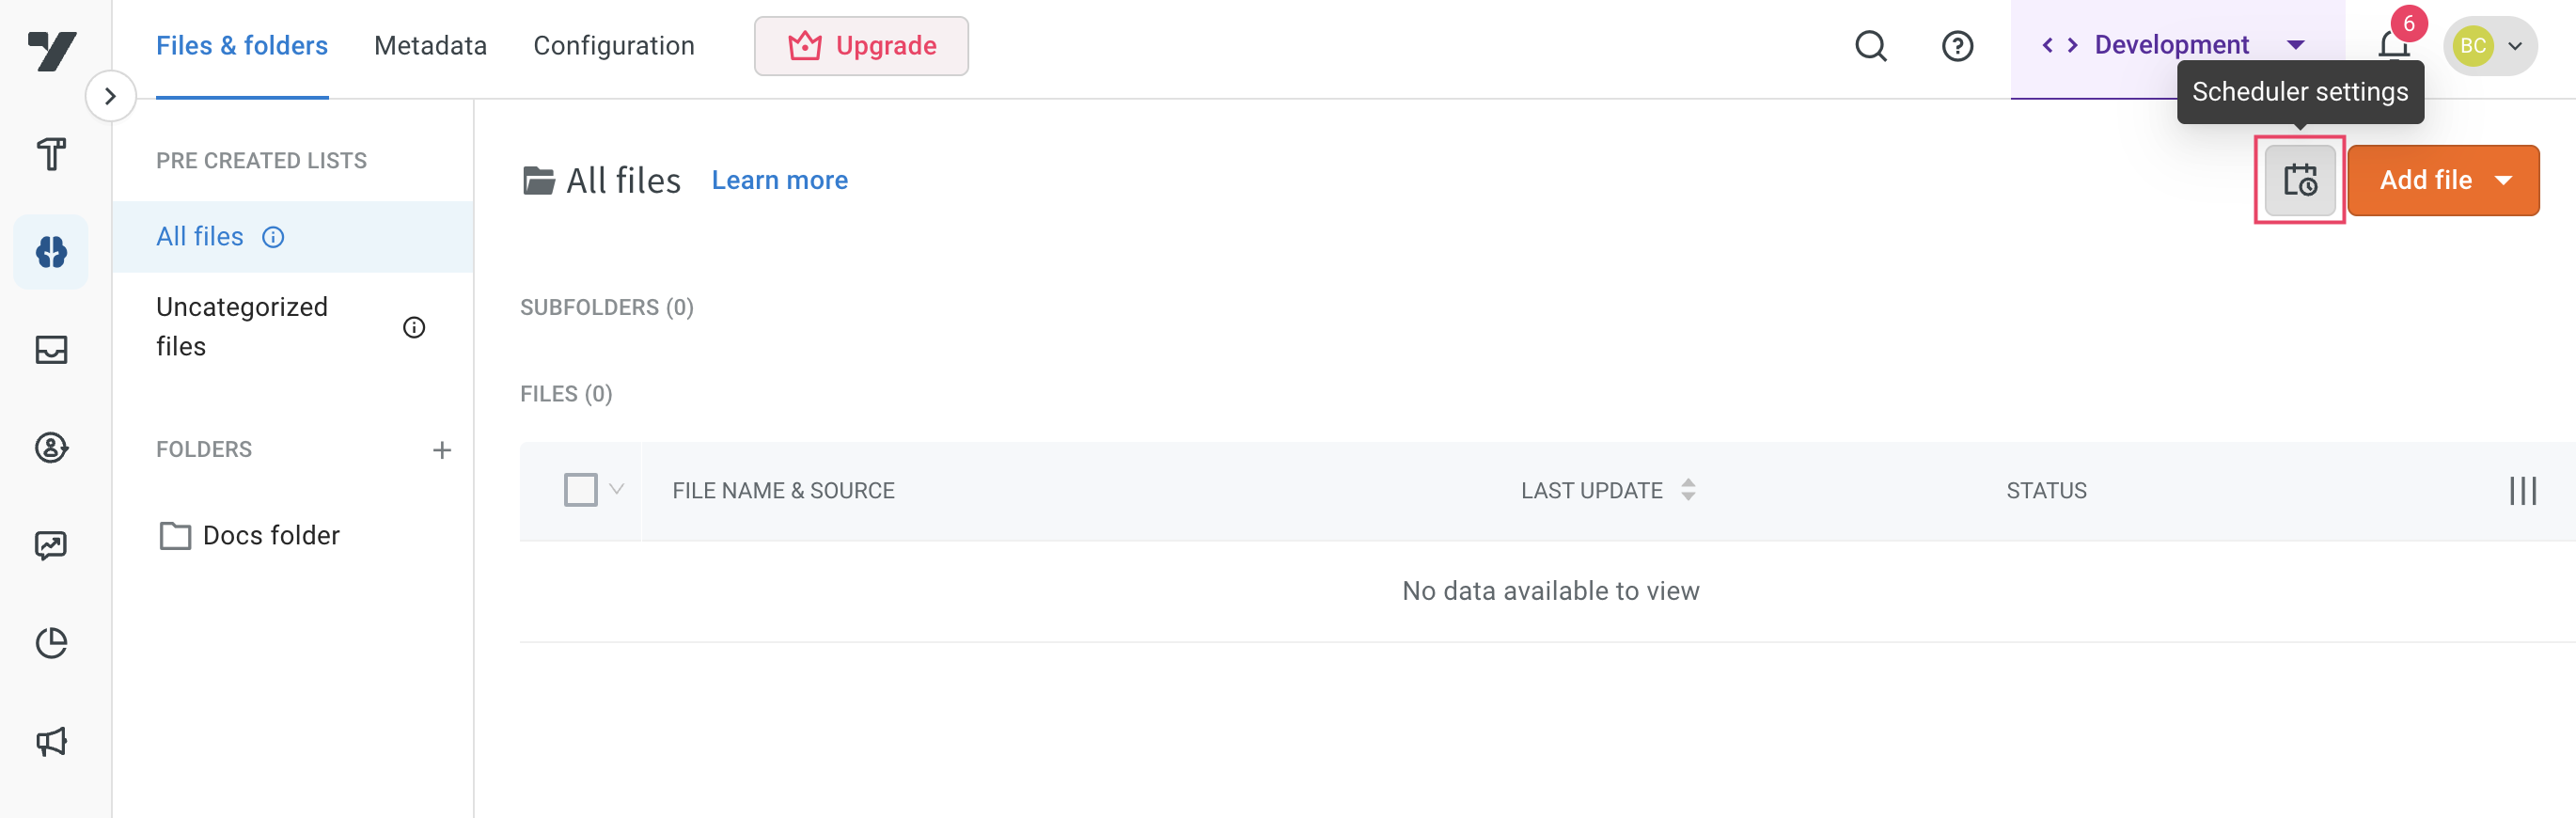
-
Click the Scheduler icon located at the top-right corner of the File management screen.
-
Enable the toogle button corresponding to the Sitemaps, URL, or Intrgrations for which you want to schedule.
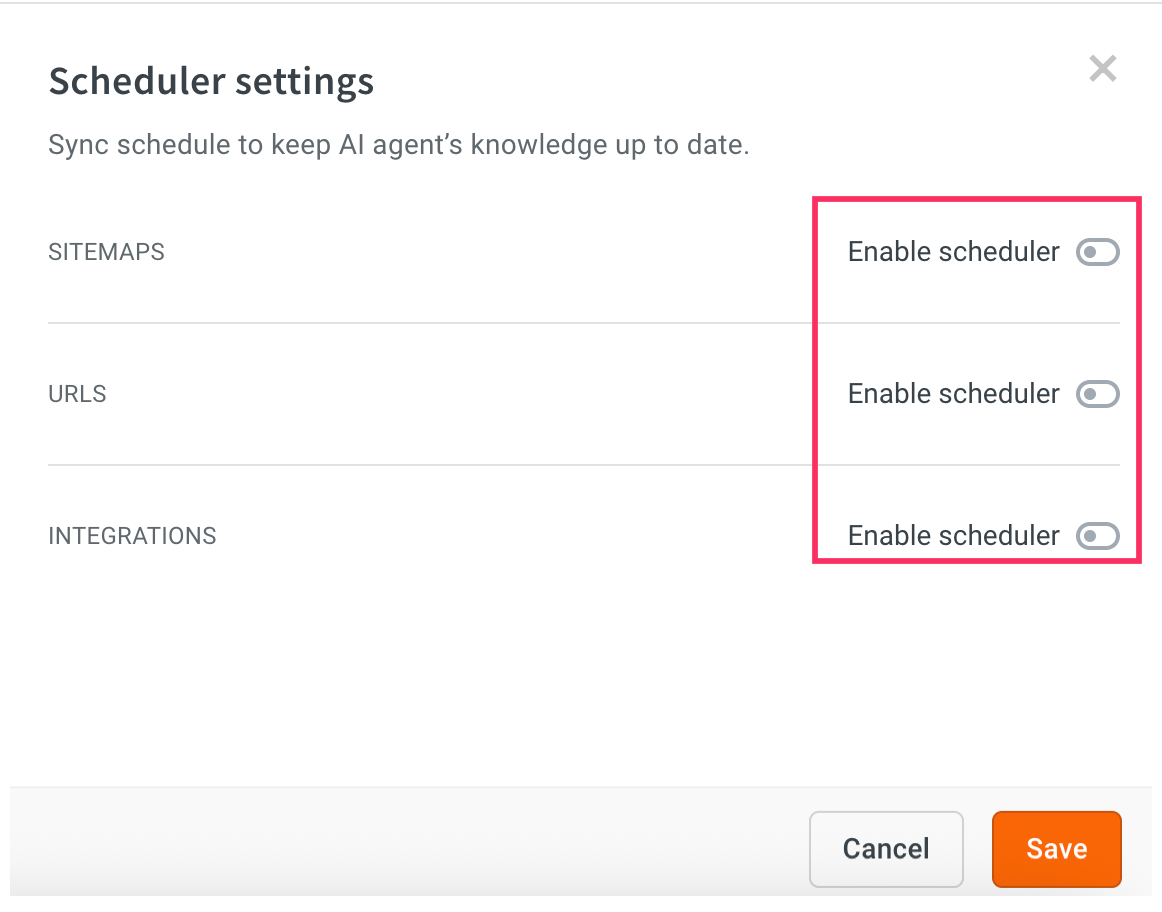
-
Select the Frequency and time for the selcted data source, then click Save.