Creatio integration
Creatio CRM integration allows you to manage your Creatio account directly from the Yellow.ai platform. This integration allows you to get, create, and update user contacts from your Creatio account.
Supported Creatio CRM actions in Yellow.ai
With this integration, you can perform the following Creatio CRM actions directly from the AI agent interface.
| Action | Description |
|---|---|
| Create a contact | Creates a new contact |
| Get a contact | Fetches a particular contact |
| Update a contact | Modifies details of a particular contact |
Get details from Creatio CRM account
Generate the required details - Instance URL, Client ID, Client Secret, and API Base URL -from your Creatio CRM account by following the steps below to integrate with Yellow.ai.
-
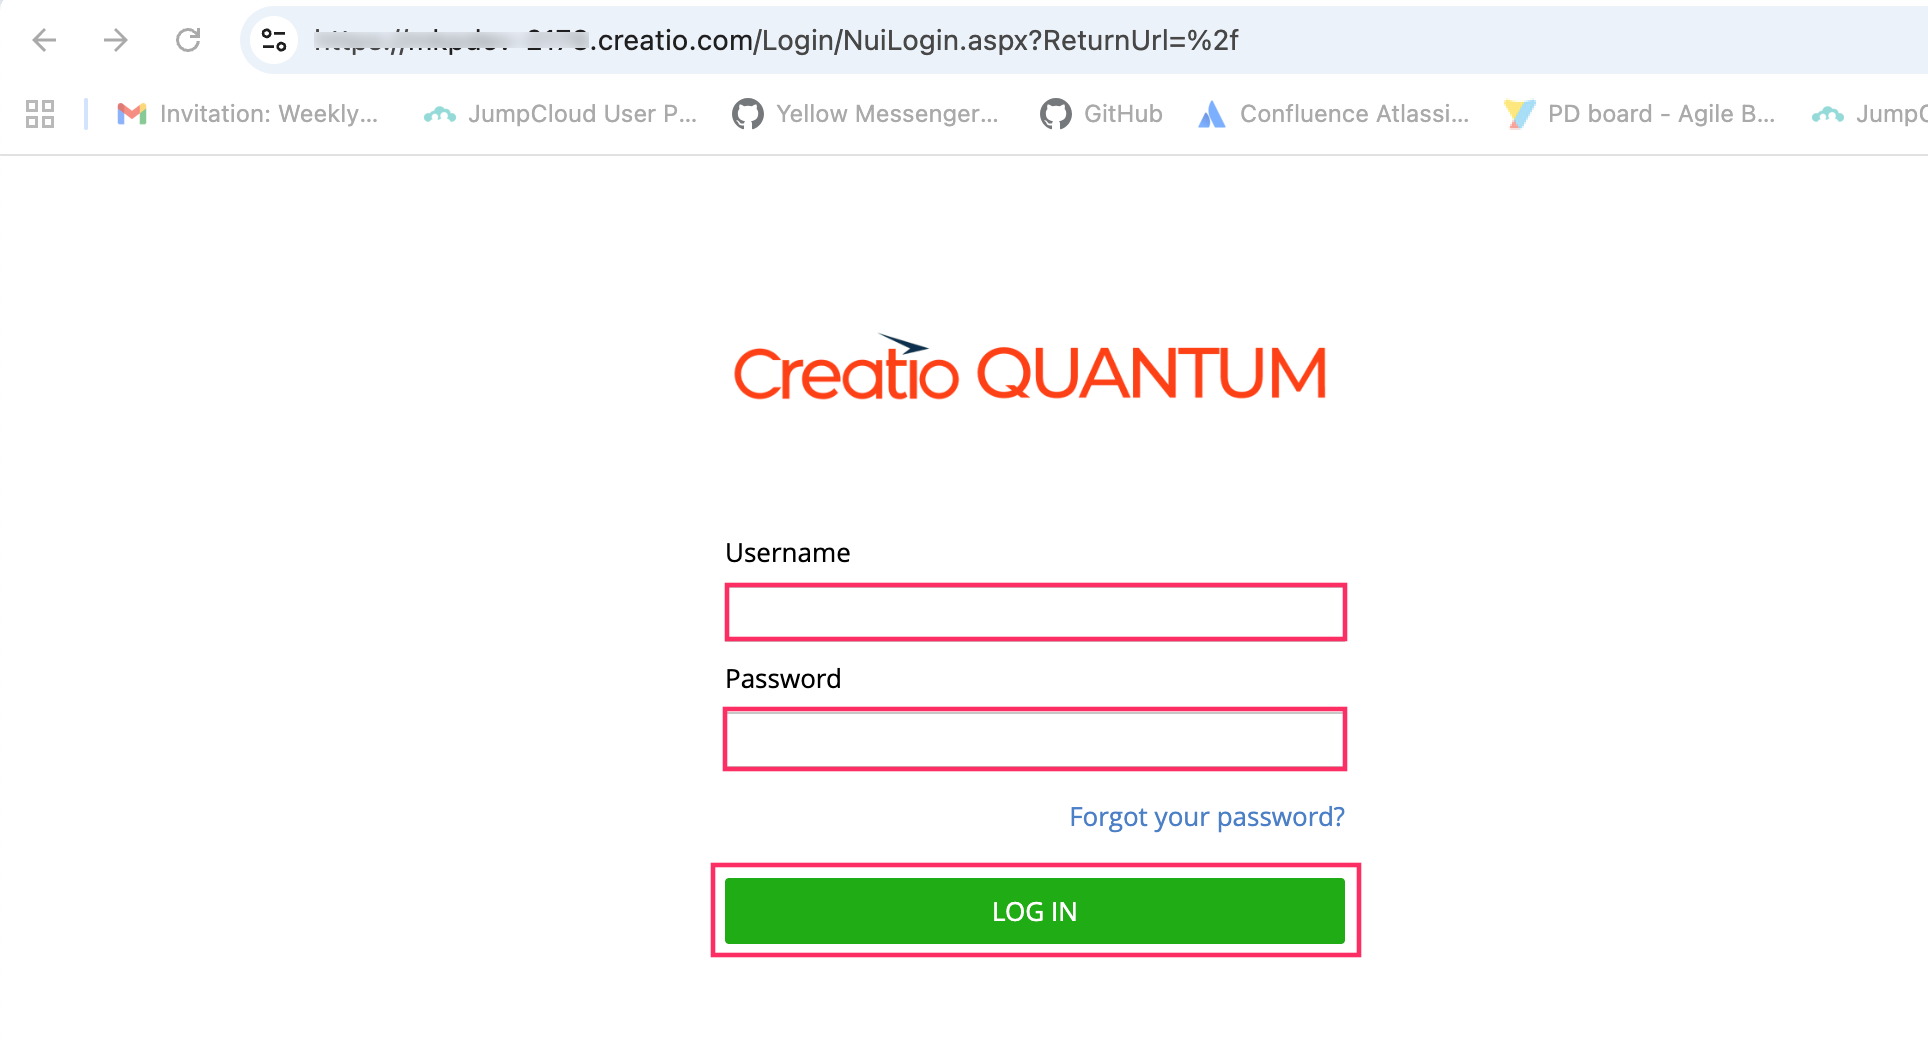
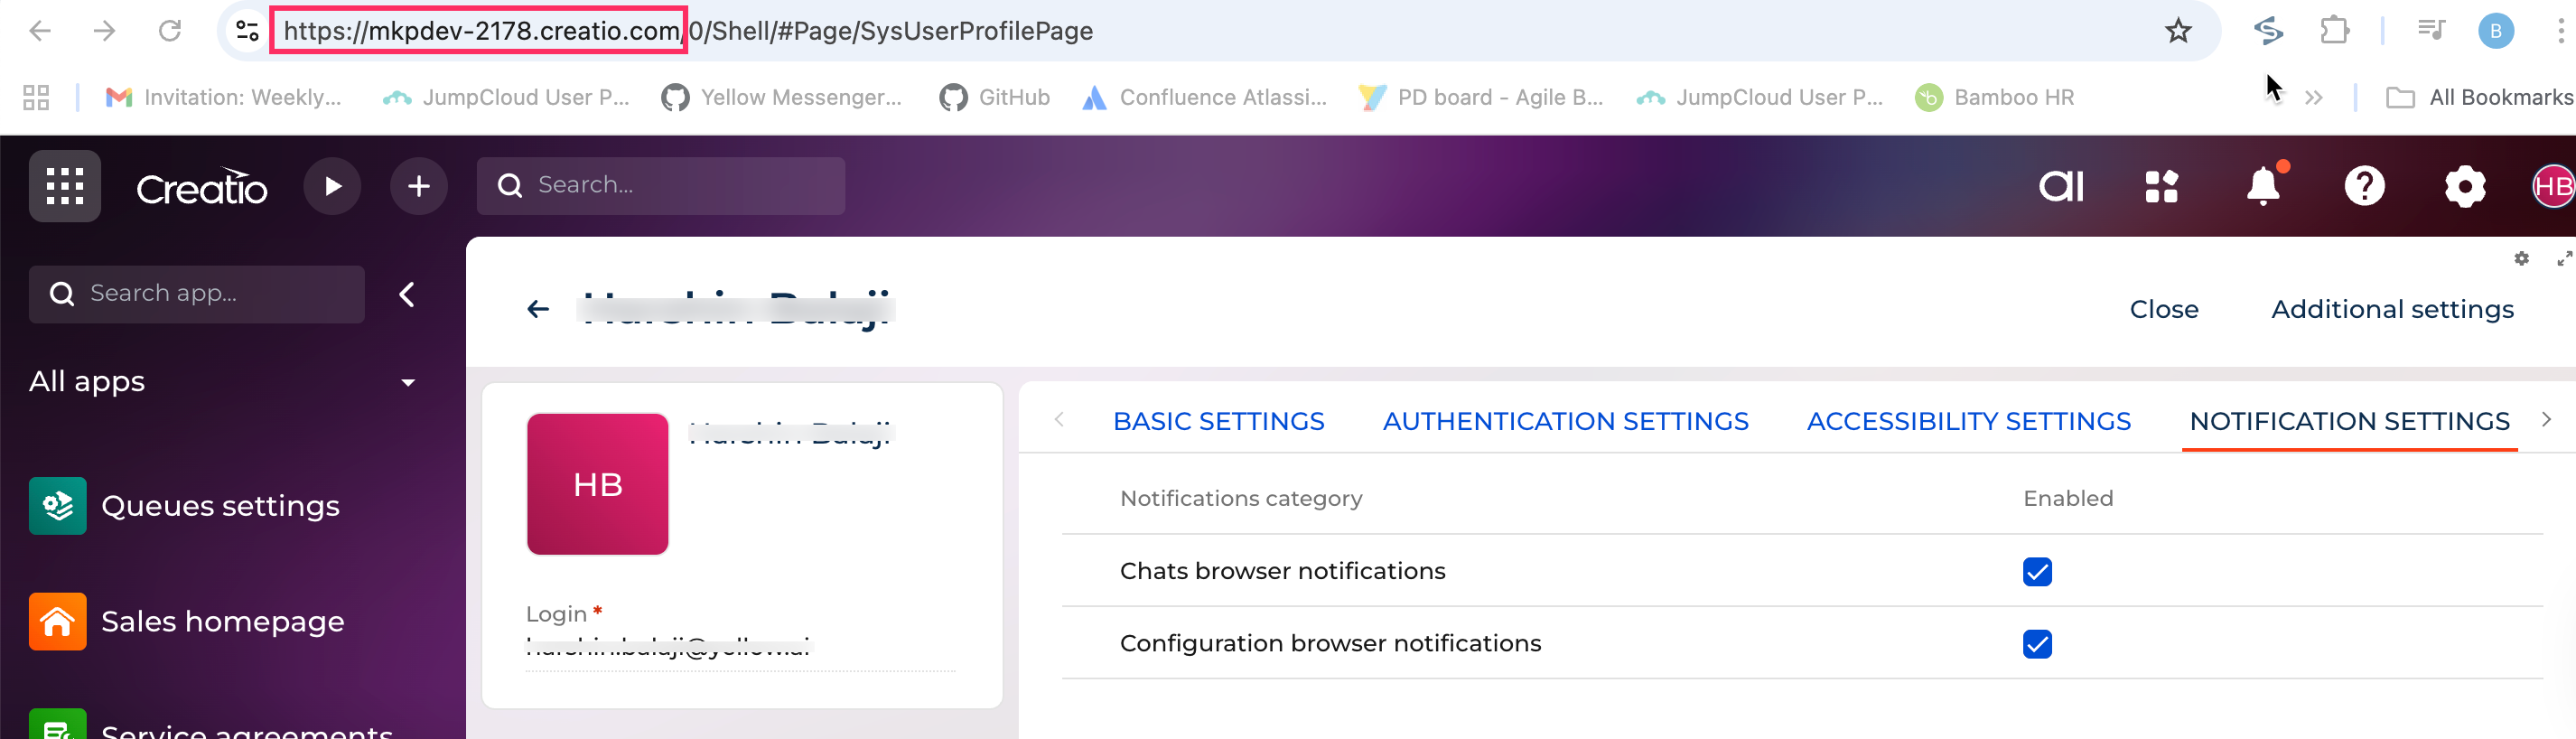
Log in to your Creatio account using your base URL. Sample format:
https://{baseURL}.creatio.com. Your login link may vary depending on the base URL assigned to your Creatio account. -
Enter your Username and Password, then click Login.
-
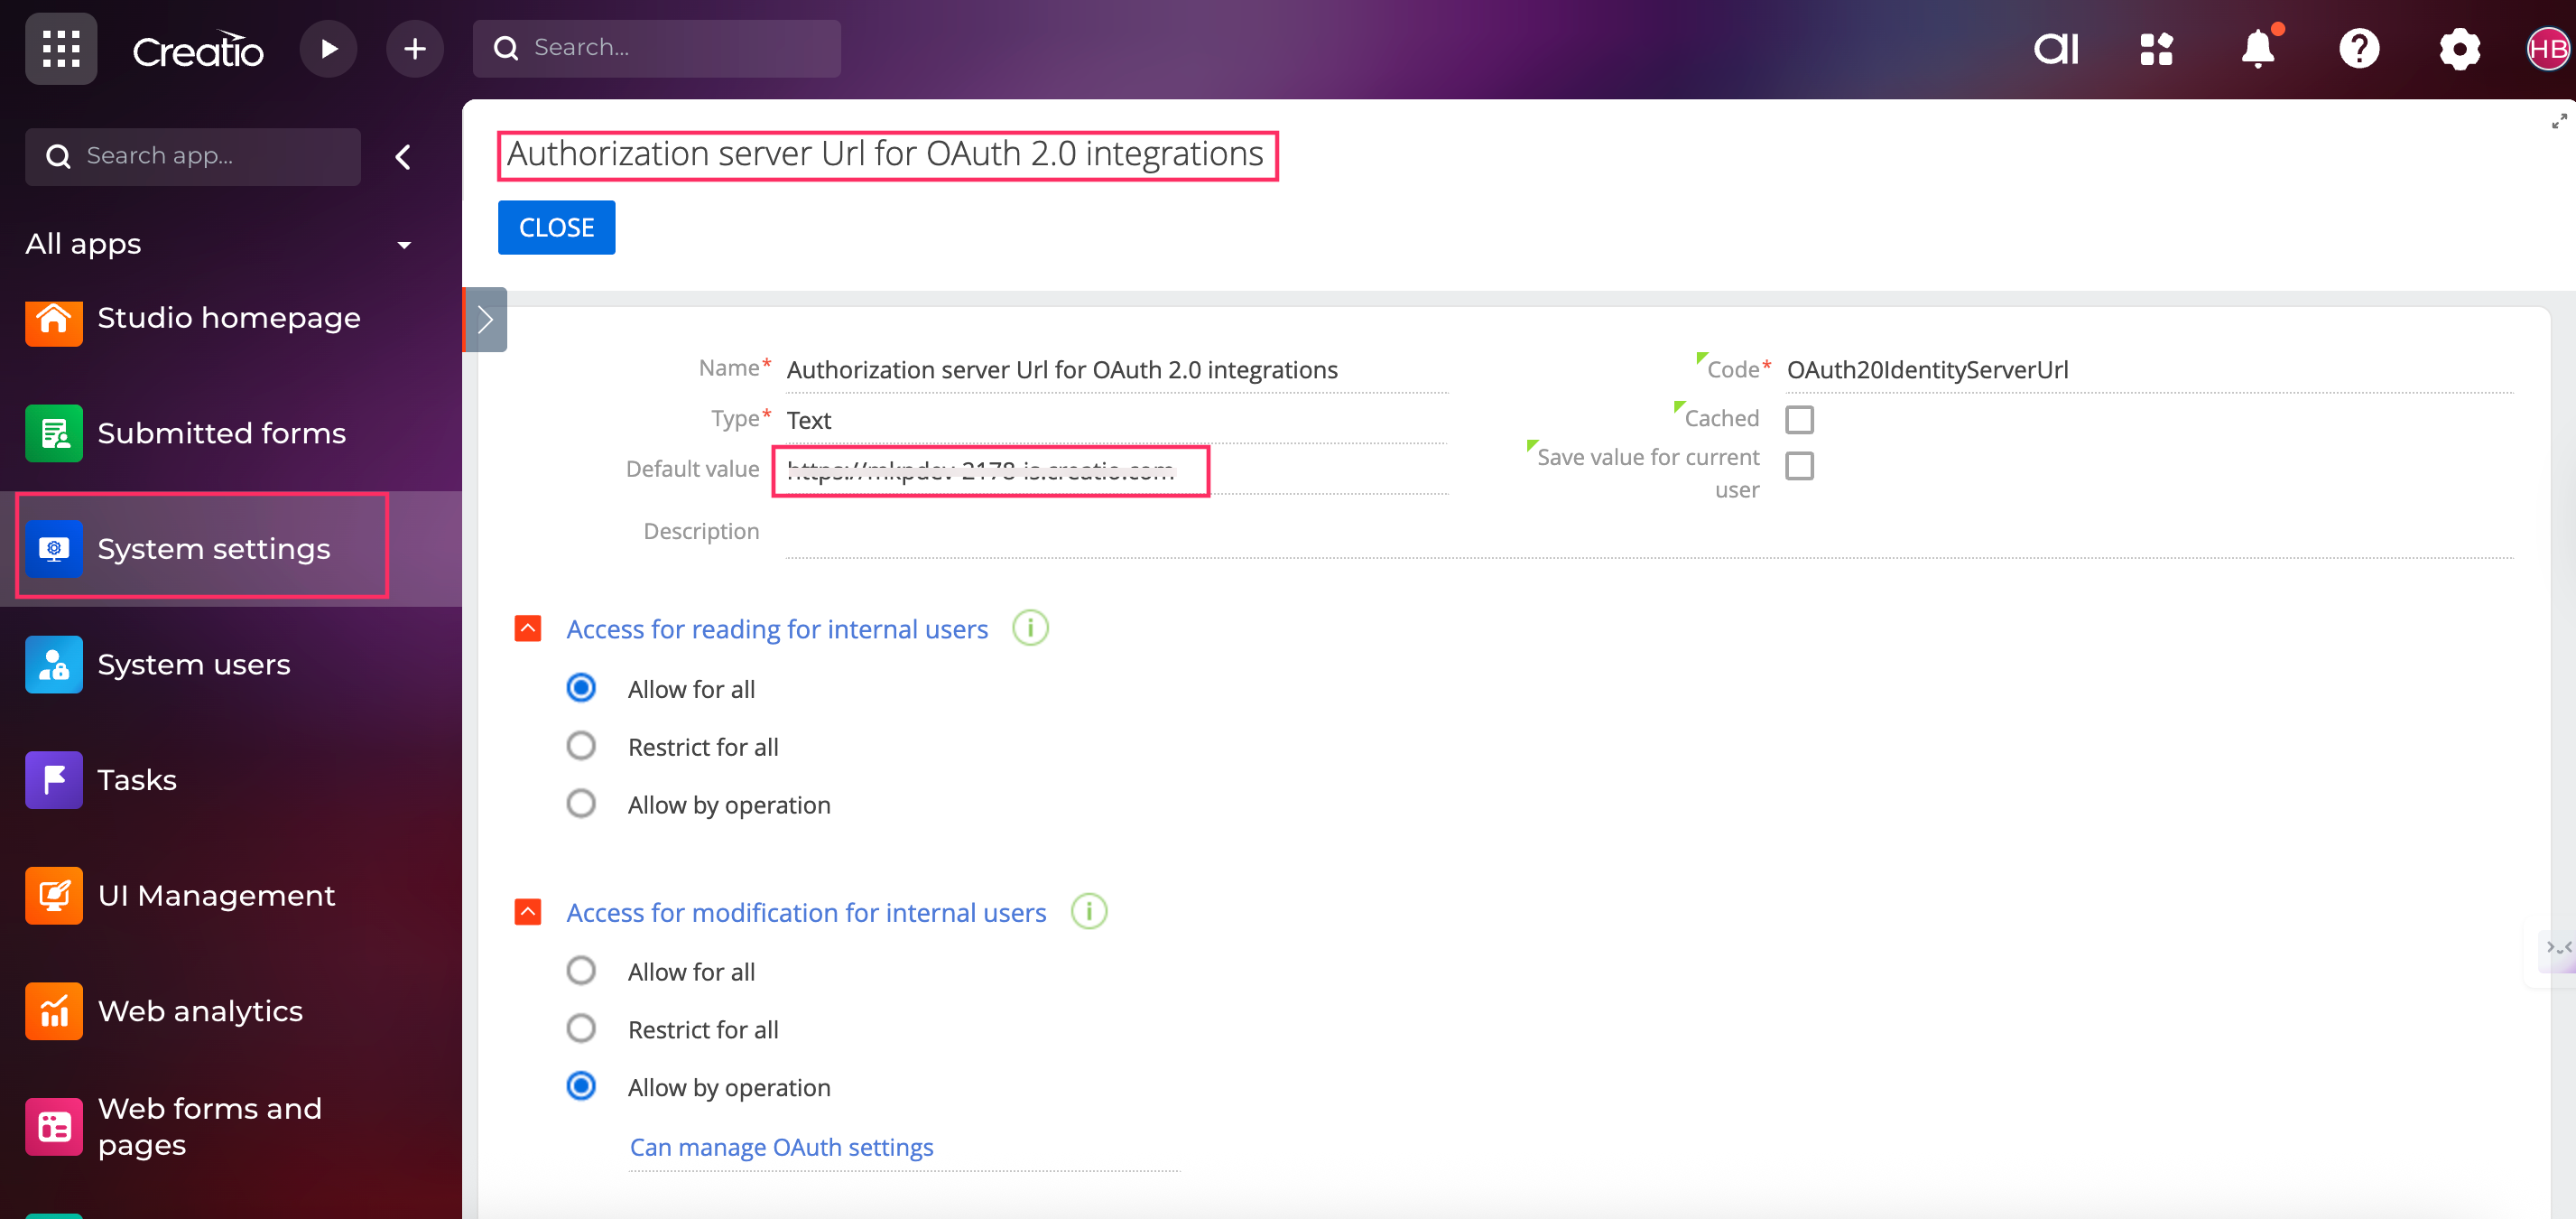
Go to System settings > Authorization server URL for OAuth 2.0 integrations > copy the Default value, which will be your Instance URL. For details, refer to the Creatio setup guide.
-
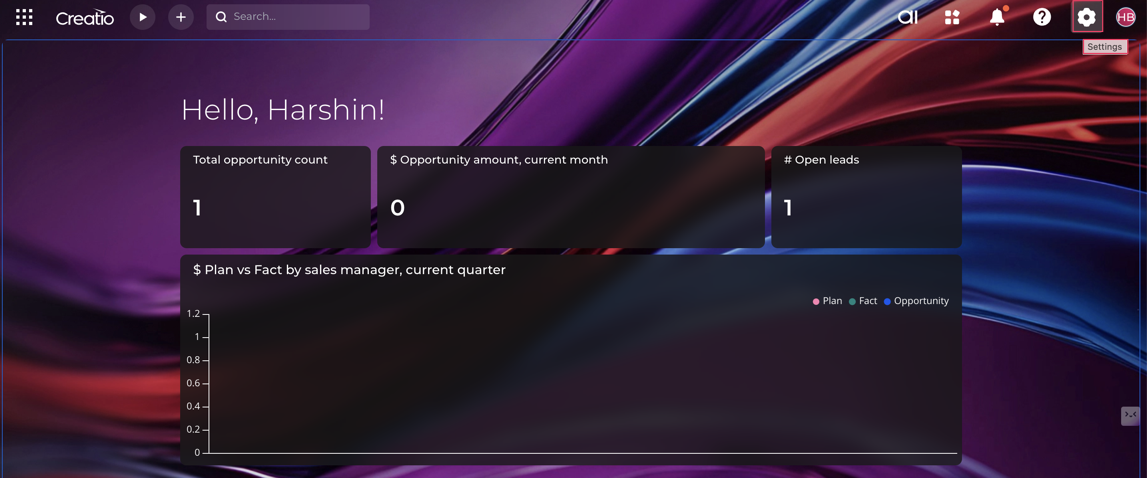
From the Creatio home page, go to Settings.
-
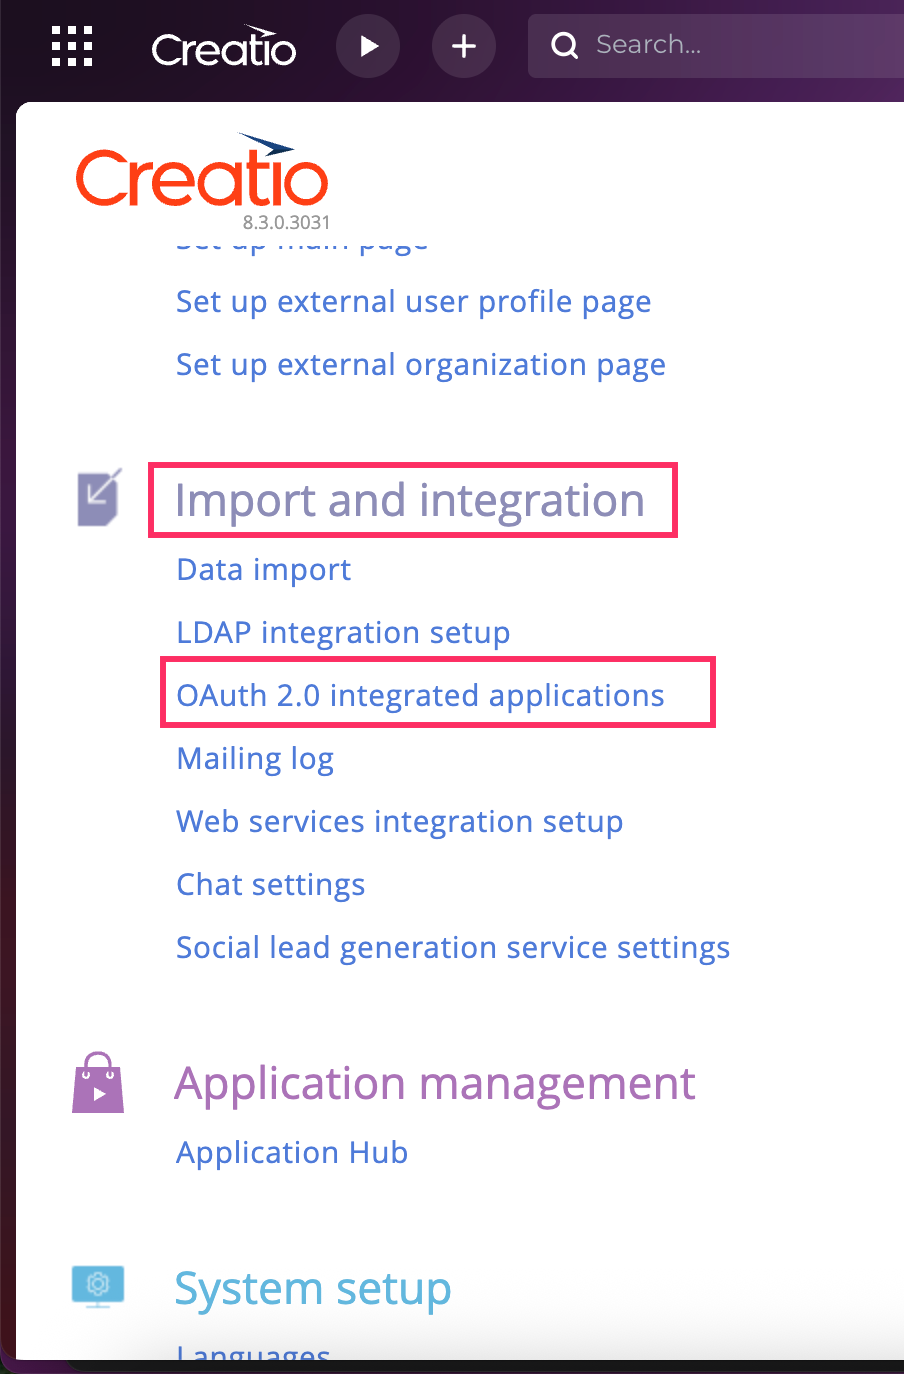
Under Import and integration, select OAuth 2.0 integrated applications.
-
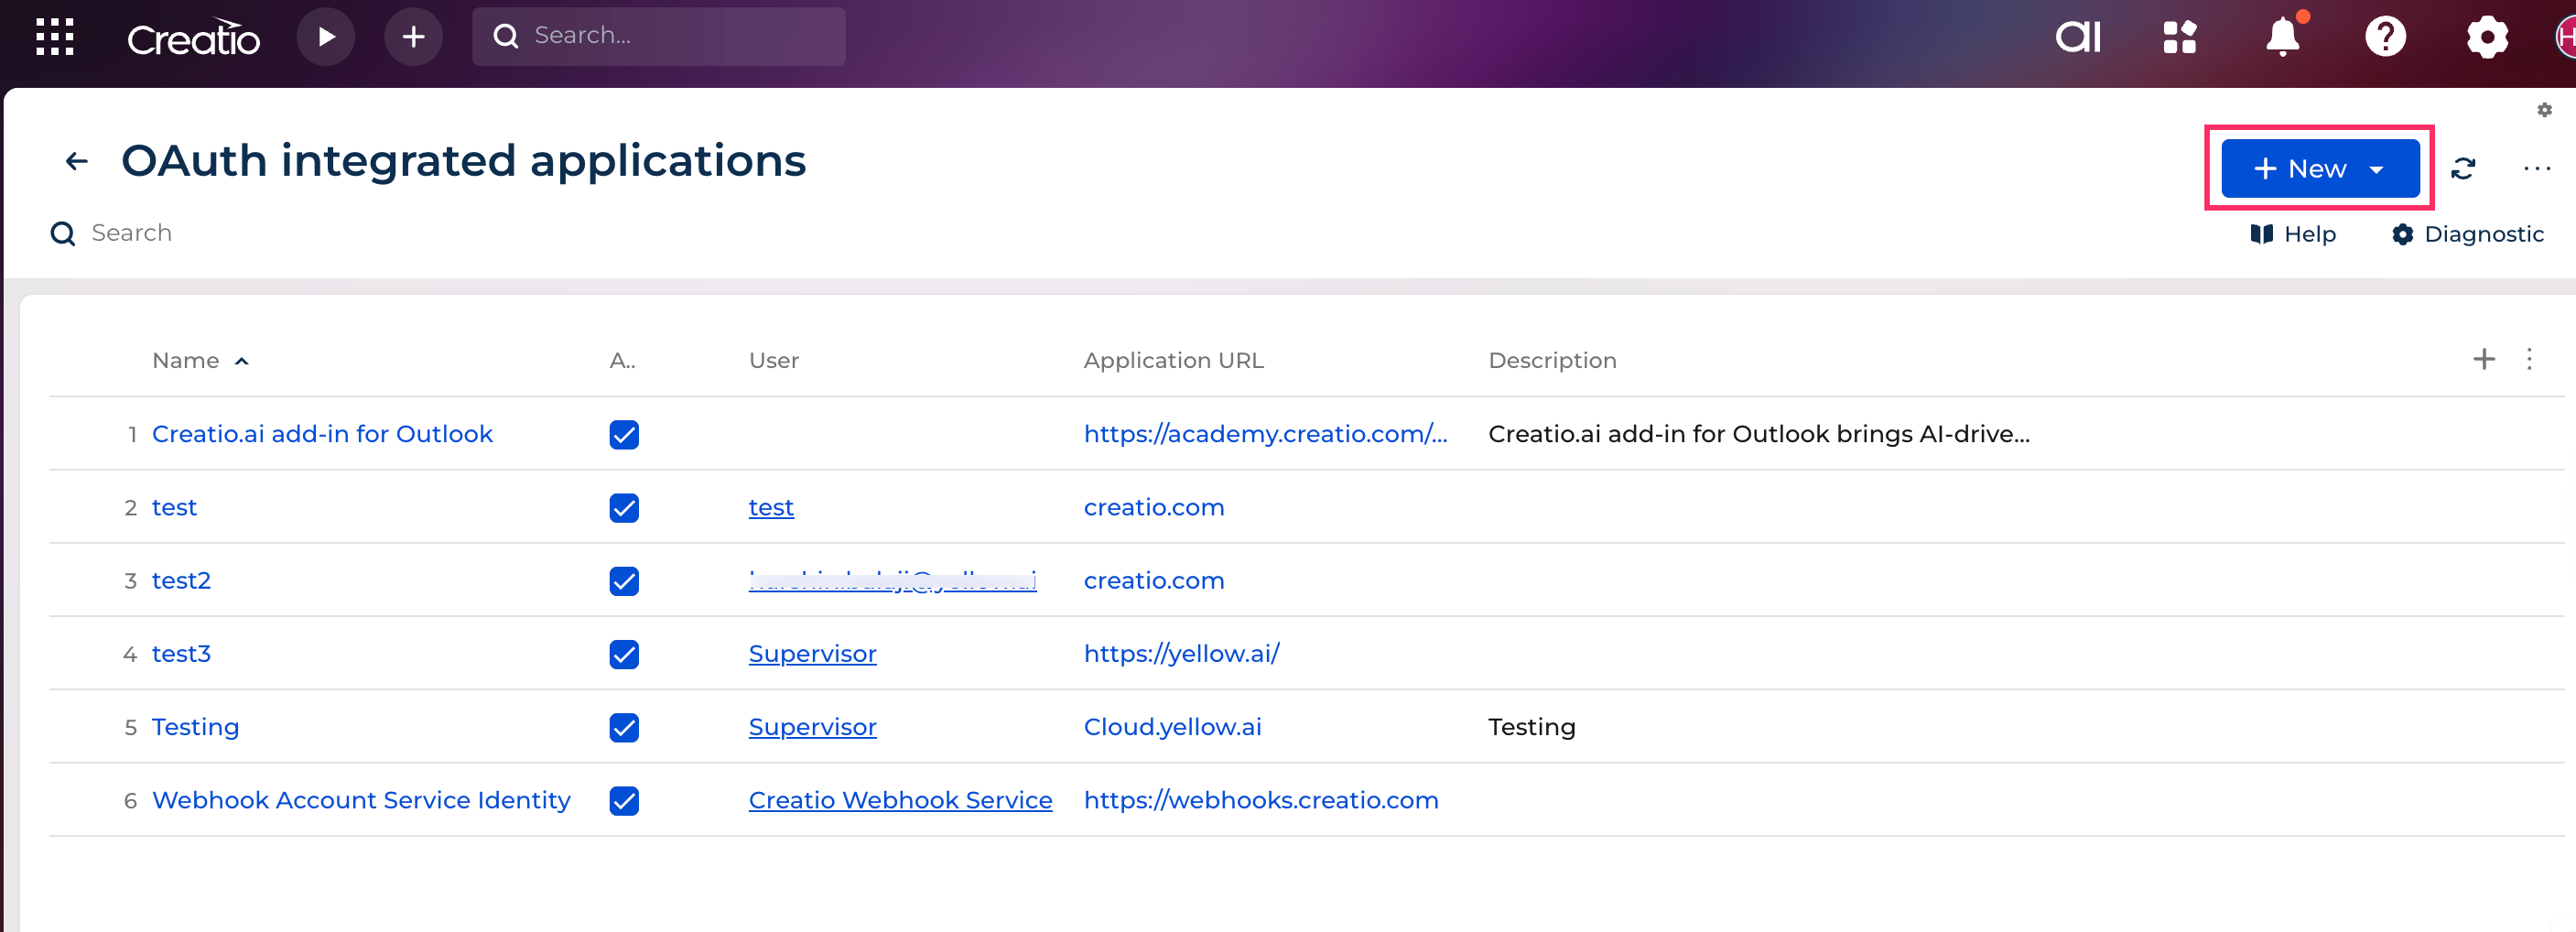
Cick + New to create a new application.
-
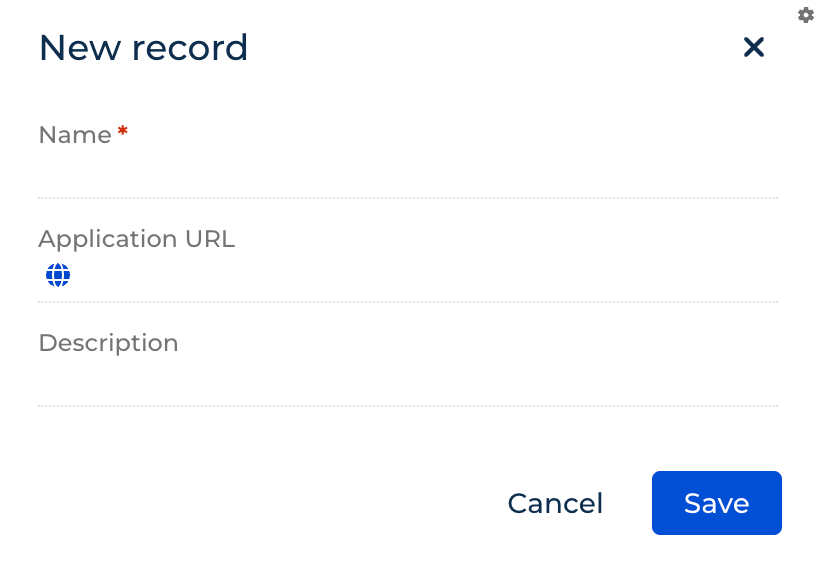
Enter the following details:
- Name: Provide a name for the application.
- Application URL: Enter your application URL (example, https://creatio.com/). Note that, this field is optional.
- Decription: Enter a description relevant to the use case.
-
Click Save.
-
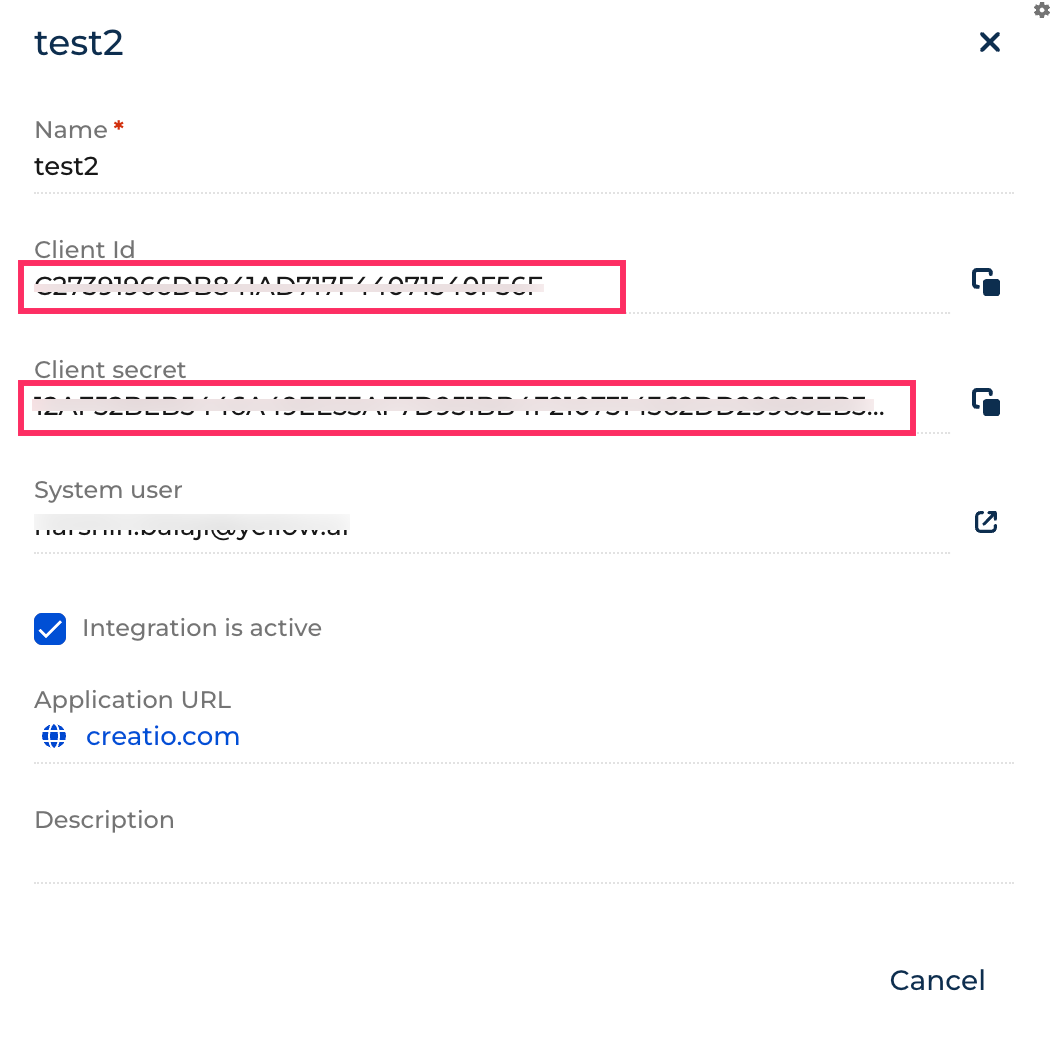
Open the application that you have created and copy the Client Id and Client secret.
-
From the Creatio application home page, copy the Creatio API Base URL.
Connect Creatio CRM with Yellow.ai
You need to add accounts only in the development or staging environment. You can access the connected accounts in the Live/Production environment.
To connect your Creatio CRM account with Yellow.ai, follow the these steps:
-
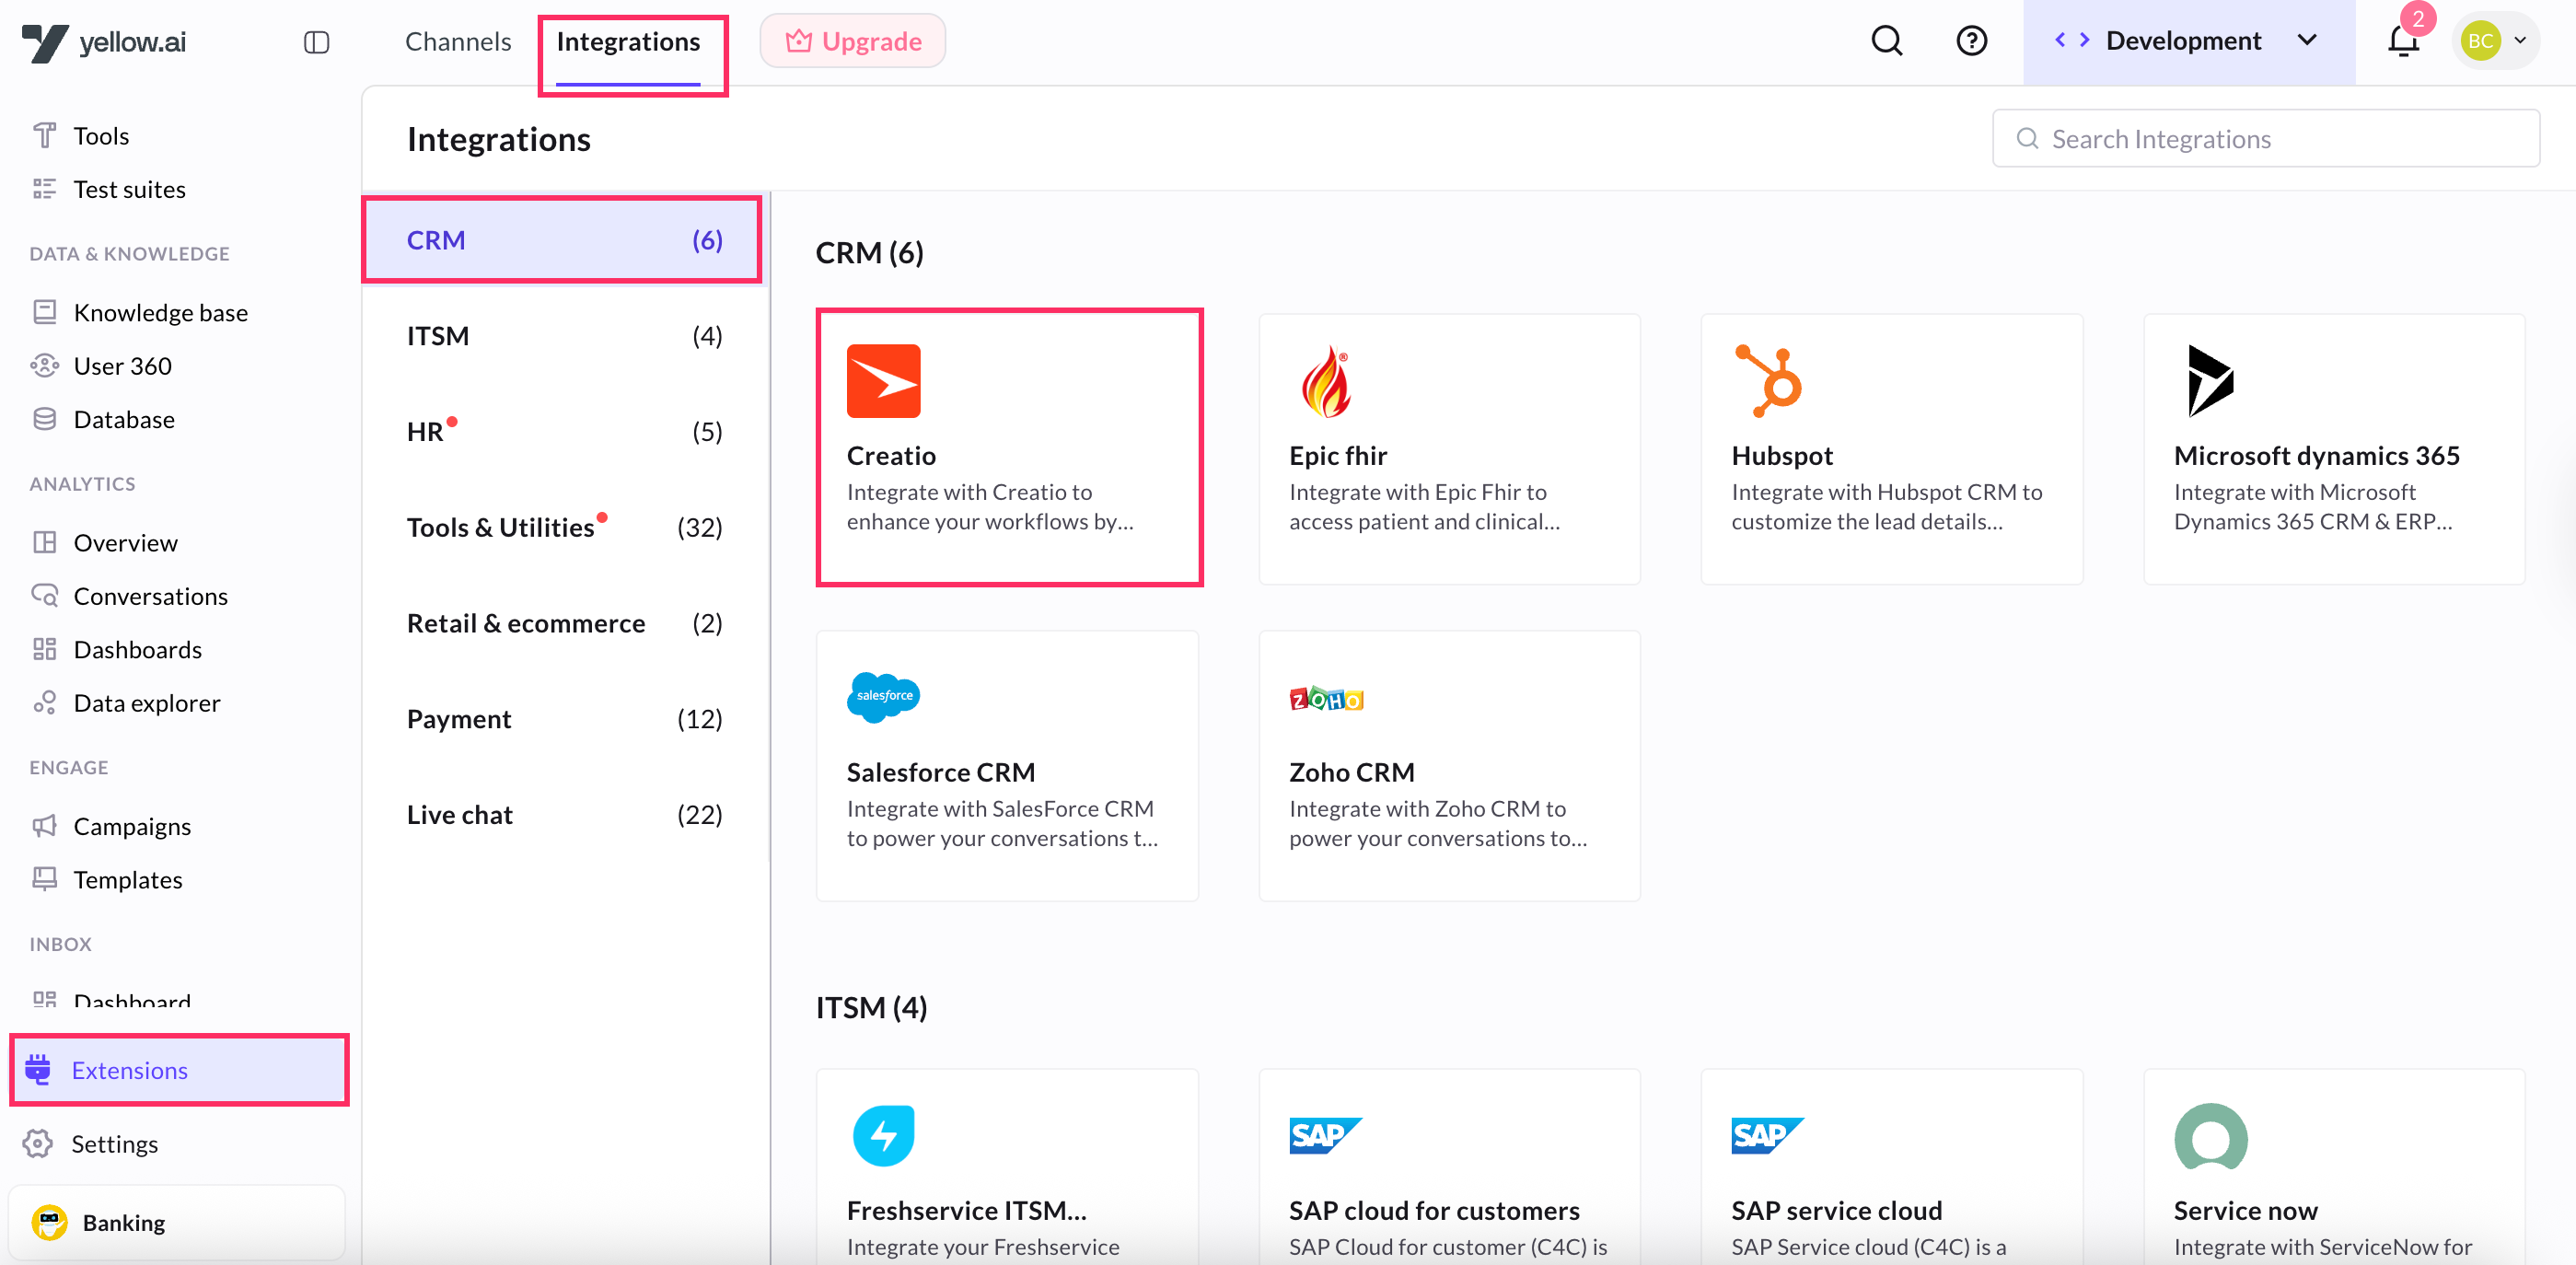
On the left navigation bar, go to Extensions > Integrations > CRM > Creatio. Alternatively, you can use the Search box to find the integration app.
- Under Give account name, provide a unique identifier. Only lowercase alphanumeric characters and underscores (
_) are allowed.
- Under Give account name, provide a unique identifier. Only lowercase alphanumeric characters and underscores (
-
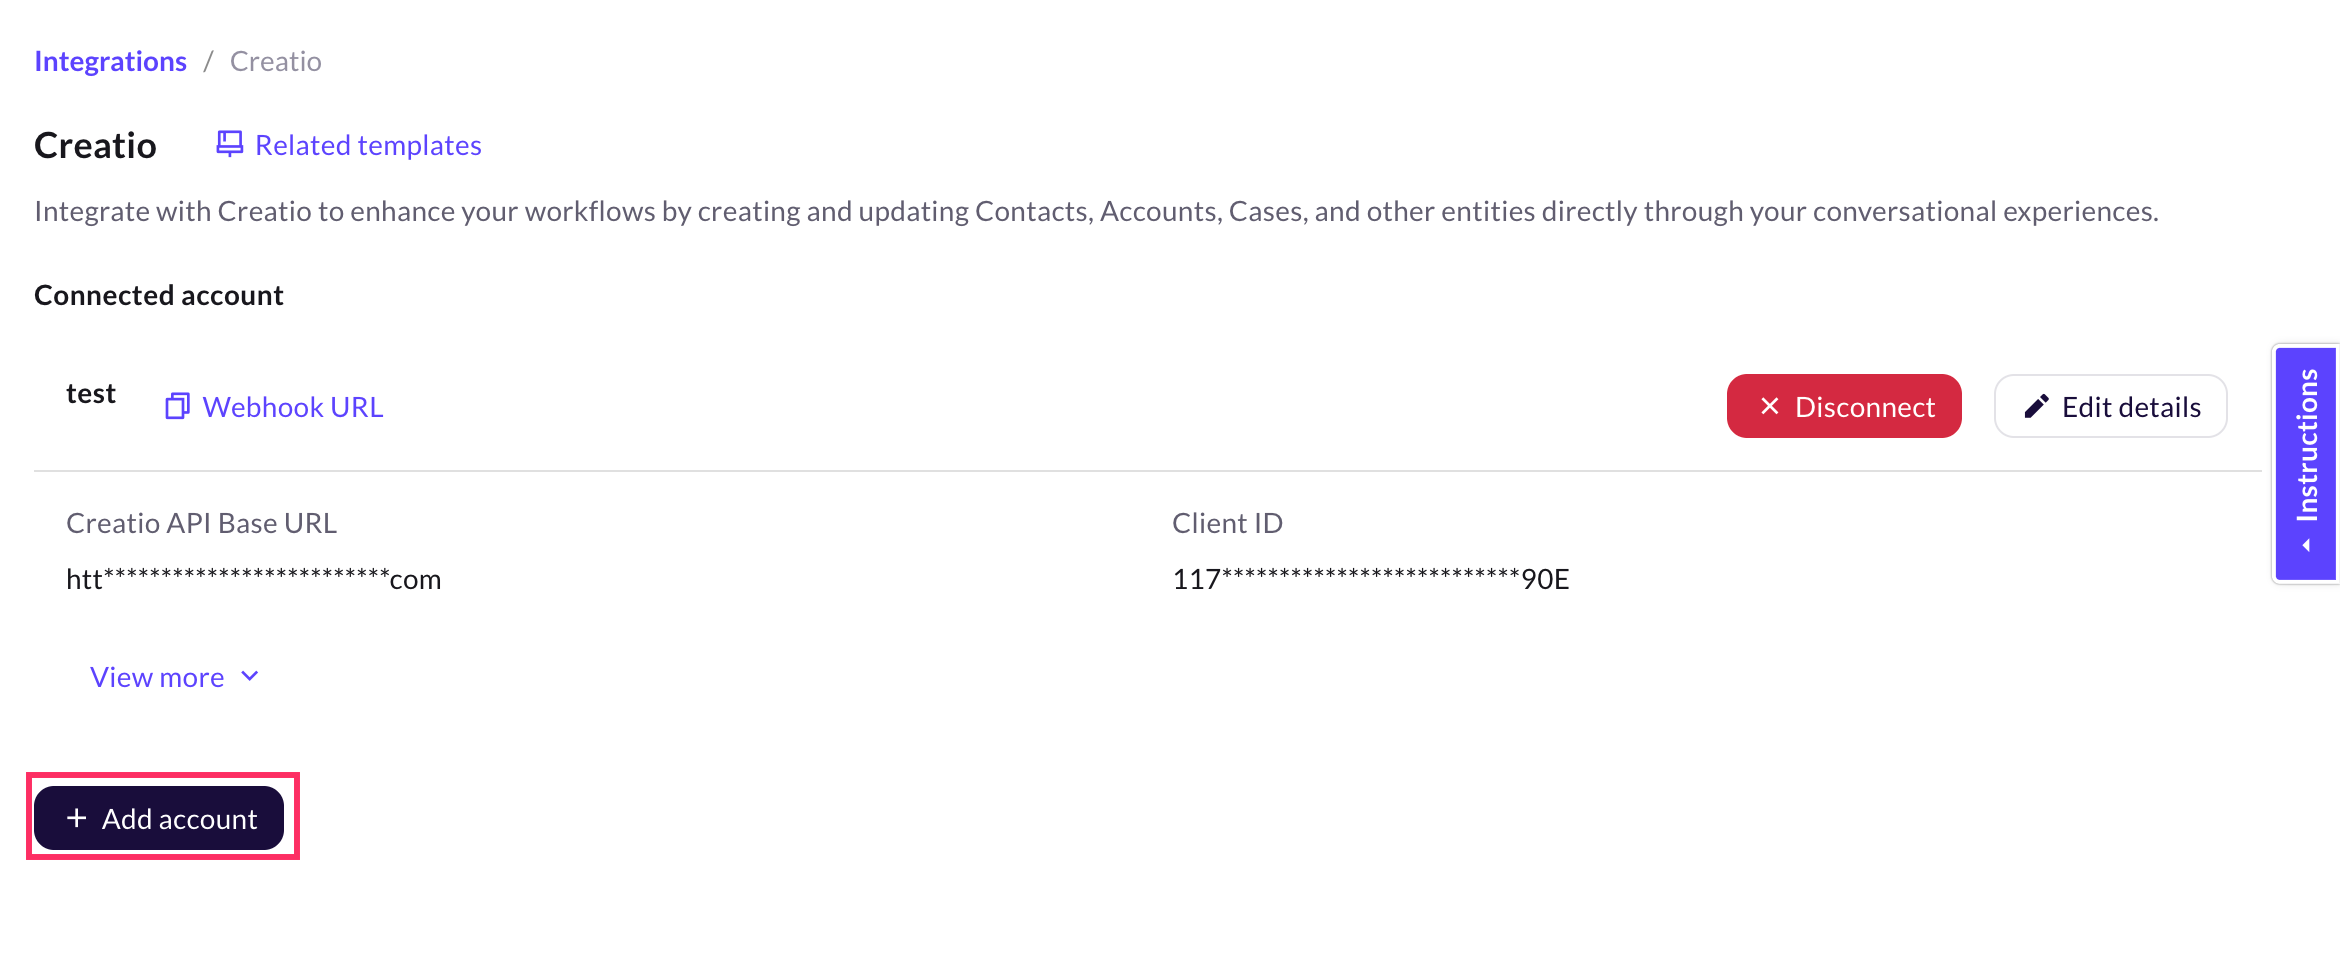
In Creatio API Base URL, paste the URL that you have copied in step 10 of Get configuration details from Creatio CRM account.
-
In Instance URL, paste the URL that you have copied from step 3 of Get configuration details from Creatio CRM account.

-
In Client ID and Client Secret, paste the values that you have copied in the step of Get configuration details from Creatio CRM account.
-
You can add up to 15 accounts. To add another Creatio CRM account, click on Add account and follow the steps mentioned above.
Manage Creatio action in AI agent conversation
You can perform these Creatio actions directly from AI agent conversations
Create user details
To create a contact in your Creatio account, follow these steps:
-
Go to Automation and create a flow based on your requirement.
-
At the point in the flow where you want the AI agnet to interact with Creatio CRM, add the Creatio CRM node. For that, drag the node connector, go to Integrations > Creatio.
-
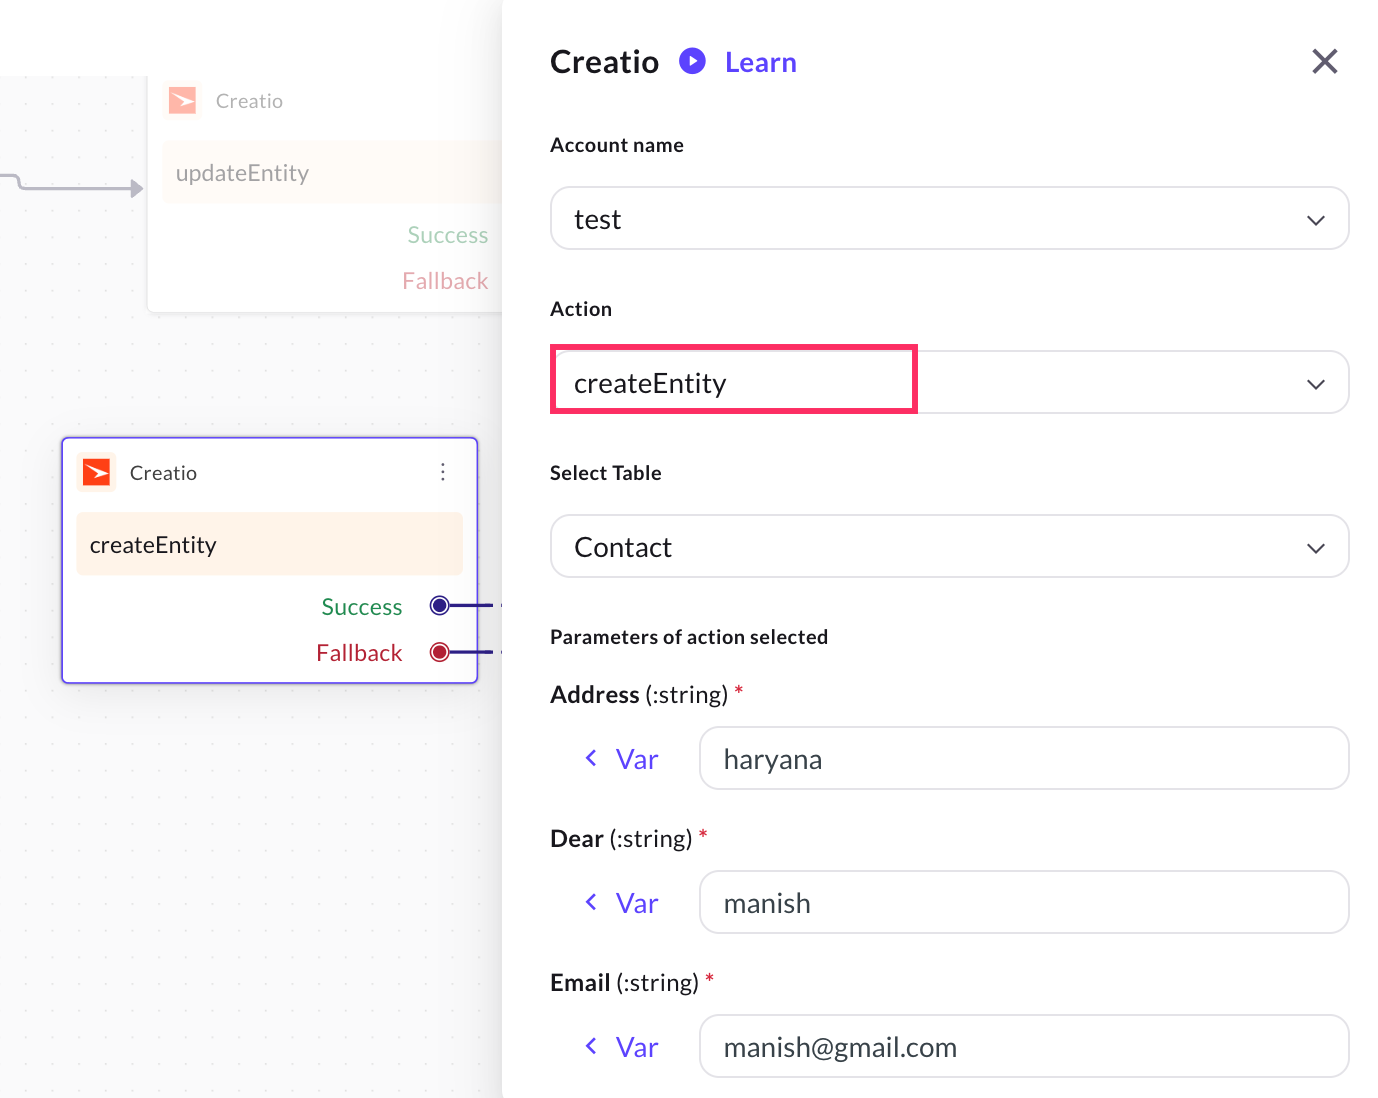
Click the node to view the drop-down with supported actions. Select createEntity.
-
Select the table you want to create. Based on your selection, all fields related to that table will be displayed.
-
Provide the details for all the required field.
Sample response
{
"@odata.context": "mkpdev-2178.creatio.com/0/odata/$metadata#Contact/$entity",
"Id": "0e7fec10-40cc-42ac-b408-ad6269320b04",
"Name": "manish",
"OwnerId": "410006e1-ca4e-4502-a9ec-e54d922d2c00",
"CreatedOn": "2025-09-16T08:57:17.2377089Z",
"CreatedById": "410006e1-ca4e-4502-a9ec-e54d922d2c00",
"ModifiedOn": "2025-09-16T08:57:17.2377089Z",
"ModifiedById": "410006e1-ca4e-4502-a9ec-e54d922d2c00",
"ProcessListeners": 0,
"Dear": "manish",
"SalutationTypeId": "00000000-0000-0000-0000-000000000000",
"GenderId": "00000000-0000-0000-0000-000000000000",
"AccountId": "00000000-0000-0000-0000-000000000000",
"DecisionRoleId": "00000000-0000-0000-0000-000000000000",
"TypeId": "00000000-0000-0000-0000-000000000000",
"JobId": "00000000-0000-0000-0000-000000000000",
"JobTitle": "test job",
"DepartmentId": "00000000-0000-0000-0000-000000000000",
"BirthDate": "0001-01-01T00:00:00Z",
"Phone": "8816988208",
"MobilePhone": "8816988208",
"HomePhone": "8819223456",
"Skype": "testskype",
"AddressTypeId": "00000000-0000-0000-0000-000000000000",
"Address": "haryana",
"CityId": "00000000-0000-0000-0000-000000000000",
"RegionId": "00000000-0000-0000-0000-000000000000",
"Zip": "127306",
"CountryId": "00000000-0000-0000-0000-000000000000",
"DoNotUseEmail": false,
"DoNotUseCall": false,
"DoNotUseFax": false,
"DoNotUseSms": false,
"DoNotUseMail": false,
"Notes": "notes test",
"Facebook": "manish sangwan",
"LinkedIn": "manishjum219",
"Twitter": "manishtwirte",
"FacebookId": "mansiFace",
"LinkedInId": "manishkumar219",
"TwitterId": "manis@twirtw",
"TwitterAFDAId": "00000000-0000-0000-0000-000000000000",
"FacebookAFDAId": "00000000-0000-0000-0000-000000000000",
"LinkedInAFDAId": "00000000-0000-0000-0000-000000000000",
"PhotoId": "00000000-0000-0000-0000-000000000000",
"GPSN": "dsfdsfsd",
"GPSE": "dfdsfdf",
"Surname": "sangwan",
"GivenName": "Test account ",
"MiddleName": "sang",
"Confirmed": true,
"Completeness": 0,
"LanguageId": "6ebc31fa-ee6c-48e9-81bf-8003ac03b019",
"Age": 0,
"IsEmailConfirmed": false,
"AdCampaignId": "00000000-0000-0000-0000-000000000000",
"CustomerNeedId": "00000000-0000-0000-0000-000000000000",
"ChannelId": "00000000-0000-0000-0000-000000000000",
"SourceId": "00000000-0000-0000-0000-000000000000",
"RegisterMethodId": "00000000-0000-0000-0000-000000000000",
"LeadConversionScore": 0,
"IsNonActualEmail": false,
}
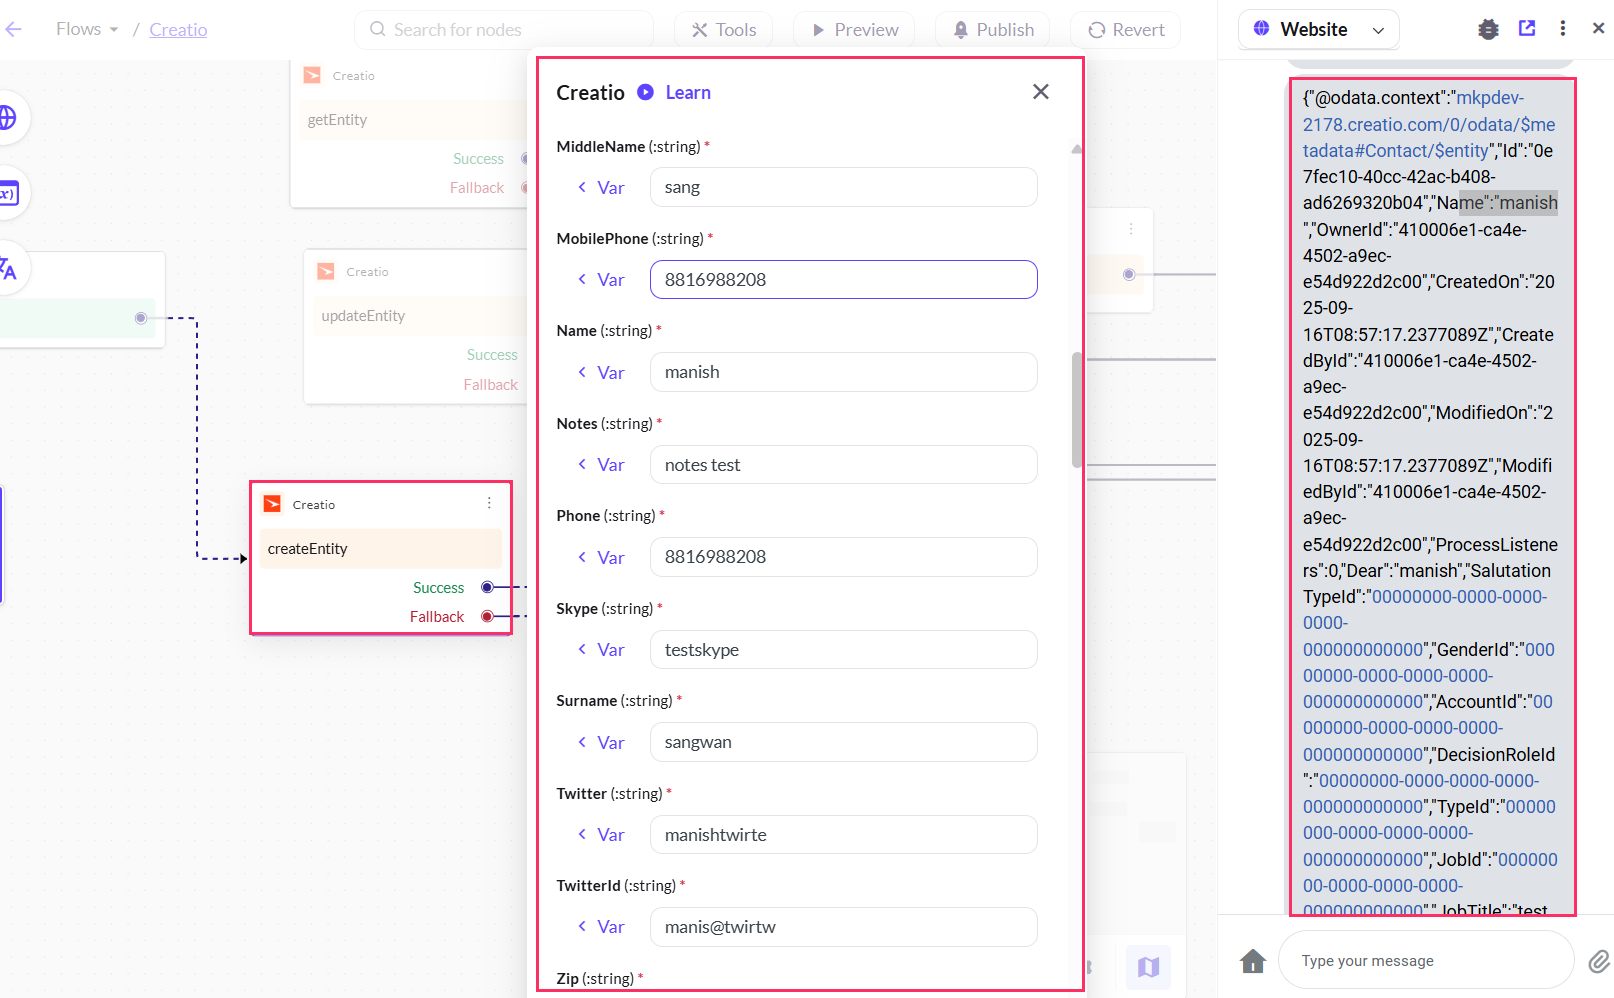
Below is a sample screenshot of how the response is generated when a new entity (contact) is created in your Creatio account:
Get user details
-
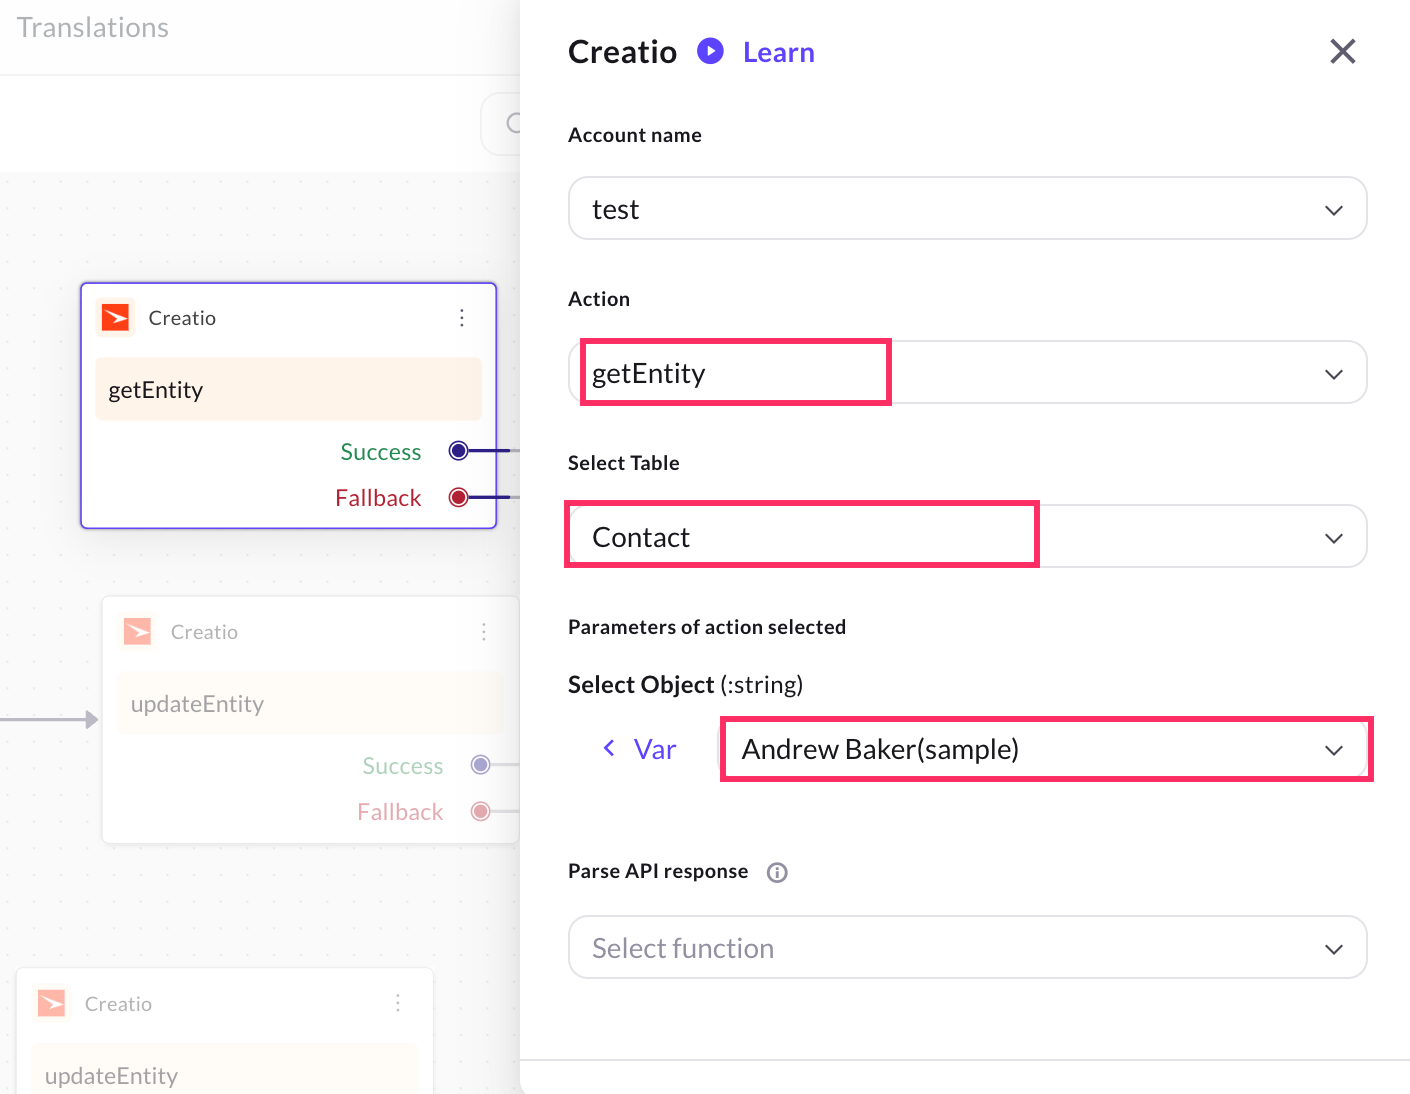
Select getEntity action.
-
Select the table from which you want to get the user details.
- Once the table is selected, the fields will automatically display all the entities of that table in a dropdown. You can then directly select the entity for which you want to fetch the details.
- Store response of the user in the variable of type object.
Sample resposne
{
  "@odata.context": "mkpdev-2178.creatio.com/0/odata/$metadata#Contact/$entity",
  "Id": "be5b2bf3-f859-4e0a-9644-e41a59774068",
  "Name": "Dwij jindal",
  "OwnerId": "410006e1-ca4e-4502-a9ec-e54d922d2c00",
  "CreatedOn": "2025-07-10T06:47:09.198782Z",
  "CreatedById": "410006e1-ca4e-4502-a9ec-e54d922d2c00",
  "ModifiedOn": "2025-07-10T06:47:09.198782Z",
  "ModifiedById": "410006e1-ca4e-4502-a9ec-e54d922d2c00",
  "ProcessListeners": 0,
  "Dear": "",
  "SalutationTypeId": "00000000-0000-0000-0000-000000000000",
  "GenderId": "00000000-0000-0000-0000-000000000000",
  "AccountId": "00000000-0000-0000-0000-000000000000",
  "DecisionRoleId": "00000000-0000-0000-0000-000000000000",
  "TypeId": "00000000-0000-0000-0000-000000000000",
  "JobId": "00000000-0000-0000-0000-000000000000",
  "JobTitle": "",
  "DepartmentId": "00000000-0000-0000-0000-000000000000",
  "BirthDate": "0001-01-01T00:00:00Z",
  "Phone": "",
  "MobilePhone": "+919876546497",
  "HomePhone": "",
  "Skype": "",
  "Email": "[email protected]",
  "AddressTypeId": "00000000-0000-0000-0000-000000000000",
  "Address": "",
  "CityId": "00000000-0000-0000-0000-000000000000",
  "RegionId": "00000000-0000-0000-0000-000000000000",
  "Zip": "",
  "CountryId": "00000000-0000-0000-0000-000000000000",
  "DoNotUseEmail": false,
  "DoNotUseCall": false,
  "DoNotUseFax": false,
  "DoNotUseSms": false,
  "DoNotUseMail": false,
  "Notes": "",
  "Facebook": "",
  "LinkedIn": "",
  "Twitter": "",
  "FacebookId": "",
  "LinkedInId": "",
  "TwitterId": "",
  "TwitterAFDAId": "00000000-0000-0000-0000-000000000000",
  "FacebookAFDAId": "00000000-0000-0000-0000-000000000000",
  "LinkedInAFDAId": "00000000-0000-0000-0000-000000000000",
  "PhotoId": "00000000-0000-0000-0000-000000000000",
  "GPSN": "",
  "GPSE": "",
  "Surname": "jindal",
  "GivenName": "Dwij",
  "MiddleName": "",
  "Confirmed": true,
  "Completeness": 0,
  "LanguageId": "6ebc31fa-ee6c-48e9-81bf-8003ac03b019",
  "Age": 0,
  "IsEmailConfirmed": false,
  "AdCampaignId": "00000000-0000-0000-0000-000000000000",
  "CustomerNeedId": "00000000-0000-0000-0000-000000000000",
  "ChannelId": "00000000-0000-0000-0000-000000000000",
  "SourceId": "00000000-0000-0000-0000-000000000000",
  "RegisterMethodId": "00000000-0000-0000-0000-000000000000",
  "LeadConversionScore": 0,
  "IsNonActualEmail": false,
  "[email protected]": "Contact(be5b2bf3-f859-4e0a-9644-e41a59774068)/ContactPhoto",
  "[email protected]": "Contact(be5b2bf3-f859-4e0a-9644-e41a59774068)/ContactPhoto",
  "[email protected]": "application/octet-stream"
}
Below is a sample screenshot of how the user details is fetched from your Creatio account:
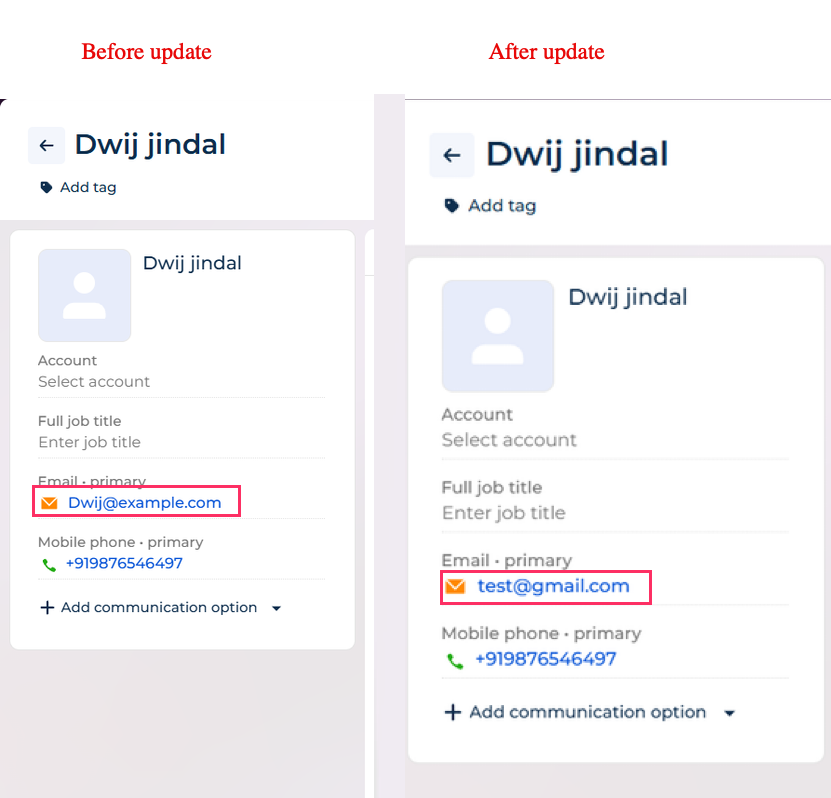
Update user details
-
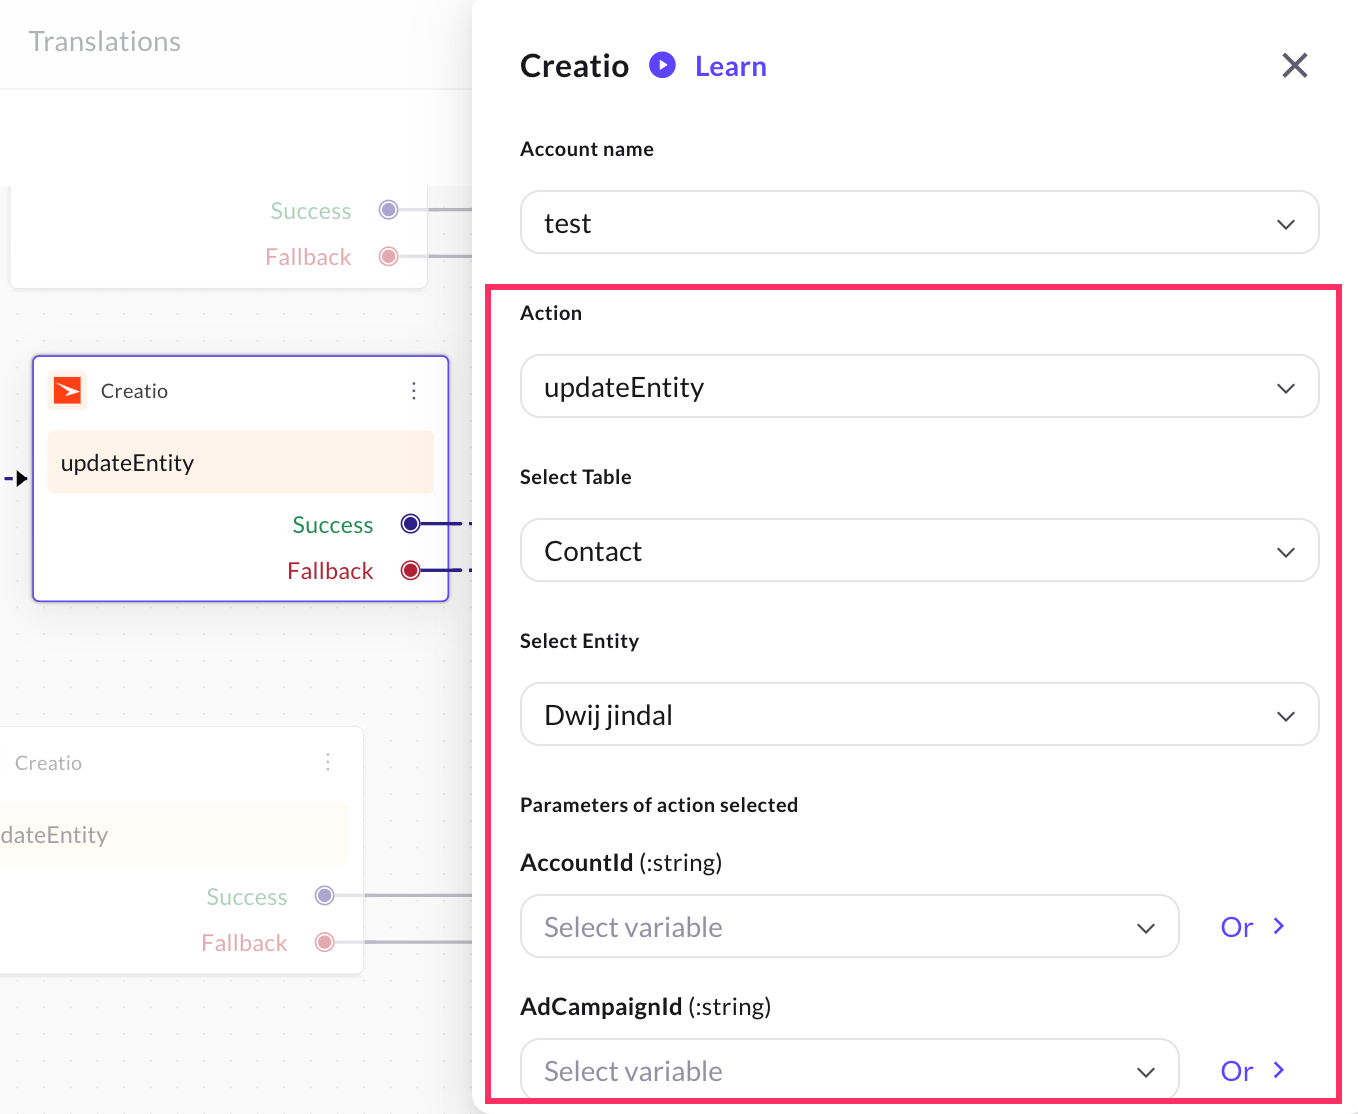
Select updateEntity action.
-
Select the table from which you want to update the user details.
- Once the table is selected, the Select Object field will automatically display all the entities of that table in a dropdown. You can then directly select the entity for which you want to update the details.
- Select the respective field for which you want to update the data. For example, user email.
Sample response
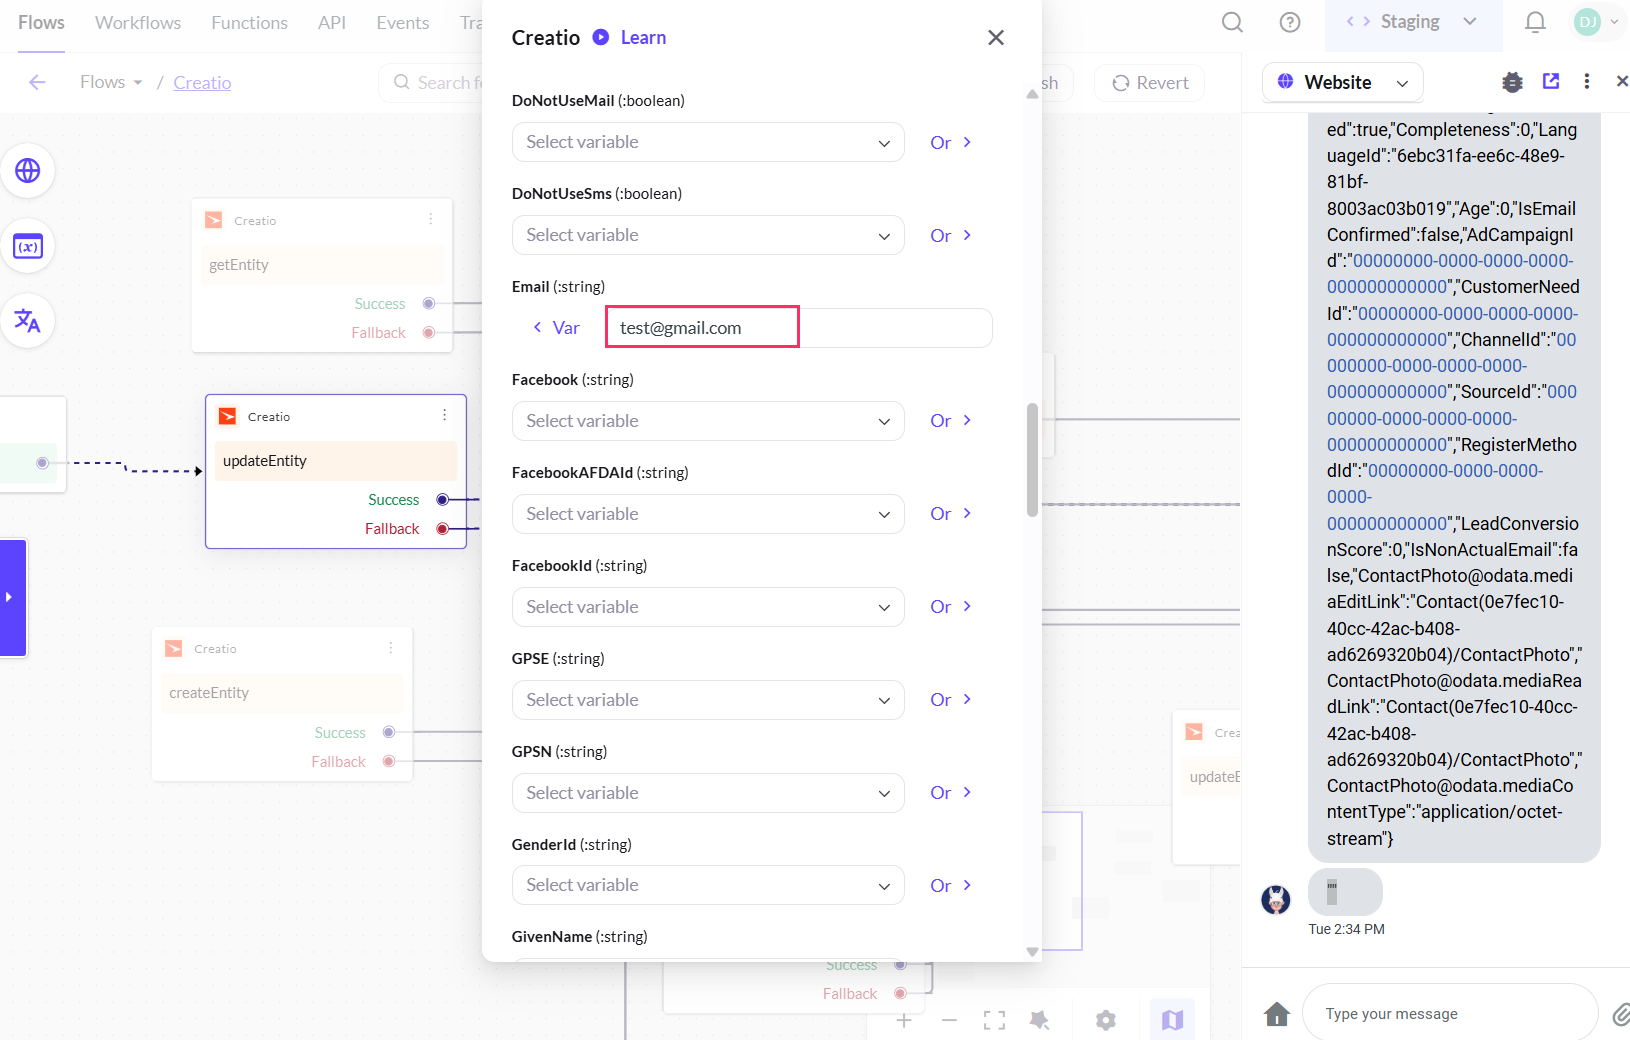
Below is a sample screenshot of how the user details is updated: