Email ticketing configuration
Yellow.ai's Inbox Email ticketing is a widely used approach that enables businesses and organizations to effectively handle customer inquiries, complaints, and support requests. It offers several use cases, including customer support, sales inquiries, IT support, bug reports, and complaints and feedback management. These applications allow companies to efficiently track the status of requests and provide timely updates to customers, employees, and users.
Email settings must be enabled to handle support emails in the Inbox tickets module.
Prerequisites to no-code email ticketing
- Create an email channel(email ID)
- Link email channel to Inbox (with forwarding address)
- Enable email ticketing from settings
Click here for details.
Follow the below steps to configure email settings:
-
Open Settings > Inbox.
-
Search and select Email settings.

-
Select Support email. Enabling the support email option means that all incoming emails will be forwarded to the yellow.ai Inbox instead of the actual mailbox, where they will be automatically converted into support tickets.

-
Add Acknowledgement email for new tickets. This allows an acknowledgement email to be automatically sent to the customer when a new support ticket is created in the inbox, while the inbox agent takes up the ticket to resolve the customer's query. This practice is widely used in the support ticketing industry. You can choose to not send an acknowledgement email by selecting the Do not send acknowledgement email option.

-
Add details and write the Acknowledgement email.
- Subject : Add
{{userSubject}}to reply to the same mail or you can type a new subject to send the acknowledgement as a new email instead of a reply. - Acknowledgement message: You can make use of the options available on the response screen (explained here) and type a message. You can also use dynamic variables in the message, commonly used variables such as Ticket ID, User subject and User name can be included by clicking Add next to the name in ticket details.

- Click Save.
- Subject : Add
Sample acknowledgement emails
Dear [User Name],
Thank you for contacting us regarding [Email Subject]. We have received your support request and a ticket has been created with the ID [Ticket ID]. Our support team will review your request and get back to you as soon as possible.
Best regards,
[Your Company]
Hello [User Name],
Thank you for reaching out to us with your question about [Email Subject]. This email is to confirm that your message has been received and a ticket with ID [Ticket ID] has been created. We will investigate your issue and get back to you shortly with a resolution.
Best,
[Your Company]
Hi [User Name],
Thank you for your email about [Email Subject]. We appreciate your business and want to assure you that we have received your message. Your support request has been assigned a ticket with the ID [Ticket ID], and one of our support agents will follow up with you soon.
Best regards,
[Your Company]
Dear [User Name],
Thank you for contacting our support team with your question about [Email Subject]. We want to assure you that your support request has been received and assigned a ticket with the ID [Ticket ID]. We will investigate your issue and provide a prompt response as soon as possible.
Best,
[Your Company]
Blocked senders
Stop unwanted inbound email before it becomes work. Emails from a blocked address are discarded on arrival — no ticket is created, and nothing reaches your agents. Use it for automated noise such as bounce notifications, mailing lists, or a mailer that repeatedly opens tickets.
Blocking applies to inbound email whether or not Support email is enabled, so it stays in effect even if you turn off no-code email ticketing.
Add a blocked sender
- Open Settings > Inbox.
- Search and select Email settings.
- Scroll to Blocked senders.
- Enter an email address or pattern, for example
[email protected]. - Click Add.
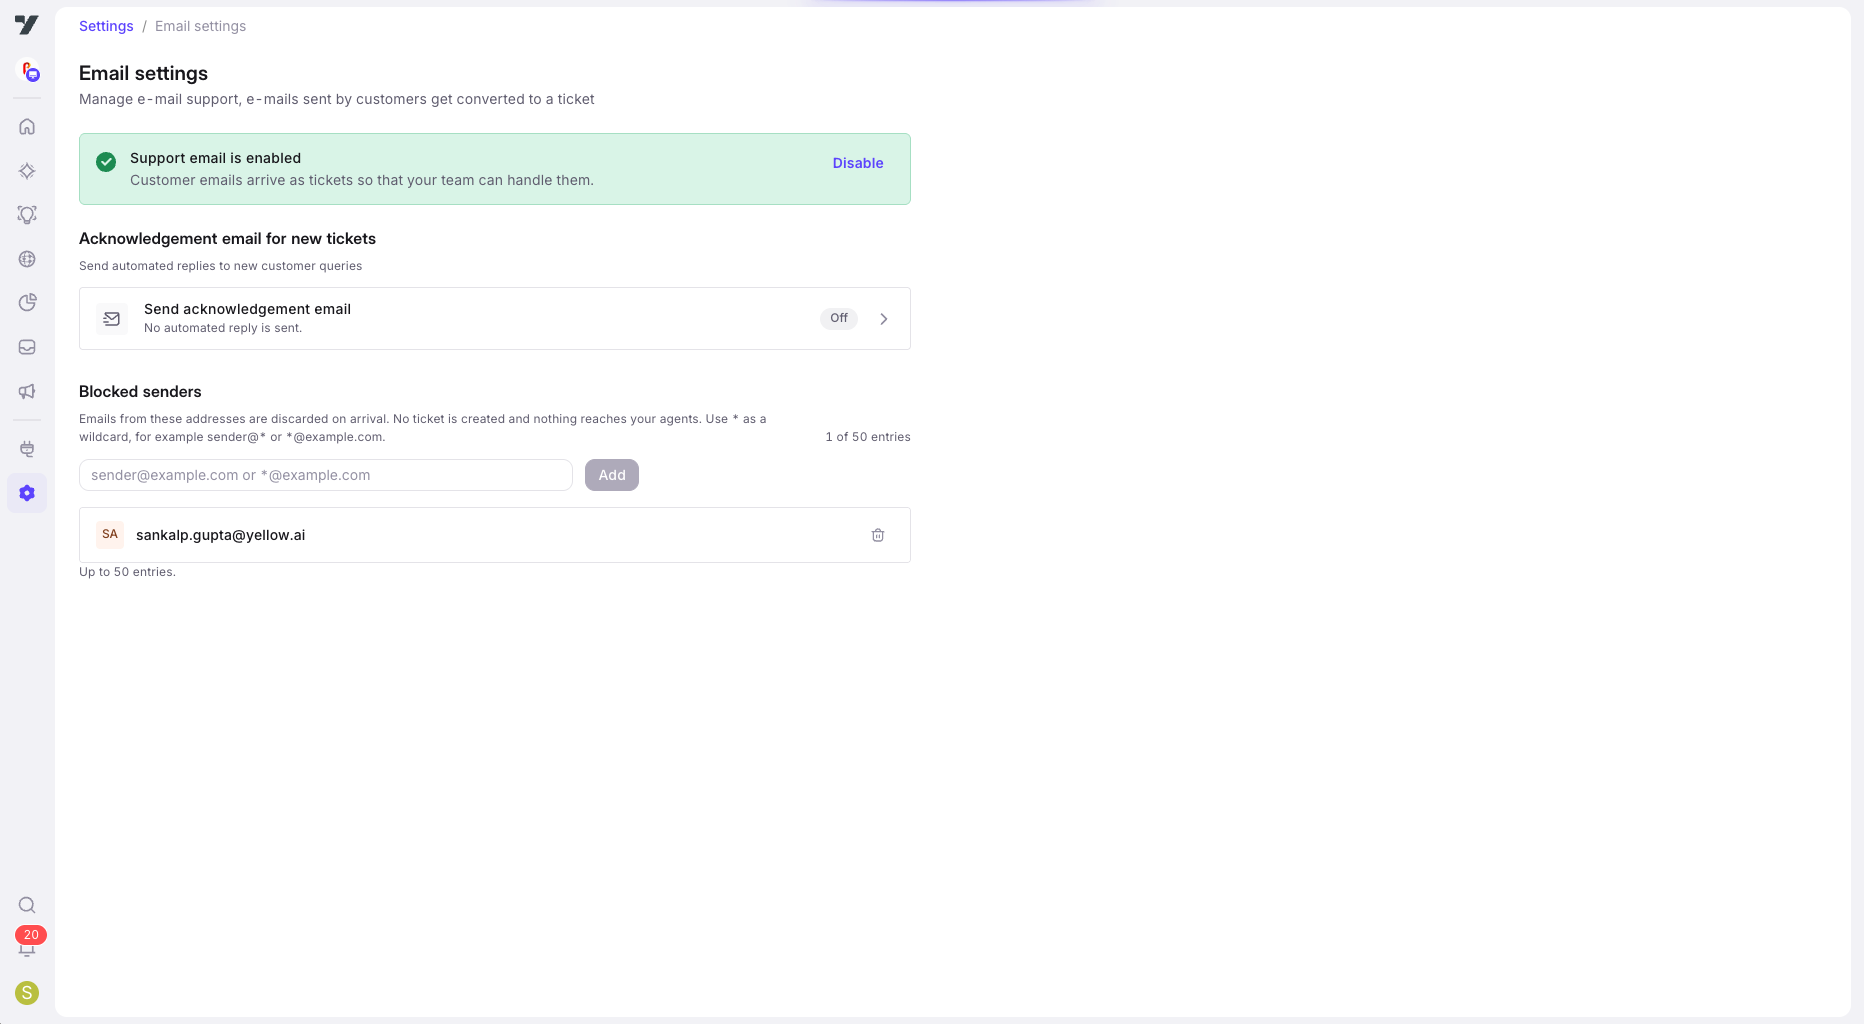
The entry appears in the list below the field and applies to email that arrives from then on. Tickets and conversations that already exist are not affected.
Address and pattern formats
Each entry is either one exact address or a pattern that uses * as a wildcard:
| Entry | What it blocks |
|---|---|
[email protected] | That one address. |
*@example.com | Every sender at example.com. |
sender@* | That sender name at any domain. |
bounce-*[email protected] | Any example.com address starting with bounce- and ending in -daemon. |
Entries are saved in lowercase.
If an entry could never match a real address, it is rejected and the field tells you which rule it broke:
- It must contain exactly one
@. - It needs a sender before the
@and a domain after it — use*for either side rather than leaving it empty. - A domain without a wildcard has to look like a domain, such as
example.com. - It cannot contain spaces. Add one address at a time.
- It cannot be broad enough to block nearly every sender, such as
*or*@*.
You can save up to 50 entries, each up to 320 characters.
See which senders are blocked
Once an address is on the list, the Inbox marks it wherever that sender turns up:
- Ticket list and ticket preview — a Blocked badge beside the ticket status.
- Chat conversation — a banner above the thread reading "[email protected] is blocked for this workspace", with Unblock sender in it.
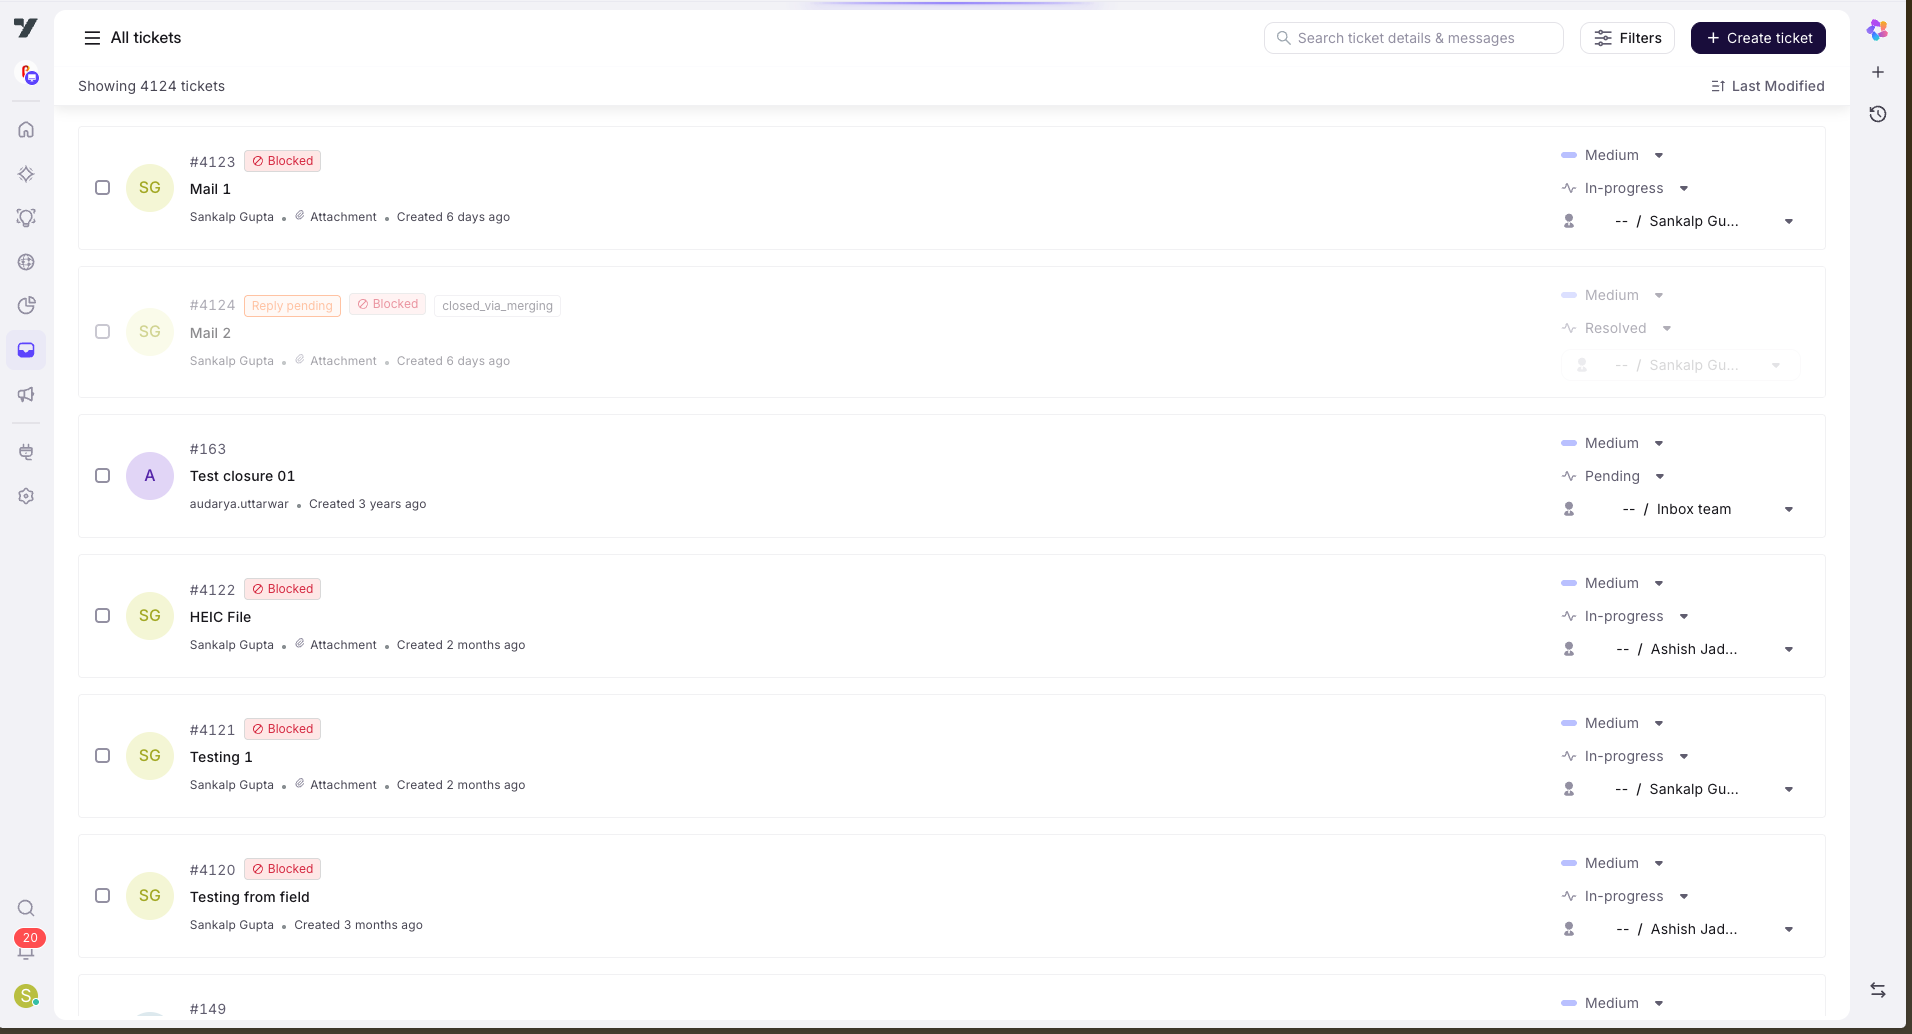
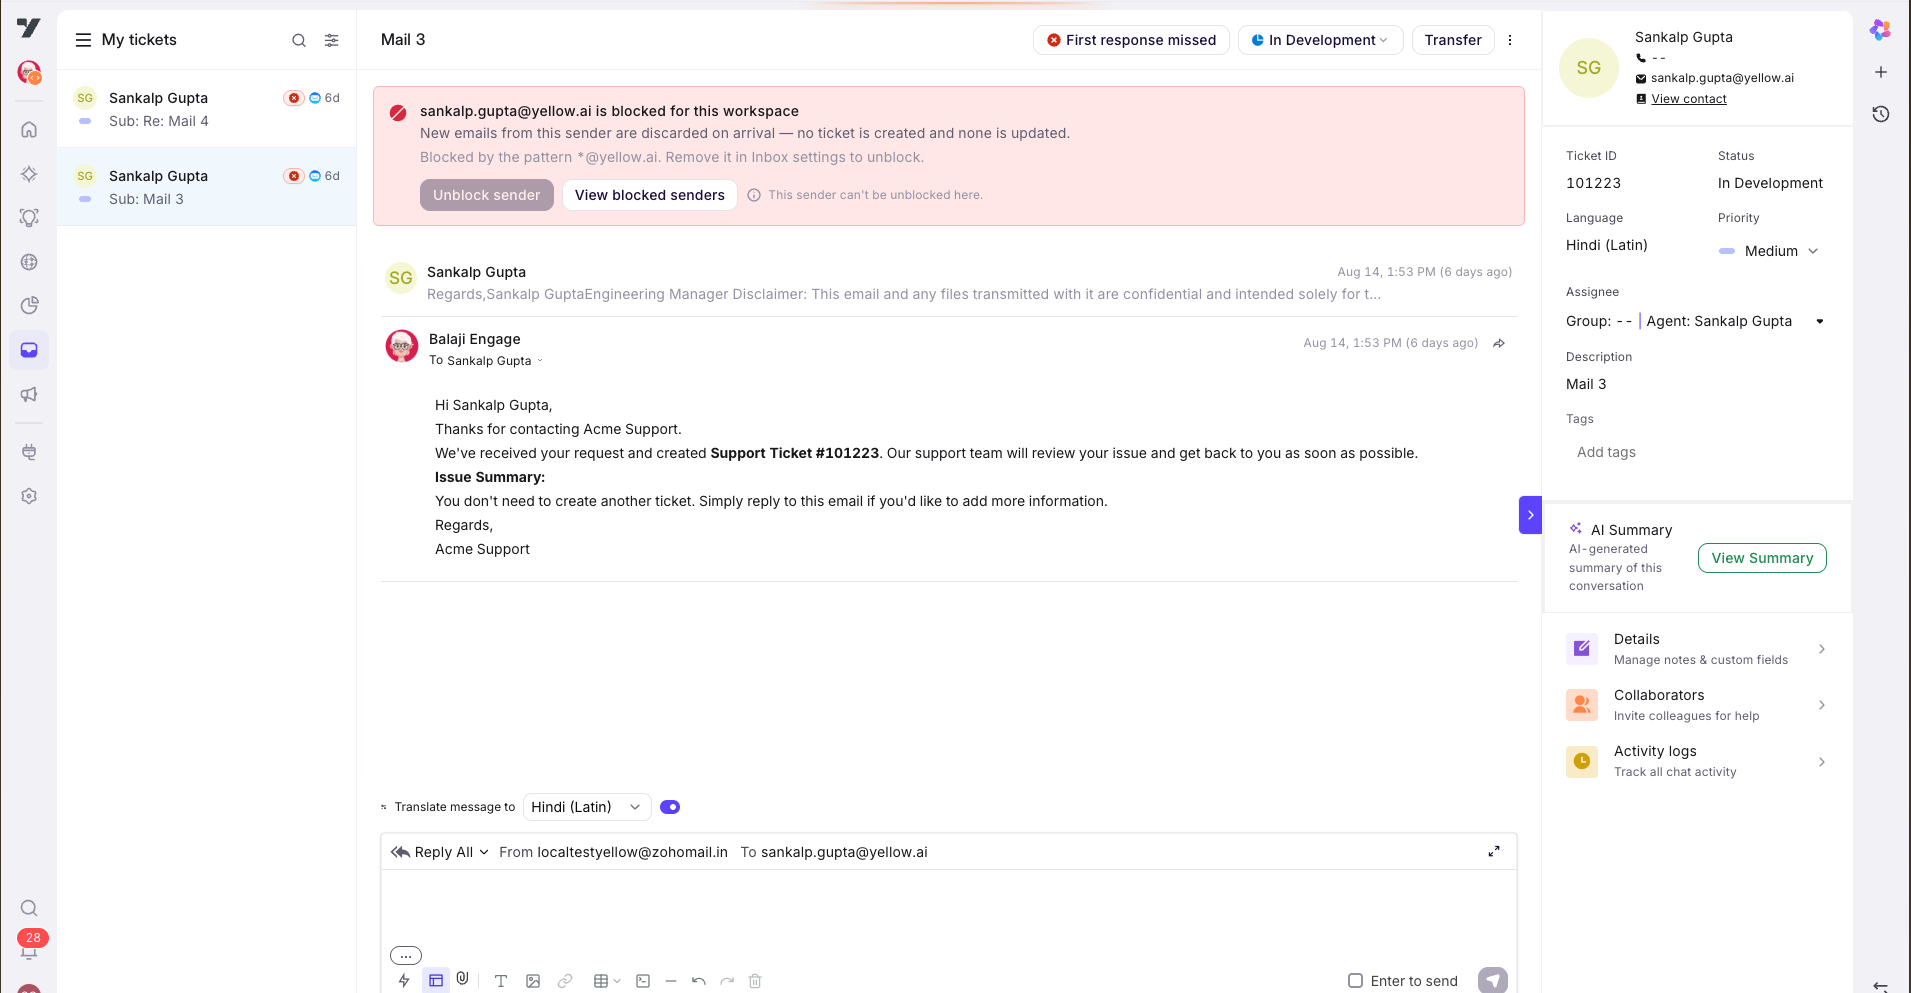
The banner also states how far the block reaches — the address itself, or the pattern that catches it.
The badge and the banner are shown to admins only. Agents see the conversation unchanged.
Block a sender from a ticket or chat
You can block the sender of an email conversation without opening Settings:
- Open the email ticket or chat in the Inbox.
- Click the more (⋯) menu in the conversation header.
- Select Block sender.
- Confirm on Block this sender?

The conversation you are viewing stays as it is — only later emails from that address are discarded. The menu entry then reads Unblock sender and the Blocked badge appears on the ticket.
If the address is already on the list, the confirmation tells you it was already blocked rather than adding it twice.
Block sender appears only on email conversations, and only for admins.
Unblock a sender from a ticket or chat
When the address is listed in its own right, you can lift the block where you found it:
- Open the email ticket or chat in the Inbox.
- On a ticket, click the more (⋯) menu and select Unblock sender. In a chat, click Unblock sender in the banner above the thread.
- Confirm on Unblock this sender?
Email from that address reaches the inbox and creates tickets again.

If a pattern is what blocks the sender — *@example.com rather than the address itself — Unblock sender is greyed out and names the pattern that matched: Blocked by the pattern *@example.com. Remove it in Inbox settings to unblock. Removing that pattern would unblock every other address it covers, so it belongs with the whole list rather than one ticket. In the chat banner, View blocked senders takes you to Email settings.
Remove a blocked sender
- Open Settings > Inbox > Email settings.
- Scroll to Blocked senders.
- Click the delete icon next to the entry you want to remove.
Email from that address is accepted again and creates tickets as before. Use this for pattern entries, and whenever you want to review the whole list in one place.