Sensitive data protection
Customers share personal details with your assistant all the time: phone numbers, email addresses, ID numbers, card details. Sensitive data protection keeps those values out of places they don't belong, while still letting your assistant use them to get the job done.
When protection is on, sensitive values are recognised the moment a customer sends them and replaced before anything else sees the message. The AI model, conversation transcripts and logs only ever see a masked version. When a value is needed, for example to look up an account or charge a card, the real value is filled in at the last moment, inside the API request, and nowhere else.
Only Super admins can change these settings.
How it works
- Detect. An incoming message is checked for the types of sensitive data you've chosen, such as phone numbers, card numbers or your own custom patterns.
- Hide. A detected value is hidden before the message reaches the AI model, the transcript or any log.
- Store. If an agent or flow node is collecting that value, the real value is encrypted and stored securely, and the conversation keeps a secure placeholder in its place. Otherwise the value is masked and discarded, and it can't be recovered later.
- Use. When an API call needs a stored value, the placeholder is swapped for the real value inside that request. The AI model never sees it.
Which messages are checked, and whether a value is stored or discarded, depends on where you turn an entity on. See Where to turn on an entity.
Sensitive values can also come back from your own APIs. Those are masked by rules you set on each API. See Mask sensitive values in API responses.
Turn it on
- On the Settings page, navigate to General > Sensitive data handling.
- Turn on Enable Sensitive Data Protection.
- Publish your assistant so live conversations pick up the change.
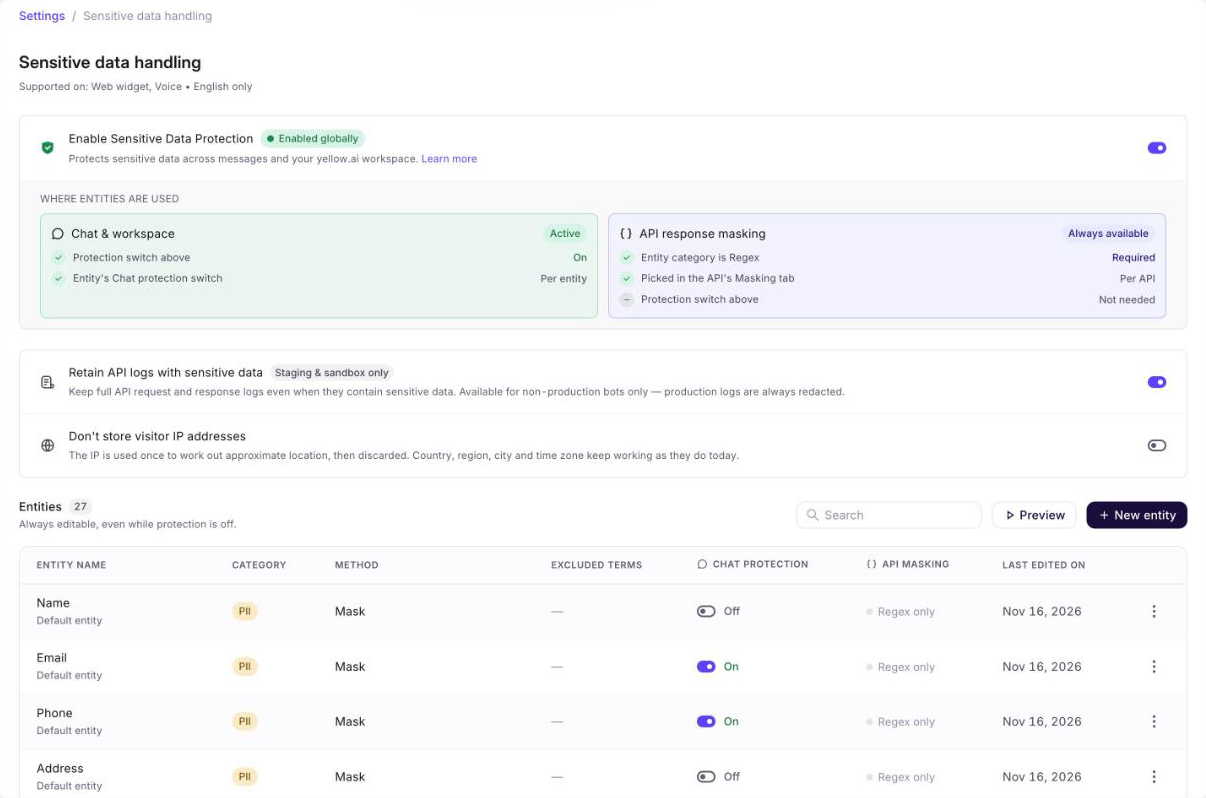
Enable Sensitive Data Protection is the master switch. While it's off, nothing is detected, whatever you've set up in Settings, on agents or on flow nodes. Turning it off asks you to confirm, and once it's off, sensitive values are no longer hidden for anyone who talks to your assistant.
Protection currently works on the web widget and voice, and detects values in English.
Entities
An entity is one type of sensitive data. The settings page lists every entity your assistant can protect, grouped by category:
| Category | Built-in entities |
|---|---|
| Personal information | Name, email, phone, address, Aadhaar, PAN, SSN |
| Payment card | Card number, security code (CVV), PIN, expiry date |
| Custom patterns | Your own entities, defined with regular expressions |
Use New entity to add a custom pattern. Every entity on this page, turned on or not, can be added to an agent or a flow node.
Where to turn on an entity
You can turn on an entity in two places, and each does a different job:
| In Settings | On an agent or flow node | |
|---|---|---|
| Purpose | Hide a type of data everywhere | Collect a value so the assistant can use it |
| Messages checked | Every message, in every conversation | Only the customer's replies while that agent or node is collecting |
| What happens to a detected value | It's masked and discarded | It's stored securely, and the agent works with a placeholder |
| Can the value be used in an API? | No | Yes |
| Is the value checked for format? | No | Yes. If it's wrong, the agent asks again |
In Settings: hide it everywhere
Turning on an entity on the settings page means it's checked in every message of every conversation, whatever the customer is talking about. A detected value is hidden and then discarded. The assistant can't use it later, because it was never stored.
For each entity in Settings you can:
- Turn it on or off.
- Choose how it's hidden. Mask replaces the value with asterisks. Replace with text swaps in a fixed phrase of your choice.
- Exclude specific values. Add terms that should never be masked, such as your own support email address.
Use Preview to test your setup on sample text before customers see it.
On an agent or flow node: collect it
Adding an entity to an agent's Protected entities, or choosing it as the Sensitive entity on a flow node, means that agent or node collects it. The value is checked for its format, stored securely, and replaced with a placeholder that can be passed to an API.
The entity doesn't need to be turned on in Settings. As long as Enable Sensitive Data Protection is on, adding an entity to an agent or node switches its detection on for that part of the conversation only. See Collect sensitive data in an agent and Collect sensitive data in a flow.
How the two combine
| Turned on in Settings | Added to the agent | What happens to the value |
|---|---|---|
| Yes | Yes | Collected while the agent is collecting it, and masked in every other message |
| Yes | No | Masked in every message. The agent sees only the masked text and can't use the value |
| No | Yes | Collected while the agent is collecting it. In every other message it isn't detected, so it reaches the AI model as typed |
| No | No | Never detected |
Choose a setup
Checking a message for sensitive data adds a short delay before your assistant can reply. An entity turned on in Settings adds that delay to every message. An entity on an agent or node adds it only to the replies that the agent or node is collecting.
So the recommended setup is:
- Turn on Enable Sensitive Data Protection.
- Leave entities turned off in Settings, unless a type of data must be hidden everywhere.
- Add each entity to the agents or flow nodes that actually ask for it.
Messages are then checked only when your assistant is waiting for sensitive data, and every other reply stays fast.
The trade-off: when an entity is off in Settings, a value the customer shares at some other point in the conversation isn't hidden. If customers often volunteer a type of data unprompted, for example an email address in their first message, also turn that entity on in Settings.
Collect sensitive data in an agent
An agent can collect sensitive details without ever seeing them. Tell it which types of data it collects, and it works with secure placeholders instead of the real values.
Add entities to the agent
- Open the agent.
- Under Capabilities, find Protected entities.
- Click Add entity and pick the entities this agent collects, for example Card number and Phone.
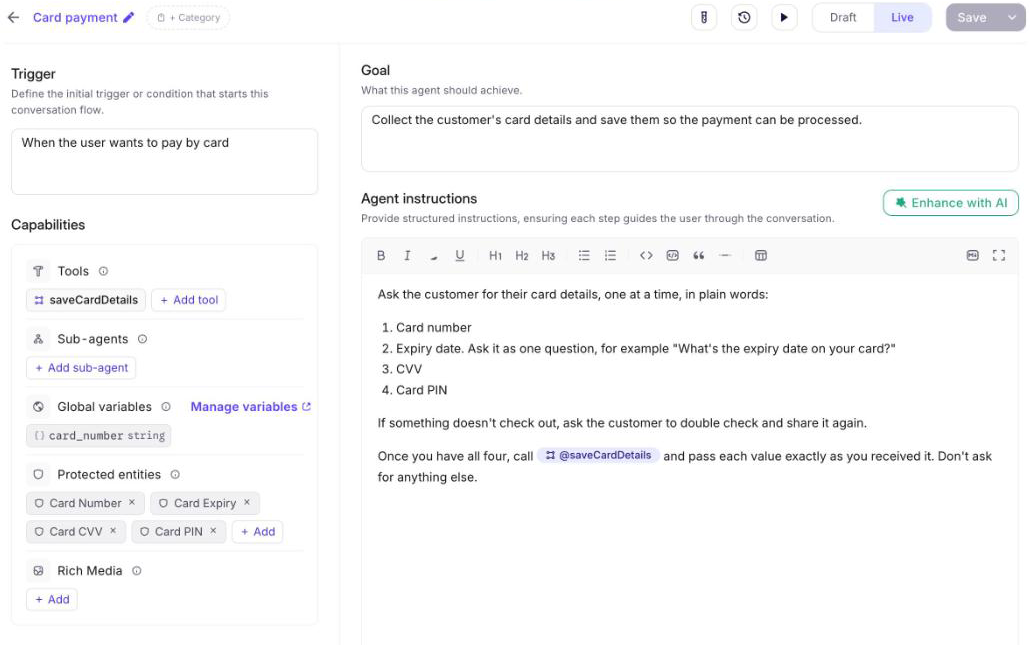
Protected entities appears once protection is turned on in Settings. The list shows every entity, turned on in Settings or not.
What happens next:
- The customer's replies to this agent are checked for those entities.
- When the customer shares one of those values, the agent receives a placeholder instead, for example
$$sensitive$$card_number_1. It passes that placeholder around like any other value, and the real value is filled in only when an API is called. See Use a collected value in an API. - If the customer corrects themselves ("sorry, it's 98…"), the new value replaces the old one.
- If a value doesn't look right, for example a card number that fails its checksum, the agent is told it's invalid and asks again.
- On voice, the agent can read a collected value back to the caller to confirm it. The caller hears the real value, but the transcript, logs and call recording keep it hidden.
Add only the entities this agent actually asks for. Each extra entity adds work to every reply this agent receives.
Choose when an entity is checked
By default, an entity on an agent is checked in every reply the agent receives. On an Agent node in a multi agent, you can narrow that to the one reply that answers the agent's question.
Click the entity's chip under Protected entities to open its protection settings. When to protect it has two choices:
| Choice | The customer's reply is checked for this entity |
|---|---|
| On every turn (default) | Every reply, unless the agent has just asked for a value tied to another entity |
| Only when the agent asks for it | Only the reply to a message that asks for the variable you choose |
For Only when the agent asks for it, pick the variable in Choose a variable. The list shows the node's Allowed variables that are strings in the global or journey scope. To use one that isn't listed, add it to Allowed variables first. The chip then names the variable.
How the agent tells the platform what it's asking for. With every message, the agent also lists the variables that message asks the customer for. That includes asking again, and asking the customer to confirm a value it already has. The customer's next reply is then checked for the entities tied to those variables:
- On that reply, only those tied entities are checked. The node's other entities aren't.
- On every other reply, the other entities are checked as usual, and the tied ones aren't.
When to use it. Use it for an entity that looks like other data in the same step. An order number can match a card number pattern, and a reference code can match a phone number. Checked only when the agent has just asked for it, the entity doesn't catch those by mistake. It also skips the check on replies where the agent isn't waiting for the value.
Keep in mind:
- The value is only collected if the agent lists the variable. If a message asks for the value without listing its variable, the reply isn't checked for that entity. If the entity is also on in Settings, the value is masked and the agent asks again. If it isn't, the value reaches the AI model as typed. This happens most often when the agent answers a side question and asks again in the same message, and in long read-back summaries. Keep payment card entities on On every turn, or turned on in Settings, unless false matches are a real problem.
- Ask for one protected value at a time. On a reply to a message that asks for a tied variable, a second value, such as an email given with a card number, isn't collected.
- If the variable is removed from Allowed variables, the chip turns red, and the entity goes back to being checked on every turn until you choose another variable.
Write the agent's instructions
The agent never sees the real value, so it can't check it. The platform does that for you: it validates each value as the customer sends it, and if a value is wrong it tells the agent what was wrong, so the agent asks again. The agent's job is only to ask, and to pass the value on.
Keep the instructions short:
- Ask for one value at a time, in plain words. For example, "Could you share your card number?" This matters even more when an entity is checked only when the agent asks for it: one clear question per reply is what the agent declares most reliably.
- Don't add validation rules. Leave out instructions such as "check that the card number is valid", "make sure the CVV is 3 digits" or "confirm the last four digits". The agent has nothing to check them against, and the platform already checks the format.
- Leave room for a re-ask. One line is enough: "If something doesn't check out, ask the customer to double check and share it again." Don't script your own error messages.
- Ask for the card expiry as one question. "What's the expiry date on your card?" is enough. The platform stores the month and year separately for you.
- Say what to do with the values. Name the tool to call, or the variable to save to, and ask the agent to pass each value exactly as received.
- Collect only what this step needs. Don't mix in unrelated questions.
For example, the agent in the screenshot above uses:
Ask the customer for their card details, one at a time, in plain words:
1. Card number
2. Expiry date. Ask it as one question, for example "What's the expiry date on your card?"
3. CVV
4. Card PIN

If something doesn't check out, ask the customer to double check and share it again.

Once you have all four, call @saveCardDetails and pass each value exactly as you received it.
Don't ask for anything else.
The platform only tells the agent about a wrong value for entities added to the agent's Protected entities. An entity that is only turned on in Settings is masked, but the agent gets no signal to ask again.
What the platform checks
Each value is checked before it's accepted. A value that fails isn't saved, and the agent is told to ask again.
| Entity | Accepted | Stored as |
|---|---|---|
| Phone | 7 to 15 digits, with or without a leading +. Obviously fake numbers, such as one digit repeated, are rejected | The digits |
| A standard email address | As entered | |
| Aadhaar | 12 digits that pass the Aadhaar checksum | The 12 digits |
| PAN | 5 letters, 4 digits, 1 letter, for example ABCDE1234F | As entered |
| SSN | The 3-2-4 digit format, with or without dashes. Ranges that were never issued are rejected | The digits, without dashes |
| Card number | 15 or 16 digits, with or without spaces or dashes, that pass the card checksum | The digits, without separators |
| Card CVV | 3 or 4 digits | The digits |
| Card PIN | 4 or 6 digits | The digits |
| Card expiry | A month and a 2-digit year in any common form, such as 07/27 or "July 2027". Dates in the past are rejected | The month and year as two separate values |
| Name, address and custom entities | Anything that is detected. There is no format check | As entered |
Use a collected value in an API
The agent never holds the real value, only its placeholder. Your job is to get that placeholder into an API node in a workflow. When the API node runs, the placeholder is swapped for the real value inside the request, and nowhere else.
There are two ways to get it there. Pick the one that matches when the API needs the value.
| The agent passes it to a tool | The agent saves it to a variable | |
|---|---|---|
| Use it when | The API runs right after the value is collected, for example "verify this phone number" | The value is needed later, by another agent, or by more than one API |
| The agent writes the placeholder into | An input of the workflow tool it calls | A Memory variable |
| The API node reads | The workflow's input variable | The Memory variable |
Option 1: the agent passes the placeholder to a tool
This is the simplest setup. The agent calls a workflow tool and fills the tool's input with the placeholder, the same way it would fill it with any other value.
-
Build the workflow. On the workflow's Start node, under Required inputs, add an input for each value, for example
cardNumber, and describe it: "The card number exactly as captured, including the secure placeholder." Clear names and descriptions are how the agent knows what to pass.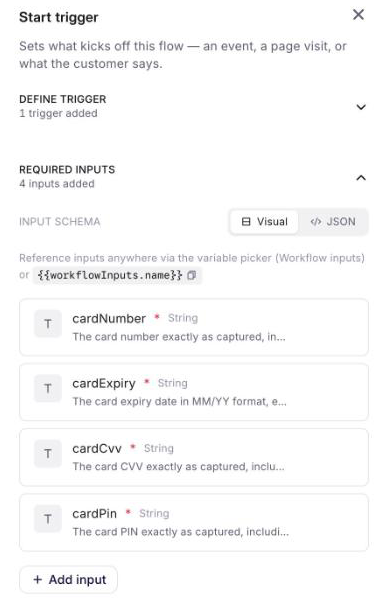
-
Map the inputs in the API node. In the workflow's API node, reference each input as
{{workflowInputs.<name>}}(or pick it from the variable picker under Workflow inputs) wherever the API needs the value, for example in the request body:{"cardNumber": "{{workflowInputs.cardNumber}}","expiry": "{{workflowInputs.cardExpiry}}","cvv": "{{workflowInputs.cardCvv}}","amount": 499}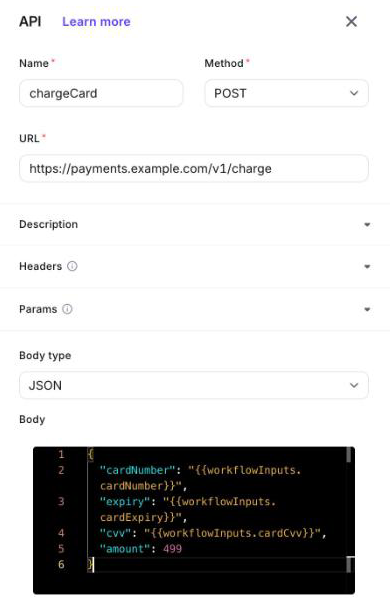
-
Attach the workflow to the agent under Reasoning & Actions > Tools.
-
Tell the agent when to call it in its Instructions, for example: "Once you have the card number, call @chargeCard."
When the customer shares their card number, the agent calls chargeCard with cardNumber = $$sensitive$$card_number_1. The workflow carries the placeholder to the API node, and your API receives the real card number.
Option 2: the agent saves the placeholder to a variable
Use this when the value has to outlive the turn it was collected in: a later step, a different agent, or several APIs all need it.
-
Declare the variable at AI agents > Configuration > Memory, for example
card_number. Give it the same name as the entity it holds, and say in the description that it holds the secure placeholder. The agent only writes to variables that are declared.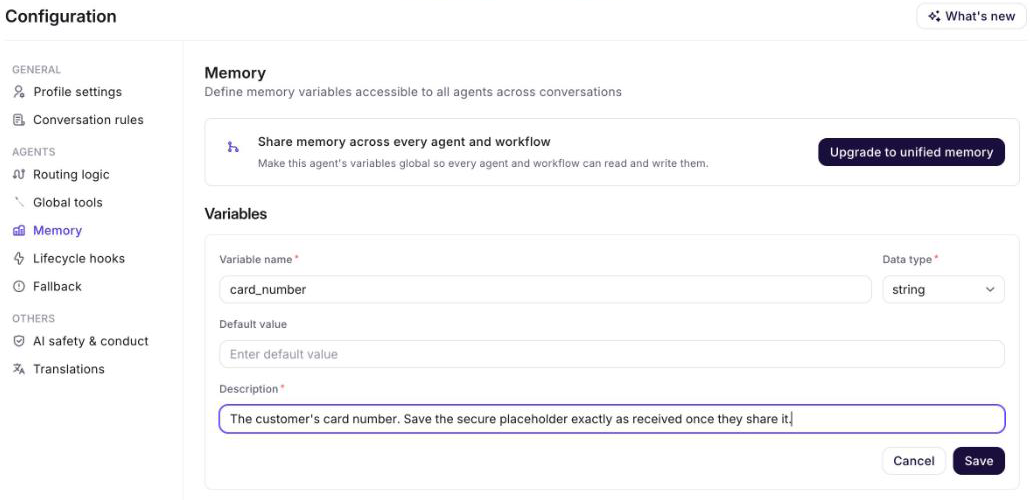
-
Tell the agent to save it in its Instructions, for example: "When the customer gives their card number, save it to @card_number."
-
Use the variable in an API node of any workflow, for example
{{variables.card_number}}in a header, query parameter or body.
The agent writes the placeholder into card_number. Whichever workflow later uses that variable in an API node sends the real value; everywhere else, including the transcript and the agent's own view of its memory, it stays a placeholder.
Things to know
- Only API nodes fill in the real value. Function, code and database nodes, and tools that aren't workflows, receive the placeholder text itself. Do any processing of the real value on your API's side.
- Pass the placeholder whole. The agent is told to copy it exactly. Don't ask it to reformat, split or shorten a sensitive value: it can't, because it never has the real digits. If your API needs a specific format, format it on your API's side.
- Check the trace, not the value. In the Playground, View trace shows the tool call with the placeholder, for example
$$sensitive$$phone_1. That is expected. The real value is only in the outgoing API request. - If a placeholder can't be resolved, for example because it has expired, the API is still called, with an empty value in its place.
Collect sensitive data in a flow
Question and Voice Input nodes have a Sensitive data input type. Choose it, then pick the Sensitive entity the node expects. The node stores a masked value in its variable and keeps a secure reference for later API steps. The option appears once protection is turned on, and the entity you pick works even if it's turned off in Settings.
Payment cards
For payment card capture, use the dedicated PCI input types on Question and Voice Input nodes: Card number, Card security code, Card pin and Card expiry.
- Card numbers are checked before they're accepted.
- You can choose an Encoding type and a Card number format for the value your API receives.
- On a Question node, turn on Handle validation errors to add an error branch. The first time a customer enters an invalid card value, the flow follows that branch, and the reason is available in the
pciErrorvariable. - On voice, call recording pauses while card details are collected.
In an API step, pick the card fields from PCI variables instead of typing them.
Payment card collection needs to be enabled for your account. Contact your Yellow.ai team to set it up.
Mask sensitive values in API responses
Everything above protects what customers send. Your own APIs can also return sensitive values, such as a customer's ID number on a lookup or a full card number on a statement. To keep those out of the conversation, set masking rules on the API itself.
Open the API in Studio > Build > API and go to its Masking tab. Rules apply every time that API is called: from a flow's API node, from a workflow an agent calls as a tool, and when you click Send in the API editor. The response is masked as soon as it arrives, before anything else reads it. Variables, messages, the AI model, post-processing and API logs only ever see the masked version.
Masking here is mask only. A masked value isn't stored anywhere, so it can't be recovered or sent to another API later. If a later step needs the real value, don't mask that field; keep the step on your API's side instead.
API masking rules work whether or not Enable Sensitive Data Protection is on.
Mask fields
A field rule hides the whole value at an exact path. Every path starts with a scope that says where to look:
| Scope | Masks | Example |
|---|---|---|
response. | A field in the response body | response.data.customer.ssn |
headers. | A response header. Header names ignore case | headers.x-session-token |
request.headers. | A request header, in the API log only | request.headers.authorization |
request.body. | A request body or form field, in the API log only | request.body.card.pan |
How to write the rest of the path:
- Use dots between keys:
response.data.customer.ssn. - Lists:
[0]is one item and[*]is every item, for exampleresponse.items[*].id. - Every value below a point:
**, only at the end of a path.response.**masks every value in the response body. - A key that contains a dot: put it in brackets and quotes, for example
response["user.ssn"]orresponse.data["policy.number"]. Brackets work at any depth and on any object, and the key inside them is taken literally. - A path that ends on an object or list masks all of it, and it's shown as
********. - A path that doesn't exist in a response is skipped. It isn't an error.
Show as chooses how a masked value looks:
- Hide all characters: one asterisk per character,
***********. - Show last 4: everything except the last four characters,
************1111. Values of four characters or fewer are hidden completely.
The editor checks every path as you type. A path without a scope, or one it can't read, is highlighted, and you can't save or send the API until it's fixed.
headers. and response.headers. are different. headers.x-token masks the HTTP response header. response.headers.x-token masks a body field that happens to be called headers, which is what an echo or proxy API returns.
Mask patterns
A pattern rule hides only the text that matches one of your custom patterns from the Entities list, and leaves the rest of the value alone. Use it for a value inside a sentence, for example Policy POL-12345678 is active becomes Policy ************ is active.
- Under Mask patterns, click Add pattern and choose a pattern.
- In Search in, enter a path using the same scopes as fields, for example
response.data.notesorresponse.items[*].description. Leave it empty to search the whole response body.
Pattern rules mask the same way as in chat: they honour the pattern's Exclude specific values list, and a pattern set to Replace with text shows its replacement text instead of asterisks. A pattern is used even if it's turned off in Settings, because the rule names it directly.
Patterns are created and edited on the Sensitive data handling page, and only a Super admin can add them. The built-in entities, such as email and phone, can't be used here. Create a custom pattern for them if you need one.
Mask values in the API log
Rules that start with request.headers. or request.body. hide values in the API log's copy of the request, such as an API key or a customer's details in the body. The request itself is sent to your API unchanged, so authentication and lookups keep working. A pattern rule with Search in set to request.body.** does the same for matching text anywhere in the logged request body.
Response rules apply to the API log too, because the log is written after the response is masked. This is also true when Retain API logs with sensitive data is on: retained logs keep the full request and response, minus what your masking rules hide.
If a rule can't be checked
Masking fails closed: a value a rule was meant to hide is never passed through because the rule couldn't run.
- A pattern that was deleted, or that can't be loaded or run, hides every value it would have searched, in full. The Masking tab warns about a pattern that no longer exists.
- A rule that can't be read hides the whole response body, and every request value in the log.
- A response that isn't JSON, such as plain text, is one value. Only
response.**and pattern rules reach it. - File responses aren't masked.
What stays protected
| Where | What it sees |
|---|---|
| The AI model | Masked text or a secure placeholder |
| Conversation transcripts and history | Masked text or a secure placeholder |
| Logs and API logs | Redacted |
| Voice call recordings | Silence in place of sensitive speech |
| Your API | The real value, only inside the request that needs it |
| What your API returns | Masked wherever the API's masking rules say, before anything else reads it |
Collected values expire automatically: payment card values within 24 hours, other values within 2 days.
Retain API logs for testing
API request and response logs are redacted whenever they contain sensitive data. While you're testing, Retain API logs with sensitive data keeps the full logs so you can debug your integration.
This option is available on non-production assistants only. Production logs are always redacted.
Related settings
- Visitor IP addresses is on the same settings page and controls whether visitor IP addresses are stored.
- The AI safety sensitivity filter removes sensitive details from what the AI says. Sensitive data protection covers what customers send.